MULTIDIRECTIONAL INSTABILITY OF THE SHOULDER
Introduced into the orthopedic lexicon by Neer and Foster in 1980, the term multidirectional instability (MDI) describes symptomatic glenohumeral subluxation or dislocation occurring in multiple directions (anterior, posterior, and inferior). The primary pathoanatomic abnormality driving multidirectional instability is a loose, highly redundant inferior capsular pouch, often accompanied by a widened rotator interval.
It is of paramount clinical importance to distinguish multidirectional instability from routine unidirectional traumatic dislocation (often conceptualized under the TUBS acronym: Traumatic, Unidirectional, Bankart, Surgery). MDI typically falls under the AMBRI classification (Atraumatic, Multidirectional, Bilateral, Rehabilitation, Inferior capsular shift). Because the underlying pathology is global capsular redundancy rather than a discrete labral avulsion, MDI is not correctable by standard unidirectional repairs (e.g., an isolated Bankart repair).
Surgical Warning: Surgery in MDI patients is strictly contraindicated unless the patient experiences frequent and significant disability, has failed an exhaustive, well-documented trial of conservative treatment (emphasizing periscapular muscular and rotator cuff rehabilitative exercises for at least 6 months), and has been definitively ruled out as a voluntary dislocator or suffering from untreated underlying psychiatric conditions.
Preoperative Evaluation and Examination Under Anesthesia (EUA)
The cornerstone of surgical decision-making in MDI is the Examination Under Anesthesia (EUA). Once a general anesthetic is administered and complete muscle relaxation is achieved, the instability of the shoulder must be systematically re-evaluated to dictate the surgical approach.
- Anterior Instability: Tested with the arm in external rotation and extension at various progressive levels of abduction.
- Inferior Instability: Tested by applying longitudinal traction with the arm in 0 degrees and 45 degrees of abduction (evaluating the sulcus sign).
- Posterior Instability: Tested with the arm in internal rotation at various levels of forward elevation, applying a posterior-directed force.
If the EUA and preoperative advanced imaging (MRI arthrogram) correlate with predominantly anteroinferior instability, an anterior surgical approach is utilized.
RECONSTRUCTION OF THE ANTERIOR GLENOID: THE EDEN-HYBBINETTE PROCEDURE
While soft-tissue redundancy is the hallmark of MDI, chronic instability can lead to significant glenoid bone loss. The Eden-Hybbinette procedure, originally described using an iliac crest autograft, is the gold standard for reconstructing the anterior glenoid in the setting of critical bone loss.
Indications for Bone Grafting:
* Glenoid bone loss approaching 40% of the anterior glenoid.
* Posterior bone loss of 25% associated with recurrent posterior dislocation.
While Provencher et al. have described using distal tibia allografts for reconstruction, an autogenous iliac crest bone graft remains the recommended standard. Autografts offer superior availability, greater osteogenic healing potential, and a significantly lower risk of graft resorption compared to allografts. Occasionally, for posterior lesions, the medial aspect of the acromion can be harvested as a local graft.
Surgical Technique: Anterior Glenoid Reconstruction (Warner et al.)
This technique utilizes a tricortical iliac crest autograft to restore the articular arc and provide a bony block against translation.
Graft Harvest and Preparation:
* Position the patient appropriately to allow access to both the shoulder and the ipsilateral iliac crest.
* Harvest a tricortical iliac crest autograft measuring approximately 2 cm wide and 3 cm long.
* Meticulously contour the graft using a burr or rongeur to ensure it forms a smooth, congruent continuation of the native glenoid arc.
* Drill two pilot holes through the graft. These will be used to align the graft perfectly with the articular surface.
Glenoid Preparation:
* Expose the anterior glenoid neck. Drill corresponding pilot holes into the glenoid neck and mark them with electrocautery to ensure they are easily identifiable during graft placement.
* Thoroughly decorticate the anterior glenoid neck down to bleeding subchondral bone to maximize the healing interface between the native glenoid and the autograft.
Graft Fixation:
* Place sutures in the native capsule and pass them around the screw shafts, positioning them between the glenoid and the graft sutures.
* Appropriate graft positioning is strictly vertical. This must be confirmed before the closure of the lateral extent of the capsular incision.
* Secure the contoured graft to the decorticated glenoid neck using two 4.0-mm cannulated bicortical screws.
* Anterior Lesions: Place the graft intracapsularly, securing the redundant capsule around the screw heads to provide a secondary soft-tissue restraint.
* Posterior Lesions: If addressing a posterior defect, secure the graft extracapsularly and perform a medial-based capsular plication.
Closure Protocol:
* With the arm held in external rotation, repair the remnant of the coracoacromial ligament to the lateral capsular flap using two interrupted absorbable sutures.
* Remove any surgical sponges placed earlier in the subscapular fossa.
* Take the arm through a full, gentle range of motion to evaluate joint mobility and confirm the absence of impingement or over-constraint.
* Coat the cut surface of the coracoid process with bone wax to minimize postoperative hematoma.
* Place a deep suction drain and close the superficial soft tissue layers in a standard anatomical fashion.
Clinical Pearl: Failure to achieve a perfectly flush articular arc during graft contouring will lead to rapid, catastrophic secondary osteoarthritis. The graft must act as an extension of the glenoid track, not a proud mechanical block.
SOFT TISSUE RECONSTRUCTION: THE NEER INFERIOR CAPSULAR SHIFT
For patients with MDI without critical bone loss, the primary surgical objective is to eliminate the redundant inferior pouch. The principle of the Neer Inferior Capsular Shift is to detach the capsule from the anatomical neck of the humerus and shift it superiorly and to the opposite side of the calcar (the inferior portion of the humeral neck). This maneuver obliterates the inferior pouch, reduces capsular redundancy on the side of the surgical approach, and simultaneously tightens the capsule on the opposite side of the joint.
Biomechanical Considerations and Approach Selection
To effectively reduce inferior laxity with the arm resting at 0 degrees of abduction, closure of the rotator interval is mandatory. Biomechanical studies have demonstrated that rotator interval closure not only prevents inferior translation but also significantly decreases posterior translation.
The choice between an anterior or posterior approach depends entirely on the direction of greatest instability determined during the EUA:
* Anterior Approach: Indicated when findings include a 3+ sulcus sign, symptoms related to inferior instability, and associated anterior instability. An anterior capsular shift combined with rotator interval closure provides the most robust correction of inferior laxity.
* Posterior Approach: Indicated if the primary finding is posterior instability with a milder (1+ to 2+) sulcus sign and minimal inferior symptoms.
Surgical Technique: Neer Anterior Capsular Shift
Positioning and Exposure:
* Place the patient in a modified beach-chair or tilted position, ensuring both the anterior and posterior aspects of the shoulder are accessible. Drape the arm free to allow unhindered manipulation. Attach a sterile arm board to the side of the operating table.
* Make a 9-cm incision following the natural skin creases, extending from the anterior border of the axilla toward the coracoid process.
* Develop the deltopectoral interval. Identify the cephalic vein and retract it laterally with the deltoid muscle to preserve its venous drainage.
* Divide the clavipectoral fascia. Retract the conjoined tendon (short head of the biceps and coracobrachialis) medially to expose the subscapularis.
Subscapularis Management:
* With the arm placed in external rotation to place the tendon under tension, divide the superficial half of the thickness of the subscapularis tendon transversely, approximately 1 cm medial to the bicipital groove.
* Crucially, leave the deep half of the subscapularis tendon attached to the underlying capsule to reinforce the anterior capsular wall.
* Tag the superficial half of the tendon with heavy stay sutures and retract it medially.

Figure A: Reinforcement of capsular flaps. Notice how approximately half the thickness of the subscapularis tendon is left attached to reinforce the underlying capsule.
Capsulotomy and Flap Preparation:
* Create a T-shaped capsular incision. The vertical limb of the incision is made adjacent to the humeral articular margin, extending from the rotator interval down to the inferior 6 o'clock position.
* The horizontal limb is made perpendicular to the vertical limb, effectively splitting the capsule into a superior flap and an inferior flap.
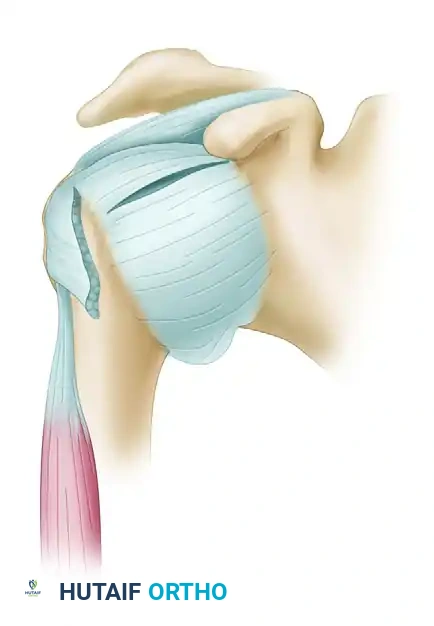
Figure B: The T-shaped capsular incision is created, separating the capsule from the humeral neck to allow for mobilization.
- Carefully prepare the flaps. The arm must be progressively externally rotated as the inferior flap is detached from the humeral neck to protect the axillary nerve, which lies in close proximity to the inferior capsule.
- Create a bony slot or decorticate the humeral neck at the intended site of capsular reattachment to promote robust soft-tissue-to-bone healing.
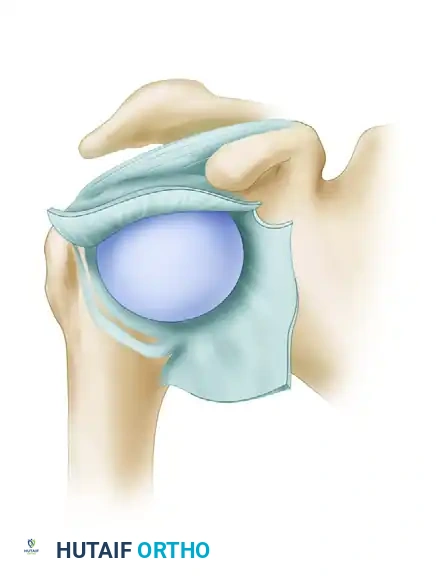
Figure C: Preparation of the capsular flaps and the bony slot on the humeral neck. The arm is externally rotated as the inferior flap is fully mobilized.
Relocation and Shifting of the Flaps:
* Position the arm in slight flexion and exactly 10 degrees of external rotation. Do not secure the flaps with the arm in internal rotation, as this will severely over-constrain the joint and lead to a devastating loss of external rotation.
* Relocate the inferior flap first. Pull it firmly forward and upward, advancing it superiorly along the humeral neck to obliterate the inferior redundant pouch. Secure it to the prepared bony bed.
* Next, bring the superior flap down over the advanced inferior flap in a "pants-over-vest" overlapping fashion. Secure the superior flap, effectively doubling the capsular thickness anteriorly.
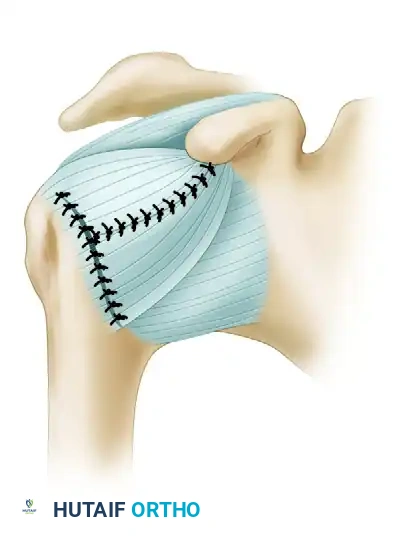
Figure D: Relocation of the flaps with the arm held in slight flexion and 10 degrees of external rotation. The inferior flap is shifted superiorly, and the superior flap is brought down over it, creating a reinforced, tightened anterior restraint.
Rotator Interval Closure:
* Following the capsular shift, assess the rotator interval. Imbricate and close the interval using non-absorbable sutures to further eliminate inferior translation.
* Repair the superficial half of the subscapularis tendon back to its anatomical footprint.
POSTOPERATIVE CARE AND REHABILITATION PROTOCOL
The success of both the Eden-Hybbinette procedure and the Neer Capsular Shift relies heavily on strict adherence to a phased postoperative rehabilitation protocol. The goal is to protect the healing tissue while preventing adhesive capsulitis.
Phase I: Maximum Protection (Weeks 0-2)
* Patients require strict immobilization in a sling or a dedicated shoulder immobilizer for 2 weeks postoperatively.
* Elbow, wrist, and hand active range of motion (ROM) exercises are encouraged immediately to prevent distal stiffness.
* No active shoulder motion is permitted.
Phase II: Early Motion (Weeks 2-6)
* The sling is gradually weaned.
* Gentle, passive forward flexion is initiated.
* External rotation is strictly limited to the intraoperative safe zone (typically 0 to 10 degrees) to protect the anterior capsular repair and subscapularis.
Phase III: Active Motion and Stretching (Weeks 6-8)
* Active-assisted and active ROM exercises begin.
* External rotation stretching is progressively introduced at 6 weeks.
* Scapular stabilization exercises (rhomboids, trapezius, serratus anterior) are emphasized to restore normal glenohumeral rhythm.
Phase IV: Strengthening and Return to Function (Weeks 8+)
* Isotonic strengthening exercises for the rotator cuff and deltoid are started at 8 weeks after surgery.
* Plyometric and sport-specific training are introduced between 4 to 6 months.
* Return to contact sports or heavy manual labor is generally restricted until 6 to 9 months postoperatively, contingent upon the restoration of full strength, dynamic stability, and a negative apprehension test.
