MICROSURGICAL TREATMENT OF NERVE INJURIES
The restoration of peripheral nerve continuity following traumatic transection remains one of the most technically demanding challenges in orthopedic microsurgery. Because anomalous innervations—such as the Martin-Gruber anastomosis in the forearm or the Riche-Cannieu anastomosis in the hand—are sufficiently common to produce profound confusion when evaluating postoperative nerve regeneration, a meticulous and detailed examination of the extremity before surgery is paramount. The surgeon must accurately map both motor and sensory deficits to establish a reliable baseline for future comparison.
The ultimate success of peripheral neurorrhaphy is not dictated by surgical technique alone. A multitude of physiological and mechanical factors influence the final functional result. These include the nature of the wounding agent (sharp laceration versus crush/avulsion), the longitudinal extent of the nerve injury, the presence of associated soft tissue or vascular injuries, the anatomical level of the injury (proximal injuries have a poorer prognosis due to the distance regenerating axons must travel), the delay between injury and repair, the stability of the skeletal repair, the choice of suture material, and the specific suturing technique employed.
Clinical Pearl: The two most critical prognostic factors in peripheral nerve repair are the age of the patient (with pediatric patients demonstrating vastly superior neuroplasticity and regenerative potential) and the amount of tension at the suture anastomosis. A repair performed under tension will inevitably suffer from ischemia, leading to intraneural fibrosis and failure of axonal progression.
Timing of Nerve Repair
The decision of when to intervene surgically is dictated by the mechanism of injury and the condition of the surrounding soft tissue envelope.
- Primary Repair (< 24 hours after injury): The best candidates for primary repair are patients who have sustained clean, sharp injuries, such as those caused by glass or sharp knives. If the patient’s general hemodynamic condition is stable, the soft tissue and skeletal injuries are relatively well-circumscribed and do not interfere with repair, suitable microsurgical instruments and assistants are available, and the surgeon is suitably rested and prepared, repair can be undertaken on the day of injury.
- Delayed Primary Repair (2 to 18 days): If conditions do not permit repair on the day of injury (e.g., contaminated wounds, lack of microsurgical equipment), sharply severed nerves may be repaired satisfactorily within the first week following initial debridement and wound stabilization.
- Secondary Repair (> 18 days but < 3 months): If the soft tissue or skeletal injury is extensive, and if there is any question regarding the longitudinal extent of injury to the nerve—especially in crushing, stretching, and avulsing injuries—it is strictly advised to repair the nerve later. Delaying the repair allows the zone of injury to fully demarcate, ensuring that when the nerve stumps are resected, the surgeon is coapting healthy, viable fascicles. This is usually performed after satisfactory soft tissue healing and skeletal stabilization have occurred.
Controversies in Repair Techniques: Epineurial vs. Perineurial
Controversies regarding the advantages of epineurial versus perineurial (fascicular) repair, as well as primary versus secondary repair of injured nerves, have historically dominated microsurgical literature.
Based on the foundational topographical work of Sunderland regarding the fascicular arrangements within respective peripheral nerves, the choice of technique should be dictated by the internal anatomy of the nerve at the specific level of injury.
- Perineurial (Fascicular) Repair: It is highly reasonable to perform perineurial repairs on nerves having relatively few, distinct fascicles. This anatomical scenario applies to the digital nerves, the median and ulnar nerves at the wrist and distally, and possibly the radial nerve at the elbow. By suturing the perineurium directly, the surgeon ensures exact matching of motor and sensory fascicles, minimizing axonal misdirection.
- Grouped Fascicular Repair: For more proximal situations where the nerve contains a complex, polyfascicular arrangement with significant cross-over (plexus formation within the nerve), the grouping of fascicles by epineurial sutures (grouped fascicular repair) is generally a superior method of matching fascicular territories without introducing excessive foreign body (suture) material into the intraneural environment.
- Epiperineurial Repair: Frequently, it is necessary to use a combination of epineurial and perineurial techniques to achieve a satisfactory, tension-free, and anatomically aligned repair.
Surgical Warning: Regardless of the technique chosen, magnification is of great benefit. While magnifying loupes (3.5× to 4.5×) may be sufficient for standard epineurial neurorrhaphies of large mixed nerves, the magnification provided by the operating microscope is absolutely essential when perineurial, epiperineurial, or interfascicular nerve grafting is performed.
MICROVASCULAR VEIN GRAFTING AS A NERVE CONDUIT
While the primary goal is always a tension-free end-to-end neurorrhaphy, traumatic tissue loss or the necessary resection of a neuroma-in-continuity often results in a nerve gap. When a gap exists that cannot be closed without exceeding physiological tension limits (typically > 8% elongation), a conduit or graft must be employed.
Microvascular vein grafting is a highly effective technique for bridging short nerve gaps (typically < 3 cm). An autologous vein (such as the saphenous vein or a dorsal hand vein) is harvested and utilized as a biological cylinder.
Biomechanics of the Vein Conduit
The vein graft serves as a physical guide for regenerating axons, preventing the ingrowth of surrounding scar tissue while concentrating neurotrophic factors secreted by the severed nerve ends.
1. Inside-Out Technique: To prevent the venous valves from physically obstructing advancing regenerating axons, the vein is often reversed (distal end coapted to proximal nerve stump) or turned "inside-out."
2. Wallerian Degeneration: The empty conduit provides an optimal microenvironment for Schwann cell migration and the clearance of myelin debris, which are critical phases of Wallerian degeneration preceding axonal sprouting.
PRIMARY NEURORRHAPHY: STEP-BY-STEP SURGICAL TECHNIQUE
The application of microsurgical techniques to neurorrhaphy requires rigorous discipline, specialized instrumentation, and a deep understanding of nerve topography.
🔪 Surgical Technique 63-4: Epiperineural Neurorrhaphy
Step 1: Preparation and Exposure
After the nerve has been exposed proximally and distally using standard surgical loupes, transition to low magnification (6×) on the operating microscope. The nerve ends must be mobilized sufficiently to allow for a tension-free repair, but aggressive stripping of the mesoneurium must be avoided to preserve the delicate vasa nervorum (the segmental blood supply to the nerve).
Step 2: Preparation of the Nerve Stumps
Using a diamond knife or a fresh scalpel blade on a sterile wooden tongue depressor, serially section the proximal and distal nerve stumps. Continue sectioning until healthy, pouting fascicles are visualized. The presence of "mushrooming" fascicles indicates healthy endoneurial tissue free of fibrotic scarring.
Step 3: Rotational Alignment
Before placing the first suture, meticulously align the nerve ends. Rotational alignment is guided by matching the surface epineurial blood vessels across the gap, as well as matching the relative size, shape, and topographical position of the internal fascicles.
Step 4: Initial Epineurial Coaptation
Using a 9-0 or 10-0 monofilament nylon suture on a micro-spatula needle, place the first suture through the epineurium.
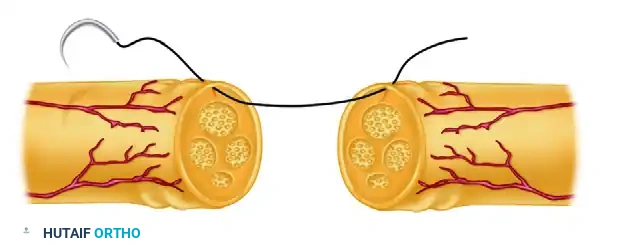
FIGURE 63-5 A: Suture placed through the epineurium, maintaining precise rotational alignment according to surface vessels and the relative size and position of the underlying fascicles.
Step 5: Traction and Stabilization
Place a second epineurial suture exactly 180 degrees opposite the first. These initial sutures are either left untied initially to allow for internal inspection, or tied and left long to serve as traction sutures. This allows the surgeon to gently rotate the nerve to access the posterior aspect of the coaptation site without handling the delicate nerve tissue with forceps.
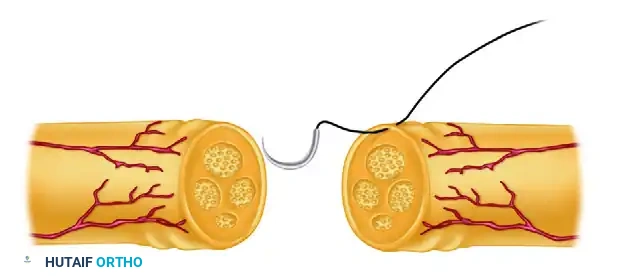
FIGURE 63-5 B: Initial sutures are left untied or tied and left long for traction, providing rotational control of the nerve cylinder.
Step 6: Circumferential Completion
Once the primary alignment sutures are secured, complete the neurorrhaphy by placing interrupted sutures circumferentially around the epineurium. If an epiperineurial technique is utilized, a few 10-0 sutures may be placed through the perineurium of the largest matched fascicles prior to closing the outer epineurial cylinder. Ensure that the fascicles are not buckling or extruding through the repair site.
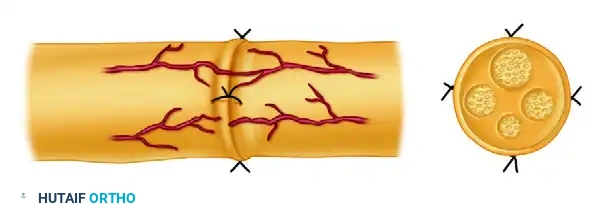
FIGURE 63-5 C: Neurorrhaphy completed with interrupted sutures placed circumferentially. The repair must be entirely tension-free to ensure optimal intraneural vascularity.
Postoperative Protocol and Rehabilitation
The success of a microsurgical nerve repair relies heavily on the postoperative rehabilitation protocol.
- Phase I: Immobilization (Weeks 0-3)
Postoperatively, the extremity is immobilized in a well-padded orthosis. The adjacent joints are positioned to minimize tension on the repair site (e.g., slight wrist and elbow flexion for a median nerve repair). Immobilization is strictly maintained for 3 weeks to allow the coaptation site to gain sufficient tensile strength. - Phase II: Protected Mobilization (Weeks 3-6)
At 3 weeks, the static splint is transitioned to a dynamic or hinged splint that blocks extension past the point of tension but allows active flexion. Gentle, supervised range-of-motion exercises are initiated to prevent joint contractures and promote nerve gliding, which reduces extraneural adhesions. - Phase III: Sensory Re-education and Strengthening (Weeks 6+)
As the advancing Tinel's sign progresses distally (averaging 1 mm per day), sensory re-education protocols are initiated. This involves cortical retraining using varied textures and temperatures to help the brain interpret the altered sensory input from misdirected axons. Motor strengthening begins once clinical or electromyographic (EMG) evidence of reinnervation is confirmed at the target muscle endplates.
Pitfall: Failure to recognize a neuroma-in-continuity or a repair that has ruptured postoperatively can lead to devastating permanent deficits. If an advancing Tinel's sign halts for more than 3 to 4 months, or if serial EMG studies show no evidence of nascent motor unit potentials, surgical re-exploration and potential interfascicular nerve grafting must be strongly considered.
