Peripheral Nerve Suturing and Grafting: Advanced Microsurgical Techniques
Key Takeaway
Peripheral nerve repair demands meticulous microsurgical technique to restore anatomy and function. Success relies on understanding intraneural fascicular topography, achieving tension-free coaptation, and utilizing appropriate magnification. Whether performing primary neurorrhaphy, utilizing autologous nerve grafts, or deploying bioabsorbable conduits for segmental defects, precise fascicular alignment and rigorous postoperative sensory reeducation are paramount for optimal axonal regeneration and clinical recovery.
PRINCIPLES OF PERIPHERAL NERVE SUTURING
The restoration of peripheral nerve continuity, particularly within the complex anatomical landscape of the hand and upper extremity, represents one of the most exacting challenges in operative orthopaedics and microsurgery. The fundamental principles that govern the repair of major peripheral nerve trunks apply equally to the delicate peripheral nerves of the hand. Successful axonal regeneration and functional recovery are predicated on a profound understanding of intraneural anatomy, meticulous tissue handling, and the strict avoidance of tension at the coaptation site.
When approaching a nerve repair, the surgeon must systematically evaluate several critical considerations:
1. Nerve Modality: Determining whether the injured nerve is mixed, pure motor, or pure sensory.
2. Intraneural Topography: Understanding the internal fascicular arrangement at the specific level of injury.
3. Surgical Approach: Designing extensile incisions that respect vascular territories and flexion creases.
4. Mobilization Limits: Balancing the need for tension-free apposition against the risk of devascularizing the nerve.
5. Material Selection: Choosing appropriate suture caliber and needle geometry.
6. Coaptation Architecture: Deciding between epineurial, perineurial (fascicular), or combined epiperineurial repair techniques.
7. Optical Enhancement: Utilizing appropriate magnification (loupes vs. operating microscope).
8. Rehabilitation: Implementing a structured, phase-appropriate postoperative sensory and motor reeducation program.
Careful, atraumatic technique is the cornerstone of successful neurorrhaphy. The ultimate goal is to provide the most precise anatomical restoration possible, thereby minimizing axonal escape and maximizing end-organ reinnervation.
Intraneural Anatomy and Fascicular Topography
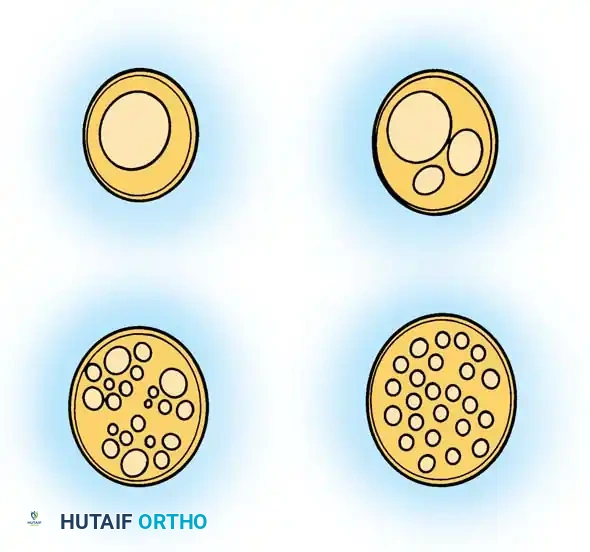
The internal arrangement of a peripheral nerve dictates the surgical strategy for its repair. As described by Millesi, the fascicular pattern changes continuously along the longitudinal axis of the nerve due to the complex plexiform intertwining of fascicles.
In the palm and digits, the internal arrangement of the common and proper digital nerves is typically oligofascicular (containing a few large fascicles). Conversely, in the major nerve trunks at the wrist (such as the median and ulnar nerves), an intraneural polyfascicular or group arrangement is predominant.
Fig. 65-5 Typical intraneural fascicular patterns in peripheral nerves. Top Left: Monofascicular. Top Right: Oligofascicular. Bottom Left: Polyfascicular with group arrangement. Bottom Right: Polyfascicular without group arrangement.
Clinical Pearl: The clinical outlook is generally superior following the repair of common digital and proper digital nerves compared to more proximal mixed nerves. This enhanced prognosis is attributed to their oligofascicular internal arrangement, their pure sensory function (eliminating the risk of motor-sensory cross-innervation), and the relatively short distance regenerating axons must travel to reach their target end-organs.
Surgical Exposure and Nerve Mobilization
Incisions designed to expose the nerve and mobilize the proximal and distal stumps must adhere strictly to proven principles of hand surgery.
* Incisions must never cross flexion creases at right angles to prevent the formation of restrictive flexion contractures.
* Skin flaps must be elevated with a robust subcutaneous fat layer to prevent devascularization and subsequent necrosis.
* Extensile exposures must be planned to avoid iatrogenic injury to adjacent neurovascular structures.
The exact extent to which a peripheral nerve can be mobilized longitudinally without inducing critical ischemia remains a subject of biomechanical debate. The segmental mesoneurial blood supply is delicate. However, clinical experience dictates that within the digits, palm, and wrist, extensive mobilization of the nerve from its surrounding connective tissue bed is generally well-tolerated and insufficient to cause irreversible ischemic harm, provided the extrinsic longitudinal vessels on the epineurium are preserved.
Magnification and Suture Selection
Magnification is not merely an adjunct; it is an absolute requirement for precise anatomical restoration of peripheral nerves.
* Distal Repairs (Palm and Fingers): The magnification achieved by high-quality 2.5× to 4.5× surgical loupes is usually sufficient to allow for accurate identification and repair of oligofascicular digital nerves.
* Proximal Repairs (Wrist and Forearm): More proximally, where polyfascicular arrangements dominate, the magnification and illumination provided by an operating microscope are indispensable for satisfactory anatomical grouping and repair.
* Terminal Branches: The operating microscope is also highly recommended for the repair of the terminal branches of the proper digital nerves distal to the distal interphalangeal (DIP) flexion crease.
Suture materials must reflect the minimal amount of tension applied to the nerve repair. The goal of the suture is simply to maintain coaptation until fibrin bridging and cellular healing occur; it is not to overcome mechanical gaps.
* In the forearm, wrist, and proximal hand, 8-0 and 9-0 monofilament nylon sutures are standardly utilized for epineurial repairs.
* In the palm and digits, or when performing fascicular repairs, 10-0 monofilament nylon on a spatulated micro-needle is preferred.
TECHNIQUES OF NEURORRHAPHY
Depending on the level of injury and the fascicular anatomy, the surgeon may select from several coaptation techniques. In the palm and digits, a pure perineurial neurorrhaphy or a combination epineurial-perineurial neurorrhaphy is usually sufficient for satisfactory anatomical repair.
Perineurial (Fascicular) Neurorrhaphy
This technique involves the direct coaptation of individual fascicles or fascicular groups. It is highly effective in oligofascicular nerves where matching corresponding fascicles is anatomically feasible.
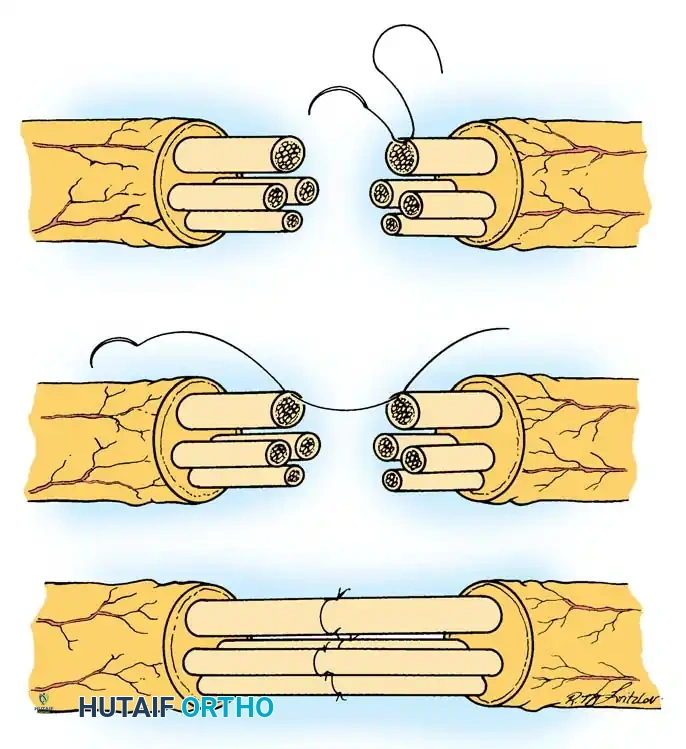
Fig. 65-6 Perineurial (fascicular) neurorrhaphy. A, The outer epineurium has been excised and retracted, exposing the individual fascicles. B, A 10-0 nylon suture is passed through the corresponding perineurium of matching fascicles on either side of the cut surface. C, The neurorrhaphy is completed, typically utilizing two 10-0 nylon sutures placed 180 degrees apart in each fascicle to prevent buckling.
Epineurial-Perineurial Neurorrhaphy
This hybrid technique provides the mechanical strength of an epineurial repair while ensuring the precise internal alignment of a fascicular repair. It is particularly useful in polyfascicular nerves with distinct group arrangements.
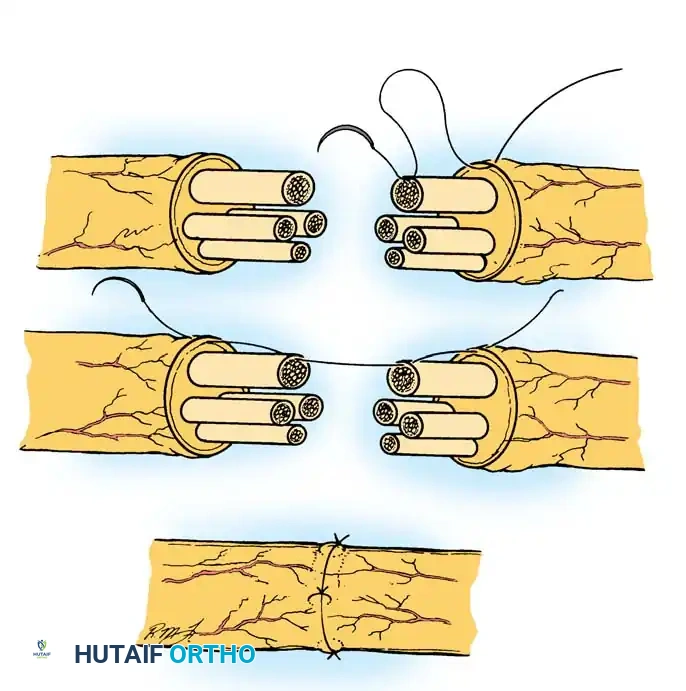
Fig. 65-7 Epineurial-perineurial neurorrhaphy. A, The epineurium is excised and retracted. A suture is placed through the epineurium, near a large fascicle at the periphery, and then through the perineurium of that fascicle. B, The suture is passed through the perineurium of the matching fascicle on the opposite stump, then out through the epineurium. C, The repair is completed after suturing other suitably matched fascicular groups.
Surgical Warning: Regardless of the technique chosen, the coaptation must be entirely tension-free. Tension across a nerve repair site leads to intraneural microvascular thrombosis, fibroblast proliferation, and dense scar formation, which acts as an impenetrable barrier to regenerating axonal growth cones.
NERVE GRAFTS: BRIDGING SEGMENTAL DEFECTS
Indications for Nerve Grafting
At times, high-energy trauma, crush injuries, or delayed presentations result in extensive tissue destruction and the creation of a segmental nerve defect. If this gap cannot be overcome through routine nerve mobilization, gentle joint flexion, or anatomical rerouting of the nerve bed, a nerve graft is absolutely indicated.
The principal indication for nerve grafting in the upper extremity is the bridging of defects following segmental nerve injury where a tension-free neurorrhaphy cannot be accomplished primarily.
Less common, yet critical, indications include:
* Providing innervation to free vascularized functioning free muscle transfers (FFMT).
* Innervating free neurovascular island flaps for sensory restoration.
Before committing to a nerve graft, the surgeon must exhaust other techniques for closing small gaps, including:
1. Extensive, yet safe, mobilization of the nerve ends over a distance of a few centimeters proximally and distally.
2. Positioning of the adjacent joints in mild flexion (avoiding extreme, awkward positions that will cause secondary joint contractures).
3. Transposing the nerve to a shorter anatomical course (e.g., anterior transposition of the ulnar nerve at the cubital tunnel).
The Tension-Free Mandate
The experimental and clinical observations pioneered by Millesi and Meissl unequivocally demonstrate that a nerve repaired with a tension-free autologous nerve graft yields a significantly better functional prognosis than an end-to-end primary repair performed under excessive tension. We have consistently observed satisfactory results with nerve grafts, particularly regarding sensory return, utilizing Millesi’s interfascicular grafting technique. This is an advanced procedure that demands rigorous microsurgical experience. Remarkably, massive nerve gaps exceeding 20 cm have been successfully bridged using this methodology.
Sources of Autologous Nerve Grafts
Selecting the appropriate donor nerve requires matching the cross-sectional area and fascicular pattern of the injured nerve while minimizing donor-site morbidity. Common donor nerves for the upper extremity include:
* Sural Nerve: The workhorse of nerve grafting, providing up to 30-40 cm of graft material.
* Lateral Antebrachial Cutaneous Nerve (LABCN)
* Medial Antebrachial Cutaneous Nerve (MABCN)
* Anterior and Posterior Interosseous Nerves (AIN/PIN)
* Digital Nerves: From an unsalvageable amputated finger, or a segment of a severed nerve from the opposite, less critical side of a single digit (e.g., using an ulnar digital nerve to graft a radial digital nerve gap on the same long finger).
Evidence-Based Selection: An anatomical study by Higgins et al. determined the optimal donor-recipient matches based on size and fascicular architecture:
* The Sural Nerve best matches the common digital nerve.
* The LABCN best matches the digital nerve proximal to the level of the distal trifurcation.
* The PIN, AIN, and MABCN best match the digital nerve distal to the trifurcation.
🔪 Surgical Technique 65-3: Autologous Nerve Grafting
- Preparation: In the digits, hand, and distal forearm, utilize a well-padded pneumatic tourniquet to allow meticulous dissection of the injured nerve in a completely bloodless field.
- Exposure: Make appropriate extensile skin incisions (e.g., Brunner zig-zag) to locate and expose the distal glioma and the proximal neuroma on the injured nerve.
- Neuroma Excision: Open the epineurium proximal to the neuroma in healthy, unscarred tissue on the proximal stump. In the distal segment, dissect proximally toward the scarred distal stump. Resect the neuroma and glioma sharply until healthy, pouting fascicles ("mushrooming") are visualized.
- Fascicular Dissection (Proximal): At the wrist and in the distal forearm, identify the major fascicle groups within the nerve. Using sharp dissection with microsurgical scissors or a diamond knife for thicker scar tissue, transect the fascicle groups at varying lengths so that a step-cut results.
- Note: Such extensive fascicular dissection is unnecessary in the common and proper digital nerves due to their pure sensory and oligofascicular nature.
- Fascicular Dissection (Distal): Carry out similar step-cut dissection on the distal stump. In a polyfascicular nerve (like the median or ulnar nerve at the wrist), individual fascicle groups of different lengths will protrude from the nerve stump after completion of the interfascicular dissection.
- Topographical Mapping: In polyfascicular nerves, it is highly beneficial to sketch the cross-sectional ends of the two nerve stumps, mapping their fascicular patterns. This allows for accurate matching of respective motor and sensory fascicles based on size, number, and spatial arrangement. This clinical estimation is reliable over short distances but becomes increasingly difficult over longer segmental defects due to internal plexiform crossing.
- Graft Harvest and Inset: Select a donor site appropriate for the size of the nerve and the gap. Harvest the graft atraumatically. Reverse the polarity of the nerve graft (to prevent axonal escape down donor nerve branches) and coapt the graft to the recipient fascicles using 9-0 or 10-0 nylon under zero tension.
BIOABSORBABLE NERVE CONDUITS
An excellent alternative for grafting small segmental defects in digital nerves is the utilization of bioabsorbable nerve conduits. These tubes create a protected microenvironment that concentrates endogenous neurotropic factors, guides axonal sprouting, and prevents the ingrowth of inhibitory scar tissue from the surrounding bed.
In a landmark randomized prospective study, Weber et al. compared 56 digital nerves treated with primary repair or standard autologous nerve grafting against 46 digital nerves repaired with polyglycolic acid (PGA) conduits. The overall results demonstrated no significant difference between the groups; however, in patients with defects smaller than 4 mm, the functional results were statistically superior in the conduit repair group.
Furthermore, Bertleff et al. (2005) reported favorable results using transparent, absorbable poly(dl-lactide-ε-caprolactone) conduits (Neurolac nerve guide). These conduits degrade more slowly than PGA conduits, providing longer structural support. Their data indicated that nerve gaps up to 2 cm could be successfully treated with this material, though autologous grafting remains the gold standard for larger defects.
🔪 Surgical Technique 65-2: Polyglycolic Acid Conduit Repair (Weber et al.)
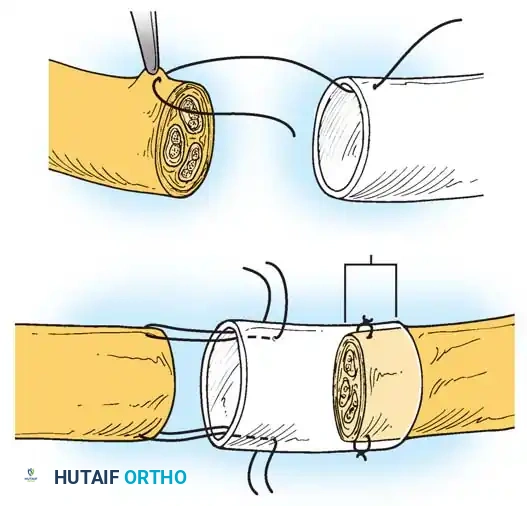
Fig. 65-8 Conduit repair technique. The minimal distance maintained between the nerve stumps within the conduit is 5 mm, even in instances where the ends could theoretically be coapted without tension. This space allows for the accumulation of neurotropic factors.
- Debridement: Before nerve repair, trim the nerve ends back sharply to the level at which there is no intraneural hemorrhage (for acute primary cases) and no interfascicular scarring (for secondary delayed cases).
- Measurement: Measure the exact distance or gap length between the two nerve ends while the limb is at rest in a neutral position.
- Conduit Selection: Select a conduit with an internal diameter slightly larger than the nerve to prevent constriction during postoperative edema. Insert the tube as described by Mackinnon and Dellon.
- Proximal Inset: Pull the proximal end of the nerve into the conduit using an 8-0 U-shaped nylon epineurial suture, ensuring that exactly 5 mm of the nerve stump lies securely within the tube.
- Heparinization: Because intraluminal blood clots act as a physical impediment to axonal regeneration, flush and fill the tube with a solution containing 1000 U of heparin per 100 mL of normal saline.
- Distal Inset: Insert the distal end of the nerve into the conduit using the identical suture technique.
- Gap Maintenance: Leave a minimum empty space of 5 mm between the nerve ends within the conduit, even in cases where there is only a 0 to 4-mm nerve tissue deficit.
- Final Flush: Inject additional heparinized saline into the tube to fill any remaining dead space.
- Closure: Repair any concomitant injuries to bone or tendon and reconstruct any vascular interruptions. Close the soft tissue meticulously, ensuring the conduit is covered by well-vascularized tissue. Splint the hand and finger as appropriate.
POSTOPERATIVE MANAGEMENT AND REHABILITATION
The success of a microsurgical nerve repair is heavily dependent on strict adherence to postoperative protocols.
Immediate Postoperative Phase:
* Oral antibiotics should be administered during the first week after surgery to prevent surgical site infection, which would be catastrophic to the repair.
* The limb is immobilized in a custom orthosis for 2 to 3 weeks to protect the coaptation site from mechanical disruption. The position of immobilization should minimize tension on the repair without causing extreme joint flexion.
Sensory Reeducation (Initiated at 6 Weeks):
* Early-Phase: Sensory reeducation should commence 6 weeks postoperatively. Initial exercises focus on basic localization and distinguishing pressure versus movement. These are performed for 5 to 10 minutes, twice daily, until protective sensation to the fingertip is recovered.
* Late-Phase: Once basic sensation returns, late-phase sensory reeducation is initiated. This involves complex tactile discrimination tasks, such as differentiating between various grades of sandpaper, textured cloths, and identifying small objects blindfolded (stereognosis).
Monitoring Regeneration:
* At approximately 2 weeks, supervised physical therapy is begun with active and active-assisted range-of-motion exercises for uninvolved joints to prevent stiffness.
* The progress of axonal regeneration is tracked clinically using the Tinel sign, which typically advances at a rate of 1 mm per day.
* Surgical Intervention: If the advancing Tinel sign halts with no further distal progression for 3 to 4 months at the distal end of a nerve graft, this indicates a neuroma-in-continuity or scar block. The nerve graft must be surgically explored, the distal suture line resected, and another end-to-end repair or revision grafting performed.
You Might Also Like