Extensor Indicis Proprius Transfer for Thumb Opposition (Opponensplasty)
Key Takeaway
The transfer of the extensor indicis proprius (EIP) is a highly reliable opponensplasty technique utilized to restore thumb opposition in cases of median nerve palsy. Originally popularized by Burkhalter, this procedure reroutes the EIP around the ulnar aspect of the wrist, utilizing the pisiform as a pulley. It is particularly indicated when the flexor digitorum superficialis is unavailable or unsuitable for transfer.
Introduction to Extensor Indicis Proprius (EIP) Transfer
The restoration of thumb opposition is a cornerstone of reconstructive hand surgery, particularly in the setting of advanced median nerve palsy. Without opposition, the hand loses its ability to perform precision pinch and powerful grasp, severely diminishing overall upper extremity function. Among the myriad of tendon transfers described for opponensplasty, the transfer of the extensor indicis proprius (EIP), as popularized by Burkhalter, Christensen, and Brown, remains one of the most versatile and reliable techniques.
This procedure is uniquely advantageous when the traditional flexor digitorum superficialis (FDS) of the ring or long finger is unsuitable for transfer—such as in cases of concomitant ulnar nerve palsy (where FDS preservation is critical for grip strength), prior flexor tendon trauma, or when avoiding a volar incision is preferred. By rerouting the EIP around the ulnar aspect of the wrist, the surgeon creates an optimal biomechanical vector that mimics the native action of the abductor pollicis brevis (APB).
Historical Context and Biomechanics
The fundamental goal of any opponensplasty is to position the thumb in palmar abduction, pronation, and flexion, allowing the pulp of the thumb to meet the pulp of the fingers. Burkhalter et al. recognized that the EIP possesses several intrinsic properties that make it an ideal donor:
1. Appropriate Excursion and Tension: The EIP has an excursion of approximately 5 cm, which perfectly matches the requirements for thumb opposition.
2. Synergistic Retraining: Although the EIP is an extensor, cortical retraining for opposition is remarkably straightforward for most patients.
3. Independent Function: The index finger retains extension through the extensor digitorum communis (EDC), provided the extensor hood is meticulously repaired.
Biomechanically, the success of the Burkhalter EIP transfer relies on the creation of a "pulley" at the ulnar border of the wrist. By passing the tendon superficial to the extensor carpi ulnaris (ECU) and around the pisiform, the vector of pull is directed from the ulnar-volar aspect of the carpus toward the thumb metacarpophalangeal (MCP) joint. This ulnar-to-radial vector is critical for achieving true pronation and palmar abduction of the first metacarpal.
Clinical Pearl: The pisiform acts as a natural anatomical pulley. Ensuring the tendon passes smoothly through the subcutaneous tissues in this region prevents bowstringing and maximizes the mechanical advantage of the transfer.
Indications and Contraindications
Indications
- Isolated Median Nerve Palsy: Secondary to trauma, severe carpal tunnel syndrome, or neuritis, resulting in thenar atrophy and loss of opposition.
- Combined Median and Ulnar Nerve Palsy: In high combined lesions, the EIP may be one of the few available expendable motors.
- Unavailability of FDS: When the FDS tendons are injured, absent, or required for other reconstructive procedures (e.g., intrinsic minus claw hand reconstruction).
- Congenital Hypoplasia: Selected cases of thumb hypoplasia (e.g., Blauth Type II) where thenar musculature is absent.
Contraindications
- Absent or Weak EIP: Preoperative clinical testing is mandatory. The patient must demonstrate independent index finger extension.
- Stiff Thumb Web Space: A fixed adduction contracture of the first web space is an absolute contraindication to tendon transfer. Passive mobility must be restored via therapy or surgical release (e.g., Z-plasty, adductor release) prior to or concurrent with the opponensplasty.
- Inadequate Index Finger EDC: If the EDC to the index finger is compromised, harvesting the EIP will result in an unacceptable extensor lag.
Preoperative Planning and Patient Positioning
Thorough preoperative assessment includes evaluating the passive range of motion of the thumb carpometacarpal (CMC) and MCP joints. The first web space must be supple. The strength of the EIP is tested by asking the patient to make a fist and then independently extend the index finger (the "pointing" sign).
Positioning:
* The patient is placed supine with the operative arm extended on a radiolucent hand table.
* A well-padded pneumatic tourniquet is applied to the proximal arm.
* The procedure is typically performed under regional anesthesia (brachial plexus block) or general anesthesia, depending on patient preference and surgical duration.
* Loupe magnification (2.5x to 3.5x) is highly recommended for meticulous dissection of the extensor hood and distal attachment sites.
Step-by-Step Surgical Technique
The Burkhalter EIP opponensplasty is performed through a series of strategic, minimally invasive incisions to harvest, reroute, and attach the tendon.
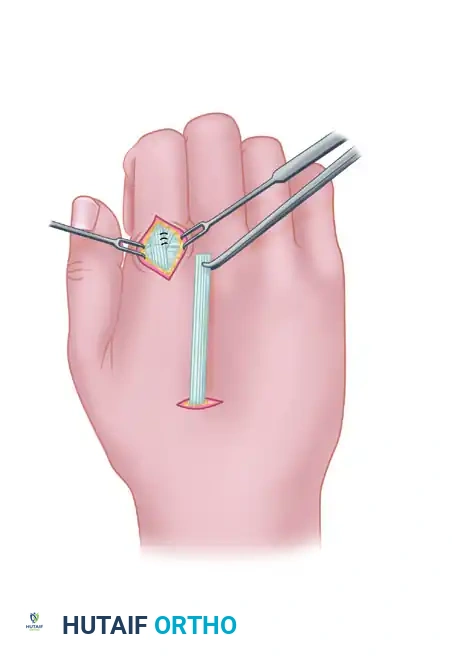
Step 1: Tendon Harvest at the Index Metacarpophalangeal Joint
The initial step involves identifying and releasing the EIP at its insertion.
- Make a short, curved, or transverse incision on the radial side of the dorsum of the index metacarpophalangeal (MCP) joint.
- Carefully dissect through the subcutaneous tissue, preserving the dorsal sensory branches of the radial nerve and dorsal venous network.
- Identify the extensor apparatus. The EIP tendon is consistently located on the ulnar side of the EDC tendon to the index finger. It is often slightly deeper and more muscular distal than the EDC.
- Divide the EIP insertion along with a small, narrow portion of the extensor hood by sharp dissection.
- Crucial Step: Repair the defect in the extensor hood with interrupted non-absorbable or slowly absorbable sutures (e.g., 4-0 braided polyester or PDS). Failure to close this defect can lead to subluxation of the EDC tendon or an extensor lag of the index finger.
Surgical Warning: Do not harvest the EDC tendon by mistake. Always verify the ulnar position of the EIP and confirm its identity by applying gentle traction while observing independent index finger extension.
Step 2: Proximal Tendon Retrieval and Fascial Release
Once the distal tendon is freed, it must be withdrawn into the proximal forearm to allow for rerouting.
- If necessary, a short intermediate incision can be made over the midportion of the dorsum of the hand to help withdraw the extensor tendon, though this can often be bypassed with careful blunt dissection.
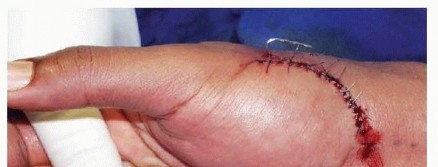
- Make a longitudinal incision approximately 2 cm long, located just proximal to the dorsal wrist crease on the ulnar aspect of the forearm.
- Identify the EIP muscle belly and tendon at this proximal level. Apply gentle traction to the distal stump and extract the tendon through this proximal ulnar incision.

- Perform a wide fascial excision or cut the antebrachial fascia as necessary to mobilize the muscle belly. The EIP muscle must be freed sufficiently to allow it to be transposed superficial to the extensor carpi ulnaris (ECU) through the subcutaneous tissue without kinking or tethering.
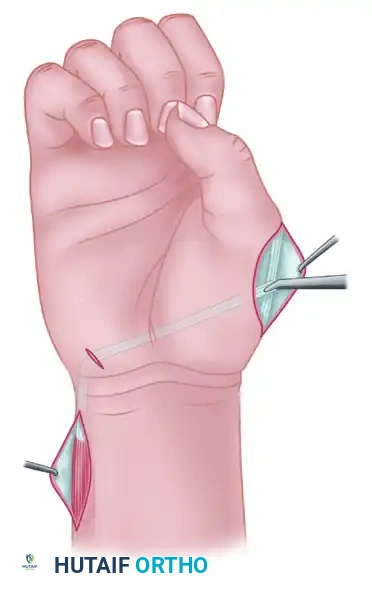
Step 3: Rerouting Around the Ulnar Border (The Pisiform Pulley)
The creation of the correct vector is the most biomechanically sensitive portion of the procedure.
- Make another small incision on the volar-ulnar aspect of the wrist, directly in the area of the pisiform bone.
- Using a tendon passer or curved Kelly clamp, create a wide subcutaneous tunnel from the dorsal ulnar forearm incision to the pisiform incision.
- Pass the EIP tendon unit through this tunnel. Ensure that the muscle-tendon junction creates a gradual, smooth curve from the dorsum of the forearm to the volar pisiform.
Pitfall: A sharp angle or inadequate fascial release at the ulnar border of the wrist will restrict tendon excursion and severely limit the functional outcome of the opponensplasty. Ensure the tunnel is capacious.
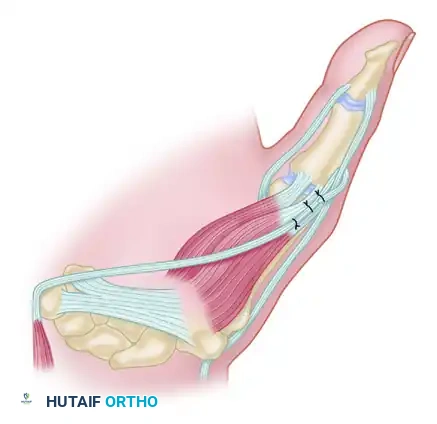
Step 4: Subcutaneous Passage to the Thumb
From the pisiform, the tendon must traverse the palm to reach the thumb MCP joint.
- Make a longitudinal or gently curved incision over the palmar side of the radial aspect of the thumb MCP joint to expose the site of attachment (the insertion of the APB).
- Pass a tendon retriever subcutaneously from the thumb MCP incision across the palm to the pisiform incision.
- Grasp the EIP tendon and draw it across the palm. The tendon should pass subcutaneously, superficial to the palmar fascia, directly toward the tendinous portion of the abductor pollicis brevis just proximal to the MCP joint.

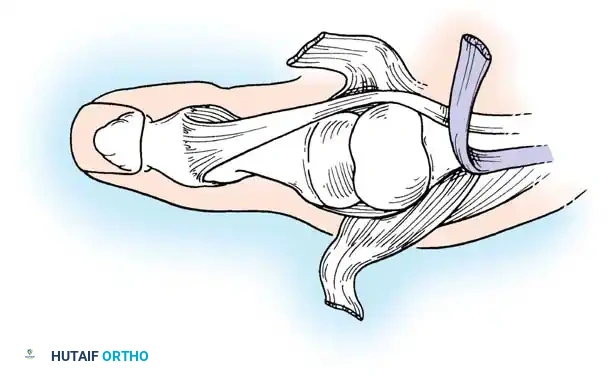
Step 5: Distal Attachment and Tensioning (Riordan Technique)
The method of distal attachment dictates the final posture and functional stability of the thumb. The Riordan technique is highly recommended as it provides palmar abduction, pronation, and MCP joint extension.
- Expose the tendinous insertion of the APB, the MCP joint capsule, and the extensor pollicis longus (EPL) tendon over the proximal phalanx.
- Attachment Method: Employ the technique of Riordan by splitting the distal end of the EIP tendon. Alternatively, if the tendon is not split, it can be passed directly into the tendinous portion of the APB.
- Weave the EIP tendon through the APB tendon. To replicate true opposition and prevent MCP flexion contracture, pass a slip of the transfer dorsally to interweave with the EPL tendon over the proximal phalanx, and anchor a portion to the dorsal MCP joint capsule.
- Setting the Tension: This is a critical step. Suture the tendon under maximal tension with the thumb held in full palmar abduction and pronation, and the wrist in only slight volar flexion (approximately 10 to 15 degrees).
- Secure the transfer with multiple interrupted non-absorbable sutures (e.g., 3-0 or 4-0 braided polyester).

Surgical Pearl: Tendon transfers inevitably stretch and lose tension postoperatively. Setting the transfer tighter than the desired final resting posture is mandatory. When the wrist is passively extended, the tenodesis effect should automatically draw the thumb into robust opposition.
- Deflate the tourniquet, achieve meticulous hemostasis, and close all skin incisions with non-absorbable monofilament sutures.
Postoperative Rehabilitation Protocol
The success of an EIP opponensplasty is equally dependent on the surgical execution and the postoperative rehabilitation. The protocol must balance the protection of the tendon repair with the prevention of adhesions.
Phase 1: Immobilization (Weeks 0 - 3)
- Immediately postoperatively, the hand and forearm are immobilized in a custom thermoplastic splint or a well-padded fiberglass cast.
- Positioning: The wrist is maintained in 15 to 20 degrees of volar flexion. The thumb is immobilized in maximum palmar abduction and opposition. The thumb interphalangeal (IP) joint may be left free to prevent stiffness, provided the EPL attachment is not under excessive tension.
- Strict elevation and digital range of motion (for the non-involved fingers) are encouraged to minimize edema.
Phase 2: Early Active Motion (Weeks 3 - 6)
- At 3 weeks, the rigid immobilization is removed.
- A removable thumb spica splint is fabricated, maintaining the thumb in opposition.
- Active range of motion (AROM) exercises are initiated. The patient is taught to actively oppose the thumb while the wrist is held in neutral or slight flexion.
- Precaution: Composite extension of the wrist and thumb is strictly prohibited during this phase to prevent stretching or rupturing the tendon repair.
- Cortical retraining begins. The patient is instructed to "extend the index finger" while attempting to oppose the thumb, utilizing the synergistic phase of the EIP.
Phase 3: Strengthening and Weaning (Weeks 6 - 12)
- At 6 weeks, passive range of motion (PROM) and gentle stretching are introduced if there is any residual stiffness.
- The splint is gradually weaned, initially during the day, and discontinued entirely by 8 weeks.
- Progressive strengthening exercises (e.g., putty squeezing, pinch grip training) are initiated.
- Full unrestricted activity is typically permitted by 10 to 12 weeks postoperatively, depending on the patient's progress and the integrity of the transfer.
Complications and Pitfalls
While the EIP transfer is highly reliable, several complications can arise if meticulous technique is not followed:
- Extensor Lag of the Index Finger: This is the most common donor-site complication. It occurs if the extensor hood is not properly repaired or if the EDC tendon is inadvertently injured during harvest. Most mild lags (<15 degrees) are well-tolerated and improve with therapy.
- Inadequate Opposition (Under-tensioning): If the tendon is sutured too loosely, or if the wrist is positioned in extension during tensioning, the transfer will lack the necessary force to pull the thumb into opposition. This requires surgical revision.
- Bowstringing at the Wrist: Failure to route the tendon deep to the subcutaneous fat and create a smooth fascial transition at the pisiform can lead to bowstringing across the volar-ulnar wrist, reducing the mechanical advantage of the transfer.
- Adhesions: The extensive subcutaneous routing makes the tendon susceptible to adhesions, particularly in the palm. Meticulous hemostasis and adherence to the early active motion protocol are essential to prevent this.
Conclusion
The transfer of the extensor indicis proprius for thumb opposition remains a masterclass in biomechanical engineering within hand surgery. By carefully harvesting the EIP, utilizing the pisiform as an anatomical pulley, and securing the tendon with the Riordan technique under maximal tension, the orthopedic surgeon can reliably restore the critical function of pinch and grasp. Strict adherence to anatomical principles and a structured postoperative rehabilitation protocol are paramount to achieving excellent, long-lasting clinical outcomes.
You Might Also Like