Thumb Carpometacarpal Arthrodesis: Comprehensive Surgical Techniques and Fixation Strategies
Key Takeaway
Thumb carpometacarpal (CMC) arthrodesis is a highly effective, durable surgical intervention for advanced trapeziometacarpal osteoarthritis, particularly in young, high-demand manual laborers. By achieving a solid osseous fusion, this procedure reliably eliminates pain while restoring powerful grip and pinch strength. Successful outcomes depend on meticulous joint preparation, precise three-dimensional positioning of the thumb ray, and rigid internal fixation using Kirschner wires, cannulated screws, or blade-plates to ensure high union rates.
INTRODUCTION TO THUMB CARPOMETACARPAL ARTHRODESIS
Thumb carpometacarpal (CMC) arthrodesis is a cornerstone procedure in the armamentarium of the hand and upper extremity surgeon. While suspensionplasty and trapeziectomy (e.g., LRTI) remain the gold standard for older, lower-demand patients with advanced trapeziometacarpal osteoarthritis, arthrodesis is the procedure of choice for young, high-demand patients, heavy manual laborers, and individuals presenting with post-traumatic arthritis.
The primary goal of thumb CMC arthrodesis is to provide a stable, painless, and powerful thumb ray. By fusing the trapeziometacarpal joint, the surgeon sacrifices a degree of mobility to achieve unparalleled pinch and grip strength, preserving the length of the thumb and preventing the proximal subsidence often seen following trapeziectomy.
💡 CLINICAL PEARL:
The success of a thumb CMC arthrodesis hinges on three critical factors: meticulous preparation of the subchondral bone, rigid internal fixation, and, most importantly, the precise three-dimensional positioning of the thumb to allow for both forceful opposition and unobstructed finger flexion.
INDICATIONS AND CONTRAINDICATIONS
Primary Indications
- High-Demand Patients: Young patients (typically under 50–55 years of age) and heavy manual laborers who require maximum grip and key pinch strength.
- Post-Traumatic Osteoarthritis: Patients with isolated trapeziometacarpal arthritis secondary to previous intra-articular fractures (e.g., Bennett or Rolando fractures).
- Inflammatory Arthritis: Selected cases of rheumatoid arthritis or systemic lupus erythematosus where joint destruction is isolated to the CMC joint, though this is less common.
- Paralytic Deformities: To stabilize the thumb ray in patients with peripheral nerve injuries (e.g., median or ulnar nerve palsy) to facilitate tendon transfers.
Contraindications
- Pantrapezial Arthritis: Arthrodesis is strictly contraindicated if there is concurrent arthritis in the scaphotrapezial-trapezoid (STT) joint or the trapeziotrapezoid joint. Fusing the CMC joint will exponentially increase the biomechanical stress on the STT joint, leading to rapid degeneration and recurrent pain.
- Elderly or Low-Demand Patients: These patients are better served by trapeziectomy with or without ligament reconstruction, which provides excellent pain relief and preserves motion without the risk of nonunion.
- Severe Bone Loss: Significant trapezial bone loss may preclude adequate fixation and necessitate structural bone grafting or alternative salvage procedures.
BIOMECHANICS AND OPTIMAL POSITION OF FUSION
The trapeziometacarpal joint is a highly complex, biconcave saddle joint that allows for flexion, extension, abduction, adduction, and pronation (opposition). When fusing this joint, the surgeon must permanently lock the thumb in a position that maximizes functional utility.
The universally accepted optimal position for thumb CMC arthrodesis is:
1. Palmar Abduction: 30 to 40 degrees.
2. Radial Abduction: 15 to 20 degrees.
3. Pronation: 10 to 15 degrees.
🚨 SURGICAL WARNING:
Fusing the thumb in excessive extension or adduction will severely impair the patient's ability to grasp large objects (e.g., a doorknob or a glass). Conversely, excessive palmar abduction will prevent the thumb from clearing the palm, obstructing the index and middle fingers during tight fist formation.
Intraoperatively, the position must be verified clinically. The thumb pulp should easily reach the pulps of the index and middle fingers (for fine pinch), while leaving sufficient space in the first web space to allow the fingers to flex fully into the palm without impingement.
SURGICAL ANATOMY
A thorough understanding of the radial and volar aspects of the thumb base is mandatory to avoid iatrogenic injury during exposure.
* Neurological Structures: The superficial branch of the radial nerve (SBRN) and the lateral antebrachial cutaneous nerve (LABCN) arborize extensively over the dorsal and radial aspects of the thumb CMC joint. Injury or aggressive retraction can lead to debilitating neuromas (Wartenberg's syndrome).
* Tendinous Structures: The first dorsal compartment, containing the abductor pollicis longus (APL) and extensor pollicis brevis (EPB), lies directly over the joint. The flexor carpi radialis (FCR) tendon runs in a groove on the volar aspect of the trapezium.
* Vascular Structures: The radial artery passes dorsally deep to the APL and EPB tendons, traversing the anatomic snuffbox just proximal to the CMC joint.
SURGICAL TECHNIQUE 1: DORSAL-RADIAL APPROACH (GOLDFARB AND STERN)
The dorsal-radial approach is the most commonly utilized exposure for thumb CMC arthrodesis, providing excellent visualization of the joint while allowing for extensile exposure if plate fixation is chosen.
Step 1: Incision and Superficial Dissection
- Make a longitudinal or slightly curved incision starting from the midpoint of the dorsal surface of the first metacarpal, extending proximally to the radial aspect of the radial styloid.
- Carefully dissect through the subcutaneous tissues using blunt dissection (e.g., tenotomy scissors) to identify and protect the arborizing branches of the superficial radial sensory nerve (SBRN) and the lateral antebrachial cutaneous nerve (LABCN).
- Retract these nerves gently using vessel loops. Avoid excessive traction to prevent neuropraxia.
Step 2: Deep Dissection and Interval Development
- Identify the first dorsal compartment tendons: the abductor pollicis longus (APL) and the extensor pollicis brevis (EPB).
- Develop the surgical interval between the APL and EPB to access the underlying trapeziometacarpal joint capsule. Alternatively, the interval between the EPB and the extensor pollicis longus (EPL) can be used, depending on the planned fixation trajectory.
Step 3: Capsulotomy and Joint Exposure
- Perform a longitudinal or T-shaped capsulotomy over the CMC joint.
- Reflect the joint capsule and soft tissue attachments sharply in a circumferential fashion from both the distal trapezium and the base of the first metacarpal.
- Deliver the base of the first metacarpal into the surgical wound by placing two small Hohmann retractors intracapsularly—one volar and one dorsal. This provides circumferential visualization of the articular surfaces.
SURGICAL TECHNIQUE 2: VOLAR APPROACH (STARK ET AL.)
The volar approach is an alternative technique that provides direct access to the volar beak of the metacarpal and the volar trapezium, which is particularly useful when correcting severe adduction contractures or when volar plate fixation is planned.
Step 1: Incision and Superficial Dissection
- Expose the trapeziometacarpal joint through a curved volar incision at the base of the thumb, centered at the level of the APL tendon insertion.
- As with the dorsal approach, meticulously avoid the sensory branches of the SBRN and LABCN, which may cross the proximal extent of the incision.
Step 2: Tendon and Muscle Reflection
- Identify the insertion of the APL tendon and the origin of the opponens pollicis muscle at the base of the first metacarpal.
- Divide the APL tendon (or a slip of it) and elevate the origin of the opponens muscle from the metacarpal base to expose the volar joint capsule.
Step 3: Capsulotomy
- Open the joint capsule through a transverse incision. This provides direct, en face visualization of the saddle joint.
JOINT PREPARATION AND ARTHRODESIS
Regardless of the approach chosen, meticulous joint preparation is the most critical step in preventing nonunion.
Cartilage Removal and Subchondral Preparation
- Using a combination of osteotomes, high-speed burrs, bone-cutting instruments, and rongeurs, remove all articular cartilage from both the trapezial and metacarpal joint surfaces.
- Technique Variation (Flat Cuts vs. Cup-and-Cone):
- Flat Cuts: Using an oscillating saw to create flat, parallel surfaces provides excellent bony apposition but shortens the thumb ray and makes multi-planar positioning more difficult.
- Cup-and-Cone (Reaming): Using matched concave and convex reamers preserves the native saddle contour, minimizes shortening, and allows for infinite adjustments in positioning (like a ball-and-socket) before final fixation.
- Ensure that the subchondral cortical bone is breached to expose healthy, bleeding cancellous bone. "Feathering" or "shingling" the bone with a fine osteotome or drill bit (1.5 mm) enhances the osteogenic response.
Bone Grafting
- If there is a lack of adequate bony contact, or if the patient has poor bone stock (e.g., cystic changes in the trapezium), autologous bone grafting is mandatory.
- Cancellous bone graft can be harvested locally from the distal radius (Lister's tubercle) or, for larger defects, from the iliac crest.
- Pack the graft tightly into any interstices between the prepared joint surfaces prior to final compression.
FIXATION STRATEGIES
Once the joint is prepared and the thumb is held in the optimal position (30-40° palmar abduction, 15-20° radial abduction, 15° pronation), the surfaces must be compressed and rigidly fixed.
1. Kirschner Wire (K-Wire) Fixation
- Technique: Maintain the desired position and drive two or three small K-wires (typically 0.045-inch or 0.062-inch) across the joint. Wires can be placed in a crossed or parallel configuration.
- Advantages: Cost-effective, technically straightforward, minimal soft tissue stripping, and easy to remove in the clinic.
- Disadvantages: Provides less rigid biomechanical stability compared to plates or screws. Requires prolonged cast immobilization and carries a risk of pin tract infections if left proud through the skin.
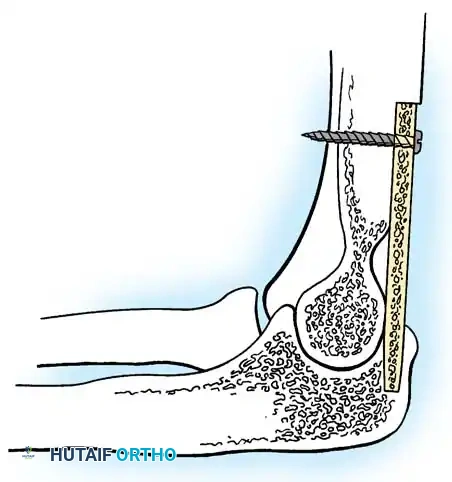
2. Cannulated Screw Fixation
- Technique: Utilize two 2.4 mm or 3.0 mm headless compression screws. Guide wires are placed centrally across the joint, position is verified under fluoroscopy, and the screws are advanced to compress the arthrodesis site.
- Advantages: Provides excellent interfragmentary compression. Headless design prevents hardware prominence beneath the skin. Allows for earlier mobilization compared to K-wires.
- Disadvantages: Technically demanding to place two screws in a small joint without causing iatrogenic fracture of the trapezium.
3. Blade-Plate and Locking Plate Fixation
- Technique: A specialized CMC fusion plate (e.g., a 90-degree blade plate or a modern pre-contoured locking plate) is applied dorsally or radially. The blade or distal screws are inserted into the trapezium, and the proximal portion is fixed to the metacarpal shaft.
- Advantages: Offers the highest biomechanical stability and rigidity. Ideal for revision cases, nonunions, or when structural bone grafting is utilized.
- Disadvantages: Requires more extensive soft tissue stripping. Hardware prominence is a significant issue, frequently necessitating a second surgery for plate removal due to tendon irritation.
💡 CLINICAL PEARL:
When using plate fixation, always ensure that the plate does not impinge on the STT joint proximally. Fluoroscopic evaluation in multiple planes is essential to confirm that screws have not breached the STT or trapeziotrapezoid articulations.
CLOSURE AND POSTOPERATIVE CARE
Closure
- Thoroughly irrigate the wound to remove bone debris.
- Repair the joint capsule if possible. If the volar approach (Stark et al.) was used, meticulously repair the APL tendon and the origin of the opponens pollicis.
- Close the skin with non-absorbable sutures (e.g., 4-0 or 5-0 nylon) in an interrupted fashion to accommodate postoperative swelling.
Postoperative Protocol
The postoperative rehabilitation protocol is designed to protect the arthrodesis while it consolidates.
- Weeks 0–2: The thumb is immobilized immediately postoperatively in a rigid, well-padded thumb spica splint or cast. The interphalangeal (IP) joint may be left free depending on surgeon preference, but the CMC and metacarpophalangeal (MCP) joints must be strictly immobilized.
- Week 2: The patient returns to the clinic. The initial splint is removed, and skin sutures are extracted. A short-arm thumb spica cast (often fiberglass) is reapplied.
- Weeks 2–8: The patient remains in the thumb spica cast. Radiographs are obtained periodically (typically at 4 and 8 weeks) to assess the progression of bony healing.
- Weeks 8–12: If clinical and radiographic signs of fusion are present (bridging trabeculae across the joint space), the cast is removed. The patient is transitioned to a custom thermoplastic removable thumb spica orthosis and begins progressive range-of-motion exercises for the IP and MCP joints, as well as wrist mobilization.
- Week 12+: Solid fusion is usually obtained by 12 weeks. Once confirmed, the patient is weaned off the splint and may begin progressive strengthening and return to heavy manual labor.
COMPLICATIONS AND MANAGEMENT
While highly successful, thumb CMC arthrodesis carries specific risks that the surgeon must be prepared to manage.
- Nonunion: Historically reported in up to 15% of cases, though modern rigid fixation (plates/screws) and meticulous joint preparation have significantly lowered this rate. Asymptomatic nonunions may be observed. Symptomatic nonunions require revision arthrodesis with structural bone grafting and rigid plate fixation.
- Hardware Prominence: Extremely common with K-wires and dorsal plates. If a plate causes extensor tendon irritation or skin breakdown, hardware removal is indicated after solid fusion is confirmed (typically after 6-9 months).
- Sensory Nerve Injury: Neuropraxia or neuroma of the SBRN or LABCN can cause severe, burning pain. Prevention through careful dissection is paramount. Established neuromas may require surgical excision and burying of the nerve stump into muscle or bone.
-
Adjacent Segment Disease: Fusing the CMC joint increases biomechanical stress on the adjacent STT and MCP joints. Over time, patients may develop compensatory hyperextension at the MCP joint or progressive STT arthritis, which may eventually require further surgical intervention.
You Might Also Like