Metacarpal Joint Surface Arthroplasty: A Comprehensive Surgical Guide
Key Takeaway
Metacarpal joint surface arthroplasty, utilizing the Beckenbaugh technique, is a sophisticated procedure designed to restore function and alleviate pain in arthritic or severely deformed metacarpophalangeal joints. This comprehensive guide details the precise surgical steps, from extensor hood incision and guided osteotomies to meticulous broaching and component implantation, ensuring optimal biomechanical restoration and long-term joint stability for orthopedic patients.
Introduction to Metacarpal Joint Surface Arthroplasty
Metacarpophalangeal (MCP) joint arthritis, whether secondary to rheumatoid disease, primary osteoarthritis, or post-traumatic degeneration, presents a profound challenge to hand function. While silicone interposition arthroplasty has historically been the gold standard for low-demand rheumatoid patients, it is often associated with long-term complications such as implant fracture, subsidence, and silicone synovitis.
Metacarpal joint surface arthroplasty, particularly utilizing the Beckenbaugh technique, represents a paradigm shift toward anatomic and biomechanical restoration. By utilizing unconstrained or semi-constrained surface replacing implants (often composed of pyrocarbon or metal-polyethylene articulations), this procedure preserves bone stock, maintains the integrity of the collateral ligaments, and restores the native kinematic center of rotation. This masterclass delineates the precise surgical execution of the Beckenbaugh technique, providing orthopedic surgeons with an evidence-based framework for achieving optimal clinical outcomes.
Indications and Patient Selection
Careful patient selection is the cornerstone of successful surface arthroplasty. Unlike silicone arthroplasty, which relies on encapsulation for stability, surface arthroplasty demands a functional soft-tissue envelope.
Primary Indications
- Osteoarthritis (OA): Advanced primary OA of the MCP joint with preserved bone stock and intact collateral ligaments.
- Post-Traumatic Arthritis: Joint destruction following intra-articular fractures where the soft tissue envelope remains viable.
- Rheumatoid Arthritis (RA): Selected RA patients with "burned-out" disease, adequate bone density, and correctable soft-tissue deformities (e.g., ulnar drift).
Contraindications
- Absolute: Active local or systemic infection, profound bone loss precluding implant seating, and absent or un-reconstructable collateral ligaments.
- Relative: Severe, unyielding ulnar drift with fixed volar subluxation, profound osteopenia, and high-demand manual labor (which may accelerate implant wear or subsidence).
Clinical Pearl: The success of a surface arthroplasty is inextricably linked to soft-tissue balance. If the collateral ligaments are irreparably compromised, a constrained implant or a traditional silicone spacer must be considered.
Preoperative Planning and Biomechanics
The MCP joint is a diarthrodial condyloid joint allowing flexion, extension, and limited radioulnar deviation. The cam-shaped metacarpal head dictates that the collateral ligaments are lax in extension and taut in flexion. Surface arthroplasty implants are designed to replicate this cam effect.
Preoperative planning requires high-quality orthogonal radiographs (Posteroanterior, Lateral, and Oblique views) of the hand. Digital templating is mandatory to estimate the size of the metacarpal and phalangeal components, assess the medullary canal diameter, and anticipate any required bone grafting for cystic lesions.
Patient Positioning and Anesthesia
- Anesthesia: Regional anesthesia (brachial plexus block) is preferred, supplemented with intravenous sedation. This provides excellent intraoperative conditions and prolonged postoperative analgesia.
- Positioning: The patient is positioned supine with the operative arm extended on a radiolucent hand table.
- Tourniquet: A well-padded pneumatic tourniquet is applied to the proximal arm and inflated to 250 mm Hg (or 100 mm Hg above systolic pressure) after exsanguination with an Esmarch bandage.
- Preparation: Standard surgical preparation and draping of the hand and forearm are performed, ensuring the fingers are freely mobile for intraoperative range of motion (ROM) assessment.
Surgical Approach
The surgical approach must provide adequate exposure while meticulously preserving the extensor mechanism and joint capsule for subsequent repair.
Incision Strategy
- Single Joint Involvement: Make a longitudinal incision directly over the dorsal aspect of the affected metacarpal joint.
- Multiple Joint Involvement: Make a curving, transverse incision across the dorsal aspect of the metacarpal joints (typically at the level of the metacarpal necks) to allow access to all affected digits without creating ischemic skin flaps.
Extensor Mechanism and Capsular Dissection
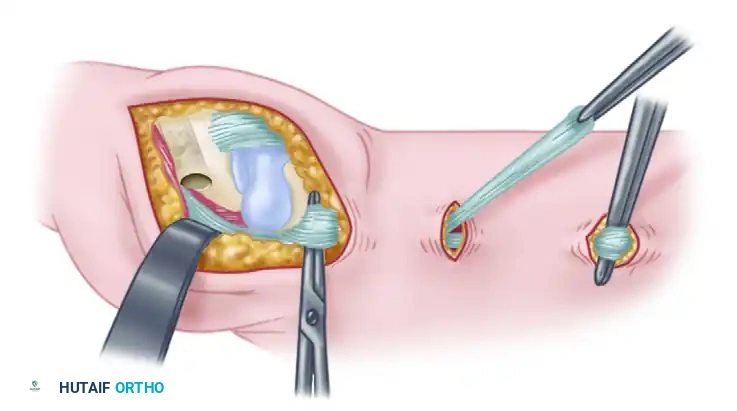
- Extensor Hood Incision: Incise the extensor hood on the radial side of the central tendon. If there is no pre-existing dislocation or subluxation of the tendon (as often seen in RA), the incision may be made directly through the center of the tendon.
- Tendon Mobilization: Dissect the extensor tendon free from the underlying joint capsule. Retract the tendon to expose the dorsal capsule.
- Capsulotomy: Split the capsule longitudinally to expose the joint space. It is imperative to visualize the proximal phalangeal dorsal base, the metacarpal head, and the origins of the collateral ligaments.
- Capsular Preservation: Preserve as much of the capsule as possible. A robust capsular repair is vital for postoperative stability and prevention of extensor lag.
Surgical Warning: Aggressive resection of the capsule or collateral ligament origins will lead to catastrophic postoperative instability. The collateral ligaments must remain attached to the metacarpal neck and phalangeal base.
Step-by-Step Surgical Technique (Beckenbaugh)
The Beckenbaugh technique relies on precise, guided osteotomies to ensure the implants are seated with perfect rotational and angular alignment.
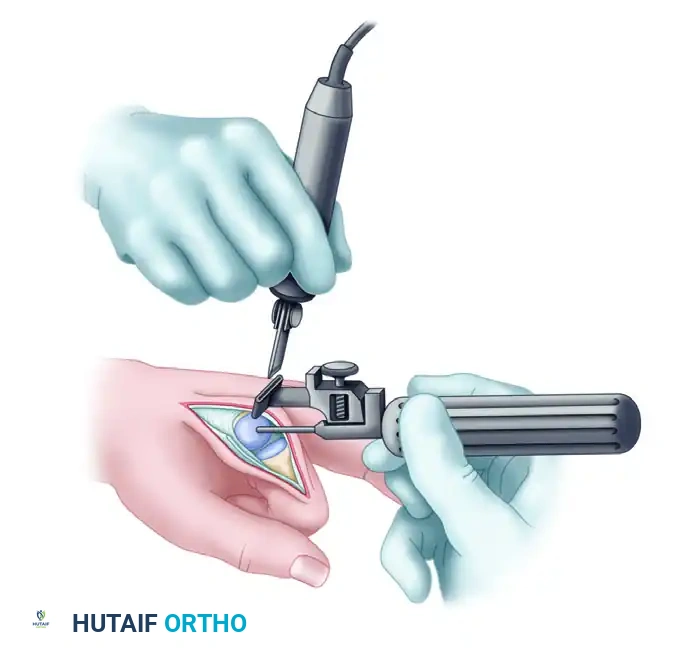
Phase 1: Metacarpal Preparation
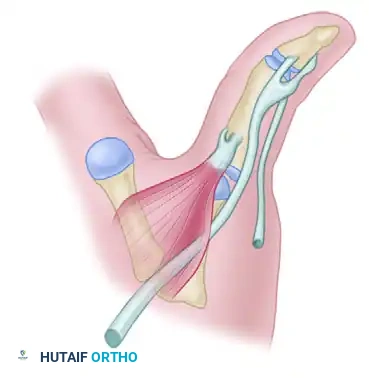
- Metacarpal Puncture: Utilize a surgical awl to puncture the metacarpal head. The entry point must be in the dorsal third of the head, perfectly centered in the coronal width, and aligned with the long axis of the metacarpal medullary canal.
- Alignment Awl Insertion: Attach the alignment guide to the alignment awl. Insert the awl into the puncture site and advance it into the medullary canal to a depth of one-half to two-thirds the length of the metacarpal.
- Crucial Check: The alignment guide must sit parallel to the dorsal surface of the metacarpal and perfectly in line with the bone's long axis.
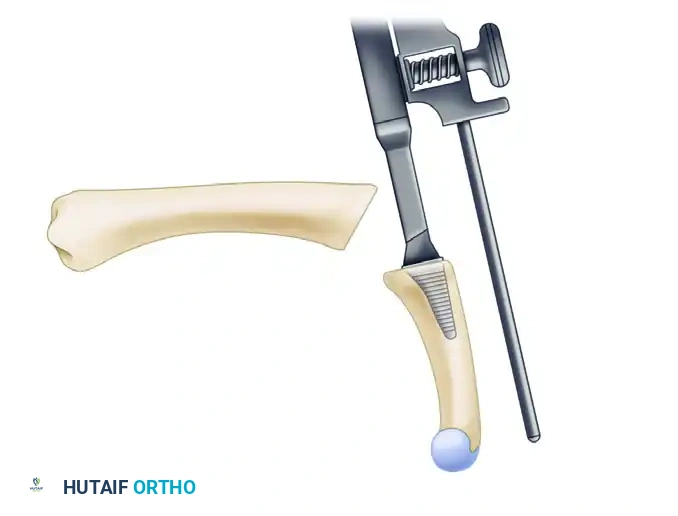
- Guided Metacarpal Osteotomy: Begin a guided partial metacarpal osteotomy using the proximal osteotomy guide mounted on the alignment awl.
- Attach the proximal osteotomy guide to the alignment awl and advance it until the cutting plane is positioned exactly 1 to 2 mm distal to the dorsal attachments of the collateral ligaments.
- Keep the volar surface of the guide parallel to the dorsal metacarpal surface to maintain proper rotational alignment.
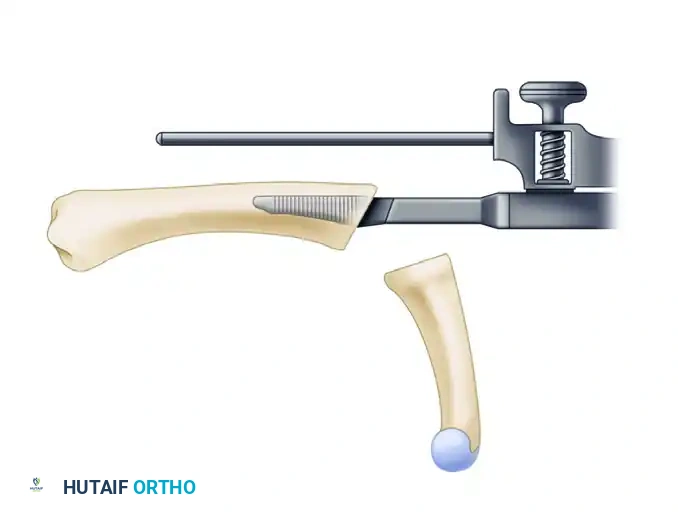
- Completing the Cut: Make the initial cut with an oscillating saw through the guide. Remove the alignment awl and complete the osteotomy freehand, strictly following the previously established osteotomy plane. Avoid any volar impingement or damage to the volar plate.
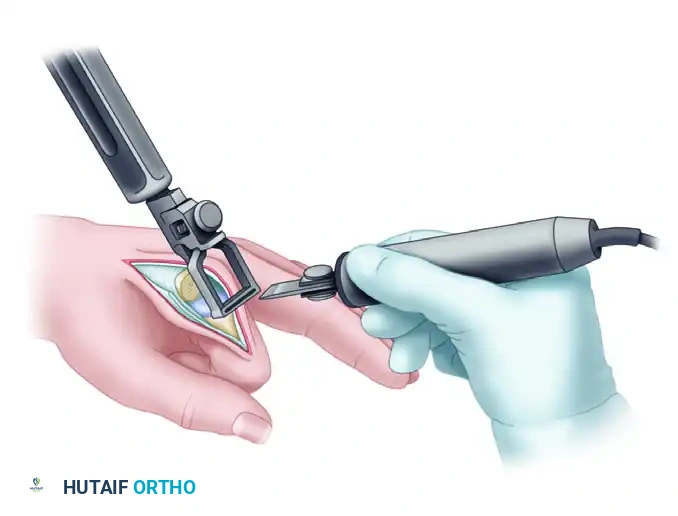
Phase 2: Phalangeal Preparation
- Phalangeal Puncture: Puncture the proximal phalangeal base. The entry point should be volar to the dorsal surface of the proximal phalanx by a distance equal to one-third of the sagittal height, and centered across the base in line with the phalangeal medullary canal.
- Distal Alignment: Advance the alignment guide one-half to two-thirds the length of the phalangeal medullary canal and attach the distal osteotomy guide.
- Positioning the Guide: Advance the guide until the cutting plane is positioned 0.5 to 1.0 mm distal to the dorsal edge of the proximal phalanx. Ensure the volar surface of the guide remains parallel to the dorsal surface of the phalanx.
- Phalangeal Osteotomy: Make the phalangeal cut using a small sagittal saw through the blade slot of the osteotomy guide. Perform the dorsal portion of the osteotomy first, remove the alignment awl, and then complete the osteotomy freehand.
Phase 3: Medullary Broaching
Precise broaching is critical to prevent implant subsidence and ensure rotational stability. The broaches must follow the native intramedullary anatomy.
- Phalangeal Broaching: Expand the phalangeal opening with the starter awl. Begin broaching distally along the previously established medullary axis.
- Alignment: Keep the dorsal surface of the broach parallel to the dorsal surface of the phalangeal bone.
- Technique: A side-cutting burr may be necessary to clear sclerotic bone and assist in the proper seating of the broaches.
- Depth: Continue broaching until the seating plane of the broach is flush to 1 mm deeper than the osteotomy cut.
-
Sizing the Phalanx: During broaching, continuously evaluate the fit and resistance to movement. Repeat the process with sequentially larger broaches until the largest possible size can be inserted and properly seated without fracturing the cortex.
-
Metacarpal Broaching: Begin broaching the metacarpal with a size 10 proximal broach. Work up sequentially to the exact broach size determined during the phalangeal broaching process.
- Depth: Continue broaching until the seating plane of the metacarpal broach is exactly 1 mm deeper than the osteotomy cut.
Pitfall: Do not mismatch proximal and distal component sizes. Mismatching alters the radius of curvature and joint reaction forces, leading to edge loading, accelerated wear, and early implant failure. The metacarpal and phalangeal components must be a matched pair.
Phase 4: Trialing and Implantation
- Trial Reduction: Insert the appropriate size trial components.
- Kinematic Assessment: Assess the range of motion, focusing on achieving full extension and at least 70 to 80 degrees of flexion.
- Troubleshooting: If there is tightness in extension, it may be relieved by further impaction of the trials or the removal of an additional 1-2 mm of bone from the metacarpal head. If the joint is too lax, a larger component or thicker polyethylene insert (if applicable to the specific implant system) may be required.
- Final Implantation: Once optimal sizing and kinematics are confirmed, remove the trials. Thoroughly irrigate the medullary canals to remove debris.
- Distal Component: Insert and impact the appropriate size final distal (phalangeal) component until the component collar is perfectly flush with the proximal phalangeal base.
- Proximal Component: Insert and impact the matching metacarpal component. Perform a final assessment of joint stability, tracking, and range of motion.
Closure and Soft Tissue Reconstruction
The longevity of the arthroplasty is highly dependent on the meticulous repair of the soft tissue envelope.
- Capsular Repair: Repair the dorsal capsule using non-absorbable or slowly absorbable sutures (e.g., 3-0 PDS or Vicryl). A tight capsular repair prevents dorsal subluxation of the implant.
- Extensor Mechanism Repair: Reapproximate the extensor hood. If the central slip was incised, repair it meticulously. If the tendon was subluxated ulnarly (common in RA), perform a radial sagittal band reefing or reconstruction to centralize the extensor tendon over the midline of the joint.
- Skin Closure: Deflate the tourniquet, achieve meticulous hemostasis, and close the skin with interrupted non-absorbable sutures (e.g., 4-0 Nylon).
- Dressing: Apply a bulky, non-adherent compressive dressing and a volar plaster splint, positioning the MCP joints in full extension to protect the extensor repair.
Postoperative Protocol and Rehabilitation
Rehabilitation following surface arthroplasty is a delicate balance between protecting the soft tissue repair and preventing joint stiffness. A specialized hand therapist is integral to this phase.
Phase I: Protection and Early Motion (Days 1 to 14)
- The bulky dressing is removed at 3 to 5 days postoperatively.
- A custom dynamic extension splint is fabricated. This splint allows active flexion but provides dynamic rubber-band assistance to return the digits to full extension.
- Patients are instructed to perform active flexion and dynamic extension exercises within the splint 4 to 6 times daily.
- Sutures are removed at 10 to 14 days.
Phase II: Intermediate Rehabilitation (Weeks 2 to 6)
- Continue dynamic splinting during the day and a static extension splint at night.
- Begin gentle passive range of motion (PROM) exercises if active motion is lagging, but avoid forceful passive stretching that could attenuate the capsular repair.
- Edema control (coban wrapping, elevation) remains critical.
Phase III: Strengthening and Weaning (Weeks 6 to 12)
- Discontinue the dynamic splint during the day. Night splinting may continue if an extensor lag persists.
- Initiate progressive strengthening exercises (putty, grip strengthening).
- Return to light activities of daily living (ADLs) is encouraged, but heavy lifting or forceful gripping should be avoided until 12 weeks postoperatively.
Complications and Management
While metacarpal joint surface arthroplasty yields excellent results in properly selected patients, surgeons must be prepared to manage potential complications.
- Implant Subsidence or Loosening: Often due to inadequate bone stock or aggressive broaching. Minor subsidence may be asymptomatic, but progressive loosening requires revision to a silicone spacer or arthrodesis.
- Stiffness: The most common complication. Usually secondary to inadequate postoperative therapy or excessive scar formation. Managed with aggressive hand therapy and, rarely, surgical tenolysis/capsulotomy.
- Instability/Dislocation: Results from failure to balance the soft tissues or violation of the collateral ligaments during bone resection. Requires prompt surgical exploration and ligamentous reconstruction.
- Infection: Superficial infections are managed with oral antibiotics. Deep periprosthetic infections require aggressive irrigation and debridement, implant removal, placement of an antibiotic spacer, and delayed reconstruction.
Conclusion
Metacarpal joint surface arthroplasty via the Beckenbaugh technique is a highly effective, biomechanically sound procedure for restoring function to the arthritic hand. By strictly adhering to the principles of precise guided osteotomies, meticulous soft-tissue handling, and rigorous postoperative rehabilitation, the orthopedic surgeon can achieve durable, pain-free joint mobility, significantly enhancing the patient's quality of life.
📚 Medical References
- metacarpal arthroplasty: a long-term follow-up, J Hand Surg 18A:560, 1993.
- Stirrat CR: Metacarpophalangeal joints in rheumatoid arthritis of the hand, Hand Clin 12:515, 1996.
- Synnott K, Mullett H, Faull H, et al: Outcome measures following metacarpophalangeal joint replacement, J Hand Surg 25B:601, 2000.
- Trail IA, Martin JA, Nuttall D, et al: Seventeen-year survivorship analysis of Silastic metacarpophalangeal joint replacement, J Bone Joint Surg 86B:1002, 2004.
- Vainio K: Vainio arthroplasty of the metacarpophalangeal joints in rheumatoid arthritis, J Hand Surg 14A:367, 1989.
- Vermeiren JAM, Dapper MML, Schoonhoven LA: Isoelastic arthroplasty of the metacarpophalangeal joints in rheumatoid arthritis: a preliminary report, J Hand Surg 19A:319, 1994.
- Wilson RL, Carlblom ER: The rheumatoid metacarpophalangeal joint, Hand Clin 5:223, 1989.
- Wilson YG, Sykes PJ, Niranjan NS: Long-term follow-up of Swanson’s Silastic arthroplasty of the metacarpophalangeal joints in rheumatoid arthritis, J Hand Surg 18B:81, 1993.
- Wolock BS, Moore JR, Weiland AJ: Arthritis of the basal joint of the thumb: a critical analysis of treatment options, J Arthroplasty 4:65, 1989.
- Wood VE, Ichtertz DR, Yahiku H: Soft tissue metacarpophalangeal reconstruction for treatment of rheumatoid hand deformity, J Hand Surg 14A:163, 1989.
- Finger Arthrodesis Allende BT, Engelem JC: Tension band arthrodesis in the fi nger joints, J Hand Surg 5A:269, 1980.
- Ayres JR, Goldstrohm GL, Miller GJ, et al: Proximal interphalangeal
You Might Also Like