Arthroscopic Bankart Repair: Advanced Surgical Technique
Key Takeaway
The arthroscopic Bankart repair is the gold standard for addressing recurrent anterior glenohumeral instability. This technique involves meticulous capsulolabral mobilization, glenoid neck abrasion, and superior advancement of the inferior glenohumeral ligament complex using suture anchors. By restoring physiological capsular tension and recreating the anterior labral bumper, surgeons can effectively stabilize the joint. This guide details the lateral decubitus approach, portal placement, and advanced knot-tying principles for optimal outcomes.
Introduction and Pathoanatomy
The arthroscopic Bankart repair remains the cornerstone surgical intervention for recurrent anterior glenohumeral instability. The classic Bankart lesion—an avulsion of the anteroinferior capsulolabral complex from the glenoid rim—disrupts the primary static stabilizer of the shoulder: the inferior glenohumeral ligament (IGHL). Successful surgical management requires not merely the reattachment of the labrum, but the anatomical restoration of capsular tension, the elimination of pathological volume (the "drive-through" sign), and the recreation of a robust anterior soft-tissue bumper.
This comprehensive masterclass details the evidence-based, step-by-step execution of the arthroscopic Bankart repair, emphasizing precise portal placement, meticulous tissue mobilization, and biomechanically sound fixation strategies.
Preoperative Evaluation and Indications
Patient selection is paramount. While arthroscopic stabilization is highly successful for soft-tissue Bankart lesions, the surgeon must rigorously evaluate the joint for critical bone loss.
🚨 SURGICAL WARNING: The Bone Loss Threshold
Thoroughly evaluate the glenohumeral joint for bipolar bone loss. Defects of the humeral head (Hill-Sachs lesions) larger than 6 mm in depth, or those that engage the anterior glenoid track, must be stabilized with an adjunctive remplissage procedure. Conversely, anterior glenoid bone loss exceeding 6 mm (or >15-20% of the glenoid width, forming the "inverted pear" defect) is a contraindication for isolated arthroscopic soft-tissue repair and should be restored with an open Latarjet procedure or bone block augmentation.
Patient Positioning and Preparation
Optimal visualization and access to the inferior capsule dictate meticulous patient positioning. The lateral decubitus position is preferred by many master surgeons for its superior access to the inferior and posterior compartments.
- Positioning: Place the patient on the operating table in the lateral decubitus position utilizing a beanbag and kidney rest for rigid pelvic and torso stabilization.
- Protection: Carefully protect all bony prominences (fibular head, greater trochanter) and place an axillary roll to prevent brachial plexus neuropraxia. Apply a heating blanket and serial sequential compression devices (SCDs) to the lower extremities.
- Draping: Prepare and drape the patient to allow wide, unencumbered exposure to the anterior, posterior, and superior aspects of the shoulder girdle.
- Traction: Place the operative arm in a specialized traction sleeve. Suspend the arm in 45 degrees of abduction and 20 degrees of forward flexion using 10 to 12 lbs of traction. This specific vector distracts the joint orthogonally, opening the anteroinferior working space without placing undue tension on the axillary nerve.
Diagnostic Arthroscopy and Portal Placement
Precise portal placement is the foundation of a successful arthroscopic stabilization. Outline the bony landmarks (acromion, clavicle, coracoid) and mark potential portals on the skin.
The Posterior Viewing Portal
Establish the standard posterior portal 2 cm inferior and 1 cm medial to the posterolateral edge of the acromion. Before establishing anterior working portals, perform a comprehensive 360-degree diagnostic sweep. Carefully visualize the entire labrum, the rotator cuff, and the attachment of the glenohumeral ligaments to the humerus.
Identify the specific pathology. The spectrum of instability lesions includes soft tissue Bankart tears, bony Bankart lesions, Anterior Labroligamentous Periosteal Sleeve Avulsions (ALPSA), and Glenoid Labral Articular Disruptions (GLAD).
A, Soft tissue Bankart lesion.
B, Bony Bankart lesion.

C, Anterior labral periosteal sleeve avulsion (ALPSA).
D, Glenoid avulsion of glenohumeral ligament.
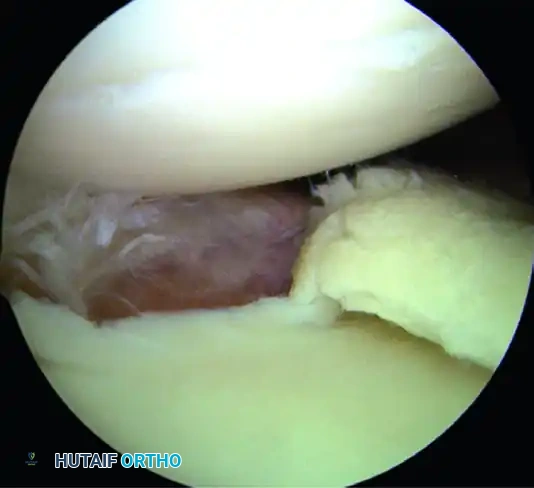
E, Glenoid labral articular disruption (GLAD).
F, Juvenile glenoid avulsion of the glenohumeral ligament.
Additionally, inspect the humeral attachment for Humeral Avulsion of the Glenohumeral Ligament (HAGL) lesions, which require specific repair techniques.
A, Humeral avulsion of glenohumeral ligament with exposure of posterior cuff.
B, Posterior glenoid avulsion of glenohumeral ligament.
C, Repaired floating humeral avulsion of glenohumeral ligament.
The Four-Quadrant Portal Approach
After identifying the quadrants of injury, create the planned working portals using outside-in spinal needle localization to ensure optimal trajectory.

A, In the superior quadrant, SLAP tears between 2 and 10 o’clock are accessible through the anterior portal (AP), anterosuperior lateral (ASL), and the portal of Wilmington (PW).
B, In the anterior quadrant, anteroinferior labral tears are accessible through the anterior portal (AP) and the 5-o’clock portal.
C, In the anteroinferior quadrant, anteroinferior capsulolabral tears are accessible through the 5- and 7-o’clock portals.
D, In the posteroinferior quadrant, posterior labral tears can be accessed through the 7-o’clock portal.
- Anterosuperior Portal: Enter just posterior to the biceps tendon and anterior to the leading edge of the supraspinatus tendon. This is the optimal viewing portal to visualize the full extent of capsuloligamentous damage.
- Anterior Central Portal: Place an 8.25-mm clear threaded cannula just above the superior edge of the subscapularis tendon, angled at approximately 45 degrees to the glenoid articular surface. This is the primary working portal for anchor placement and suture passing.
- 5-o'clock Percutaneous Portal: Essential for placing the most inferior anchor at the 5:30 position.
- 7-o'clock Posterior Portal: If the lesion extends posteriorly, establish this portal via spinal needle localization to address posteroinferior pathology.
Surgical Technique: Step-by-Step
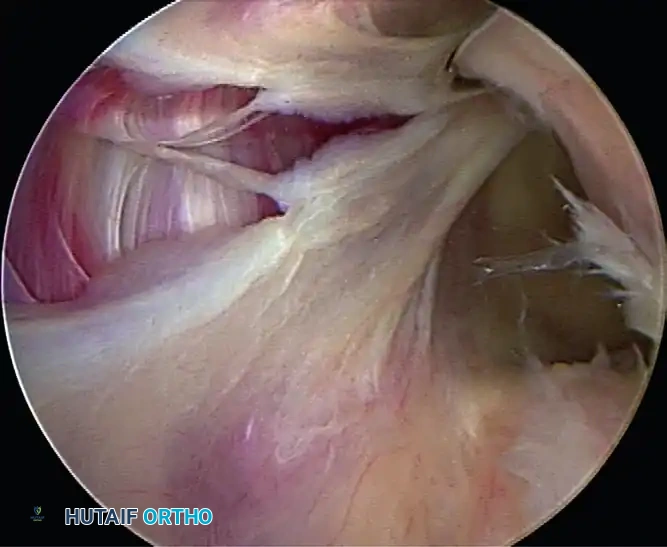
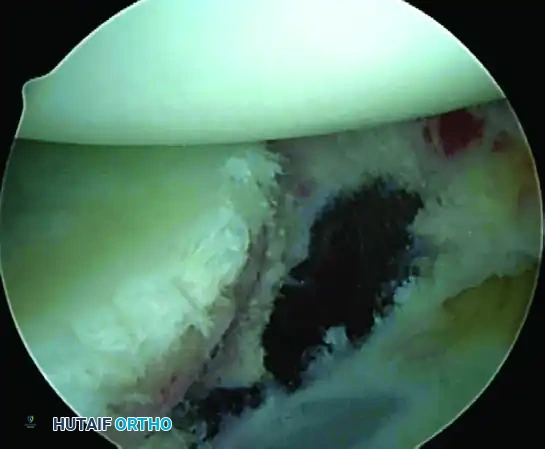
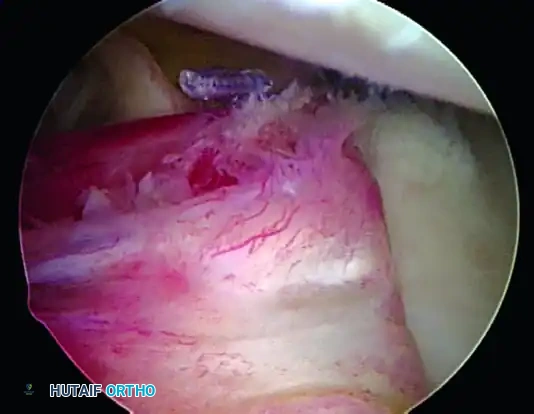
1. Capsulolabral Mobilization and Glenoid Preparation
The most common cause of failure in Bankart repair is inadequate mobilization of the capsulolabral complex.
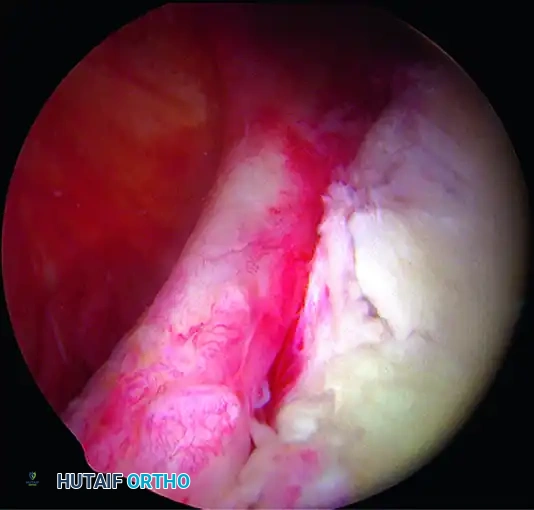
While visualizing from the anterosuperior portal, use an arthroscopic elevator or radiofrequency wand to meticulously free the capsule down to the 6-o’clock position. You must release the tissue until the underlying red muscle belly of the subscapularis is clearly visible. This complete release is mandatory to allow the inferior capsule to be shifted superiorly without tension.
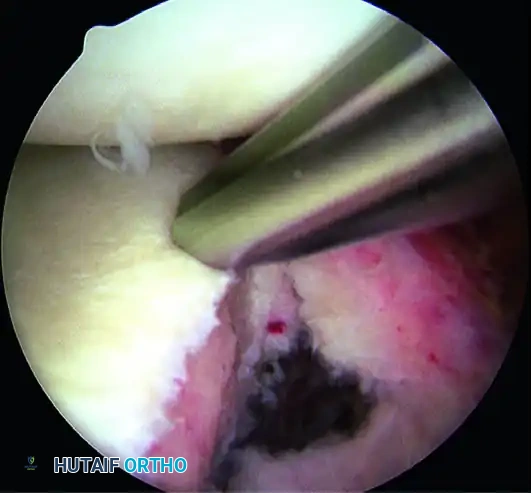
💡 CLINICAL PEARL: The Biological Bed
Soft tissue healing requires a robust vascular response. Use an arthroscopic rasp or motorized burr to abrade the anterior glenoid neck down to bleeding cancellous bone. Do not over-resect the bone, as preserving the cortical edge is necessary for secure anchor purchase.
A, Abrasion of glenoid neck and capsular release to allow advancement of capsulolabral complex superiorly and laterally to restore anatomy and physiological tension.
2. Posterior Capsular Plication (If Indicated)
In collision athletes or patients with multidirectional laxity, an injury to the posterior inferior glenohumeral ligament is often present. Plication of the posterior inferior capsule is highly indicated.
- Visualize from the anterosuperior portal.
- Use a rasp to freshen the posterior soft tissue to incite a healing response.
- Using a Spectrum suture passer through the posterior cannula, pass PDS sutures starting at the 6-o’clock position.
- Take a 1 cm bite of the capsule using a "pinch-tuck" technique, ensuring the needle passes up under the labrum.
- Pass multiple sutures (usually three), storing them outside the cannula to be tied later.
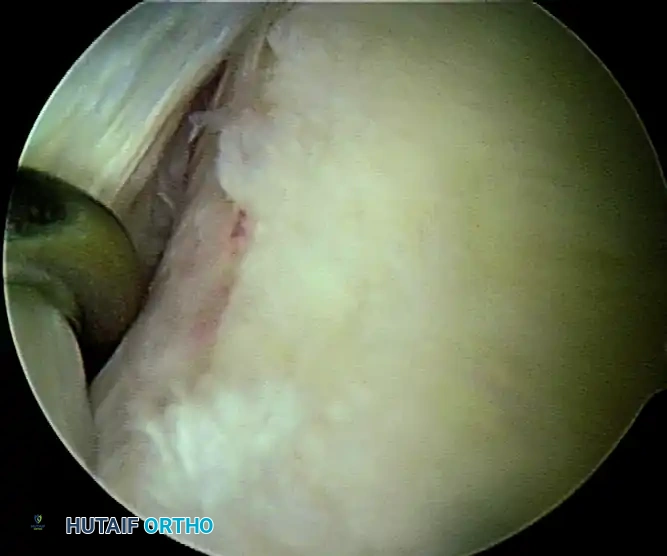
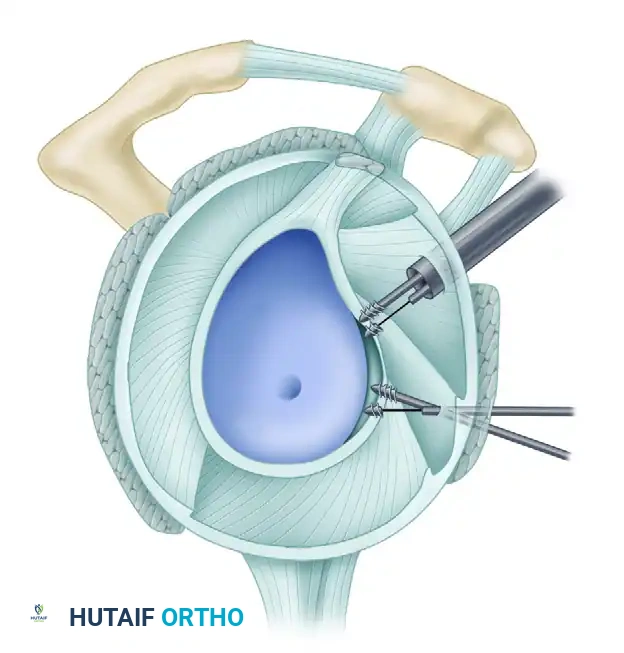
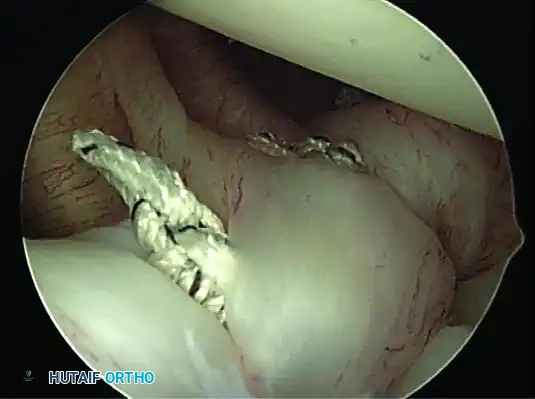
3. Anterior Anchor Placement
Transition to the anterior Bankart repair. The goal is to secure anatomical fixation 2 mm onto the articular surface with a minimum of three (preferably four) suture anchors, spaced 5 to 7 mm apart.
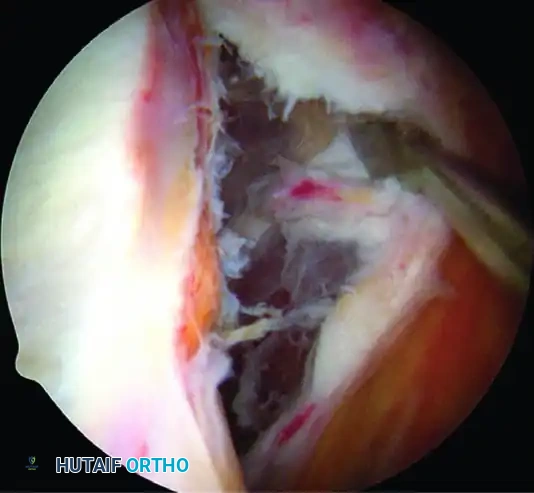
A, Capsule and labral complex freed.
The Inferior Anchor (The Keystone):
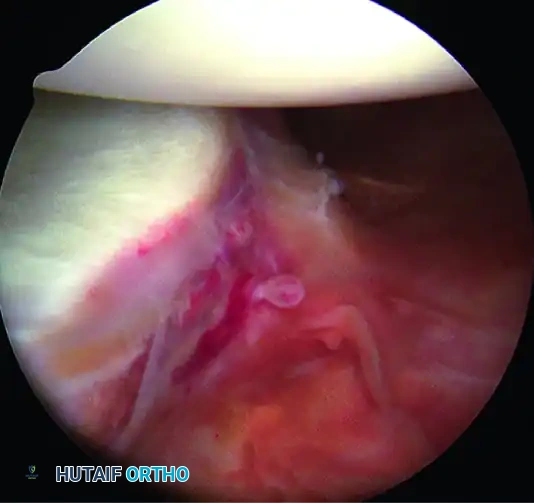
The most critical anchor is the most inferior one. Use the 5-o’clock percutaneous portal with a spinal needle for precise trajectory (45-degree angle to the articular surface). Place the spear guide at the 5:30 position, 1 to 2 mm onto the articular cartilage margin. Drill and insert a biocomposite or all-suture anchor (e.g., JuggerKnot).
B, Anchor inserted on articular edge.
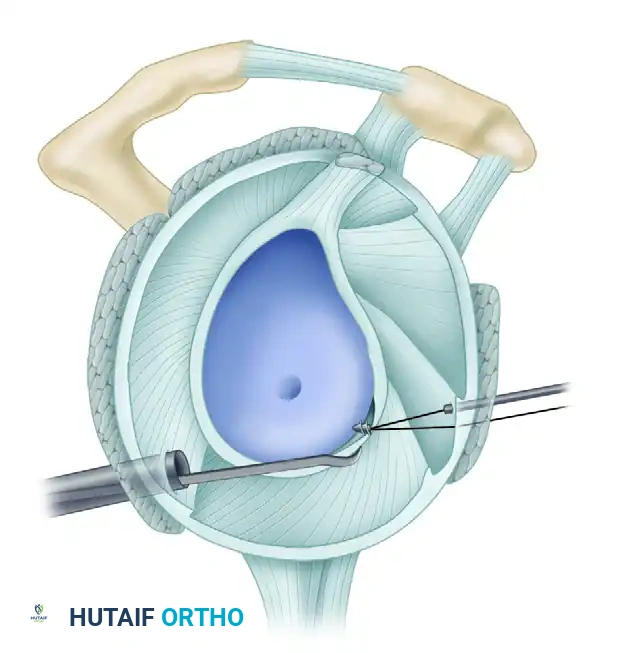
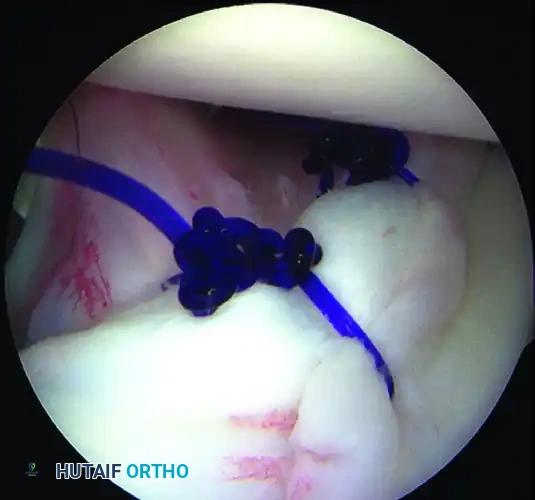
4. Suture Passing and Superior Advancement
To eliminate the drive-through sign and restore physiological tension, the capsule must be shifted superiorly and laterally.
- Retrieve the most inferior suture limb out of the posteroinferior cannula using a suture grasper.
- Use a Spectrum suture passer through the anterior cannula to take a substantial (1 cm) bite of the capsule and labrum inferior to the anchor site.
C, A 1-cm capsular bite taken with Spectrum suture passed distal to anchor.
- Shuttle the PDS relay suture out the posterior cannula, load the anchor suture, and pull it through the capsulolabral tissue.
- Retrieve the corresponding suture limb and tie a secure, low-profile sliding knot (e.g., SMC or Weston knot) backed up by alternating half-hitches.
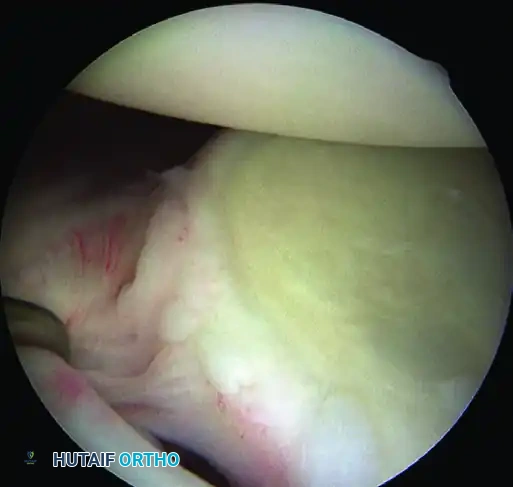
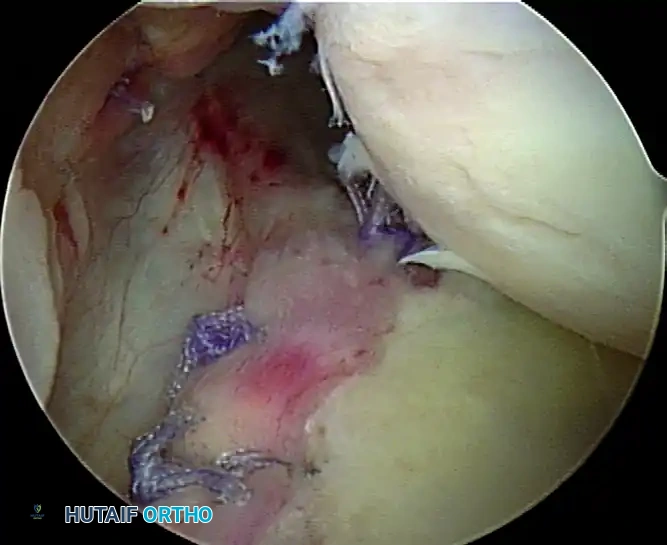
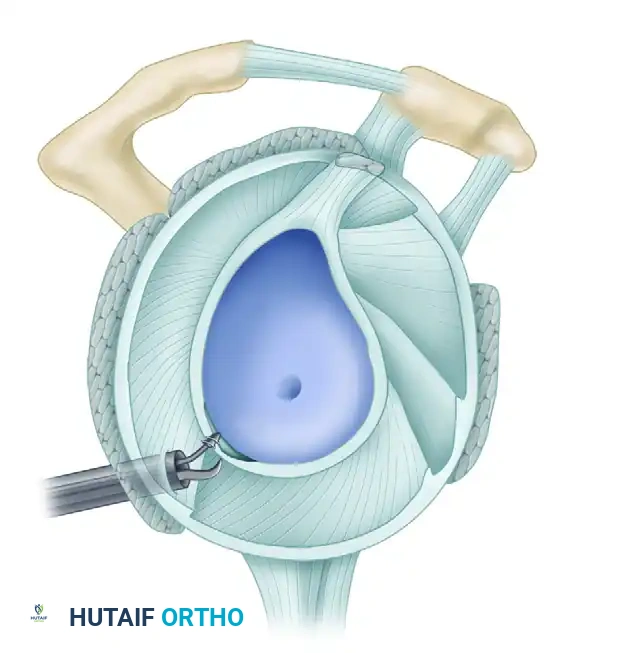
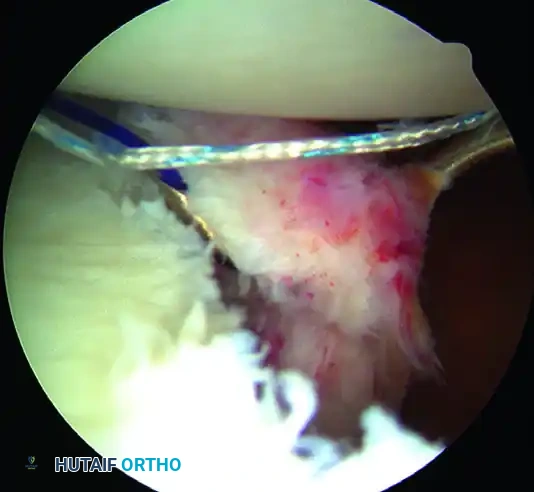
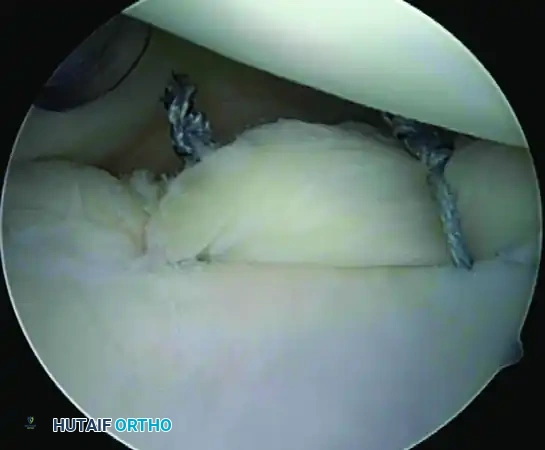
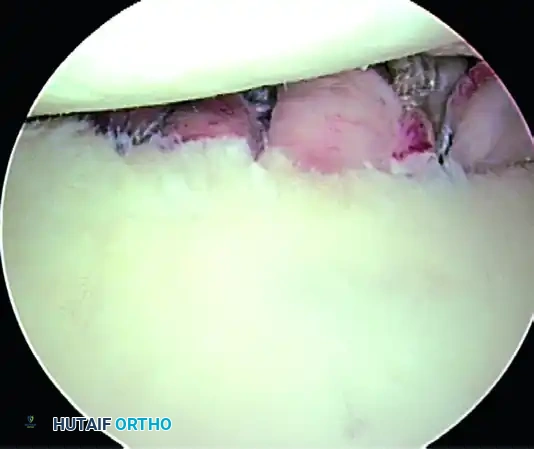
5. Recreating the Anterior Bumper
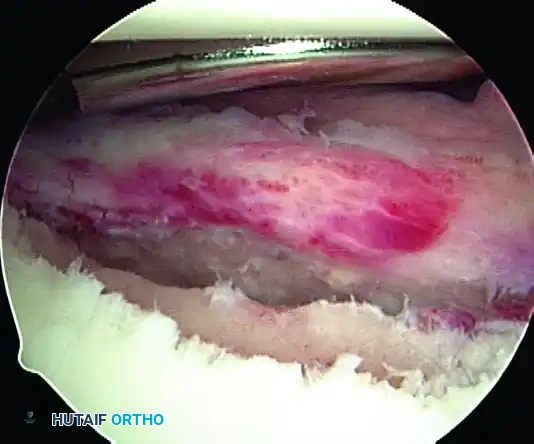
Proceed superiorly, placing the second and third double-loaded anchors. Firmly secure the sutures, compressing the capsuloligamentous complex to the abraded bone surface. This "loop and knot fixation" rolls the tissue up onto the glenoid face, recreating a robust anterior soft-tissue bumper.
D, Knots tied re-creating soft tissue bumper.
B, Restored anterior labral bumper (arthroscopic view).
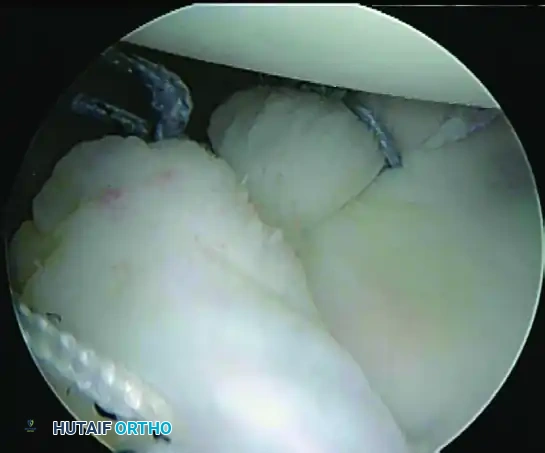
C, Restored anterior labral bumper (alternate angle).
6. Rotator Interval Closure
If the patient exhibits baseline hyperlaxity and a significant sulcus sign that persists after the Bankart repair, a rotator interval closure is mandatory to address the superior glenohumeral ligament (SGHL) and coracohumeral ligament (CHL) laxity.
- Withdraw the anterior central cannula just outside the capsule.
- Pass a crescent Spectrum needle through the IGHL, several millimeters into the ligament, and into the joint.
- Maintain one limb outside the capsule. Retrieve the intra-articular limb using a penetrator device at the level of the SGHL.
- Tie the sutures extracapsularly using an SMC knot. Generally, two sutures are sufficient. The slight loss of external rotation is a necessary trade-off for the added inferior stability.
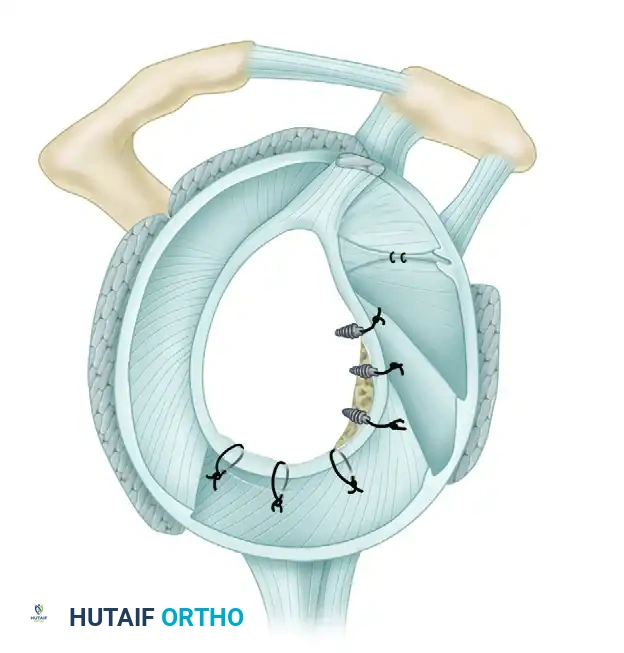
Completed Bankart repair with three anchors and capsule plicated inferiorly. Rotator interval is closed.
Final Construct Verification
Evaluate the final repair. The drive-through sign should be eliminated, the humeral head should be centered on the glenoid, and a prominent anterior bumper should be visible.
A, Repaired glenoid avulsion of the glenohumeral ligament.
B, Repaired juvenile glenoid avulsion.
C, Completed bony Bankart repair.
Close the portals with subcuticular poliglecaprone 25 (Monocryl) and apply a sterile dressing. Place the patient in an Ultrasling (DJD, Vista, CA) prior to extubation.
Postoperative Rehabilitation Protocol
A supervised, goal-oriented rehabilitation program is critical to protect the repair while restoring functional kinematics.
- Weeks 0 to 4-6: The patient is strictly immobilized in a sling. Pendulum exercises may be permitted depending on tissue quality, but active external rotation is restricted to protect the subscapularis and anterior capsule.
- Weeks 2 to 8: Formal physical therapy commences. Active-assisted range of motion (AAROM) is initiated, gradually increasing forward flexion and external rotation in a protected arc.
- Weeks 8 to 12: Transition to isometric strengthening of the rotator cuff and periscapular stabilizers.
- 12 Weeks: The athlete is permitted to return to pre-injury conditioning programs and light weight training.
- 6 Months: Return to contact sports is permitted, strictly contingent upon the patient achieving full, symmetrical range of motion and demonstrating isokinetic strength equal to the contralateral shoulder.
📚 Medical References
- arthroscopic Bankart repairs: signifi cance of the inverted-pear glenoid and the humeral engaging Hill-Sachs lesion, Arthroscopy 16:677, 2000.
- Cave EF, Rowe CR: Capsular repair for recurrent dislocation of shoulder: pathologic fi ndings and operative technic, Surg Clin North Am 27:1289, 1947.
- Chen AL, Hunt SA, Hawkins RJ, et al: Management of bone loss associated with recurrent anterior glenohumeral instability, Am J Sports Med 33:912, 2005.
- Cofi eld RH, Irving JF: Evaluation and classifi cation of shoulder instability: with special reference to examination under anesthesia, Clin Orthop Relat Res 223:32, 1987.
- Cofi eld RH, Nessler JP, Weinstabl R: Diagnosis of shoulder instability by examination under anesthesia, Clin Orthop Relat Res 291:45, 1993.
- Connolly JF: Humeral head defects associated with shoulder dislocations—their diagnostic and surgical signifi cance, Instr Course Lect 21:42, 1972.
- Cordasco FA, Pollock RG, Flatow EL, et al: Management of multidirectional instability, Oper Tech Sports Med 1:293, 1993.
- Danzig LA, Greenway G, Resnick D: The Hill-Sachs lesion: an experimental study, Am J Sports Med 8:328, 1980.
- Danzig L, Resnick D, Greenway G: Evaluation of unstable shoulders by computed tomography: a preliminary study, Am J Sports Med 10:138, 1982.
- Deitch J, Mehlman CT, Foad SL, et al: Traumatic anterior shoulder dislocation in adolescents, Am J Sports Med 31:758, 2003.
- Diaz JA, Cohen SB, Warren RF, et al: Arthrodesis as a salvage procedure for recurrent instability of the shoulder, J Shoulder Elbow Surg 12:237, 2003.
- Dickson JW, Devas MB: Bankart’s operation for recurrent dislocation of the shoulder, J Bone Joint Surg 39B:114, 1957.
- du Toit GT, Roux D: Recurrent dislocation of the shoulder: a twenty-four year study of the Johannesburg stapling operation, J Bone Joint Surg 38A:1, 1956.
- Eden R: Zur Operation der habituellen Schulterluxation unter Mitteilung eines neuen Verfahrens bei Abriss am inneren Pfannenrand, Dtsch Z Chir 144:269, 1918.
- Ferlic DC, DiGiovine NM: A long-term retrospective study of the modifi ed Bristow procedure, Am J Sports Med 16:469, 1988.
- Field LD, Warren RF, O’Brien SJ, et al: Isolated closure of rotator interval defects for shoulder instability, Am J Sports Med 23:557, 1995.
- Fronek J, Warren RF, Bowen M: Posterior subluxation of the glenohumeral joint, J Bone Joint Surg 71A:205, 1989.
- Fuchs B, Jost B, Gerber C: Posterior-inferior capsular shift for the treatment of recurrent, voluntary posterior subluxation of the shoulder, J Bone Joint Surg 82A:16, 2000.
- Gallie WE, LeMesurier AB: Recurring dislocation of the shoulder, J Bone Joint Surg 30B:9, 1948.
- Garth WP Jr, Allman FL, Armstrong WS: Occult anterior subluxations of the shoulder in noncontact sports, Am J Sports Med 15:579, 1987.
- Garth WP Jr, Slappey CE, Ochs CW: Roentgenographic demonstration of instability of the shoulder: the apical oblique projection, J Bone Joint Surg 66A:1450, 1984.
- Gerber C, Ganz R, Vinh TS; Glenoplasty for recurrent
You Might Also Like