Patellar Tendon Repair via Transosseous Drill Holes: A Comprehensive Surgical Guide

Key Takeaway
The transosseous drill hole technique remains a gold-standard approach for acute patellar tendon ruptures, particularly at the tendon-bone junction. This procedure involves creating a bony trough at the inferior patellar pole, passing heavy nonabsorbable sutures through longitudinal transosseous tunnels, and meticulously restoring patellar height. Proper execution prevents patella baja and restores extensor mechanism biomechanics, ensuring optimal functional recovery for the patient.
Introduction to Patellar Tendon Ruptures
Disruption of the knee extensor mechanism via patellar tendon rupture is a profoundly debilitating injury that mandates prompt surgical intervention. Occurring most frequently in patients under the age of 40 following an eccentric quadriceps contraction with a flexed knee, these ruptures typically manifest at the proximal tendon-bone junction (the inferior pole of the patella).
While suture anchor constructs have gained popularity in recent years, the classic transosseous drill hole repair remains a highly reliable, biomechanically robust, and cost-effective gold standard. This technique allows for excellent biological healing by docking the tendon directly into a bleeding cancellous bone trough.
This comprehensive guide details the surgical execution of the transosseous repair, emphasizing meticulous tissue handling, precise restoration of patellar height, and advanced augmentation techniques for compromised tissue.
Surgical Anatomy and Biomechanics
A profound understanding of the extensor mechanism's anatomy is critical for a successful repair. The patellar tendon is a flat, robust ligamentous structure originating from the inferior pole of the patella and inserting onto the tibial tubercle.
Clinical Pearl: The patellar tendon is not a true tendon but rather a ligament connecting two bones (patella to tibia). However, its functional role in transmitting the force of the quadriceps muscle makes its precise anatomical restoration vital for normal knee kinematics.
The Infrapatellar Branch of the Saphenous Nerve
During the anterior approach to the knee, the infrapatellar branch of the saphenous nerve is frequently encountered crossing from medial to lateral over the proximal tibia and patellar tendon. Iatrogenic injury to this nerve can result in painful neuromas or bothersome numbness over the anterolateral aspect of the proximal leg.
Patellofemoral Kinematics
The patella acts as a fulcrum, increasing the mechanical advantage of the quadriceps. If the patellar tendon is repaired with excessive tension, patella baja (an abnormally low-riding patella) ensues. This severely alters patellofemoral contact pressures, leading to early chondral wear, anterior knee pain, and restricted range of motion. Conversely, inadequate tensioning results in an extensor lag.
Preoperative Planning and Patient Positioning
Imaging
Standard anteroposterior (AP) and lateral radiographs of the knee are mandatory. The lateral radiograph will demonstrate patella alta (high-riding patella), confirming the disruption of the extensor mechanism. Magnetic Resonance Imaging (MRI) is highly beneficial for assessing the exact location of the tear, the quality of the remaining tendon stump, and any concurrent intra-articular pathology.
Positioning and Anesthesia
- Anesthesia: The procedure is typically performed under general or regional anesthesia (spinal), often supplemented with a regional nerve block (e.g., adductor canal block) for postoperative pain control.
- Positioning: Place the patient in the supine position on a standard radiolucent operating table.
- Tourniquet: Apply a well-padded pneumatic tourniquet high on the proximal thigh.
- Preparation: Prep and drape the surgical limb in a standard sterile fashion, allowing for full, unencumbered flexion and extension of the knee.
Surgical Technique: Step-by-Step
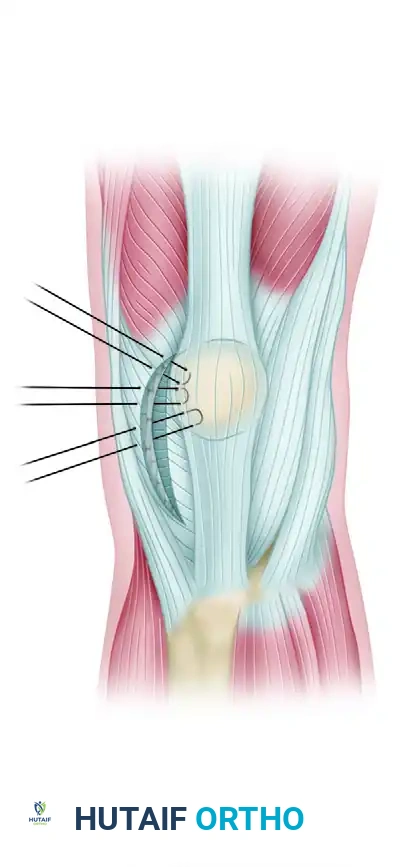
1. Surgical Approach and Dissection
- Incision: Make a longitudinal midline incision centered directly over the palpable defect in the patellar tendon. This extensile approach allows for proximal and distal extension if augmentation is required.
- Subcutaneous Dissection: Perform careful subcutaneous dissection to expose the area of the rupture.
- Nerve Management: Meticulously identify the infrapatellar branch of the saphenous nerve. Gently mobilize and retract it out of the surgical field.
Surgical Warning: The patient must be explicitly informed during the preoperative consent process that there will likely be a permanent area of anesthesia or altered sensation lateral to the incision, regardless of how carefully the nerve is handled.
- Peritenon Exposure: Use sharp dissection to open the peritenon longitudinally in the midline, extending both proximally and distally from the defect to fully expose the tendon ends.
2. Tendon Preparation and Trough Creation
- Debridement: Carefully realign the tear. Because the rupture most commonly occurs at the proximal tendon-bone junction, the distal stump must be mobilized and replaced into its anatomical footprint to allow for normal patellar tracking. Debride any necrotic or severely contused tissue, but preserve as much tendon length as possible.
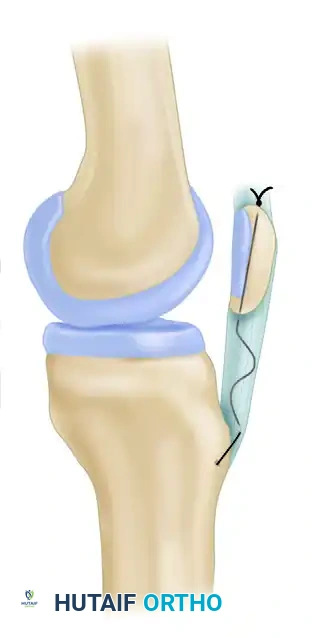
- Bony Preparation: Using a rongeur or a high-speed burr, create a small, horizontal cancellous bone trough at the inferior pole of the patella. This bleeding bone bed is critical for the biological integration of the repaired tendon.
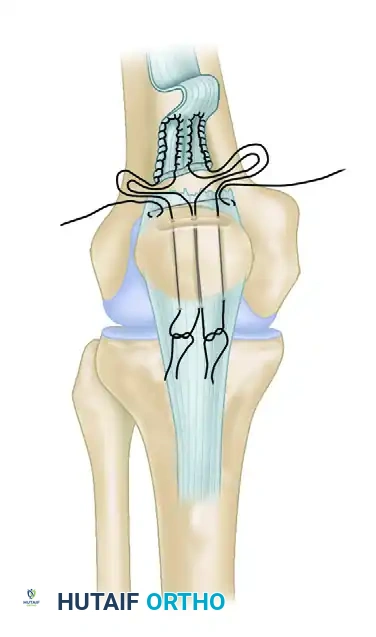
3. Suture Configuration and Transosseous Drilling
- Suture Placement: Place three horizontal mattress sutures using heavy, No. 5 nonabsorbable braided suture (e.g., FiberWire or Ethibond) through the proximal aspect of the patellar tendon stump. Ensure these sutures take a robust bite of the healthy tendon tissue.
- Drill Holes: Drill three parallel, longitudinal transosseous tunnels (typically 2.5 mm to 3.0 mm in diameter) starting from the prepared trough at the inferior pole and exiting at the superior pole of the patella.
- Suture Passing: Utilize a suture passer or a Beath pin to draw the suture limbs through the drilled holes in the patella. This action draws the tendon stump securely into the prepared bony trough at the inferior pole.

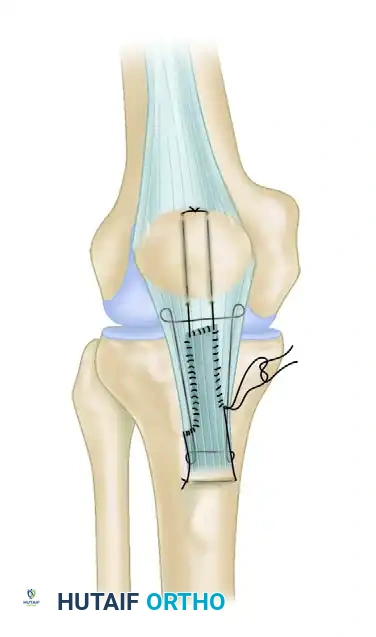
4. Restoring Patellar Height and Tensioning
This is arguably the most critical step of the procedure to prevent postoperative complications.
- Positioning for Tensioning: Flex the knee to exactly 45 degrees.
- Assessing Height: Place a hemostat or a rigid straight edge parallel to the roof of the intercondylar notch (Blumensaat's line) on the lateral aspect of the knee.
- Verification: To ensure that patella baja has not been iatrogenically produced, verify that the inferior pole of the patella sits at, or just slightly above, the level of the hemostat. Intraoperative fluoroscopy can be utilized to confirm the Insall-Salvati ratio if there is any ambiguity.
Pitfall: Over-tensioning the repair is a common error. It is far more difficult to correct a stiff, painful knee caused by patella baja than it is to rehabilitate a knee with a slight extensor lag. Always tension the repair at 45 degrees of flexion, never in full extension.
5. Knot Tying and Retinacular Repair
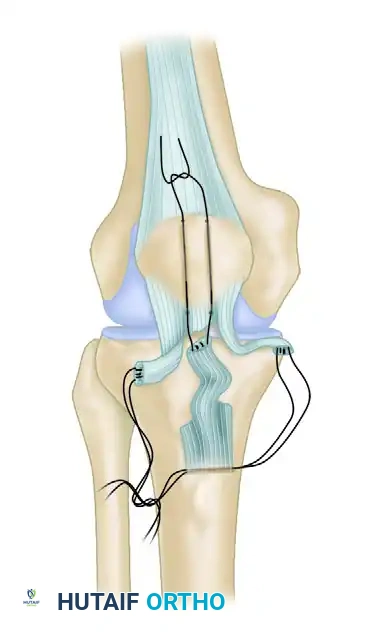
- Securing the Repair: With the knee held at 45 degrees of flexion and the patellar height confirmed, tie the nonabsorbable sutures over the superior pole of the patella.
- Burying the Knots: Bury the bulky suture knots superior to the patella, deep to the quadriceps tendon. Hold them in this recessed position while closing the two vertical windows in the quadriceps tendon using No. 0 absorbable sutures.
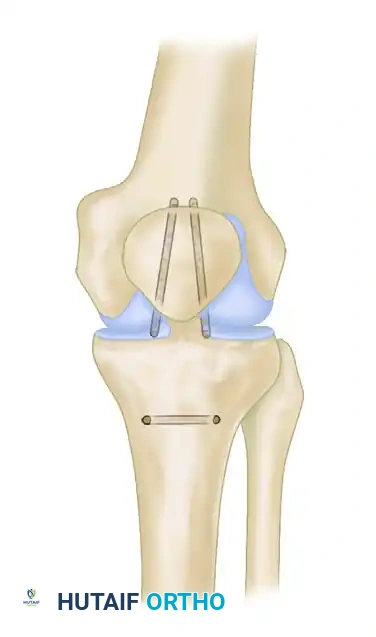
- Articular Alignment: Ensure the tendon is repaired adjacent to the articular surface of the patella, not anteriorly.
Biomechanical Imperative: Failure to repair the tendon adjacent to the articular surface creates an abnormal moment arm, causing anterior tilting of the patella. This significantly increases patellofemoral contact forces, leading to accelerated arthrosis and chronic pain.
- Retinacular Repair: The medial and lateral retinacula are almost always torn in conjunction with the patellar tendon. Identify the full extent of these tears and meticulously repair them using No. 0 absorbable sutures or No. 2 nonabsorbable sutures. This step is vital for restoring the coronal plane stability of the patella.
Advanced Techniques for Compromised Tissue
Management of the Extensively Frayed Tendon
In cases of delayed presentation, chronic tendinopathy, or severe high-energy trauma, the patellar tendon may be extensively frayed, rendering standard mattress sutures insufficient for secure fixation.
- Interlocking Suture Technique: Utilize two running interlocking (Krackow-style) No. 5 nonabsorbable sutures to secure the medial and lateral bundles of the frayed tendon.
- Transosseous Routing: Use a suture retriever or Beath pin to thread the suture strands through 3-mm drill tunnels. Route one tunnel horizontally through the tibial tubercle and two tunnels vertically through the patella.
- Biological Augmentation: If secure fixation still cannot be obtained due to poor tissue quality, the repair must be augmented. Harvest the ipsilateral semitendinosus or gracilis tendon and weave it through the patella and tibial tubercle to act as a biological scaffold and load-sharing device.
Repair of Midsubstance Ruptures
While less common than proximal avulsions, true midsubstance ruptures require a modified approach to ensure the tendon ends do not gap during healing.
- Suture Configuration: Repair midsubstance ruptures using running interlocking sutures placed in both the proximally and distally based tendon bundles.
- Fixation: Secure these sutures through parallel vertical holes drilled in the patella and a transverse hole drilled in the tibial tuberosity.
- Bundle Repair: After the appropriate tendon length is determined and the heavy sutures are tied, repair the individual tendon bundles side-to-side with finer absorbable sutures to optimize the biological healing environment.
Mechanical Augmentation (Tension Band Wiring)
If the repair is tenuous, or if the patient is anticipated to be non-compliant with postoperative restrictions, mechanical protection of the repair is warranted.
- Circumferential Wire: Place a circumferential tension suture of No. 5 nonabsorbable suture or a stainless steel box wire (cerclage) around the superior pole of the patella and through a transverse drill hole in the tibial tubercle. This acts as an internal splint, offloading the primary repair during early rehabilitation.
Postoperative Care and Rehabilitation Protocol
The postoperative rehabilitation following a transosseous patellar tendon repair must balance the need to protect the healing tendon-bone interface with the necessity of preventing arthrofibrosis.
Phase I: Maximum Protection (Weeks 0 to 3)
- Immobilization: Immediately postoperatively, the limb is placed in a cylinder cast or a hinged knee brace locked in full extension.
- Weight Bearing: Weight bearing to tolerance (WBAT) is generally allowed with the knee locked in extension, utilizing crutches for support. The locked extension prevents eccentric loading of the repair.
- Therapy: Isometric quadriceps sets and straight-leg raising (SLR) exercises are initiated at 3 weeks, provided the patient can perform them without an extensor lag.
Phase II: Controlled Motion (Weeks 4 to 6)
- Brace Modification: At 6 weeks, if a cast was used, it is removed. The patient is transitioned to a controlled motion hinged brace.
- Range of Motion (ROM): The brace is initially unlocked to allow a ROM of 0 to 45 degrees.
- Progression: Flexion is gradually increased by 10 to 15 degrees each subsequent week, guided by the patient's tolerance and the surgeon's assessment of the repair's integrity.
Phase III: Strengthening and Weaning (Weeks 7 to 12+)
- Ambulation: Crutches are utilized for ambulation in the brace until the patient has regained sufficient quadriceps strength (typically able to perform a straight leg raise without a lag) and adequate motion.
- Hardware Removal: If a tension wire or heavy cerclage cable was utilized to protect the repair, it can cause local irritation. This hardware is electively removed at 10 to 12 weeks under local or light general anesthesia, once clinical and radiographic healing is assured.
- Return to Sport: Return to high-impact activities or sports is generally delayed until 6 to 9 months postoperatively, contingent upon the restoration of at least 85-90% of the contralateral limb's quadriceps strength and full, pain-free range of motion.
Conclusion
The transosseous drill hole technique for patellar tendon repair is a foundational procedure in operative orthopaedics. By adhering strictly to the principles of anatomical footprint restoration, meticulous tensioning at 45 degrees of flexion, and robust retinacular repair, the orthopedic surgeon can reliably restore the extensor mechanism. Careful attention to the postoperative rehabilitation protocol ensures that the biological repair matures into a functionally stable and pain-free knee.
You Might Also Like