Talonavicular Joint Arthrodesis: Comprehensive Surgical Guide
Key Takeaway
Talonavicular joint arthrodesis is a powerful procedure for addressing severe midfoot arthritis, deformity, and instability. By eliminating motion at the talonavicular articulation—the keystone of the Coxa Pedis—surgeons can effectively restore the medial longitudinal arch and correct hindfoot malalignment. This guide details the precise surgical technique, from the dorsomedial approach and meticulous joint preparation to rigid internal fixation and structured postoperative rehabilitation.
Introduction to Talonavicular Joint Arthrodesis
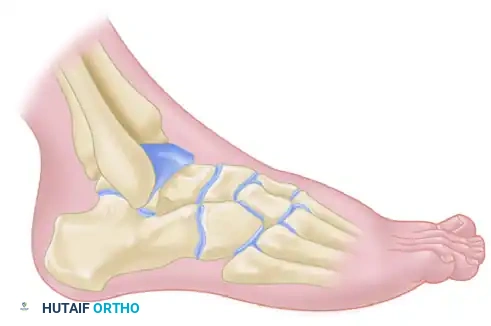
The talonavicular joint is the biomechanical keystone of the medial longitudinal arch and the primary functional component of the transverse tarsal joint (Chopart's joint). Often referred to anatomically as the acetabulum pedis or coxa pedis, the articulation between the spherical head of the talus and the concave proximal articular surface of the navicular dictates the complex triplanar motion of the hindfoot and midfoot.
Talonavicular joint arthrodesis is a highly effective, workhorse orthopedic procedure utilized to eradicate pain, correct severe deformity, and restore stability in patients suffering from advanced degenerative joint disease, inflammatory arthropathies, or profound adult-acquired flatfoot deformity (posterior tibial tendon dysfunction). Because the talonavicular joint acts as the universal joint of the foot, its isolated fusion has profound biomechanical implications, effectively locking the transverse tarsal joint and eliminating nearly all subtalar motion. Consequently, meticulous surgical technique, precise anatomical alignment, and rigid internal fixation are paramount to achieving a successful, functional outcome and avoiding the notoriously high nonunion rates associated with this specific articulation.
Biomechanics and Surgical Rationale
Understanding the biomechanics of the talonavicular joint is critical for any orthopedic surgeon undertaking this arthrodesis. Classic biomechanical studies, notably by Astion et al., have demonstrated that isolated fusion of the talonavicular joint restricts subtalar joint motion to approximately 2 degrees (eliminating roughly 90% of its native excursion) and restricts calcaneocuboid motion to roughly 2 degrees.
💡 Clinical Pearl: The "Locking" Effect
Because the talonavicular and calcaneocuboid joints function in tandem as the transverse tarsal joint, arthrodesis of the talonavicular joint effectively "locks" the entire hindfoot complex. This makes isolated talonavicular arthrodesis an incredibly powerful tool for stabilizing a collapsing arch in Stage III posterior tibial tendon dysfunction, but it also places immense stress on adjacent joints, predisposing the patient to adjacent segment disease over time.
Due to the spherical nature of the talar head, the joint experiences significant shear forces during the gait cycle. Furthermore, the vascular watershed zones of the navicular and the retrograde blood supply of the talus make this joint particularly susceptible to nonunion. The reported nonunion rate for isolated talonavicular arthrodesis ranges from 5% to 15%, which is the highest among the joints typically included in a triple arthrodesis. Therefore, meticulous joint preparation, preservation of subchondral architecture, and absolute rigid compression are non-negotiable technical requirements.
Indications and Contraindications
Primary Indications
- Osteoarthritis: Advanced, symptomatic primary or post-traumatic osteoarthritis of the talonavicular joint that has failed exhaustive conservative management (e.g., custom orthotics, rigid AFOs, NSAIDs, corticosteroid injections).
- Rheumatoid Arthritis: Inflammatory arthropathy leading to joint destruction, subluxation, and severe midfoot collapse.
- Adult-Acquired Flatfoot Deformity (AAFD): Stage III posterior tibial tendon dysfunction characterized by a rigid, non-reducible hindfoot valgus and forefoot abduction deformity.
- Neuropathic Arthropathy: Selected cases of Charcot neuroarthropathy requiring stabilization of the midfoot, provided the acute inflammatory phase has resolved.
- Congenital Deformities: Severe, neglected, or recurrent clubfoot or vertical talus deformities in adults.
Contraindications
- Absolute: Active local or systemic infection, severe peripheral arterial disease (inadequate vascular inflow to support bone healing), and medically unstable patients.
- Relative: Active Charcot arthropathy (Eichenholtz Stage I), severe osteopenia (which may compromise hardware purchase), and heavy tobacco use (significantly increases the risk of nonunion).
Preoperative Planning and Patient Positioning
Radiographic Assessment
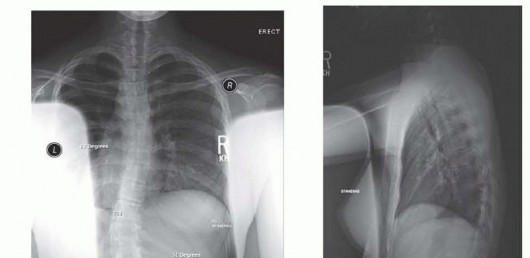
Standard weight-bearing radiographs of the foot and ankle (anteroposterior, lateral, and oblique views) are mandatory. The AP view assesses talonavicular uncoverage and forefoot abduction, while the lateral view evaluates the collapse of the medial longitudinal arch (Meary's angle, talocalcaneal angle) and the presence of dorsal osteophytes. A computed tomography (CT) scan is highly recommended to evaluate the exact extent of cystic changes, subchondral sclerosis, and bone stock, which will dictate the need for supplemental bone grafting.
Patient Positioning
- The patient is placed in the supine position on a standard radiolucent operating table.
- A bump (sandbag or gel pad) is placed beneath the ipsilateral hip to internally rotate the leg slightly, bringing the foot into a neutral, directly vertical position. This prevents the natural tendency of the leg to externally rotate, which would obscure the medial approach.
- A well-padded pneumatic tourniquet is applied to the ipsilateral thigh or proximal calf, depending on surgeon preference and patient vascular status.
- The limb is prepped and draped in a standard sterile orthopedic fashion, ensuring the iliac crest is accessible if autogenous bone grafting is anticipated.
Surgical Technique: Step-by-Step
1. Incision and Exposure
The approach to the talonavicular joint must provide adequate exposure while respecting the delicate medial soft tissue envelope.
- Make a longitudinal incision beginning just distal to the tip of the medial malleolus. Extend the incision distally along the medial or dorsomedial aspect of the talonavicular joint, terminating at the level of the naviculocuneiform joint.
- Carry the dissection meticulously through the subcutaneous tissue and fat.
- Structures at Risk: Identify and carefully retract the terminal branches of the saphenous nerve and the medial marginal vein.
- Expose the deep fascia and the joint capsule. The anterior tibial tendon will be visible at the dorsal margin of the wound; protect it beneath the dorsal skin flap using a blunt retractor (e.g., a Senn or small Hohmann retractor). The posterior tibial tendon lies plantar to the incision and must be preserved unless it is being formally reconstructed or transferred.
2. Capsular Release and Joint Distraction
- Perform a thorough capsulotomy. Release the capsule medially, dorsally, and plantarward to allow for adequate distraction of the joint.
- The plantar release is particularly critical but must be done cautiously to avoid injury to the spring ligament complex and the plantar neurovascular bundle.
- To achieve adequate visualization of the highly curved talar head, distraction is necessary. Place a stout towel clip or a 4.0 mm Schanz pin into the dorsomedial surface of the navicular. Use this to apply longitudinal traction, effectively opening the talonavicular articulation. Alternatively, a small lamina spreader can be inserted into the joint, though care must be taken not to crush the subchondral bone that will be needed for structural support.
3. Joint Preparation
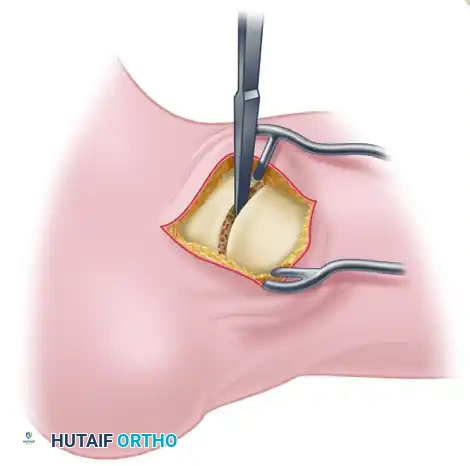
The preparation of the articular surfaces is the most critical step in preventing nonunion. The goal is to remove all hyaline cartilage down to healthy, bleeding subchondral bone while preserving the native spherical contour of the joint. Preserving this "ball-and-socket" architecture allows for multi-planar correction of the deformity prior to fixation.
- Using a small, curved osteotome, sharp curettes, or a high-speed burr, meticulously remove the articular cartilage from both the talar head and the proximal navicular.
- Remove as much of the articular surface as possible through the medial incision.
- Dynamic Preparation: Because the talar head is spherical, it is impossible to access the entire surface from a static position. By systematically abducting, adducting, plantar flexing, and dorsiflexing the ankle and midfoot during distraction, the surgeon can rotate different aspects of the talar head into the surgical window. This dynamic maneuver allows for the preparation of up to 90% of the talonavicular articulation.
- Once the cartilage is removed, use a 2.0 mm drill bit or a sharp osteotome to "fish-scale" or fenestrate the subchondral bone. This breaks the sclerotic subchondral plate and allows osteoprogenitor cells and vascular ingrowth to cross the arthrodesis site.
⚠️ Surgical Warning: Avoid Flat Cuts
Do not use a saw to make flat, planar cuts across the talonavicular joint unless there is severe, uncorrectable deformity or massive bone loss. Flat cuts shorten the medial column, exacerbate flatfoot deformity, and eliminate the inherent stability of the native ball-and-socket joint configuration.
4. Deformity Correction and Alignment
Proper alignment of the arthrodesis dictates the functional outcome of the entire foot.
- Place the foot into satisfactory alignment. The calcaneus should be positioned in 5 to 10 degrees of valgus relative to the tibia.
- The forefoot must be positioned in neutral abduction and adduction.
- Correction of Supination: In chronic flatfoot deformities, the forefoot often develops a fixed supination deformity relative to the hindfoot. Do not leave the forefoot supinated. Once the heel is reduced into its proper valgus position and the talonavicular joint is apposed, manually derotate (pronate) the forefoot to ensure the first ray is plantarflexed and capable of bearing weight.
- Temporarily fix the joint using multiple smooth 2.0 mm Kirschner wires (K-wires). Verify the alignment both clinically (simulating weight-bearing by loading the plantar surface of the foot) and fluoroscopically (AP, lateral, and axial heel views).
5. Hardware Templating and Fixation
Rigid, compressive internal fixation is required to counteract the high shear forces across the talonavicular joint.
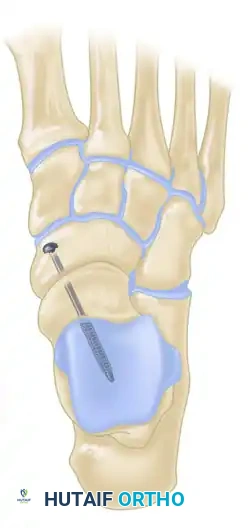
- Preparation of the Entry Portal: Make a small trough or countersink in the dorsomedial edge of the medial cuneiform or the distal navicular. This ensures that the screw head will sit flush against the bone, preventing it from levering on the hard cortical edge, which can lead to stress risers, hardware prominence, or loss of compression.
- Guidewire Placement: Place a guidewire starting from the medial plantar aspect (at the prepared trough), directing it laterally and dorsally, crossing the center of the navicular and entering the dense bone of the head and neck portion of the talus. Fluoroscopy is used to confirm that the wire is centrally located within the talar neck and does not penetrate the subtalar or ankle joints.
- Drilling and Tapping: Drill parallel to the wire, or ream directly over it if utilizing a cannulated screw system. Measure the required length of the screw.
- Bone Quality Considerations: Tapping the screw path is generally required in patients with dense, sclerotic bone typical of osteoarthritis. However, tapping is usually not needed—and may actually compromise purchase—in patients with severe osteopenia or rheumatoid arthritis.
- Screw Insertion: Using a partially threaded, 6.5-mm or 7.0-mm cancellous lag screw, compress the articular surfaces together. The threads must fully bypass the arthrodesis site and reside entirely within the talus to achieve true interfragmentary compression.
- Alternative Fixation: Occasionally, the bone is so osteopenic that the screw head will sink into the cortex; in these cases, a washer is mandatory. Alternatively, two 4.0-mm or 4.5-mm fully threaded cancellous screws can be utilized using a standard lag technique (over-drilling the near cortex of the navicular to create a gliding hole). Two screws provide superior rotational stability compared to a single central screw.
- Confirm final hardware placement and joint compression with multi-planar fluoroscopy.
6. Closure
- Thoroughly irrigate the wound with sterile saline to remove bone debris.
- Release the pneumatic tourniquet and achieve meticulous hemostasis.
- Insert a closed-suction drain if there is excessive oozing or if extensive bone grafting was performed.
- Close the capsule and deep fascial layers using heavy absorbable sutures (e.g., 2-0 Vicryl) to eliminate dead space.
- Close the subcutaneous tissue with inverted interrupted absorbable sutures, and close the skin with non-absorbable monofilament (e.g., 3-0 or 4-0 Nylon) using a vertical mattress or simple interrupted technique.
- Apply a sterile, non-adherent dressing, followed by a bulky, well-padded compression dressing and a rigid posterior short-leg splint with the ankle in neutral dorsiflexion.
Postoperative Care and Rehabilitation Protocol
The postoperative protocol must balance the need for rigid immobilization to ensure bone healing with the eventual need for functional rehabilitation. Because of the high risk of nonunion, strict adherence to weight-bearing restrictions is critical.
Phase 1: Immediate Postoperative (0 to 2 Weeks)
- The patient is strictly non-weightbearing (NWB) on the operative extremity.
- Elevation of the limb above heart level is emphasized to minimize edema and promote wound healing.
- If a drain was placed, it is typically removed on postoperative day 1 prior to discharge.
- At 10 to 14 days after surgery, the patient returns to the clinic. The splint and dressings are removed, and the surgical wound is inspected. Sutures are removed if the incision is fully healed.
- A rigid, short-leg, non-weightbearing fiberglass cast is applied.
Phase 2: Intermediate Immobilization (2 to 5 Weeks)
- The patient remains strictly non-weightbearing in the short-leg cast.
- Deep vein thrombosis (DVT) prophylaxis may be continued based on patient risk factors and institutional protocols.
- At the 5-week mark (or 6 weeks, depending on surgeon preference and radiographic appearance), the cast is removed, and interval weight-bearing radiographs (AP, lateral, oblique) are obtained out of the cast.
Phase 3: Transition to Weight-Bearing (5 to 11 Weeks)
- If radiographs at 5 to 6 weeks demonstrate early evidence of trabecular bridging and clinical union (absence of pain or warmth at the surgical site), the patient is transitioned to a short-leg walking cast or a rigid controlled ankle motion (CAM) boot.
- The patient is allowed to progressively bear weight as tolerated in the walking cast/boot for the next 6 weeks.
- Physical therapy may be initiated to maintain knee and hip strength, though ankle and hindfoot motion remains immobilized.
Phase 4: Maturation and Rehabilitation (12 Weeks and Beyond)
- At 12 weeks post-surgery, repeat radiographs are obtained.
- If solid union of the arthrodesis site is evident radiographically and clinically, no further rigid immobilization is required. The patient may transition to supportive athletic shoes, often utilizing a custom orthotic or rigid carbon fiber plate to support the medial arch.
- Delayed Union Protocol: If the arthrodesis site is not solidly fused at 12 weeks, another short-leg walking cast or CAM boot should be applied, and the arthrodesis should be re-evaluated with radiographs or a CT scan in 1 month.
- Physical therapy focuses on gait retraining, proprioception, and strengthening of the extrinsic foot musculature (anterior tibial, peroneals, and gastrocnemius-soleus complex).
Complications and Management
- Nonunion/Delayed Union: As previously noted, the talonavicular joint has a high propensity for nonunion. If an asymptomatic nonunion occurs, it may be observed. Symptomatic nonunions require revision surgery, typically involving removal of hardware, aggressive debridement of the fibrous nonunion, structural autogenous bone grafting (e.g., iliac crest), and revision internal fixation, often augmented with orthobiologics or a medial column plating system.
- Malunion: Fusing the joint in excessive varus or forefoot supination will lead to lateral column overload, fifth metatarsal stress fractures, and severe gait dysfunction. Prevention through meticulous intraoperative alignment is key. Corrective osteotomies are required for symptomatic malunions.
- Hardware Prominence: The medial soft tissue envelope is thin. Screw heads, particularly if not adequately countersunk into the navicular or cuneiform, can cause painful bursa formation or skin irritation, necessitating hardware removal after solid bony union is achieved (typically after 6-12 months).
- Adjacent Segment Disease: By locking the transverse tarsal joint, increased stress is transferred to the subtalar, calcaneocuboid, and naviculocuneiform joints. Over years or decades, patients may develop secondary osteoarthritis in these adjacent joints, which may eventually require extension of the arthrodesis.
You Might Also Like