Posterior Approaches to the Lumbar Spine and Sacroiliac Joint: A Master Surgical Guide
Key Takeaway
The posterior approaches to the lumbar spine and sacroiliac joint provide critical access for decompression, arthrodesis, and trauma management. Mastering these techniques requires a profound understanding of paraspinal and gluteal anatomy to minimize hemorrhage and avoid neurovascular injury. This guide details the step-by-step execution of the midline lumbar exposure and the transosseous sacroiliac approach, emphasizing subperiosteal dissection principles and precise bone window creation for optimal surgical outcomes.
Introduction to Posterior Lumbosacral and Pelvic Exposures
The posterior approach to the lumbar spine and the sacroiliac (SI) joint remains the foundational workhorse for a vast array of orthopedic and neurosurgical procedures. From complex deformity correction and trauma stabilization to routine decompression and arthrodesis, mastering the posterior anatomical corridors is non-negotiable for the practicing spine and pelvic surgeon.
Historically, posterior exposures were plagued by significant intraoperative hemorrhage and postoperative paraspinal muscle atrophy—often termed "fusion disease." Modern surgical philosophy, however, dictates a meticulous, tissue-sparing approach. By exploiting avascular internervous and intermuscular planes, and by adhering strictly to subperiosteal dissection techniques, surgeons can dramatically reduce morbidity. This comprehensive guide details the classic midline posterior approach to the lumbar spine (incorporating Wagoner’s principles of hemostasis) and the highly specialized posterior transosseous approach to the sacroiliac joint as described by Ebraheim et al.
Part I: The Posterior Approach to the Lumbar Spine
The standard midline posterior approach provides extensile access to the spinous processes, laminae, facet joints, and transverse processes of the lumbar spine. It is the gold standard for laminectomy, posterior lumbar interbody fusion (PLIF), transforaminal lumbar interbody fusion (TLIF), and posterolateral gutter fusions.
Surgical Anatomy and Biomechanics
A profound understanding of the posterior paraspinal musculature and its vascular supply is the key to a bloodless exposure. The paraspinal musculature is arranged in three distinct layers:
1. Superficial Layer: Erector spinae aponeurosis.
2. Intermediate Layer: The erector spinae group, comprising the iliocostalis (lateral) and longissimus (medial).
3. Deep Layer: The transversospinalis group, predominantly the multifidus, which attaches directly to the spinous processes, laminae, and facet capsules.
Vascular Considerations:
The arterial supply to the posterior spinal muscles arises from the dorsal branches of the lumbar arteries. These vessels penetrate the musculature and send branches that course in a proximal-to-distal direction, entering the muscles at an acute angle relative to their insertion on the spinous processes.
Surgical Pearl: The Direction of Dissection
Dissecting from distal to proximal allows the periosteal elevator to strip the muscle insertions within the acute angle of the vascular branches, preserving the vessels and maintaining a relatively avascular field. Conversely, dissecting from proximal to distal drives the instrument directly into the muscle fibers, transecting the arterial branches and causing profuse, avoidable hemorrhage.
Indications and Contraindications
Indications:
* Lumbar spinal stenosis requiring multilevel laminectomy.
* Degenerative disc disease or spondylolisthesis necessitating PLIF/TLIF.
* Spinal trauma (fractures/dislocations) requiring posterior segmental instrumentation.
* Excision of posterior spinal column tumors or epidural abscesses.
Contraindications:
* Severe overlying soft tissue infection (relative).
* Pathology strictly confined to the anterior column where a posterior approach would require excessive neural retraction (e.g., massive central disc herniations above L2).
Patient Positioning and Preparation
- Positioning: Place the patient prone on a specialized spinal frame (e.g., Jackson table, Relton-Hall frame, or padded bolsters). The abdomen must hang completely free.
- Biomechanics of Positioning: Allowing the abdomen to hang free decreases intra-abdominal pressure, which in turn decompresses the inferior vena cava. This prevents engorgement of the epidural venous plexus (Batson's plexus), significantly reducing intraoperative epidural bleeding.
- Preparation: Standard wide surgical prep from the mid-thoracic spine to the gluteal cleft.
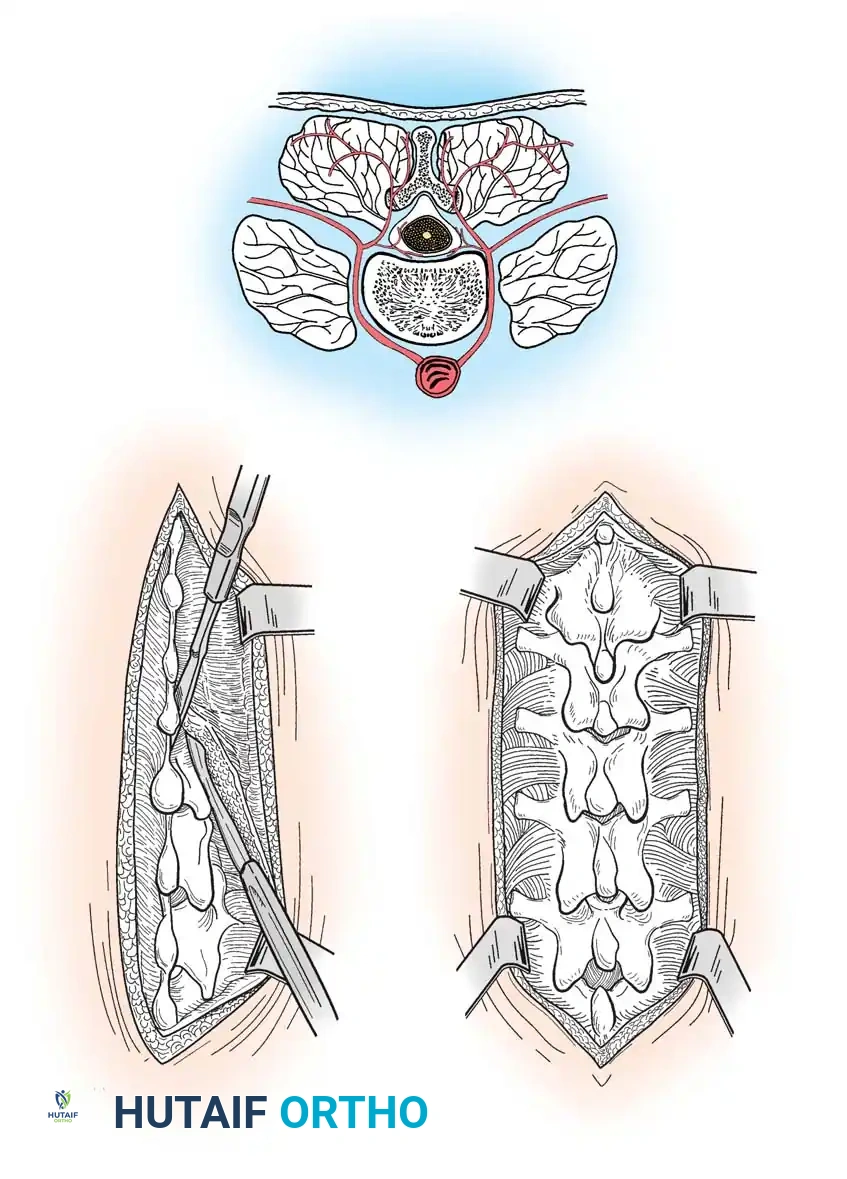
Step-by-Step Surgical Technique: Midline Lumbar Exposure
The following technique incorporates the principles of Wagoner to minimize hemorrhage during the exposure of the posterior elements.
1. Incision and Superficial Dissection
* Palpate the spinous processes and make a precise midline longitudinal skin incision centered over the targeted pathology.
* Deepen the incision through the subcutaneous fat to expose the glistening white lumbodorsal fascia and the supraspinous ligament.
* Apply self-retaining retractors to maintain tension on the soft tissues.
2. Fascial Incision and Initial Subperiosteal Elevation
* With a scalpel, precisely divide the supraspinous ligament longitudinally, directly over the tips of the spinous processes.
* Crucial Step: Begin the deep dissection at the most distal part of the wound.
* Insert a small, blunt periosteal elevator (such as a Cobb elevator) through the fascial opening so that its leading edge rests firmly on the junction of the spinous process and the lamina of the more proximal vertebra.
3. Distal-to-Proximal Muscle Stripping
* Move the handle of the elevator proximally and laterally. This maneuver places the multifidus and erector spinae muscles attached to the spinous process under tension.
* Using a scalpel or the sharp edge of the Cobb elevator, move from distal to proximal, stripping the muscles subperiosteally from the lateral surface of the spinous process.
* Maintain strict contact with the bone. The periosteum should peel away cleanly, taking the muscle attachments with it.
Fig. 34-28 Approach to posterior aspect of spine. A, Courses of arteries supplying posterior spinal muscles, showing proximity of internal muscular branches to spinous processes. B, Muscle insertions are freed subperiosteally from lateral side of spinous processes and interspinous ligaments; dissection proceeds proximally, with periosteal elevator being held against bases of spinous processes. C, Spinous processes, laminae, and articular facets exposed.
4. Sequential Exposure
* Advance the elevator into the wound so that its tip rests on the junction of the spinous process and lamina of the next most proximal vertebra. Repeat the distal-to-proximal subperiosteal stripping.
* Repeat this sequence until the desired number of vertebral levels have been exposed.
* For bilateral procedures, replicate this exact technique on the contralateral side.
5. Expanding the Exposure
* The initial dissection exposes the spinous processes and the medial aspect of the laminae.
* To increase the exposure for instrumentation or decompression, continue the subperiosteal reflection laterally along the posterior surface of the laminae.
* Sweep the soft tissues laterally to expose the pars interarticularis and the articular facet joints. Pack each exposed segment tightly with a radiopaque tape sponge immediately after exposure to tamponade venous oozing.
Surgical Warning: Paraspinal Muscle Necrosis
Prolonged, high-pressure retraction of the paraspinal muscles leads to ischemia, postoperative necrosis, and chronic back pain. Release self-retaining retractors periodically during long cases to allow tissue reperfusion.
Part II: Posterior Transosseous Approach to the Sacroiliac Joint
While the posterior sacrum and sacroiliac (SI) joint can be approached through a standard posterior exposure, direct intra-articular access is notoriously limited by the overhanging posterior ilium. To overcome this, Ebraheim et al. developed a highly effective transosseous approach. This technique provides unparalleled access to the SI joint for debridement and arthrodesis while minimizing soft-tissue destruction and preserving the structural integrity of the pelvic ring.
Surgical Anatomy of the Posterior Pelvis
The sacroiliac joint is a complex, diarthrodial joint with a highly irregular articular surface.
* Bony Landmarks: The posterior superior iliac spine (PSIS) and the posterior inferior iliac spine (PIIS) serve as the primary superficial landmarks.
* Musculature: The gluteus maximus originates from the posterior gluteal line of the ilium, the posterior surface of the lower sacrum, and the sacrotuberous ligament. The gluteus medius lies superior and lateral.
* Neurovascular Structures: The superior border of the greater sciatic notch is the critical danger zone. The superior gluteal artery and nerve exit the pelvis through the greater sciatic notch, immediately superior to the piriformis muscle.
Indications and Contraindications
Indications:
* Septic arthritis or osteomyelitis of the SI joint requiring open debridement.
* Post-traumatic SI joint disruption or nonunion requiring open reduction and internal fixation (ORIF) and arthrodesis.
* Severe, recalcitrant degenerative joint disease or inflammatory sacroiliitis failing conservative management.
Contraindications:
* Hemodynamic instability in acute pelvic ring trauma (where percutaneous fixation or anterior external fixation is preferred).
* Inadequate soft tissue coverage over the posterior ilium.
Patient Positioning and Preparation
- Positioning: Place the patient prone on padded bolsters or a radiolucent spinal frame. Ensure all bony prominences are padded.
- Fluoroscopy: Position the C-arm to allow for standard AP, Inlet, and Outlet views of the pelvis, as well as lateral sacral views.
- Preparation: Prep and drape the entire posterior pelvis, extending from the lower lumbar spine down to the posterior thighs.
Step-by-Step Surgical Technique: Ebraheim Transosseous Approach
1. Incision and Superficial Dissection
* Palpate the PSIS. Make a curvilinear incision beginning exactly at the level of the PSIS.
* Extend the incision distally to the midpoint between the PSIS and the PIIS.
* From this midpoint, curve the incision laterally and distally for approximately 5 cm, following the natural contour of the gluteal musculature.
2. Muscular Reflection
* Divide the superficial fascia. Incise the gluteus medius muscle fascia along the line of the skin incision.
* Using electrocautery, sharply dissect the origin of the gluteus maximus from the posterior ilium.
* Subperiosteally elevate the gluteal musculature laterally.
3. Identifying the Danger Zone
* Carefully continue the subperiosteal elevation distally to identify the superior border of the greater sciatic notch.
* Retraction: Insert one or two heavy Steinmann pins into the dense bone of the ilium superior to the notch. Use these pins to retract the massive gluteus maximus muscle belly laterally and distally.
Surgical Pitfall: The Superior Gluteal Artery
Extreme caution must be exercised when dissecting near the greater sciatic notch. Laceration of the superior gluteal artery is a catastrophic complication; the severed vessel can rapidly retract into the deep pelvis, making direct hemostasis nearly impossible and requiring emergent angiographic embolization. Furthermore, injury to the superior gluteal nerve will denervate the gluteus medius and minimus, resulting in a permanent Trendelenburg gait.
4. Creating the Transosseous Window
* Expose the posterior external surface of the ilium between the PSIS (superiorly) and the superior border of the greater sciatic notch (inferiorly).
* Using a sharp osteotome or a high-speed oscillating power saw, outline and elevate a right-angle triangle–shaped bone window from the outer table of the posterior ilium.
* Window Dimensions: The vertical limb of the triangle drops inferiorly from the PSIS. The horizontal limb extends laterally. The hypotenuse connects the two. (Refer to the precise geometric dimensions in the operative diagram).
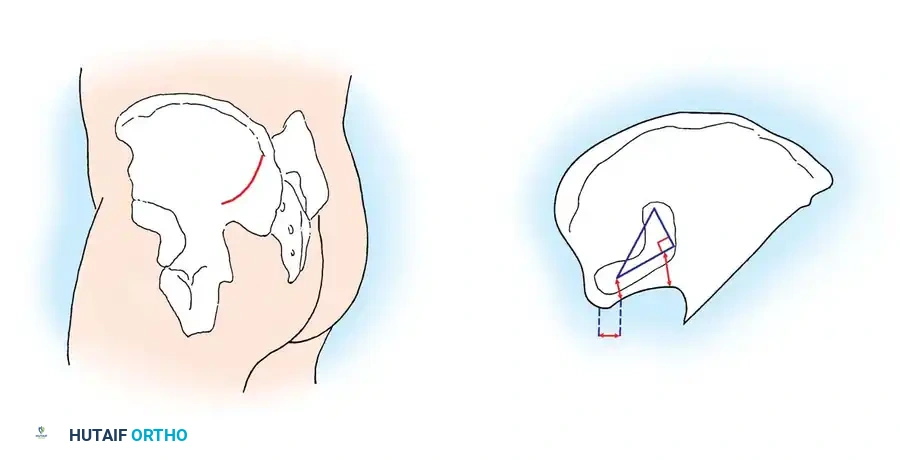
Fig. 34-29 Posterior approach to sacroiliac joint. A, Skin incision. B, Right triangle on outer table of posterior ilium. PIIS, posterior inferior iliac spine; PSIS, posterior superior iliac spine.
5. Joint Debridement and Arthrodesis
* Removal of this bone window provides direct, unhindered visualization of the sacroiliac articular surfaces.
* Utilize straight and angled curettes, pituitary rongeurs, and a high-speed burr to meticulously remove all articular cartilage from both the sacral and iliac sides of the joint.
* If treating infection, obtain deep tissue cultures and aggressively debride all necrotic bone.
* If performing an arthrodesis, decorticate the subchondral bone to expose bleeding cancellous bone. Pack the joint space with autologous bone graft (often harvested from the removed iliac window) or allograft.
6. Closure and Window Replacement
* Once the intra-articular work is complete, take the previously elevated right-angle triangle bone window and place it back into its original anatomical position.
* Carefully tamp the bone window back into place. It often press-fits securely; however, if unstable, it can be secured with a small fragment screw or heavy intraosseous sutures.
* Release the Steinmann pins. Allow the gluteus maximus to fall back into its anatomical position.
* Close the deep fascial layers over a subfascial suction drain to prevent postoperative hematoma formation. Close the subcutaneous tissue and skin in a standard layered fashion.
Postoperative Protocols and Rehabilitation
The postoperative management following posterior spinal or pelvic approaches depends heavily on the underlying pathology and the structural stability achieved during surgery.
Wound Care and Hemostasis:
* Maintain subfascial drains for 24 to 48 hours, or until output is less than 30 cc per shift.
* Strict adherence to sterile dressing changes is required, given the proximity of the incisions to the perianal region, which increases the risk of polymicrobial contamination.
Mobilization and Weight-Bearing:
* Lumbar Decompression/Fusion: Patients are typically mobilized on postoperative day one. A rigid lumbosacral orthosis (LSO) may be utilized depending on the surgeon's preference and the quality of bone fixation.
* Sacroiliac Arthrodesis: If a transosseous SI joint arthrodesis is performed without rigid percutaneous screw fixation, patients are generally restricted to toe-touch weight-bearing (TTWB) or non-weight-bearing (NWB) on the operative side for 6 to 8 weeks to allow for initial osseous integration of the bone window and the joint space.
Deep Vein Thrombosis (DVT) Prophylaxis:
* Given the pelvic dissection and potential for delayed mobilization, mechanical prophylaxis (SCDs) should be initiated immediately.
* Chemical prophylaxis (e.g., Low Molecular Weight Heparin) is typically initiated 24 hours postoperatively, provided there is no evidence of expanding epidural or gluteal hematoma.
Conclusion
Mastery of the posterior approaches to the lumbar spine and sacroiliac joint is a fundamental requirement for the advanced orthopedic surgeon. By respecting the vascular anatomy of the paraspinal musculature and employing a strict distal-to-proximal subperiosteal dissection technique, surgeons can achieve extensile lumbar exposure with minimal blood loss. Similarly, the Ebraheim transosseous approach to the sacroiliac joint offers an elegant, anatomically sound method for accessing a notoriously difficult joint, provided the surgeon maintains a healthy respect for the superior gluteal neurovascular bundle. Adherence to these textbook principles ensures optimal intraoperative visualization and maximizes postoperative functional recovery.
You Might Also Like