Cleft Hand Reconstruction: Miura-Komada and Ueba Techniques
Key Takeaway
Cleft hand reconstruction requires meticulous surgical planning to restore both function and aesthetics. The Miura-Komada and Ueba techniques are cornerstone procedures for cleft closure and the release of thumb adduction contractures. These approaches utilize strategic skin flaps, metacarpal transposition, and soft-tissue balancing to deepen the first web space, reconstruct the transverse metacarpal ligament, and optimize digital biomechanics for superior long-term functional outcomes.
SURGICAL ANATOMY AND BIOMECHANICAL PRINCIPLES OF THE CLEFT HAND
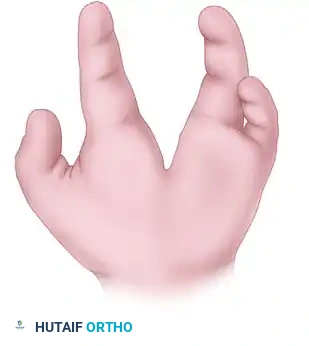
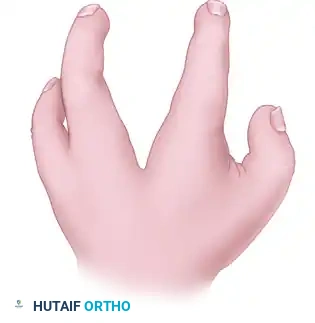
Typical cleft hand, historically referred to as ectrodactyly or split hand malformation, is a rare congenital longitudinal deficiency characterized by the absence of central rays (usually the third ray), a deep V-shaped central cleft, and frequently, syndactyly of the border digits. The functional impairment in a cleft hand is rarely due to the missing central digits alone; rather, it is dictated by the secondary deformities.
The most functionally limiting secondary deformity is the thumb adduction contracture. The absence of the central ray removes the structural buttress of the hand, allowing the index ray to drift ulnarward or the thumb to collapse into the palm. This is exacerbated by anomalous fibrous bands, a contracted adductor pollicis muscle, and a shortened first dorsal interosseous muscle.
Surgical intervention aims to achieve three primary biomechanical goals:
1. Closure of the central cleft to restore the transverse metacarpal arch.
2. Release of the thumb adduction contracture to widen the first web space, enabling opposition and grasp.
3. Realignment of the index ray to prevent digital overlapping during flexion.
The Miura and Komada technique and the Ueba technique represent two highly effective, evidence-based approaches to achieving these goals through strategic metacarpal transposition and complex local flap rearrangement.
💡 Consultant Clinical Pearl
The optimal timing for cleft hand reconstruction is typically between 12 and 18 months of age. Surgery at this stage capitalizes on neuroplasticity for functional adaptation while ensuring the anatomical structures are large enough for meticulous surgical handling.
TECHNIQUE 1: CLEFT CLOSURE AND RELEASE OF THUMB ADDUCTION CONTRACTURE (MIURA AND KOMADA)
The Miura and Komada technique is a powerful reconstructive option that simultaneously addresses the central cleft and the narrowed first web space. By transposing the index ray ulnarward and utilizing the redundant skin of the cleft to deepen the thumb web, the surgeon can restore both the aesthetic contour and the functional span of the hand.
Preoperative Preparation and Positioning
- Anesthesia: General anesthesia is required.
- Positioning: Supine with the operative arm extended on a radiolucent hand table.
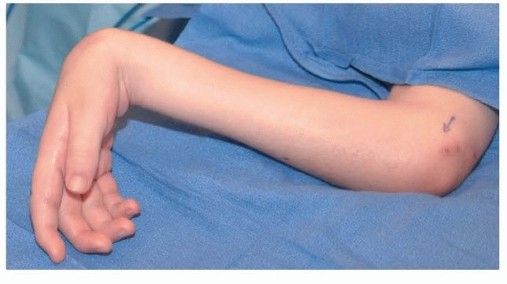
- Tourniquet: A well-padded pneumatic upper arm tourniquet is applied and inflated to standard pediatric pressures (typically 100 mmHg above systolic pressure) after exsanguination.
- Magnification: Surgical loupes (2.5x to 3.5x) are highly recommended for the identification and protection of digital neurovascular bundles.
Step-by-Step Surgical Approach
1. Incision Design and Flap Elevation
* Design a linear incision beginning on the radial aspect of the base of the ring finger. Extend this incision continuously to the ulnar side of the base of the index finger, crossing directly through the cleft space.
* Design a second, curved incision around the base of the index finger. The apex of this curve should correspond to the desired level and depth of the newly reconstructed thumb web space.
* Carefully elevate the skin flaps, preserving the subdermal vascular plexus to prevent marginal necrosis.
2. Metacarpal Detachment and Muscle Release
* Identify the base of the index (second) metacarpal.
* Perform a subperiosteal dissection to detach the index metacarpal at its base. During this step, the first dorsal interosseous muscle must be mobilized and partially detached along with the metacarpal to allow for tension-free transposition.
* Exposure Adjunct: If the palmar and cleft incisions do not provide adequate visualization of the metacarpal bases, make an additional longitudinal dorsal skin incision centered over the bases of the index and long (third) metacarpals.
3. Release of the Thumb Adduction Contracture
* Identify the tight fascial bands contributing to the narrowed first web space.
* Systematically release the fascia of the adductor pollicis muscle and the first dorsal interosseous muscle.
* In severe cases, a fractional lengthening or partial release of the adductor pollicis origin from the third metacarpal may be necessary to achieve a fully abducted thumb posture.
⚠️ Surgical Warning
Aggressive release of the adductor pollicis must be balanced against the risk of devascularizing the first web space or injuring the deep palmar arch. Always maintain strict hemostasis and visualize the neurovascular structures before transecting deep fascial bands.
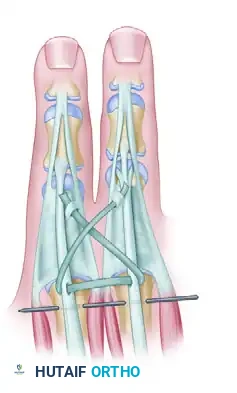
4. Skeletal Stabilization and Transposition
* Assess the base of the third metacarpal. If the base of the third metacarpal is present (as is common in typical cleft hands), it serves as the ideal docking site.
* Impale the transposed index ray onto the base of the third metacarpal.
* Achieve rigid skeletal fixation using two crossed or parallel smooth Kirschner wires (0.045 or 0.062 inches, depending on patient size). Ensure the rotation of the index ray is anatomically aligned to prevent scissoring during digital flexion.
5. Ligamentous Reconstruction
* To prevent future splaying of the reconstructed hand, the deep transverse metacarpal ligament must be recreated.
* Place two or three heavy, nonabsorbable or long-lasting absorbable soft-tissue sutures (e.g., 3-0 PDS or Ethibond) between the volar plates and deep fascial tissues of the index and ring fingers.
6. Web Space Fashioning and Closure
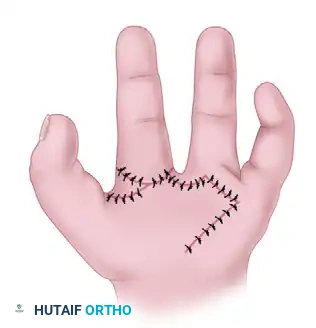
* Fashion the flap for the new thumb web space utilizing the skin radial to the curved incision along the original cleft. The redundancy of the cleft skin is transposed radially to line the deepened first web.
* Close the skin meticulously with interrupted absorbable sutures (e.g., 5-0 chromic gut or fast-absorbing plain gut).
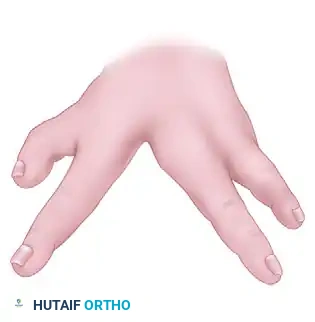
* Apply a bulky, non-adherent dressing followed by a well-molded long-arm cast. The cast must be specifically molded over the metacarpals to compress the space and prevent separation of the newly closed cleft.
Postoperative Care (Miura-Komada)
- Immobilization: The initial long-arm cast and any non-absorbable skin sutures are removed at exactly 3 weeks postoperatively.
- Re-evaluation: At the 3-week mark, assess the stability of the cleft. If there is any residual laxity or if the K-wires require further time for osseous integration, an additional short-arm cast or thermoplastic splint is applied.
- Hardware Removal: K-wires are typically removed in the clinic at 4 to 6 weeks once radiographic consolidation is confirmed.
- Rehabilitation: After final cast removal, gradual resumption of normal activities is permitted over the subsequent 6 to 8 weeks, often guided by a specialized pediatric hand therapist to encourage integration of the reconstructed hand into daily activities.
TECHNIQUE 2: PALMAR CLEFT CLOSURE (UEBA)
The Ueba technique is a sophisticated alternative that utilizes a palmar approach and a specialized interdigital flap to reconstruct the commissure. This technique is particularly advantageous when addressing severe rotational deformities of the index ray, as it explicitly incorporates metacarpal supination and extensor tendon reconstruction to optimize digital tracking.
Step-by-Step Surgical Approach
1. Incision Design and Flap Creation
* Begin by designing a V-shaped skin incision that forms a triangular skin flap on the radial side of the ring finger. This specific flap is critical, as it will be transposed to form the new, smooth commissure between the index and ring fingers.
(Fig. 79-32A: Dorsal view of incisions. Solid lines indicate dorsal incisions; broken lines indicate palmar incisions.)
- Make a second skin incision beginning from the palmar end of the previous V-shaped incision. Extend this line transversely to the ulnar side of the palm.
(Fig. 79-32B: Palmar view of incisions. Solid lines indicate palmar incisions; broken lines indicate dorsal incisions.)
- Make a third skin incision curving around the base of the index finger. Place an incision at the very bottom of the cleft to connect all previous incisions, allowing for complete mobilization of the cleft skin.
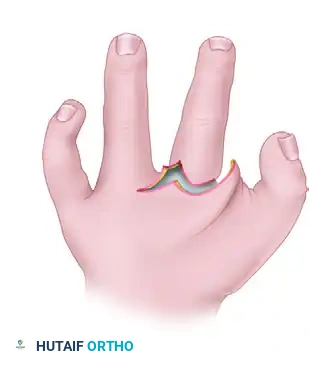
(Fig. 79-32C: Incisions from the web space. Solid lines indicate dorsal incisions; broken lines indicate palmar incisions.)
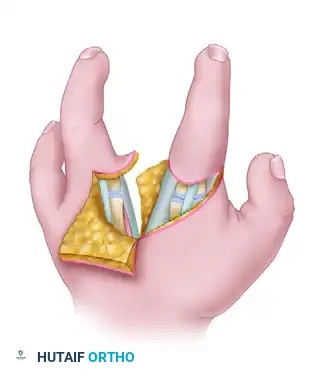
2. Flap Elevation and Contracture Release
* Carefully elevate the interdigital palmar and dorsal skin flaps.
* Identify and sever the unyielding fibrous bands located between the thumb and the index finger. This step is paramount to widening the thumb web space as much as anatomically possible.
(Fig. 79-32D: Flaps developed and elevated, exposing the underlying anomalous fibrous bands and skeletal anatomy.)
3. Metacarpal Transfer and Rotational Correction
* Incise and elevate the periosteum circumferentially around the second (index) metacarpal.
* Perform an osteotomy or mobilize the base to transfer the metacarpal ulnarward toward the fourth metacarpal.
* Critical Maneuver: As the second metacarpal is shifted ulnarward, it must be supinated. Because the natural flexion arc of the index finger is directed toward the scaphoid, moving its base ulnarward without rotational correction will cause the index finger to cross over and overlap the ring finger during flexion. Supinating the metacarpal corrects this trajectory.
💡 Consultant Clinical Pearl: The Supination Maneuver
Failure to supinate the transposed index metacarpal in the Ueba technique is the most common cause of postoperative digital scissoring. Flex the digits passively on the operating table after provisional K-wire fixation to ensure the index and ring fingers track parallel to the scaphoid tubercle without overlapping.
4. Skeletal Fixation and Ligament Reconstruction
* Fix the transposed second metacarpal to the fourth metacarpal using one or two smooth Kirschner wires.
* To recreate the transverse metacarpal arch and prevent late diastasis, pass a heavy nonabsorbable suture (or a long-lasting absorbable suture like #1 PDS) circumferentially around the necks of the second and fourth metacarpals, tying it under appropriate tension.
5. Extensor Tendon Reconstruction
* Because the index ray has been transposed, its extensor mechanism often requires centralization and reinforcement to prevent an extensor lag or ulnar subluxation of the tendon.
* Harvest a free tendon graft from the palmaris longus muscle (if present) via standard minimally invasive transverse wrist incisions.
* Connect the common extensor tendons of the index and ring fingers using this graft. Pass the tendon graft transversely through the substance of the extensor tendons at the level of the metacarpophalangeal (MCP) joints.
* Reflect the ends of the graft and suture them securely to the extensor aponeurosis using a Pulvertaft weave or strong figure-of-eight sutures.
(Fig. 79-32E: Reconstruction of the extensor tendon with a palmaris longus graft; Kirschner wire stabilizes the index to the ring metacarpal.)
6. Flap Rotation and Wound Closure
* Rotate the previously elevated flaps into their new positions. The triangular flap from the ring finger is inset to create a smooth, U-shaped commissure.
(Fig. 79-32F: Flaps rotated into position, demonstrating the obliteration of the cleft and the creation of the new commissure.)
- Design the final suture lines transversely. This strategic orientation conceals the original longitudinal cleft and further deepens the newly constructed thumb web space.
- Close the skin meticulously with interrupted absorbable sutures (e.g., 5-0 chromic gut).
(Fig. 79-32G: Final appearance of the palm after wound closure, showing a deepened first web space and a closed central cleft.)
- Apply a well-padded, long-arm cast. The cast must be expertly molded in the intermetacarpal space to avoid any recurrence of the cleft or loss of the rotational correction.
Postoperative Care (Ueba)
- Initial Immobilization: The long-arm cast and any remaining non-absorbable sutures are removed at 3 weeks postoperatively under mild sedation in the clinic.
- Secondary Immobilization: At the 3-week mark, a second, well-molded cast is applied to protect the K-wires and the healing tendon graft.
- Hardware Removal: The cast and Kirschner wires are removed at approximately 6 weeks, contingent upon radiographic evidence of complete bone healing and clinical stability.
- Rehabilitation Phase: Following pin removal, the patient is referred to hand therapy. Resumption of normal activities, focusing on grasp, pinch, and fine motor integration, is allowed and encouraged progressively over the next 4 to 6 weeks. Night splinting of the first web space may be utilized for up to 6 months to prevent recurrent adduction contracture.
You Might Also Like