Scaphoid Nonunion Grafting: Fernandez Technique & Surgical Guide
Key Takeaway
Scaphoid nonunion with humpback deformity and dorsal intercalated segment instability (DISI) requires meticulous surgical correction. The Fernandez technique utilizes a palmar approach, precise osteotomy, and a tailored trapezoidal corticocancellous iliac crest bone graft to restore scaphoid length and carpal alignment. This guide details the preoperative templating, surgical execution, and postoperative protocols essential for achieving high union rates and restoring wrist biomechanics in complex scaphoid nonunions.
Introduction to Scaphoid Nonunion and Carpal Collapse
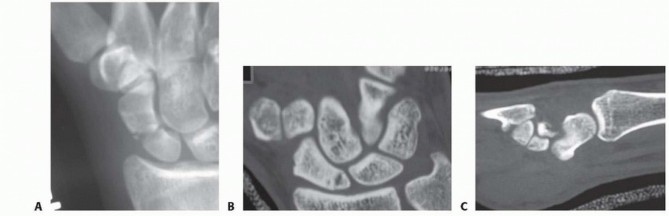
Scaphoid fractures account for the vast majority of carpal bone fractures. Due to the tenuous retrograde blood supply—predominantly entering through the dorsal ridge and supplying the proximal pole—fractures of the scaphoid waist and proximal pole are at a high risk of delayed union, nonunion, and osteonecrosis.
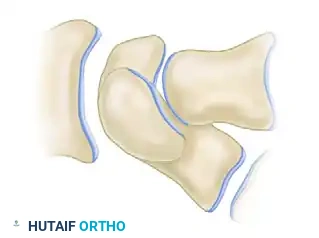
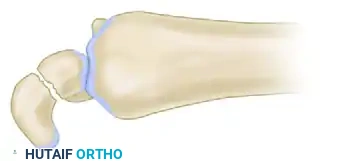
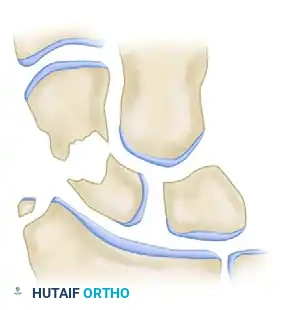
When a scaphoid waist fracture fails to unite, the biomechanical integrity of the carpus is profoundly disrupted. The scaphoid normally functions as a critical tie-rod stabilizing the proximal and distal carpal rows. In the setting of a nonunion, the distal scaphoid fragment tends to flex volarly (driven by the trapezium and trapezoid), while the proximal fragment extends dorsally alongside the lunate. This divergent rotation results in the classic "humpback" deformity of the scaphoid and a secondary Dorsal Intercalated Segment Instability (DISI).
Left untreated, this altered kinematics inevitably progresses to Scaphoid Nonunion Advanced Collapse (SNAC), characterized by predictable, progressive radiocarpal and midcarpal arthrosis. The primary goal of scaphoid nonunion grafting—specifically utilizing the Fernandez technique with a palmar approach—is to debride the nonunion, restore the anatomical length and alignment of the scaphoid using a structural corticocancellous graft, correct the DISI deformity, and achieve rigid internal fixation.
💡 Clinical Pearl: The Biomechanical Imperative
Simply achieving bone union in a malaligned scaphoid is insufficient. Failure to correct the humpback deformity and restore the volar cortical length will leave the patient with persistent carpal instability, reduced wrist extension, and a high likelihood of progressive degenerative changes. Anatomical restoration of scaphoid geometry is paramount.
Preoperative Planning and Templating
Meticulous preoperative planning is the cornerstone of a successful Fernandez grafting procedure. The surgeon must accurately calculate the amount of bone resection required, the exact dimensions of the structural graft, and the degree of angular deformity that must be corrected.
Radiographic Evaluation
Standard posteroanterior (PA), lateral, and scaphoid-specific views are mandatory. However, the contralateral, uninjured wrist serves as the most critical reference point.
- Bilateral Imaging: Obtain high-quality PA and lateral radiographs of both the injured and uninjured wrists.
- CT Scanning: A fine-cut computed tomography (CT) scan in the sagittal plane (along the longitudinal axis of the scaphoid) is highly recommended to assess the true extent of bone loss, the presence of cystic changes, and the viability (sclerosis vs. fragmentation) of the proximal pole.
The Fernandez Templating Method
Using tracing paper or digital templating software, the radiographic findings of the uninjured wrist are used as a precise anatomical guide.
- Step 1: Trace the outline of the uninjured scaphoid and lunate on the lateral radiograph. Measure the normal scaphoid length and the physiological scapholunate (SL) angle.
- Step 2: Overlay this tracing onto the radiograph of the injured wrist. Align the distal articular surface of the scaphoid template with the distal fragment of the nonunion.
- Step 3: Calculate the angular deformity (the difference between the injured and uninjured SL angles).
- Step 4: Determine the size of the resection area. The gap between the corrected proximal and distal fragments on the template dictates the exact dimensions and trapezoidal shape of the required iliac crest bone graft.
Surgical Anatomy and Positioning
Patient Setup
- Anesthesia: Regional block (axillary or supraclavicular) or general anesthesia.
- Positioning: Supine with the operative arm extended on a radiolucent hand table.
- Tourniquet: A well-padded pneumatic tourniquet is applied to the proximal arm and inflated to 250 mm Hg after exsanguination.
- Equipment: Mini-C-arm fluoroscopy must be positioned to allow unimpeded PA and lateral imaging of the wrist throughout the procedure.
The Russe Approach (Palmar Approach)
The classic Russe procedure utilizes a palmar approach, which is ideal for addressing scaphoid waist nonunions, correcting humpback deformities, and placing a volar structural graft.
- Incision: A longitudinal or slightly curvilinear incision is made over the palmar aspect of the wrist, directly over the flexor carpi radialis (FCR) tendon, extending distally to the scaphoid tubercle.
- Internervous Plane: The approach exploits the interval between the FCR tendon (median nerve) and the radial artery.
- Deep Dissection: The FCR tendon sheath is incised, and the tendon is retracted ulnarly. The posterior sheath of the FCR is then incised to expose the palmar wrist capsule.
⚠️ Surgical Warning: Radial Artery and Palmar Cutaneous Nerve
Extreme care must be taken to identify and protect the radial artery, which lies immediately radial to the FCR tendon. Additionally, avoid overly vigorous ulnar retraction of the superficial tissues to prevent neuropraxia to the palmar cutaneous branch of the median nerve.
Step-by-Step Surgical Technique
1. Capsulotomy and Exposure
Incise the palmar capsule of the wrist longitudinally, directly in line with the skin incision. Extend this capsulotomy distally to the scaphoid tubercle. This provides excellent exposure of the nonunion site, the proximal and distal scaphoid fragments, and the scapholunate junction.
To preserve the critical volar radiocarpal ligaments (specifically the radioscaphocapitate ligament), some surgeons prefer a step-cut or Z-lengthening capsulotomy, which facilitates robust closure at the end of the procedure.
2. Preparation of the Nonunion Site
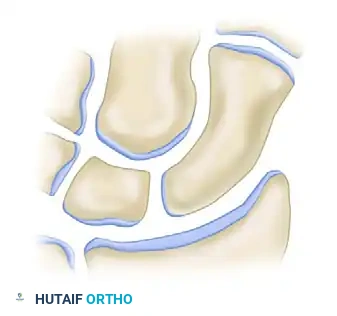
Identify the nonunion. Often, the site is filled with dense fibrous tissue and sclerotic bone.
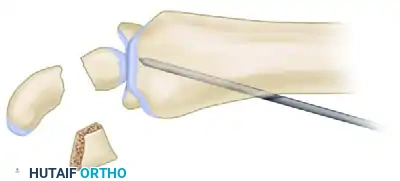
- Resection: Using a microsagittal or oscillating saw, resect the fibrous nonunion and sclerotic bone ends according to the preoperative plan. The cuts should be made perpendicular to the long axis of the scaphoid to create flat, healthy bleeding bone surfaces.
- Addressing Osteonecrosis: Inspect the proximal fragment. If signs of osteonecrosis or severe sclerosis are apparent, use a 1.0-mm or 1.2-mm Kirschner wire (K-wire) to place multiple drill holes into the sclerotic cancellous bone until punctate bleeding (the "paprika sign") is observed. This stimulates angiogenesis and osteogenesis.
3. Correction of the Deformity (DISI and Humpback)
This is the most critical biomechanical step of the operation. The flexion deformity of the scaphoid and the dorsal rotation of the lunate must be corrected simultaneously.

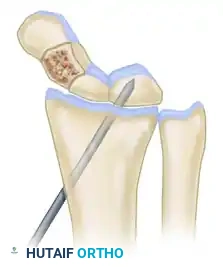
- Distraction: Distract the osteotomy site on the palmar-radial aspect using two small bone hooks, a lamina spreader, or a specialized scaphoid spreader clamp. This maneuver corrects the scaphoid shortening and opens the volar defect.
- Lunate Correction: As the scaphoid is distracted, an assistant must simultaneously correct the dorsal rotation of the lunate (the DISI deformity). This is achieved by pushing the palmar pole of the lunate dorsally and proximally toward the radius using a fine bone spike or elevator.
🔪 Surgical Technique 69-14 & 69-15: The Tomaino Modification
To maintain the corrected lunate position while the graft is prepared and inserted, the radiolunate joint can be temporarily pinned.
With the wrist placed in extension to correct the lunate malalignment, drive a K-wire from the dorsal aspect of the radius into the lunate. This stabilizes the lunate in a neutral position, effectively opening the scaphoid nonunion site volarly and facilitating accurate graft placement.
4. Graft Harvest and Shaping
A structural corticocancellous graft is required to bridge the defect and provide volar mechanical support. The ipsilateral anterior iliac crest is the gold standard donor site due to its robust cortical thickness and rich cancellous bone.
- Harvest: Expose the anterior iliac crest. Harvest a tricortical or bicortical block of bone using an oscillating saw and fine osteotomes.
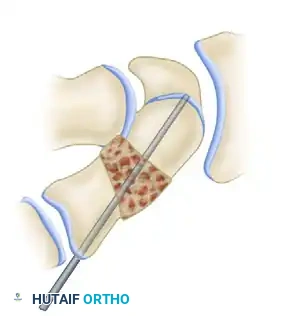
- Shaping: Shape the corticocancellous graft to precisely fit the defect measured during preoperative templating. Because the volar cortex of the scaphoid requires lengthening to correct the humpback deformity, the graft must be shaped as a trapezoid (wedge-shaped), with the wider base positioned volarly.
5. Graft Insertion
Orient the trapezoidal graft so that its cortical surface faces palmarward. This cortical strut acts as a buttress to prevent recurrent flexion of the distal fragment, while the cancellous portion interfaces with the proximal and distal scaphoid fragments to promote rapid osteointegration.
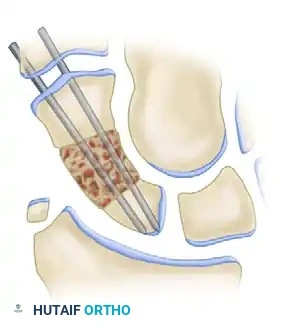
- Insert the graft into the distracted defect.
- Release the distraction. The native ligamentous tension should compress the scaphoid fragments against the graft, holding it snugly in place.
- Use a rongeur or high-speed burr to shape any protruding edges of the graft so that it sits flush with the native proximal and distal scaphoid contours, ensuring no impingement occurs during wrist motion.
6. Internal Fixation
Rigid internal fixation is required to maintain the correction and compress the graft. This can be achieved via multiple K-wires or a headless compression screw (e.g., Herbert-Whipple screw).
Option A: Kirschner Wire Fixation (Classic Fernandez)
* Use image intensification to confirm the correction of the lunate rotation and scaphoid alignment.
* Fix the scaphoid with two or three 1.2-mm K-wires. These are power-driven percutaneously from the palmar aspect of the distal fragment, directed proximally across the graft, and into the dorsal aspect of the proximal fragment.
* Ensure the wires engage the subchondral bone of the proximal pole for maximum purchase.
Option B: Headless Compression Screw (Modern Preference)
* Pin the graft in place temporarily with a fine K-wire that lies outside the planned trajectory of the screw.
* If a radiolunate transfixion pin was used (Tomaino modification), it must be removed before final screw placement to facilitate accurate imaging of the scaphoid and the screw guidewire.
- Insert the guidewire for the headless compression screw from distal-palmar to proximal-dorsal, passing through the center of the distal fragment, the center of the graft, and into the apex of the proximal pole.
- Measure the depth, overdrill the near cortex (if required by the specific screw system), and insert the appropriate length headless compression screw to achieve rigid compression across both osteotomy interfaces.


7. Closure
- Obtain final multi-planar fluoroscopic images to confirm anatomical restoration of the scaphoid, correction of the SL angle, and ideal hardware placement.
- Thoroughly irrigate the wound.
- Carefully repair the palmar capsule. A meticulous capsular closure is vital to restore volar stability.
- If K-wires were used, cut them short, approximately 3 mm below the palmar skin of the thenar area, to allow for easy retrieval later while preventing skin irritation.
- Close the subcutaneous tissues and skin in a standard fashion.
Postoperative Care and Rehabilitation
The postoperative protocol must balance the need for rigid immobilization to allow bony union with the desire to initiate early motion to prevent severe wrist stiffness.
Phase 1: Immediate Postoperative (Weeks 0-2)
- A bulky palmar plaster splint that includes the thumb (thumb spica splint) is applied in the operating room.
- The wrist is positioned in slight flexion and radial deviation to relax the palmar capsule and reduce tension on the repair.
- Strict elevation and active finger motion are encouraged immediately to reduce edema.
- At 2 weeks, the splint is removed, the wound is inspected, and sutures are removed.
Phase 2: Casting (Weeks 2-8)
- The wrist and thumb are immobilized in a well-molded short-arm navicular (thumb spica) cast for an additional 6 weeks.
- The patient is instructed to continue active range of motion of the elbow, shoulder, and all free digits.
Phase 3: Splinting and Early Motion (Weeks 8-10)
- At 8 weeks postoperatively, the cast is discontinued.
- A custom-molded palmar thermoplastic removable splint is fabricated.
- The patient is permitted to remove the splint to perform active, gravity-eliminated exercises of the wrist and thumb three times a day for 15 minutes. Passive stretching and forceful gripping are strictly prohibited at this stage.
Phase 4: Radiographic Verification and Hardware Removal (Week 10+)
- At 10 weeks, a fine-cut CT scan in the longitudinal axis of the scaphoid is obtained to definitively assess bony bridging across both the proximal and distal graft interfaces. Plain radiographs are often insufficient to confirm union due to overlapping carpal shadows.
- If robust bony union is confirmed on the CT scan:
- The thermoplastic splint is weaned.
- Progressive strengthening and passive range of motion exercises are initiated under the guidance of a certified hand therapist.
- If K-wires were utilized for fixation, they are removed through a small stab incision under local anesthesia in the clinic or minor procedure room. Headless compression screws are typically left in situ unless they become symptomatic or intra-articular penetration is suspected.
Complications and Pitfalls
- Persistent Nonunion: Often results from inadequate resection of sclerotic bone, failure to achieve rigid fixation, or an undersized graft that fails to provide structural support.
- Avascular Necrosis (AVN): If the proximal pole is completely avascular and fragmented, a non-vascularized iliac crest graft may fail. In such cases, a vascularized bone graft (e.g., 1,2-Intercompartmental Supraretinacular Artery [1,2-ICSRA] graft or medial femoral condyle free flap) should be considered.
- Hardware Prominence/Penetration: Headless screws must be countersunk beneath the articular cartilage. Protrusion into the radiocarpal or midcarpal joints will cause rapid, irreversible chondral damage.
- Loss of Correction: Failure to adequately pin the lunate or use a properly sized trapezoidal graft can result in recurrent humpback deformity and persistent DISI, leading to poor functional outcomes despite achieving bony union.
You Might Also Like