Percutaneous Fixation of Scaphoid Fractures: A Comprehensive Surgical Guide
Key Takeaway
Percutaneous fixation of scaphoid fractures utilizing a headless cannulated compression screw offers rigid stability while minimizing soft tissue dissection. By achieving the fluoroscopic "ring sign," surgeons can accurately target the central axis of the scaphoid. This minimally invasive technique, often arthroscopically assisted, preserves the tenuous vascular supply of the scaphoid, accelerates rehabilitation, and significantly reduces the risk of nonunion compared to prolonged cast immobilization.
Introduction and Biomechanical Rationale
The management of scaphoid fractures has evolved significantly, shifting from prolonged cast immobilization to early surgical intervention. Percutaneous fixation of scaphoid fractures, particularly utilizing the dorsal approach pioneered by Slade et al., represents a paradigm shift in hand and wrist trauma surgery.
The scaphoid is the critical mechanical link between the proximal and distal carpal rows. Its tenuous blood supply—predominantly derived from the dorsal carpal branch of the radial artery entering the distal ridge and flowing retrograde—makes the proximal pole highly susceptible to avascular necrosis (AVN) and nonunion following a fracture. Open surgical approaches, while effective for direct reduction, risk further disrupting this fragile vascular network and dividing critical volar radiocarpal ligaments.
Percutaneous fixation utilizing a headless cannulated compression screw (such as the standard Acutrak screw) provides rigid internal fixation, maintains the biological envelope, and allows for early mobilization. When combined with arthroscopic assistance, it permits direct visualization of the articular surface, confirmation of anatomical reduction, and assessment of concomitant intercarpal ligamentous injuries.
Surgical Anatomy and Fracture Classification
Understanding the three-dimensional orientation of the scaphoid is paramount for successful percutaneous fixation. The scaphoid lies at an oblique angle—approximately 45 degrees to both the sagittal and coronal planes of the wrist.

Fractures are generally classified by their anatomic location: distal pole, waist (middle third), and proximal pole. Waist fractures are the most common, accounting for 70-80% of all scaphoid fractures. Proximal pole fractures have the highest rate of nonunion and osteonecrosis due to the retrograde blood supply.
Clinical Pearl: The central axis of the scaphoid is the biomechanically optimal position for screw placement. A screw placed down the central third of the scaphoid provides maximum stiffness, highest load to failure, and optimal compression across the fracture site.
Preoperative Planning and Equipment
Slade et al. recommend a highly specific equipment setup to ensure the success of this technique. The operating room must be prepared for both fluoroscopic and arthroscopic intervention.
Required Equipment:
* Headless cannulated compression screw system (e.g., standard Acutrak screw).
* Mini-fluoroscopy unit (C-arm) with a high-resolution monitor.
* Kirschner wires (K-wires): 0.045-inch (1.14-mm) and 0.062-inch (1.57-mm) double-pointed wires.
* Cannulated hand drill and measuring devices.
* Equipment for small joint (wrist) arthroscopy (2.7-mm or 1.9-mm arthroscope).
* 12-gauge angiocatheter (used as a soft-tissue protector and wire guide).
Patient Positioning and Anesthesia
- Anesthesia: Regional anesthesia (supraclavicular or axillary brachial plexus block) is preferred, though general anesthesia may be utilized based on patient factors and the anticipated duration of the arthroscopic portion.
- Positioning: Place the patient supine on the operating table with the affected upper extremity extended on a radiolucent hand table.
- Preparation: Following standard sterile preparation and draping, apply a sterile tourniquet to the upper arm.
- Initial Positioning: Flex the elbow to 90 degrees. This position allows the surgeon to easily manipulate the wrist under the C-arm while maintaining a stable platform.
Step-by-Step Surgical Technique
1. Fluoroscopic Targeting and The "Ring Sign"
The cornerstone of the Slade percutaneous dorsal approach is achieving the correct fluoroscopic view to target the central axis of the scaphoid.
- Use the C-arm to evaluate the fracture position, alignment, and any associated carpal injuries.
- Targeting the Axis: Locate the central axis of the scaphoid on a standard posteroanterior (PA) view of the reduced scaphoid.
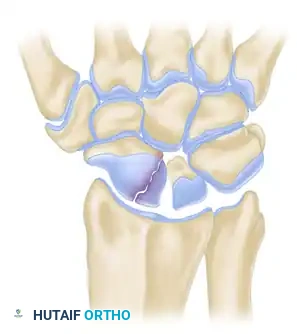
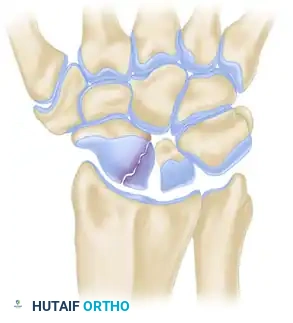
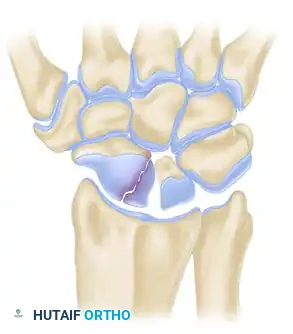
- Achieving the Ring Sign: Gently pronate and flex the patient's wrist. Because the scaphoid sits obliquely, flexing and pronating the wrist aligns the proximal and distal poles coaxially with the fluoroscopy beam.
- When perfectly aligned, the scaphoid will project a cortical "ring" appearance on the fluoroscopic monitor. The exact center of this "ring" represents the central axis of the scaphoid—the optimal starting point for the guidewire.
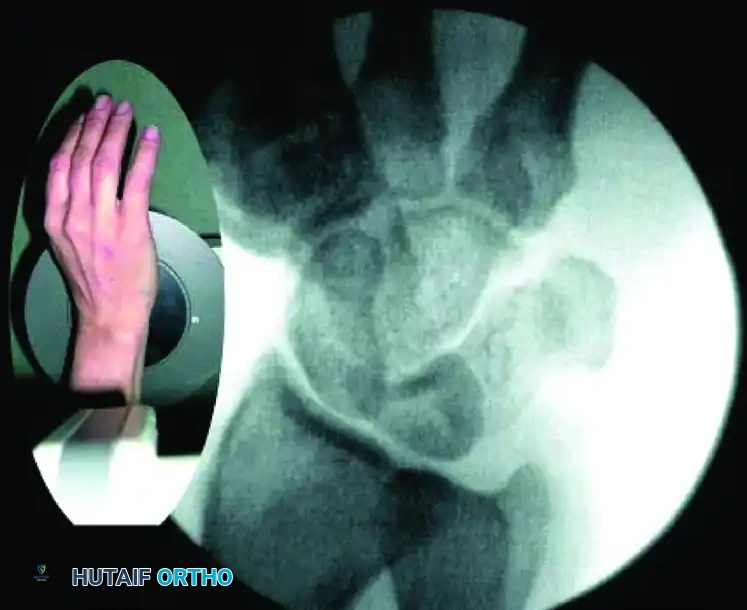
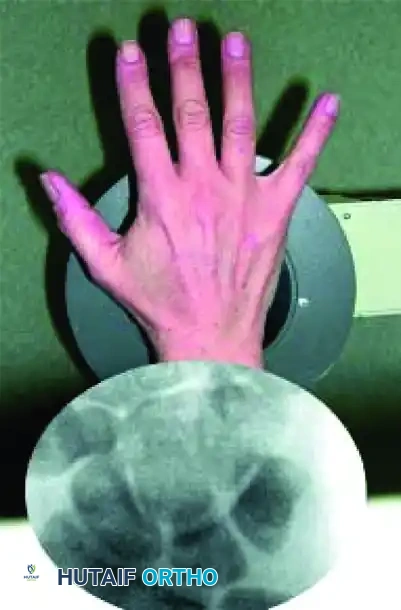
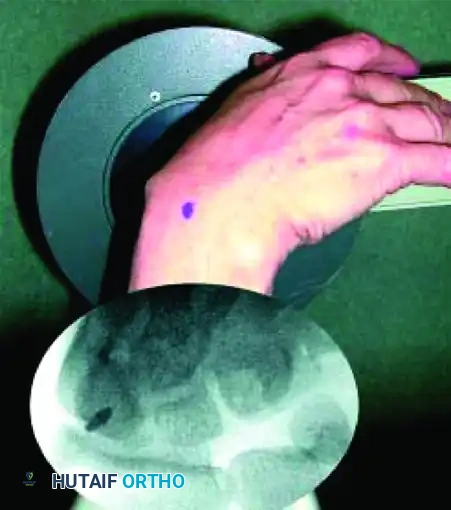
FIGURE: Percutaneous fixation of scaphoid fracture. (A) Central axis of scaphoid located on PA view. (B) Wrist pronated until poles align. (C) Wrist flexed until the scaphoid demonstrates the classic "ring" appearance, indicating coaxial alignment.
- Use a skin marking pen to indicate this precise surface location for the dorsal skin incision.
2. Incision and Guidewire Insertion
- Make a small (3-5 mm) skin incision at the marked location. Use a hemostat for blunt dissection down to the dorsal capsule of the wrist joint to protect the extensor tendons and terminal branches of the superficial radial nerve.
- Load a double-pointed 0.045-inch (1.14-mm) K-wire into a powered wire driver.
- Insertion: Under live fluoroscopic control, insert the wire starting at the exact center of the proximal pole (the center of the "ring").
- Pass the guidewire from dorsal to volar, directing it down the central axis of the scaphoid and out through the trapezium.
- Technical Tip: Use a 12-gauge angiocatheter over the K-wire to protect the dorsal soft tissues during insertion. Keep the wrist flexed during this step to prevent the guidewire from bending against the radius.
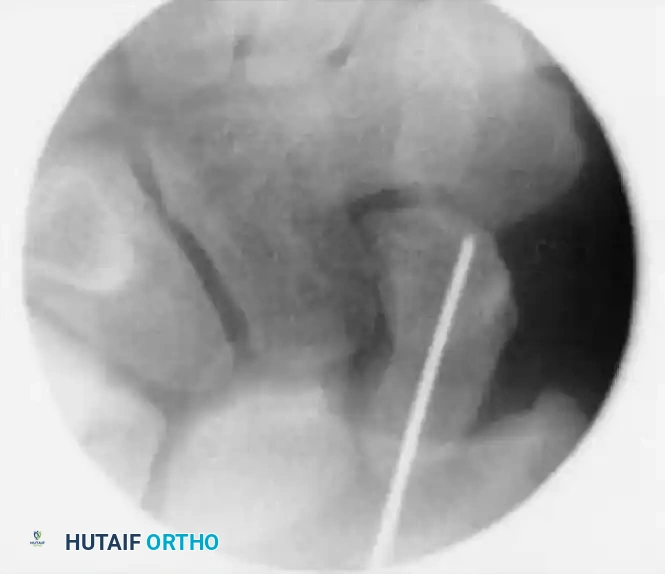
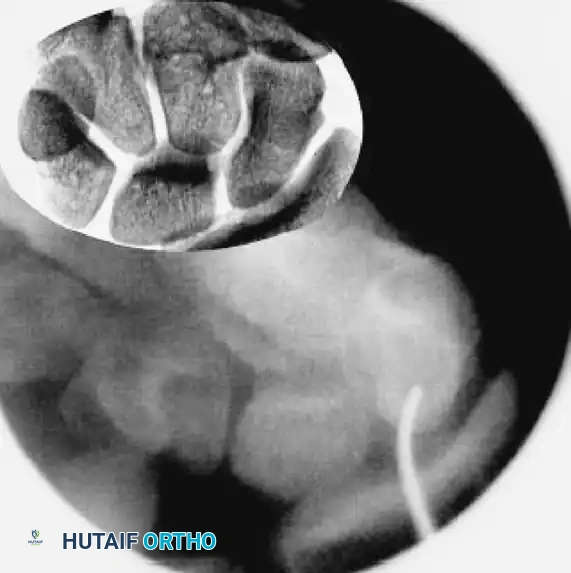
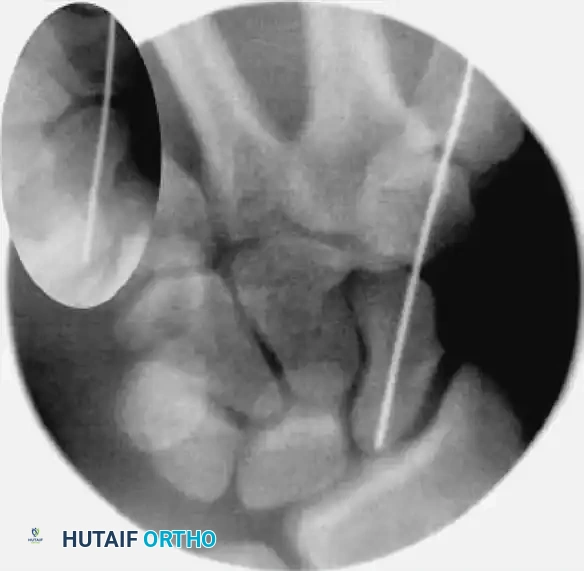
FIGURE: (A, B) The guidewire is placed at the base of the proximal pole and driven along the central axis. (C) The wrist is extended, and fracture alignment alongside guidewire position is confirmed.
- Advance the wire through the distal pole and out the palmar surface of the hand.
- Reverse the wire driver and pull the wire distally just enough so that the dorsal (trailing) end clears the radiocarpal joint. This allows the wrist to be fully extended.
- Extend the wrist and use the C-arm to confirm scaphoid fracture alignment and the central positioning of the guidewire in all planes.
Surgical Warning: If a correct path cannot be created with the 0.045-inch wire due to deflection, use a stiffer 0.062-inch (1.57-mm) wire to establish the trajectory. Once the path is created, exchange it back for the 0.045-inch wire before drilling, as the cannulated drill is sized for the smaller wire.
3. Fracture Reduction Techniques (The "Joystick" Method)
If fluoroscopy reveals unsatisfactory fracture reduction, or if dealing with a displaced fracture, percutaneous manipulation is required.
- Insert a 0.062-inch K-wire into the proximal fragment and another into the distal fragment, placing them perpendicular to the axis of the scaphoid.
- Use these stout wires as "joysticks" to toggle and manipulate the fracture fragments into anatomic alignment. If the proximal pole is too small, the proximal joystick can be placed into the lunate to control the proximal carpal row.
- Once aligned, pass the central 0.045-inch guidewire from distal to proximal across the fracture site to capture and hold the reduction.
- Rotational Control: Insert a second 0.045-inch anti-rotation wire parallel to the main guidewire to prevent the fragments from spinning during drilling and screw insertion. Leave the joysticks and anti-rotation wires in place.
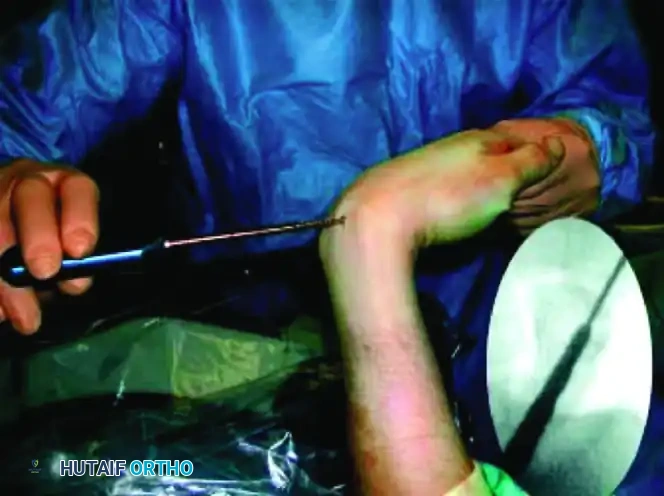
FIGURE: Fracture reduction utilizing two 0.062-inch K-wires as "joysticks" to manipulate and align the displaced fracture fragments prior to central guidewire advancement.
Pitfall: If the fracture remains irreducible percutaneously, or if the guidewire cannot be centralized, the surgeon must abandon the percutaneous technique and convert to an open dorsal or volar approach.
4. Determining Scaphoid Length
Accurate measurement is critical to ensure the screw is fully countersunk and does not impinge on the articular surfaces.
- Adjust the central guidewire so its distal tip rests exactly against the distal cortex of the scaphoid (subchondral bone).
- Take a second K-wire of the exact same total length. Place it parallel to the inserted guidewire, resting its tip against the dorsal cortex of the proximal pole.
- Measure the difference in length between the exposed ends of the two wires. This difference represents the exact intraosseous length of the scaphoid.
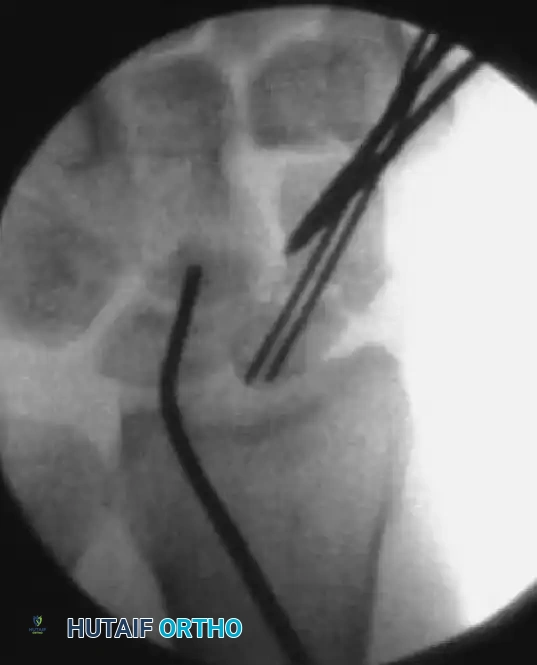
FIGURE: Scaphoid length is determined using the two-wire subtraction technique.
- Screw Selection: Subtract 4 mm from the measured scaphoid length. This ensures the screw can be countersunk 2 mm at both the proximal and distal articular surfaces.
5. Drilling the Central Axis
- Pass the cannulated hand drill over the central 0.045-inch guidewire.
- Drill the screw channel manually to a depth 2 mm short of the opposite scaphoid cortex. Never breach the opposite cortex with the drill.
- Continuously check the position and depth of the drill using live fluoroscopy to prevent over-penetration or wire advancement.
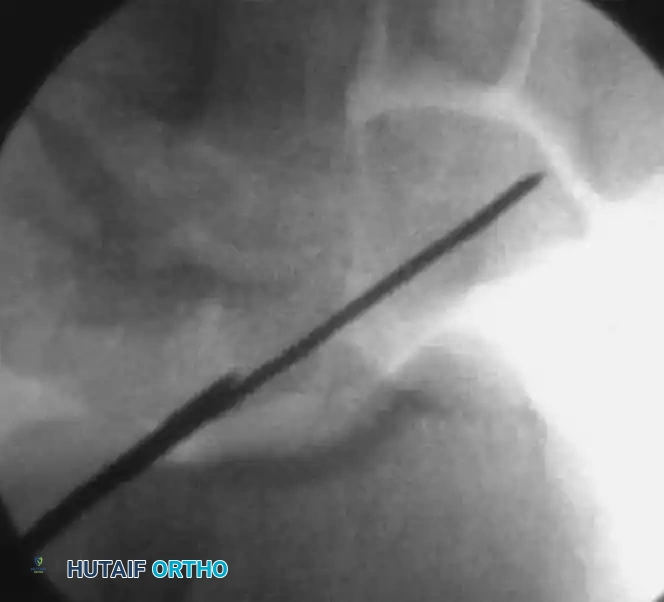
FIGURE: The screw channel is carefully created with a cannulated hand drill over the guidewire, confirmed continuously with fluoroscopy.
6. Screw Insertion and Countersinking
- Select the appropriate headless compression screw (e.g., Acutrak), ensuring it is 4 mm shorter than the measured scaphoid length.
- Advance the screw over the guidewire using the cannulated screwdriver.
- Monitor the insertion under fluoroscopy. The variable pitch of the headless screw will compress the fracture site as it is advanced.
- Drive the screw until the trailing edge is buried 1 to 2 mm beneath the proximal articular cartilage, and the leading edge is 1 to 2 mm short of the distal cortex.
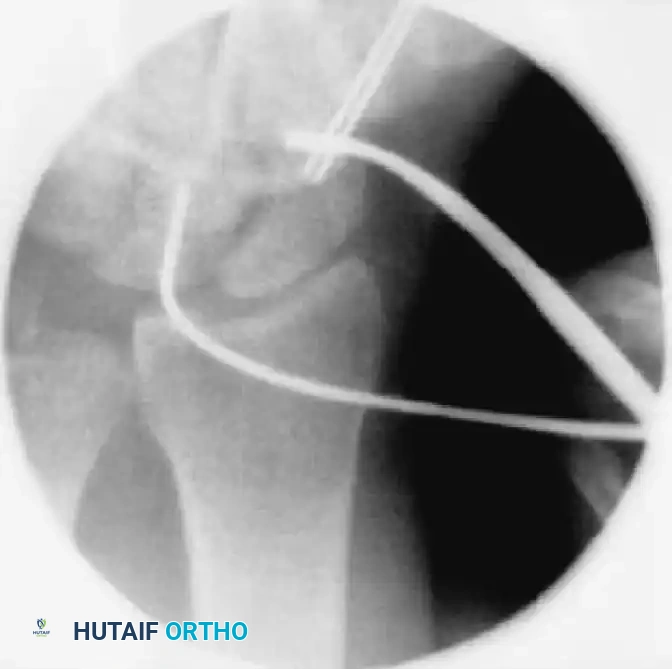
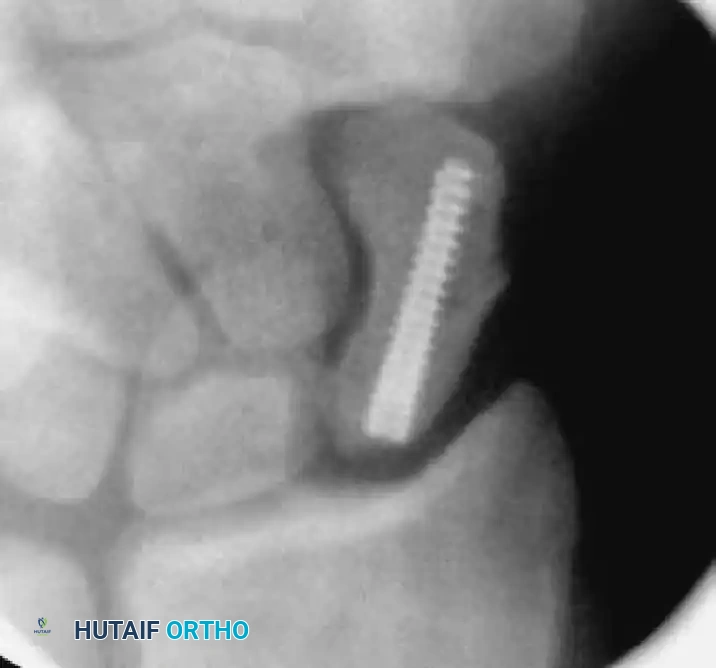
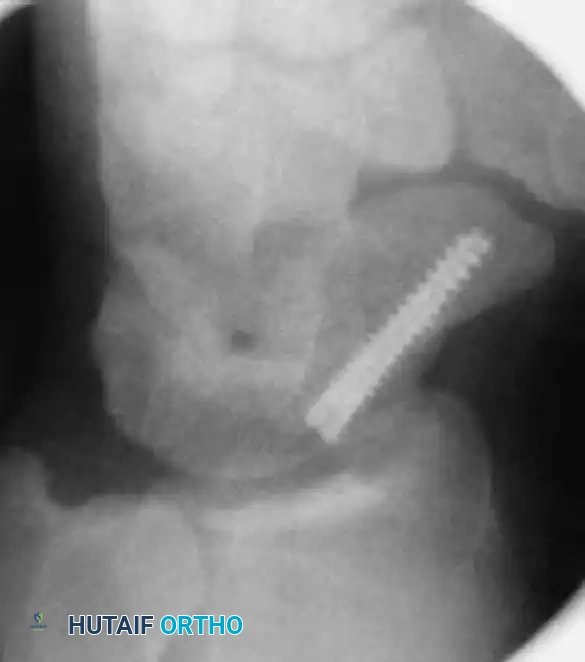
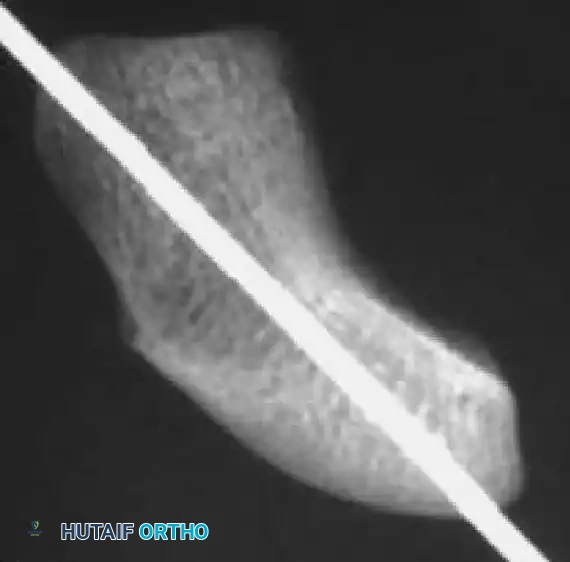
FIGURE: (A) Joysticks and anti-rotation wires are maintained during dorsal implantation of the screw. (B, C) Final fluoroscopy confirms the precise placement and countersinking of the headless compression screw.
- Remove the guidewire, anti-rotation wires, and joysticks. Obtain final multi-planar fluoroscopic images to verify fracture compression, anatomic reduction, and complete intraosseous screw containment.
Arthroscopic Assistance (Optional but Recommended)
If intercarpal ligament injury is suspected, or to definitively confirm articular reduction, wrist arthroscopy is an invaluable adjunct.
- Apply 10 to 15 lbs of longitudinal traction through the fingers using finger traps.
- Establish standard radiocarpal (3-4 and 4-5) and midcarpal (radial and ulnar) portals using fluoroscopic guidance.
- Insert the arthroscope into the radial midcarpal portal to directly inspect the scaphoid fracture reduction.
- Use a full-radius shaver to clear hematoma and reactive synovium.
- Probe and examine the scapholunate (SL) and lunatotriquetral (LT) ligaments for concomitant tears.
- Move the arthroscope to the 3-4 radiocarpal portal to directly visualize the proximal pole of the scaphoid and confirm that the screw head is adequately countersunk beneath the cartilage.
- If ligament tears are identified, they may be treated concurrently with arthroscopic debridement, percutaneous intercarpal pinning, or open dorsal ligament repair depending on severity.
Postoperative Care and Rehabilitation
Postoperative immobilization is dictated by the stability of the fixation and the presence of associated soft-tissue injuries.
- Standard Protocol (Isolated Fracture): Close the small incisions and apply a sterile dressing. Place the patient in a well-padded short-arm thumb spica splint.
- Complex/Ligamentous Injury Protocol: If concomitant ligamentous injuries were addressed, apply a Munster-type sugar-tong thumb spica splint extending above the elbow to control forearm rotation.
- 2-Week Follow-up: Remove skin sutures. Transition the patient to a short-arm thumb spica cast or a custom-molded rigid removable splint.
- 6 to 8 Weeks: Remove any supplemental K-pins (if used for ligamentous stabilization).
- Healing Assessment: Continue immobilization until radiographic union is evident. Because plain radiographs can be misleading due to the hardware, fine-cut Computed Tomography (CT) along the longitudinal axis of the scaphoid is the gold standard for confirming bridging trabeculae.
- Rehabilitation: Once clinical and radiographic union is confirmed, initiate a therapist-supervised rehabilitation program focusing on progressive wrist range of motion, grip strengthening, and proprioception.
Management of Scaphoid Nonunions
Scaphoid nonunions present a complex reconstructive challenge. They are heavily influenced by delayed diagnosis (an estimated 40% of scaphoid fractures are missed at initial presentation), gross displacement, and the inherently poor retrograde blood supply.
- Epidemiology: Displaced scaphoid fractures treated non-operatively have a nonunion rate approaching 92%. Osteonecrosis (AVN) occurs in 30% to 40% of cases, most frequently in proximal pole fractures.
- Pathology: Untreated nonunions predictably progress to Scaphoid Nonunion Advanced Collapse (SNAC wrist), characterized by cystic changes, carpal collapse, and progressive radiocarpal degenerative arthritis.
- Preoperative Evaluation: Gadolinium-enhanced MRI is critical to evaluate the vascularity of the proximal pole.
- Treatment Algorithms:
- Vascularized Proximal Pole: Nonunions with adequate circulation can be treated with rigid internal fixation and non-vascularized cancellous bone grafting (e.g., from the distal radius or iliac crest).
- Avascular Proximal Pole: If MRI or intraoperative punctate bleeding assessment reveals AVN, vascularized bone grafts (e.g., 1,2-Intercompartmental Supraretinacular Artery [1,2-ICSRA] graft or free medial femoral condyle graft) are indicated.
- Salvage Procedures: For extremely small, avascular, and un-reconstructible proximal pole fragments, excision of the fragment or proximal row carpectomy may be required.
- Adjunctive Therapies: While pulsed electromagnetic field (PEMF) and low-intensity pulsed ultrasound (LIPUS) have been utilized, current literature suggests that rigid surgical fixation and bone grafting remain vastly superior to electrical stimulation for established nonunions.
Complications and Pitfalls
- Hardware Prominence: Failure to accurately measure the scaphoid or subtract 4 mm will result in screw protrusion, leading to rapid destruction of the radiocarpal or scaphotrapezial joints.
- Eccentric Screw Placement: Missing the central axis reduces the biomechanical strength of the construct and increases the risk of iatrogenic fracture comminution during screw insertion.
- Thermal Necrosis: Using a power drill instead of a hand drill can cause thermal necrosis of the bone and cartilage, increasing the risk of nonunion. Always use a cannulated hand drill.
- Guidewire Breakage/Bending: Advancing the guidewire while the wrist is extended can cause the wire to bend against the dorsal lip of the radius. Always flex the wrist during initial wire advancement.
You Might Also Like