Open Reduction and Internal Fixation of Acute Displaced Scaphoid Fractures: The Volar Approach
Key Takeaway
The volar approach for open reduction and internal fixation (ORIF) of acute displaced scaphoid fractures is the gold standard for waist and distal pole lesions. This technique provides direct visualization of the fracture, facilitates anatomic reduction, and allows for optimal trajectory of headless compression screws. Careful preservation of the volar radiocarpal ligaments and precise fluoroscopic guidance are critical to achieving stable fixation and preventing postoperative carpal instability or nonunion.
Introduction to Scaphoid Fracture Management
The scaphoid is the critical biomechanical link between the proximal and distal carpal rows, playing an indispensable role in global wrist kinematics. Acute displaced fractures of the scaphoid demand meticulous surgical intervention to restore anatomic alignment, preserve carpal stability, and prevent the devastating long-term sequelae of scaphoid nonunion advanced collapse (SNAC).
While dorsal approaches are generally reserved for proximal pole fractures due to the proximity of the retrograde blood supply, the volar approach remains the gold standard for fractures located at the scaphoid waist and distal pole. This approach provides unparalleled exposure of the volar cortex, facilitates the correction of the classic "humpback" flexion deformity, and allows for the optimal distal-to-proximal trajectory required for headless compression screw fixation.
This comprehensive guide details the indications, biomechanical considerations, and step-by-step surgical execution of the volar approach for open reduction and internal fixation (ORIF) of acute displaced scaphoid fractures.
Surgical Anatomy and Biomechanics
A profound understanding of scaphoid anatomy is mandatory before undertaking this procedure. Approximately 80% of the scaphoid is covered by articular cartilage, severely limiting the available surface area for vascular penetration and hardware insertion.
The Tenuous Blood Supply
The scaphoid relies on a retrograde intraosseous blood supply. The major vascular contribution arises from the dorsal carpal branch of the radial artery, which enters the scaphoid at the dorsal ridge and supplies the proximal 70% to 80% of the bone in a retrograde fashion. A minor volar branch supplies the distal 20% to 30% via the scaphoid tubercle.
Clinical Pearl: The primary advantage of the volar approach for waist and distal pole fractures is the complete preservation of the critical dorsal blood supply. Dissecting dorsally for a waist fracture unnecessarily risks iatrogenic avascular necrosis (AVN) of the proximal pole.
The "Humpback" Deformity
When the scaphoid fractures at its waist, the distal pole tends to flex volarly and pronate due to the strong pull of the radioscaphocapitate ligament and the scaphoid tubercle's attachments. Conversely, the proximal pole extends with the lunate. This creates a volar cortical defect and a flexion deformity known as the "humpback" deformity. Failure to correct this intrascaphoid angle during ORIF will result in a loss of wrist extension and progressive carpal collapse.
Preoperative Planning and Patient Positioning
Imaging Modalities
Standard posteroanterior (PA), lateral, pronated oblique, and specific scaphoid views are required. However, fine-cut computed tomography (CT) scans reformatted along the longitudinal axis of the scaphoid are now considered the standard of care for preoperative planning. CT allows the surgeon to accurately assess the degree of comminution, the exact location of the fracture line, and the magnitude of the humpback deformity.
Operating Room Setup
- Positioning: Place the patient supine on the operating table with the affected arm extended on a radiolucent hand table.
- Anesthesia: The procedure is typically performed under regional anesthesia (supraclavicular or axillary block) or general anesthesia, depending on patient factors and the anticipated need for an iliac crest bone graft.
- Preparation: Prepare and drape the hand, wrist, and forearm. If preoperative imaging suggests volar comminution requiring structural grafting, simultaneously prepare and drape one iliac crest.
- Tourniquet: Apply a well-padded pneumatic tourniquet to the proximal arm. Exsanguinate the limb with an Esmarch bandage and inflate the tourniquet to the appropriate pressure (typically 250 mm Hg) prior to incision.
Surgical Technique: The Volar Approach Step-by-Step
1. Superficial Incision and Nerve Protection
The volar approach utilizes the internervous plane and the bed of the flexor carpi radialis (FCR) to access the radiocarpal joint safely.
- Make a longitudinal skin incision over the palmar surface of the wrist, beginning 3 to 4 cm proximal to the wrist flexion crease, directly over the FCR tendon.
- Extend the incision distally to the wrist flexion crease, and gently curve it radially toward the scaphotrapezial (STT) and trapeziometacarpal joints.
- Reflect the skin flaps at the level of the forearm fascia.
Surgical Warning: Meticulous superficial dissection is critical. You must identify and protect the terminal branches of the palmar cutaneous branch of the median nerve (PCBMN), which typically lies ulnar to the FCR, and the superficial branch of the radial nerve (SBRN), which lies radially. Retract these neural structures with extreme care using blunt Ragnell or Senn retractors.
2. Deep Dissection and the FCR Sheath
- Identify the FCR tendon and sharply open its superficial sheath.
- Retract the FCR tendon radially. (Note: While some classical descriptions retract the FCR ulnarly to protect the median nerve, retracting it radially as described in this specific technique provides a direct trajectory to the scaphoid while keeping the radial artery safely lateral).
- Incise the deep surface of the FCR sheath to expose the underlying palmar capsule of the radiocarpal joint.
3. Capsulotomy and Ligament Preservation
Exposing the radioscaphoid joint requires incising the robust volar extrinsic carpal ligaments.
- Extend the wrist and place it in ulnar deviation to bring the scaphoid out from under the radial styloid.
- Identify the radioscaphocapitate (RSC) and long radiolunate (LRL) ligaments.
- Open the capsule in the longitudinal axis of the scaphoid bone, extending the incision obliquely toward the scaphotrapezial joint.
- With sharp dissection, incise the RSC and LRL ligaments.
Pitfall: You must meticulously preserve each leaf of these capsuloligamentous structures. Failure to perform a robust repair of the RSC and LRL ligaments at the conclusion of the procedure can lead to postoperative volar intercalated segment instability (VISI) or ulnar translocation of the carpus.
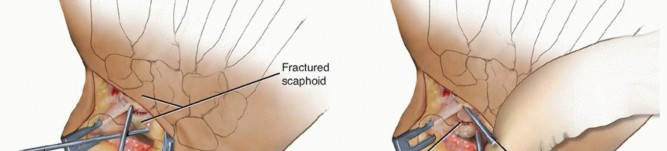
4. Fracture Exposure and Debridement
- Once the capsule is open, the scaphoid waist and distal pole will be directly visible.
- Use a dental pick or a small curette to clear the fracture site of hematoma, fibrous tissue, and debris.
- Inspect the fracture edges to determine the degree of comminution and the need for bone grafting.
- If comminution is absent or minimal, primary reduction and fixation will suffice.
- If comminution is extensive—especially on the palmar surface, resulting in a humpback flexion deformity—an iliac crest bone graft (ICBG) is mandatory to restore volar cortical length and structural integrity.
5. Fracture Reduction Techniques
Anatomic reduction is the most critical determinant of a successful outcome.
- Place 0.045-inch Kirschner wires (K-wires) into the distal and proximal poles to act as toggle levers or "joysticks."
- Use these joysticks to manipulate the fragments, extending the distal pole to correct the flexion deformity.
- Once reduced, provisionally fix the fracture with a separate K-wire. Ensure this provisional wire is placed peripherally so it does not interfere with the central trajectory required for the definitive cannulated screw.
- Verify the reduction using C-arm fluoroscopy in multiple planes. Avoid any rotational malalignment or residual angulation.
Internal Fixation: Headless Compression Screw Technique
The advent of the Herbert screw revolutionized scaphoid fixation by providing compression without a protruding head that could impinge on the articular surface. Today, modern cannulated headless compression screws operate on similar biomechanical principles.
For fractures through the waist and in the distal pole, the fixation device must be inserted through a distal portal to achieve a biomechanically superior distal-to-proximal trajectory down the central axis of the scaphoid.
Creating the Distal Portal
- Create the distal portal by opening the scaphotrapezial (STT) joint with a longitudinal capsular incision.
- Because the trapezium often blocks the direct linear trajectory to the central axis of the scaphoid, use a small rongeur to remove a minimal portion of the proximal lip of the trapezium. This allows unhindered placement of the guidewire from distal to proximal.
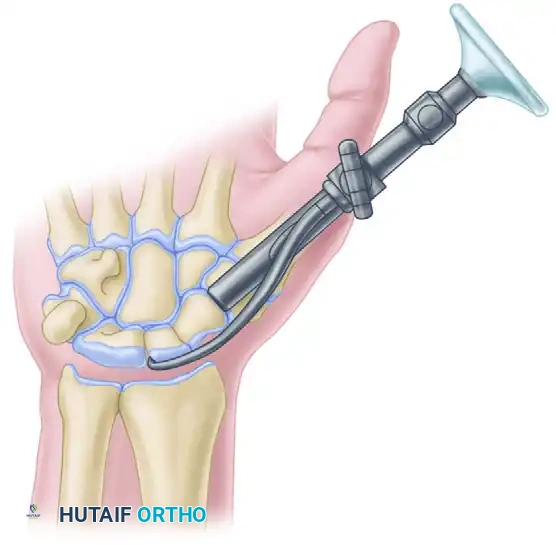
Guidewire Placement
- Placement of the central guidewire (or K-wires if using non-cannulated techniques) down the long axis of the scaphoid is facilitated by gentle radial deviation of the wrist. This aligns the scaphoid vertically relative to the radius.
- With the wrist in this position, direct the guidewire almost dorsally and proximally into the scaphoid.
- Confirm central placement in the proximal and distal poles using AP, lateral, and pronated oblique fluoroscopic views. The wire must be in the central third of the bone to maximize biomechanical stability and screw purchase.
The Herbert Screw Fixation Sequence
The following sequence illustrates the classic Herbert screw technique, the foundational method for headless scaphoid fixation.
A. Jig Placement:
A specialized jig is applied to maintain compression across the fracture site and guide the drilling process. The jig hooks around the proximal pole and seats against the distal pole.
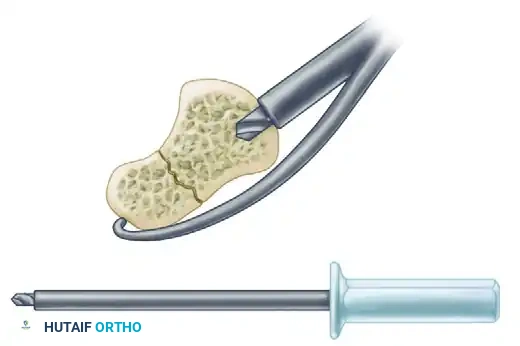
B. Short Drill:
A short drill is used to open the near cortex and prepare the distal pole for the trailing threads of the screw.
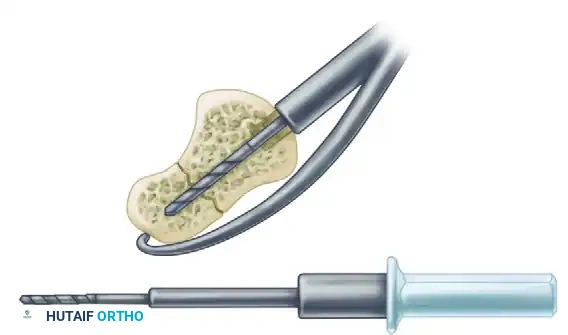
C. Long Drill:
A long drill is then inserted through the guide to its maximal depth, crossing the fracture site and penetrating the proximal pole to prepare the channel for the leading threads.
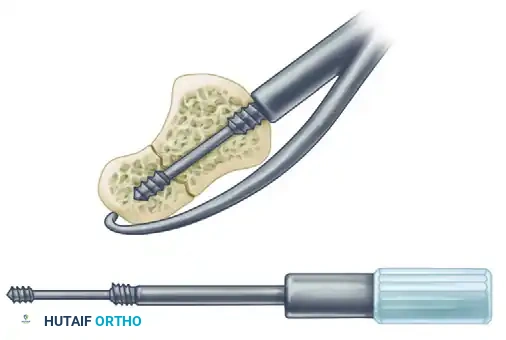
D. Screw Insertion:
The Herbert screw (or modern cannulated equivalent) is inserted. The differential pitch between the leading and trailing threads generates dynamic compression across the fracture site as the screw is advanced.
- Crucial Step: Insert the screw until the trailing end (the head) is completely flush with the subchondral bone and countersunk beneath the articular cartilage. A prominent screw head will cause rapid destruction of the STT joint.
Final Fluoroscopic Verification
After stable reduction and fixation are obtained, meticulously check the position and alignment of the reduction. Sweep the C-arm through a full range of motion to ensure the screw is fully contained within the bone and does not penetrate the radiocarpal or midcarpal joints.
Closure and Postoperative Protocol
Hemostasis and Capsular Repair
- Deflate the pneumatic tourniquet and obtain meticulous hemostasis using bipolar electrocautery.
- Insert a small closed-suction drain if there is significant oozing or if a structural bone graft was utilized.
- Capsular Closure: This is a non-negotiable step. Close the wrist capsule, specifically repairing the radioscaphocapitate and long radiolunate ligaments, using strong nonabsorbable sutures (e.g., 2-0 Ethibond) or long-lasting absorbable sutures (e.g., 2-0 PDS). A watertight, robust repair restores the volar tether of the carpus.
Skin Closure and Splinting
- Close the subcutaneous tissues and skin in a standard layered fashion.
- Apply a sterile, non-adherent dressing.
- Immobilize the wrist and thumb. Apply either a well-molded sugar-tong splint with a thumb spica extension or a long-arm cast incorporating the thumb. The wrist should be positioned in slight extension with the thumb in a functional position.
Postoperative Rehabilitation
- 0-2 Weeks: The patient remains in the initial splint or cast. Elevate the limb strictly to minimize edema. Encourage immediate active range of motion of the fingers and shoulder.
- 2 Weeks: Remove sutures. Transition the patient to a short-arm thumb spica cast or a rigid custom thermoplastic splint, depending on the rigidity of the fixation and patient compliance.
- 6-8 Weeks: Obtain follow-up radiographs (or a low-dose CT scan) to assess for bridging trabeculae. If clinical and radiographic signs of union are progressing, begin gentle active range of motion of the wrist and thumb under the guidance of a certified hand therapist.
- 12+ Weeks: Return to heavy labor or contact sports is generally restricted until definitive radiographic union is confirmed, which may take 12 to 16 weeks or longer in cases requiring bone grafting.
Conclusion
The volar approach for the open reduction and internal fixation of acute displaced scaphoid fractures is a highly effective, anatomically sound procedure. By preserving the dorsal blood supply, allowing direct visualization for the correction of humpback deformities, and facilitating the central placement of headless compression screws, this technique maximizes the probability of achieving a stable union and restoring optimal wrist kinematics. Mastery of the deep capsular anatomy and precise fluoroscopic guidewire targeting are the hallmarks of a successful surgical outcome.
You Might Also Like