Scarf Osteotomy Masterclass: Precision Correction of Hallux Valgus
Key Takeaway
This masterclass guides fellows through the Scarf osteotomy for hallux valgus, detailing comprehensive surgical anatomy, meticulous preoperative planning, and precise intraoperative execution. We cover every micro-step, from incision to hardware fixation, emphasizing neurovascular protection, optimal osteotomy cuts, and fragment displacement. Critical pearls and pitfalls are highlighted, alongside comprehensive postoperative rehabilitation, ensuring a thorough understanding of this versatile procedure.
Comprehensive Introduction and Patho-Epidemiology
The Evolution of the Scarf Osteotomy
The Scarf osteotomy represents a pinnacle of biomechanical engineering applied to orthopedic surgery, deriving its name from a classic woodworking joint designed to splice two pieces of timber together while maintaining structural integrity. Initially conceptualized for hallux valgus correction by Burutaran in 1976 and later popularized and refined by Weil and Barouk in the 1990s, this versatile diaphyseal osteotomy has become a cornerstone procedure for foot and ankle surgeons worldwide. Unlike simple transverse or closing wedge osteotomies, the Scarf utilizes a complex Z-shaped configuration that maximizes the surface area of cancellous bone contact. This expansive biological footprint not only promotes rapid and robust osseous union but also provides exceptional inherent mechanical stability against the deforming forces of the first ray.
The procedure's enduring popularity among academic and community surgeons alike stems from its unparalleled versatility in addressing multiplanar deformities. The Scarf osteotomy allows for precise, independent adjustments of the first metatarsal head in several dimensions: lateral translation to correct the intermetatarsal angle (IMA), horizontal rotation to address the distal metatarsal articular angle (DMAA), and even controlled shortening or lengthening. Furthermore, by altering the angulation of the longitudinal saw cut, the surgeon can achieve subtle plantarflexion or dorsiflexion of the metatarsal head, thereby restoring the critical weight-bearing function of the first ray and mitigating transfer metatarsalgia.
Mastery of the Scarf osteotomy requires a profound understanding of three-dimensional spatial geometry and meticulous surgical execution. The learning curve is notoriously steep, demanding precise saw control and a deep appreciation for the delicate soft-tissue envelope surrounding the first metatarsal. However, once mastered, the Scarf provides a powerful, reproducible, and definitive solution for a broad spectrum of hallux valgus deformities, offering patients a durable restoration of both form and function that withstands the rigors of daily ambulation and athletic pursuit.
Pathoanatomy of Hallux Valgus
Hallux valgus is not merely a cosmetic bump on the medial aspect of the foot; it is a complex, progressive, and multiplanar subluxation of the first metatarsophalangeal (MTP) joint. The deformity initiates with the failure of the medial stabilizing structures, particularly the medial collateral ligament and the medial sesamoid ligament. As these structures attenuate, the first metatarsal head drifts medially, escaping the confines of the sesamoid apparatus. This medial deviation of the metatarsal—termed metatarsus primus varus—is the foundational skeletal anomaly that drives the clinical presentation of the "bunion."
Concurrently, the proximal phalanx is tethered to the lateral sesamoid and the deep transverse metatarsal ligament via the adductor hallucis tendon and the lateral collateral ligament. As the metatarsal head drifts medially, the proximal phalanx is pulled into a valgus and pronated position. This alters the mechanical axis of the extrinsic tendons. The extensor hallucis longus (EHL) and flexor hallucis longus (FHL) tendons, which normally stabilize the joint dynamically, bowstring laterally. This bowstringing creates a vicious cycle, exerting a continuous lateral and proximal deforming force that further exacerbates the valgus drift and pronation of the great toe.
The sesamoid apparatus, embedded within the flexor hallucis brevis (FHB) tendon complex, remains relatively stationary in relation to the second metatarsal due to its attachment to the deep transverse metatarsal ligament. Therefore, what appears on an anteroposterior radiograph as lateral subluxation of the sesamoids is, in reality, the medial subluxation of the first metatarsal head off the sesamoid articulation. Over time, the crista—the bony ridge separating the medial and lateral sesamoid grooves on the plantar metatarsal head—erodes, and the joint becomes incongruent, leading to altered joint reactive forces, cartilage degradation, and eventual osteoarthritis if left uncorrected.
Epidemiological Considerations and Biomechanical Impact
Hallux valgus is one of the most prevalent forefoot deformities encountered in orthopedic practice, with a significantly higher incidence in females compared to males. The etiology is multifactorial, encompassing intrinsic genetic predispositions and extrinsic environmental factors. A strong familial inheritance pattern is frequently observed, often linked to underlying biomechanical variants such as ligamentous laxity, pes planus, or a hypermobile first tarsometatarsal (TMT) joint. Extrinsic factors, most notably the prolonged use of constrictive, narrow-toebox footwear and high heels, act as powerful catalysts, accelerating the progression of the deformity in genetically susceptible individuals.
The biomechanical consequences of a symptomatic hallux valgus deformity extend far beyond localized pain at the medial eminence. The first ray is designed to bear approximately 50% of the body's weight during the push-off phase of the gait cycle. As the first metatarsal deviates medially and dorsally, it becomes mechanically incompetent, failing to engage the ground effectively. This loss of structural integrity disrupts the windlass mechanism of the plantar fascia, leading to a profound loss of propulsive power and a destabilized medial column.
Consequently, the load normally borne by the robust first metatarsal is transferred laterally to the lesser metatarsals—structures not evolutionarily designed to handle such concentrated forces. This phenomenon, known as transfer metatarsalgia, frequently manifests as intractable plantar keratoses beneath the second or third metatarsal heads, capsulitis, or even stress fractures. Therefore, the primary objective of the Scarf osteotomy is not merely cosmetic realignment, but the rigorous biomechanical restoration of the first ray's weight-bearing capacity, thereby rescuing the lesser metatarsals from impending overload and failure.
Detailed Surgical Anatomy and Biomechanics
Osteology and Articular Geometry of the First Ray
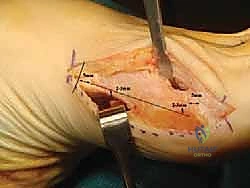
The first metatarsal is unique among its peers; it is the shortest, thickest, and most robust of the metatarsals, reflecting its critical role in load-bearing and propulsion. Its diaphyseal cross-section is roughly triangular, with a broad dorsal surface and a narrower plantar ridge. The medial cortex is significantly thicker and denser than the lateral cortex, a structural adaptation to the bending moments experienced during gait. This differential cortical thickness is a crucial consideration during the Scarf osteotomy; the surgeon must ensure the longitudinal saw cut is positioned to maximize contact with the robust medial cortical bone to prevent the complication of "troughing," where the lateral cortex collapses into the softer medullary canal.
The proximal articular surface of the first metatarsal forms the first tarsometatarsal (TMT) joint with the medial cuneiform. The orientation and stability of this joint are paramount. A highly oblique or hypermobile TMT joint is a classic contraindication for a Scarf osteotomy, as correcting the deformity distally without addressing proximal instability will inevitably lead to recurrence. Distally, the metatarsal head is covered by hyaline cartilage that extends further plantarly than dorsally, accommodating the articulation of the sesamoids. The distal metatarsal articular angle (DMAA) dictates the orientation of this cartilage; an abnormally high DMAA requires specific modification of the Scarf cuts to rotate the articular surface and achieve a congruent MTP joint.
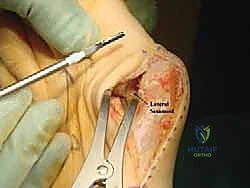
The plantar aspect of the metatarsal head features two longitudinal grooves separated by a central bony ridge known as the crista. These grooves house the medial (tibial) and lateral (fibular) sesamoids. The integrity of the crista is vital for maintaining sesamoid tracking. In advanced hallux valgus, the crista is often flattened or completely eroded by the friction of the subluxated sesamoids. Recognizing this articular geometry is essential during the lateral release and subsequent translation of the metatarsal head; the surgeon must physically relocate the metatarsal head back over the sesamoids to restore the functional mechanics of the flexor hallucis brevis complex.
Critical Neurovascular Structures
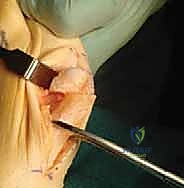
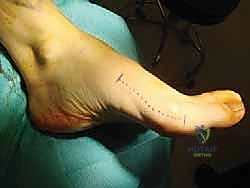
Navigating the surgical approach for a Scarf osteotomy requires a precise understanding of the surrounding neurovascular anatomy to prevent iatrogenic injury. The dorsal medial cutaneous nerve (DMCN), a terminal branch of the superficial fibular nerve, courses superficially along the dorsomedial aspect of the first metatarsal. It provides sensory innervation to the medial aspect of the hallux. This nerve is highly vulnerable during the initial skin incision, subcutaneous dissection, and placement of medial retractors. Injury to the DMCN can result in painful neuromas, hyperesthesia, or permanent numbness, significantly compromising an otherwise technically successful surgery. Meticulous blunt dissection and gentle retraction are mandatory to protect this structure.
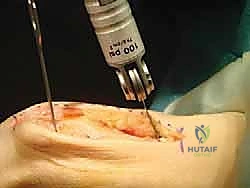
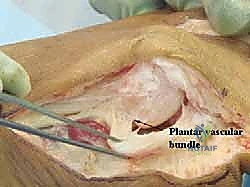
The vascular supply to the first metatarsal head is complex and critically important. The primary arterial supply is derived from the first plantar metatarsal artery, a branch of the deep plantar arch, which enters the metatarsal neck plantarly and laterally. A secondary supply comes from the first dorsal metatarsal artery. The intraosseous blood supply is relatively tenuous, making the metatarsal head heavily reliant on its extraosseous capsular vessels.
During the Scarf osteotomy, aggressive stripping of the plantar capsule or careless placement of retractors around the metatarsal neck can sever or compress these vital plantar feeding vessels. Disruption of this blood supply precipitates avascular necrosis (AVN) of the metatarsal head—a catastrophic complication that leads to joint collapse, intractable pain, and the likely need for a salvage arthrodesis. Therefore, all capsular and periosteal dissection on the plantar aspect of the metatarsal neck must be strictly subperiosteal and kept to the absolute minimum required for surgical exposure.
Musculotendinous and Ligamentous Stabilizers
The stability of the first MTP joint is governed by a delicate balance of dynamic musculotendinous forces and static ligamentous restraints. Dynamically, the extrinsic tendons (EHL and FHL) and intrinsic muscles (abductor hallucis, adductor hallucis, and flexor hallucis brevis) control motion. In the pathoanatomy of hallux valgus, the adductor hallucis, which inserts onto the lateral base of the proximal phalanx and the fibular sesamoid, becomes a primary deforming force. As the metatarsal drifts medially, the adductor pulls the phalanx into valgus. Releasing this tendinous insertion is a critical step in the lateral release portion of the procedure.
Conversely, the abductor hallucis, normally a medial stabilizer, migrates plantarly as the proximal phalanx pronates. In this displaced position, it loses its ability to abduct the toe and paradoxically contributes to the deformity by increasing the pronation moment. While not routinely addressed surgically during a standard Scarf, severe cases may require a medial capsulorrhaphy to reposition the abductor hallucis tendon dorsally, restoring its mechanical advantage as a medial stabilizer.
The static restraints include the medial and lateral collateral ligaments, the sesamoid ligaments, and the deep transverse metatarsal ligament. The lateral collateral ligament and the suspensory metatarsal-sesamoid ligaments become contracted in chronic hallux valgus. The "over-the-top" lateral release technique specifically targets these contracted lateral structures, severing them to allow the proximal phalanx to return to a neutral, congruent alignment with the metatarsal head. Failure to adequately release these tight lateral structures will result in persistent tension on the repair, leading to early recurrence of the deformity regardless of the quality of the bony osteotomy.
Exhaustive Indications and Contraindications
Patient Selection Criteria
The decision to proceed with a Scarf osteotomy must be rooted in rigorous patient selection, prioritizing clinical symptomatology over radiographic appearance. The primary indication is a patient presenting with a painful, symptomatic hallux valgus deformity that has proven refractory to a comprehensive trial of conservative management. Conservative measures should include wide-toebox footwear modification, custom or over-the-counter orthotics to support the medial arch, non-steroidal anti-inflammatory drugs (NSAIDs), and activity modification. Surgery should never be offered solely for cosmetic purposes, as the inherent risks of intervention outweigh the benefits in an asymptomatic foot.
Ideal candidates are typically adults with a mature skeleton who possess adequate bone stock to support the complex diaphyseal cuts and subsequent hardware fixation. The patient must also demonstrate the cognitive capacity and physical discipline required to adhere to a strict postoperative rehabilitation protocol, which often involves a period of modified weight-bearing and specific footwear requirements. Patients with high physical demands, such as elite athletes or heavy laborers, require careful preoperative counseling regarding expected recovery timelines and the potential, albeit small, risk of altered forefoot biomechanics.
Furthermore, the surgeon must evaluate the patient's overall vascular and neurological status. Patients with poorly controlled diabetes mellitus, peripheral neuropathy, or significant peripheral arterial disease are at an exponentially higher risk for wound healing complications, infection, and nonunion. In these compromised populations, the threshold for surgical intervention must be significantly higher, and less invasive or completely different surgical strategies may need to be considered to mitigate catastrophic postoperative complications.
Radiographic Thresholds for Intervention
Preoperative radiographic evaluation is the cornerstone of surgical planning for the Scarf osteotomy. Standardized, weight-bearing anteroposterior (AP), lateral, and sesamoid axial views are mandatory; non-weight-bearing films are virtually useless as they fail to demonstrate the true dynamic extent of the deformity. The Scarf is classically indicated for moderate to severe hallux valgus deformities. The primary metric is the Intermetatarsal Angle (IMA), with the Scarf being highly effective for an IMA ranging from 13 degrees up to approximately 20 degrees. Deformities with an IMA greater than 20 degrees often require an excessive amount of lateral translation that may destabilize the osteotomy or lead to troughing, thus favoring a proximal osteotomy or Lapidus arthrodesis.
The Hallux Valgus Angle (HVA) is another critical parameter, with the Scarf typically indicated for an HVA between 20 and 40 degrees. However, the HVA is often a secondary consideration to the IMA and the congruency of the MTP joint. The Distal Metatarsal Articular Angle (DMAA) must be meticulously measured. A normal DMAA is less than 10 degrees. If the DMAA is significantly increased (a condition often seen in juvenile hallux valgus), the standard Scarf cuts must be modified—specifically, angling the distal and proximal transverse cuts to allow for medial rotation of the metatarsal head—to restore joint congruency and prevent recurrence.
Finally, the surgeon must assess the position of the sesamoids on the AP and axial views. The degree of lateral sesamoid subluxation (often graded on a 4-point scale) dictates the extent of the lateral soft tissue release required. The ultimate goal of the Scarf osteotomy, combined with the soft tissue balancing, is to physically translate the metatarsal head laterally until it is recentered precisely over the sesamoid apparatus, thereby restoring the functional integrity of the flexor complex.
Absolute and Relative Contraindications
While highly versatile, the Scarf osteotomy is not a panacea and possesses distinct contraindications that the vigilant surgeon must respect. Absolute contraindications include the presence of active local or systemic infection, severe peripheral vascular disease precluding adequate wound healing, and advanced degenerative joint disease (osteoarthritis) of the first MTP joint. In cases of severe hallux rigidus or end-stage arthritis, realigning the joint will not alleviate the pain originating from denuded cartilage; these patients are definitively treated with a first MTP joint arthrodesis.
A critical biomechanical contraindication is hypermobility or gross instability of the first tarsometatarsal (TMT) joint. If the foundational base of the first ray is unstable, a diaphyseal osteotomy will fail to provide lasting correction, as the entire ray will continue to drift medially postoperatively. In the presence of TMT hypermobility, a Lapidus procedure (first TMT arthrodesis) is the procedure of choice. Similarly, severe spasticity or neuromuscular disorders (e.g., cerebral palsy, Charcot-Marie-Tooth) often present with overpowering dynamic imbalances that will rapidly tear through a Scarf reconstruction, necessitating arthrodesis for reliable, permanent positioning.
Relative contraindications revolve primarily around bone quality and anatomy. Severe osteopenia or osteoporosis significantly increases the risk of hardware pull-out, fracture during the saw cuts, and troughing. Furthermore, a first metatarsal with a very narrow diaphyseal width (a "pencil-like" metatarsal) is highly problematic. The Scarf relies on adequate cortical bone contact after translation; in a narrow metatarsal, lateral translation quickly results in the medial cortex of the plantar fragment falling into the medullary canal of the dorsal fragment (troughing), leading to loss of fixation, elevation of the metatarsal head, and severe transfer metatarsalgia.
| Parameter | Indications for Scarf Osteotomy | Contraindications for Scarf Osteotomy |
|---|---|---|
| Intermetatarsal Angle (IMA) | 13° to 20° (Moderate to Severe) | > 20° (Consider Lapidus or Proximal Osteotomy) |
| Hallux Valgus Angle (HVA) | 20° to 40° | > 40° with |
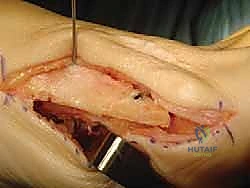
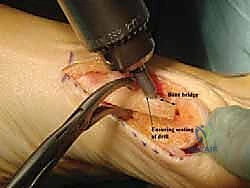
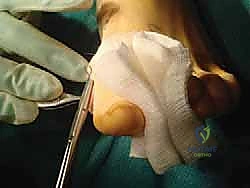
Clinical & Radiographic Imaging Archive