Mastering Open Reduction and Internal Fixation of Clavicular Fractures
Key Takeaway
Open reduction and internal fixation (ORIF) of clavicular fractures is indicated for significantly displaced midshaft fractures to restore shoulder biomechanics and prevent nonunion. Surgical options include anteroinferior plating, superior plating, and intramedullary nailing. Successful outcomes depend on meticulous soft-tissue handling, preservation of the supraclavicular nerves, anatomic reduction, and rigid fixation. This guide details the step-by-step operative techniques, biomechanical considerations, and postoperative rehabilitation protocols for optimal patient recovery.
INTRODUCTION TO CLAVICULAR FRACTURE MANAGEMENT
Clavicular fractures represent approximately 5% to 10% of all adult fractures, with the vast majority (up to 80%) occurring in the middle third of the diaphysis. Historically, nonoperative management was the gold standard for nearly all midshaft clavicle fractures. However, landmark prospective randomized trials, notably those by the Canadian Orthopaedic Trauma Society (COTS), have unequivocally demonstrated that nonoperative treatment of completely displaced midshaft clavicle fractures results in higher rates of nonunion, symptomatic malunion, and inferior functional outcomes compared to primary surgical fixation.
Open reduction and internal fixation (ORIF) is now widely recognized as the standard of care for displaced midshaft clavicular fractures, particularly those exhibiting greater than 100% displacement, shortening of more than 1.5 to 2.0 centimeters, or severe comminution (z-type fractures). The primary goals of operative intervention are to restore the anatomic length and alignment of the shoulder girdle, provide rigid mechanical stability to facilitate early mobilization, and minimize the risk of neurovascular compromise or nonunion.
SURGICAL ANATOMY AND BIOMECHANICS
A profound understanding of clavicular anatomy and the deforming forces acting upon it is essential for successful surgical reconstruction. The clavicle is an S-shaped tubular bone that acts as the sole osseous strut connecting the axial skeleton to the upper extremity.
Deforming Forces
When a midshaft fracture occurs, predictable deforming forces displace the fragments:
* Medial Fragment: The sternocleidomastoid (SCM) muscle exerts a strong superior and posterior pull on the medial fragment.
* Lateral Fragment: The weight of the upper extremity, combined with the pull of the pectoralis major and latissimus dorsi muscles, draws the lateral fragment inferiorly, anteriorly, and medially, resulting in the characteristic shortening and ptosis of the shoulder.
Neurovascular Proximity
The subclavian vessels and the brachial plexus lie in perilous proximity to the middle third of the clavicle, situated directly posterior and inferior to the bone.
Surgical Warning: The distance between the posterior cortex of the clavicle and the subclavian vein can be as little as 10 to 15 millimeters. Plunge depth during drilling or over-penetration of screws, particularly during superior plating, carries a catastrophic risk of iatrogenic neurovascular injury.
PREOPERATIVE PLANNING AND PATIENT POSITIONING
Meticulous preoperative planning involves a thorough evaluation of orthogonal radiographs (standard anteroposterior and 15-degree cephalad tilt views) to assess fracture morphology, comminution, and shortening.
Patient Positioning
- Table and Posture: Place the patient in a supine or modified beach-chair position on a radiolucent operating table.
- Scapular Retraction: Place a large bump or rolled towel longitudinally between the scapulae. This allows the injured shoulder girdle to fall posteriorly, which passively aids in restoring clavicular length and significantly increases the anterior exposure of the clavicle.
- Head Positioning: Turn the patient's head away from the operative side to maximize the surgical field and move the anesthesia airway equipment out of the sterile field.
- Draping: Prep and drape the entire forequarter, allowing free manipulation of the ipsilateral arm to assist with intraoperative fracture reduction.
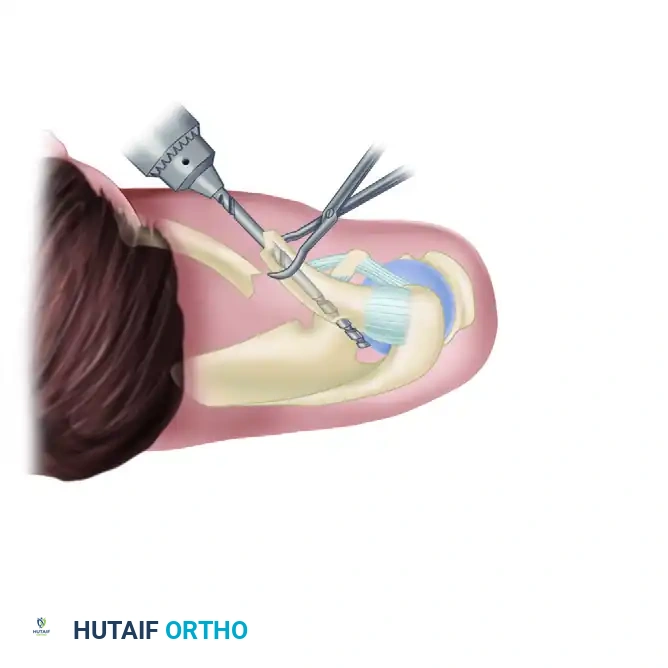
SURGICAL TECHNIQUE: ANTEROINFERIOR PLATE AND SCREW FIXATION
The anteroinferior plating technique, modified from Collinge et al., has gained immense popularity due to its distinct biomechanical and clinical advantages. Placing the plate on the anteroinferior surface allows for longer screw trajectories (directed from anterior to posterior) that safely parallel the neurovascular bundle rather than aiming directly toward it. Furthermore, the anteroinferior position minimizes hardware prominence beneath the thin superior skin envelope.
Step 1: Incision and Superficial Dissection
- Make a transverse or slightly oblique incision centered over the fracture site, extending from the sternal notch medially to the anterior edge of the acromion laterally.
- Sharply incise the skin and subcutaneous tissue to expose the platysma muscle.
- Release the lateral platysma carefully.
Clinical Pearl: As you divide the platysma, meticulously identify and protect the branches of the supraclavicular nerve (medial, intermediate, and lateral branches) traversing the anterior aspect of the clavicle. Preserving these nerves prevents the formation of painful neuromas and avoids postoperative numbness over the anterior chest wall.
Step 2: Deep Dissection and Fascial Release
- Identify the clavipectoral fascia along its attachment to the anterior border of the clavicle.
- Incise the clavipectoral fascia and carefully elevate it inferiorly.
- Begin your deep dissection along the medial fragment. Because the medial fragment is typically flexed superiorly by the SCM, it is pulled away from the vital infraclavicular neurovascular structures, making it the safer starting point.
- Soft Tissue Preservation: For acute fractures, perform only minimal soft tissue dissection. Preserve the periosteal attachments to comminuted butterfly fragments to maintain their vascularity and osteogenic potential.
Step 3: Fracture Reduction
- Utilize the pre-positioned scapular bump and manual traction on the arm to restore length.
- Reduce the main fracture fragments anatomically. Use pointed reduction forceps or bone clamps to hold the reduction provisionally.
- If the fracture pattern is oblique, utilize a 3.5-mm lag screw for provisional absolute stability. Alternatively, a mini-fragment screw (2.0-mm or 2.4-mm) can be placed outside the planned plate footprint to hold the reduction, allowing for perfect contouring and application of the definitive plate.
Step 4: Plate Contouring and Application
- Select a 3.5-mm reconstruction plate, dynamic compression plate (DCP), or pre-contoured locking plate. Typically, an eight-hole plate provides adequate fixation (aiming for at least three, preferably four, bicortical screws on each side of the fracture).
- Contour the plate to fit flush along the anteroinferior edge of the clavicle. When viewed on edge, the plate should be contoured into a gentle S-shape to match the native clavicular bow.
- Apply the plate to the bone. Aim the drill bit and subsequent screws posteriorly and superiorly. This trajectory maximizes bone purchase while directing the sharp screw tips safely away from the subclavian vessels.
- If an oblique fracture line is present and was not previously lagged, a lag screw can be placed directly through the plate or independently into the bone at roughly a 90-degree angle to the fracture plane.
SURGICAL TECHNIQUE: SUPERIOR PLATE FIXATION
While anteroinferior plating offers safety and cosmetic benefits, superior plating remains a biomechanically robust option. The superior aspect of the clavicle represents the tension band side of the bone; thus, a plate placed superiorly is mechanically optimal for resisting the inferior bending forces exerted by the weight of the arm.
Technique Modifications for Superior Plating
- Contouring: The plate must be meticulously contoured to the superior surface of the clavicle. Pre-contoured locking plates are highly advantageous here, as they match the complex S-shaped superior anatomy and reduce the need for intraoperative bending.
- Screw Trajectory: Insert the screws from superior to inferior.
- Safety Precaution: Because the drill and screws are directed straight toward the neurovascular bundle and pleura, extreme caution is mandatory. Use a drill stop, place a protective retractor (such as a malleable ribbon) under the clavicle during drilling, and measure depth accurately to prevent over-penetration.
SURGICAL TECHNIQUE: INTRAMEDULLARY FIXATION
Intramedullary (IM) nailing of clavicular fractures is a technique with a history spanning over 50 years. Historically, a variety of devices were utilized, including Rockwood pins, Kirschner wires, Küntscher nails, and Rush nails.
Rationale and Biomechanics
The theoretical advantages of intramedullary fixation include a smaller skin incision, superior cosmetic results, minimal periosteal stripping, and the preservation of the fracture hematoma. Unlike rigid plating, which promotes primary bone healing, IM nailing provides relative stability, encouraging robust secondary bone healing via callus formation.
However, biomechanical studies comparing the fixation of clavicular osteotomies have consistently shown that 3.5-mm compression plates are superior to 3.8-mm or 4.5-mm intramedullary pins in resisting displacement and torsional forces. Furthermore, historical IM devices were plagued by frequent and sometimes catastrophic complications, including intrathoracic hardware migration, pin breakage, and damage to underlying neurovascular structures.
Modern Titanium Elastic Nails (TENs)
More recently, titanium elastic intramedullary nails (TENs) have revitalized this technique, yielding good to excellent results in appropriately selected patients (typically simple, non-comminuted midshaft fractures).
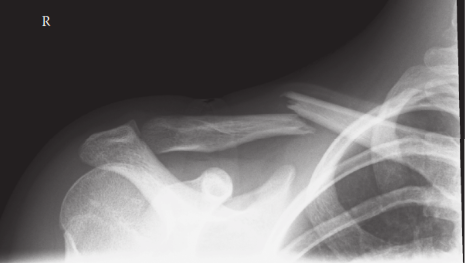
Preoperative radiograph demonstrating a significantly displaced midshaft clavicular fracture, an ideal candidate for surgical intervention.
Despite the improvements in implant design, reported complication rates for TENs have historically ranged from 9% to 78%, primarily involving medial or lateral hardware migration and cortical perforations.
To mitigate these risks, Frigg et al. introduced critical technical modifications that successfully reduced complication rates from 60% to 17%:
1. Use of an End Cap: Securing the lateral end of the nail with an end cap prevents medial migration and provides axial stability.
2. Strict Closed Reduction Limits: The surgeon should attempt closed reduction and percutaneous passage of the nail no more than twice. If unsuccessful, immediate conversion to a small open reduction at the fracture site is mandatory to prevent soft tissue trauma.
3. Manual Passage: The nail should be passed manually using a T-handle rather than power-driven, allowing for tactile feedback and reducing the risk of cortical perforation.
4. Intraoperative Imaging: Obtain multiple intraoperative oblique radiographs to definitively rule out lateral or posterior cortical perforation before finalizing fixation.
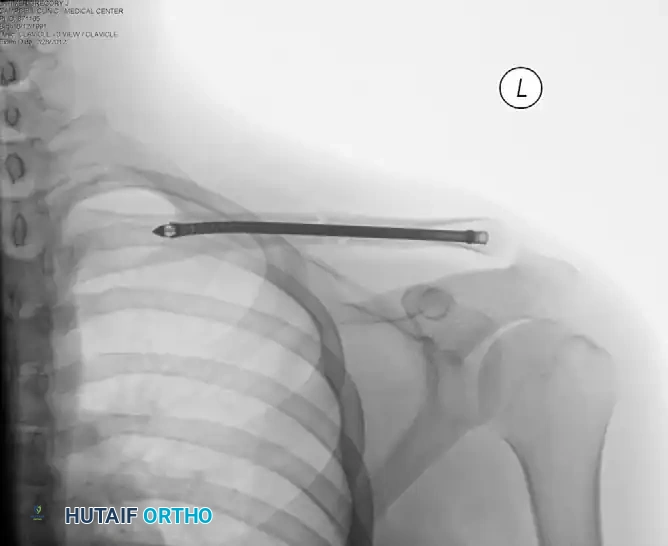
Postoperative radiograph demonstrating successful intramedullary fixation of the clavicle, restoring anatomic length and alignment.
POSTOPERATIVE CARE AND REHABILITATION PROTOCOL
The success of clavicular ORIF relies heavily on a structured, phased postoperative rehabilitation program. The goal is to prevent shoulder stiffness while protecting the fixation construct until clinical and radiographic union is achieved.
Phase 1: Immediate Postoperative Period (Weeks 0-2)
- Immobilization: The operated extremity is placed in a standard shoulder sling for comfort and to support the weight of the arm, thereby reducing stress on the hardware.
- Early Motion: Passive range of motion (ROM) is initiated immediately. Pendulum exercises and Codman exercises are taught to the patient.
- Distal Joints: Active ROM of the elbow, wrist, and hand is highly encouraged to prevent distal edema and stiffness.
- Restrictions: Strict avoidance of active shoulder elevation, heavy lifting, pushing, or pulling.
Intramedullary Nailing Specifics: If the patient was treated with an intramedullary device, postoperative range of motion should be strictly limited to a maximum of 90 degrees of forward flexion and abduction for the first 6 weeks to prevent hardware back-out or migration.
Phase 2: Intermediate Phase (Weeks 2-6)
- Weaning the Sling: The patient is gradually weaned from the sling, using it only in crowded public spaces or for comfort during sleep.
- Active-Assisted ROM: Transition from passive to active-assisted range of motion using pulleys or a wand.
- Isometric Strengthening: Gentle isometric strengthening of the deltoid and rotator cuff can begin, provided it does not elicit pain at the fracture site.
Phase 3: Advanced Strengthening and Return to Play (Weeks 6-12+)
- Radiographic Check: At 6 to 8 weeks, radiographs should be obtained to assess for bridging callus (in IM nailing) or obliteration of the fracture line (in plating).
- Active Strengthening: Once clinical and radiographic signs of healing are present, progressive isotonic strengthening of the shoulder girdle is initiated.
- Full Return: Full return to unrestricted activities, including heavy manual labor and contact sports, is generally allowed when solid fracture healing is confirmed, usually between 2 to 3 months postoperatively.
COMPLICATIONS AND PITFALLS
While ORIF of the clavicle is highly successful, surgeons must be prepared to manage potential complications:
* Infection: Superficial and deep infections require prompt aggressive debridement and culture-directed antibiotic therapy.
* Hardware Prominence: Particularly common with superior plating in thin individuals. Symptomatic hardware may be removed after 12 to 18 months, once solid union is confirmed.
* Nonunion: Rare with rigid plating but can occur due to inadequate fixation, excessive periosteal stripping, or patient non-compliance. Treatment requires revision ORIF with autologous bone grafting.
* Adhesive Capsulitis: Prevented by early, controlled passive mobilization (Pendulum exercises) as outlined in the postoperative protocol.
You Might Also Like