COMMINUTED PATELLAR FRACTURES: PRINCIPLES AND BIOMECHANICS
Comminuted patellar fractures present a complex reconstructive challenge for the orthopedic surgeon. Often resulting from high-energy direct trauma to the anterior knee, these injuries frequently manifest with severe fragmentation of the distal pole, leaving a substantial and relatively normal proximal fragment. Historically, total patellectomy was a common recourse for severe comminution; however, contemporary orthopedic principles dictate that the proximal fragment—an indispensable component of the extensor mechanism—must be preserved whenever feasible.
The patella serves as a critical fulcrum, increasing the moment arm of the quadriceps mechanism and enhancing its mechanical advantage by up to 30%. Excision of the entire patella drastically reduces quadriceps efficiency, requiring up to 30% more force to achieve full extension. Therefore, if at least one-third of the proximal patella remains intact and possesses a viable articular surface, a partial patellectomy with extensor mechanism advancement is the gold standard.
💡 Clinical Pearl: The Myth of Inevitable Arthritis
The historical apprehension that retaining a partial patellar fragment will inevitably produce severe, symptomatic patellofemoral arthritis later in life has been vastly overemphasized. Clinical outcomes demonstrate that preserving the proximal pole yields superior functional results, better quadriceps strength, and higher patient satisfaction compared to total patellectomy, even if mild radiographic arthrosis develops over time.
The most critical technical objective during a partial patellectomy is the precise anatomical reattachment of the patellar tendon to the retained fragment. The details of suturing the patellar tendon to the bone must be observed meticulously to prevent a sagittal plane tilt of the fragment. An anteriorly tilted proximal fragment will cause the sharp, raw osseous edge of the osteotomy to gouge into the femoral trochlea during flexion, leading to rapid, catastrophic erosion of the patellar groove.
PREOPERATIVE PLANNING AND PATIENT POSITIONING
Indications for Partial Patellectomy
- Highly comminuted distal pole fractures (e.g., OTA/AO 34-C3) where anatomical reduction and stable internal fixation (ORIF) are impossible.
- Proximal pole comminution with an intact, large distal fragment (less common, but managed with identical biomechanical principles).
- Failure of previous patellar fracture fixation requiring salvage.
Patient Positioning
- Place the patient in the supine position on a standard radiolucent operating table.
- Apply a high thigh pneumatic tourniquet to ensure a bloodless surgical field.
- Prep and drape the limb freely to allow full, unhindered flexion and extension of the knee during the procedure. This dynamic assessment is critical for evaluating the tension and tracking of the extensor mechanism repair.
- Ensure fluoroscopy (C-arm) is available from the contralateral side to confirm fragment positioning, drill trajectories, and hardware placement.
SURGICAL TECHNIQUE: PARTIAL PATELLECTOMY
The objective of this procedure is to excise the unsalvageable comminuted fragments, prepare the retained proximal bone, and securely advance and anchor the patellar tendon to restore extensor continuity.
1. Exposure and Joint Debridement
- Utilize a standard midline longitudinal incision over the anterior knee, extending from the distal quadriceps tendon to the tibial tubercle. This approach provides extensile access and avoids the neurovascular complications associated with transverse incisions.
- Elevate full-thickness fasciocutaneous flaps medially and laterally to expose the extensor retinaculum.
- Identify the fracture site. If at least one-third of the proximal patella is intact, proceed with partial patellectomy.
- Meticulously clear the knee joint of all loose fragments of bone, articular cartilage, and hematoma. Copious irrigation is recommended.
- Excise the comminuted, unsalvageable distal fragments.
- Surgical Tip: Small flecks of bone can be intentionally left within the substance of the patellar tendon. These osseous remnants act as biological anchors, making suture purchase and anchorage significantly easier and more robust.
- Trim away the frayed, devitalized edges of the joint capsule and patellar tendon to expose healthy, robust collagenous tissue for repair.
2. Preparation of the Proximal Fragment
- Using an oscillating saw or a sharp osteotome, trim the inferior articular edge of the proximal fragment to create a flat, transverse surface.
- Smooth the raw osseous edge meticulously with a rasp. Any sharp cortical edges left behind risk abrading the patellar tendon or eroding the femoral articular cartilage.
- Beginning on the raw fracture surface of the proximal fragment, identify a starting point just anterior to the articular cartilage.
- Use a 2.0-mm Kirschner wire or a 2.5-mm drill bit to drill three parallel holes in a proximal direction. These holes should exit at the superior pole of the patella.
- The spatial distribution of these holes is critical: place one hole in the exact center, one in the medial third, and one in the lateral third of the fragment.
⚠️ Surgical Warning: Drill Trajectory
The drill holes must originate as close to the articular margin as possible. If the holes are placed too anteriorly on the fracture surface, tensioning the patellar tendon will cause the proximal fragment to tilt anteriorly, driving the raw posterior bone edge directly into the trochlear groove during knee flexion.
3. Tendon Preparation and Suture Passage
- Utilize heavy, nonabsorbable, braided sutures (e.g., #2 or #5 FiberWire, Ethibond, or equivalent).
- Weave two separate heavy sutures through the substance of the patellar tendon using a locking Krackow or Bunnell technique. Place one suture through the medial half of the tendon and the second through the lateral half.
- Using a suture passer or a Hewson suture passer, shuttle the free proximal ends of the sutures through the pre-drilled intraosseous holes in the patella.
- Route the suture limbs systematically: place one suture end through the medial hole, one through the lateral hole, and pass the remaining two central limbs through the central hole.
4. Reduction and Fixation
- Extend the knee fully, or place it in slight hyperextension, to maximally relax the extensor mechanism.
- Pull the sutures proximally to advance the patellar tendon to the raw bone surface.
- Tie the sutures securely over the superior pole of the patella (often over a bony bridge or through the quadriceps tendon insertion to prevent suture cut-out).
- The Evagination Principle: As the sutures are tensioned, the patellar tendon should evaginate (roll inward) and lie flush against the raw fractured surface of the patellar remnant, directly adjacent to the articular surface. This critical step prevents tilting of the fragment and ensures that only smooth articular cartilage and soft tissue contact the femur.
- Repair the medial and lateral retinacular expansions meticulously with #1 or #0 absorbable sutures. The retinacular repair is vital for restoring the coronal plane stability of the patella and sharing the load of the extensor mechanism.
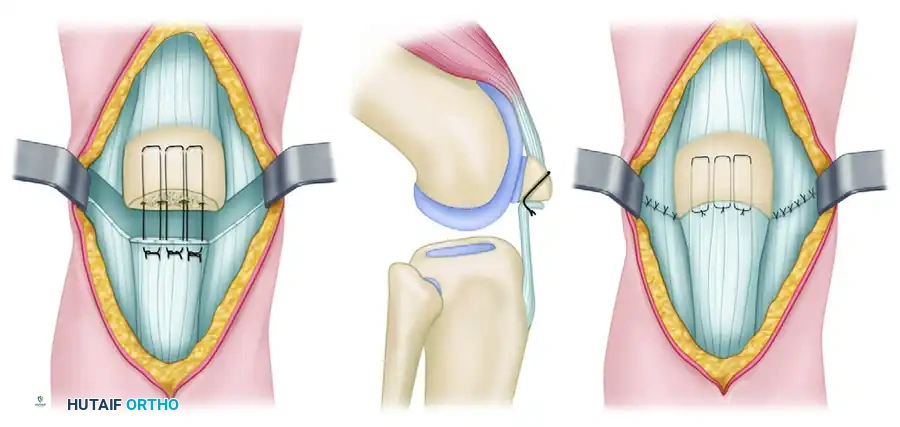
FIGURE 54-65 Partial patellectomy. A, Retained fragment is approximated to tendon with large, nonabsorbable sutures. B, Drill holes are oriented to reattach tendon close to articular surface. C, Quadriceps expansions are completely repaired.
Management of Proximal Pole Comminution
Occasionally, the injury pattern is reversed: the proximal pole of the patella is severely comminuted, leaving a single, large distal fragment consisting of half or more of the bone. Provided this distal fragment contains a smooth, undamaged articular surface, it must be preserved. The principles outlined above are applied in reverse. The quadriceps tendon is advanced and sutured to the distal fragment. Note that much of the lower pole at its inferior limits is naturally uncovered by articular cartilage, which must be accounted for during tendon positioning to avoid impingement.
SURGICAL TECHNIQUE: FIGURE-OF-EIGHT LOAD-SHARING WIRE
Because of the immense, powerful forces generated by the quadriceps mechanism (which can exceed several times body weight during basic activities), isolated suture repair of the tendon to bone is often mechanically insufficient. Protection of the repair is frequently necessary to prevent catastrophic postoperative gap formation or rupture.
This protection is optimally accomplished by utilizing a figure-of-eight, load-sharing wire or cable, as originally described by Perry et al. The cable acts as an internal splint, protecting the patellar tendon repair by transmitting tensile loads directly from the quadriceps tendon (or proximal pole of the patella) bypassing the fracture/repair site, directly to the tibial tubercle.
This technique is not only essential for partial patellectomies but can also be utilized to protect tenuous internal fixation (ORIF) of highly comminuted patellar fractures, allowing for much more aggressive, early postoperative rehabilitation.
1. Proximal and Distal Anchorage
- After the internal fixation or partial patellectomy with extensor mechanism repair has been completed, prepare for the load-sharing augmentation.
- Drill a 2.0-mm hole transversely across the proximal pole of the patella, from medial to lateral.
- Alternative Proximal Anchorage: If the proximal bone is osteoporotic or too small, pass the wire or cable directly through the robust quadriceps tendon insertion adjacent to the superior pole of the patella.
- Drill a second 2.0-mm hole transversely across the tibial tubercle, posterior to the patellar tendon insertion.
2. Wire Passage and Tensioning
- Hyperextend the knee to completely relax the patellar tendon and the primary repair.
- Pass a heavy braided cable (e.g., 1.0mm or 1.2mm titanium/cobalt-chrome cable) or a 16-gauge stainless steel wire through each of the two transverse drill holes.
- Crucial Step: Cross the sutures or wires anterior to the patellar tendon to form a figure-of-eight configuration.
- Tighten and crimp (or twist, if using wire) the construct to each other.
- As the wires are tightened, observe the patella tracking distally. The primary patellar tendon repair should become completely lax during this step, confirming that the wire is successfully offloading the tension.
⚠️ Pitfall: Iatrogenic Patella Baja
Extreme caution must be exercised during the tensioning of the load-sharing wire. Over-tightening the cable will pull the patella too far distally, creating an iatrogenic patella baja (infera). This alters patellofemoral kinematics, severely restricts knee flexion, and increases retropatellar contact pressures. Compare the patellar height to the contralateral knee fluoroscopically if necessary.
3. Dynamic Intraoperative Testing
- Once the wire is secured, gently flex the knee to 90 degrees under direct visualization.
- Confirm that no displacement of the fracture or gapping of the tendon repair occurs.
- Biomechanical Imperative: It is absolutely critical to cross the wires anteriorly over the patellar tendon. If the wires are crossed posteriorly (between the tendon and the joint capsule), flexion of the knee will cause the wire to displace posteriorly into the joint space. This posterior displacement shortens the effective length of the wire, causing it to go slack and completely preventing it from sharing the load across the fracture site during flexion.
POSTOPERATIVE REHABILITATION AND HARDWARE REMOVAL
The addition of the load-sharing wire allows for a modified, accelerated rehabilitation protocol compared to traditional cast immobilization.
Phase I (0-2 Weeks):
- The knee is placed in a hinged knee brace locked in full extension.
- Weight-bearing as tolerated (WBAT) with crutches is permitted with the brace locked in extension.
- Isometric quadriceps sets and straight leg raises are initiated immediately to prevent muscular atrophy.
Phase II (2-6 Weeks):
- The hinged brace is unlocked to allow progressive passive and active-assisted range of motion (ROM).
- Flexion is typically advanced by 30 degrees every 1 to 2 weeks, depending on the intraoperative stability assessment. The load-sharing wire protects the repair during this vulnerable phase.
Phase III (6-12 Weeks):
- Progression to full active ROM.
- Initiation of closed-chain kinetic exercises (e.g., mini-squats, leg presses) as radiographic and clinical healing progresses.
Hardware Removal:
The figure-of-eight wire or cable is a temporary load-sharing device. Because it spans a mobile joint segment and does not stretch, it will eventually restrict terminal flexion or fatigue and break if left in situ indefinitely.
- The wire should be routinely removed as a minor outpatient procedure at approximately 3 to 4 months postoperatively, or once definitive clinical and radiographic healing of the fracture/repair has occurred.
- Delaying removal beyond 6 months increases the risk of wire fragmentation, making extraction significantly more difficult.
📚 Medical References
- comminuted patellar fractures: a prospective randomized trial, J Bone Joint Surg 79B:13, 1997.
- Haxton HA: The function of the patella and the effects of its excision, Surg Gynecol Obstet 80:389, 1945.
- Heckman JD, Alkire CC: Distal patellar pole fractures: a proposed common mechanism of injury, Am J Sports Med 12:424, 1984.
- Ho TK, Fang D: Posterior cruciate avulsion fracture associated with a large inverted medial tibial osteochondral fragment, J Trauma 38:653, 1995.
- Hoffer MM, Schechter DE: Results of seventy-fi ve patellectomies in seventy patients, Am J Surg 111:645, 1966.
- Houghton GR, Ackroyd CE: Sleeve fractures of the patella in children: a report of three cases, J Bone Joint Surg 61B:165, 1979.
- Hung LK, Chan KM, Chow YN, et al: Fractured patella: operative treatment using the tension band principle, Injury 16:343, 1985.
- Kaufer H: Mechanical function of the patella, J Bone Joint Surg 53A:1551, 1971.
- Kennedy JC, Grainger RW, McGraw RW: Osteochondral fractures of the femoral condyles, J Bone Joint Surg 48B:436, 1966.
- Leung PC, Mak KH, Lee SY: Percutaneous
