Introduction and Biomechanical Principles
Posterior glenohumeral instability represents a complex spectrum of pathology, often underdiagnosed and technically demanding to manage. Among the primary anatomical lesions responsible for recurrent posterior instability is the Posterior Humeral Avulsion of the Glenohumeral Ligament (PHAGL). Unlike the more common posterior Bankart lesion, a PHAGL involves the failure of the posterior band of the inferior glenohumeral ligament (IGHL) at its humeral insertion.
Concurrently, anterior instability often presents with bipolar bone loss, notably the Hill-Sachs lesion—a posterolateral humeral head impaction fracture. When a Hill-Sachs lesion is "engaging" (dropping over the anterior glenoid rim during abduction and external rotation), it necessitates surgical intervention to prevent recurrent dislocation. The arthroscopic remplissage (French for "to fill") technique, popularized by Wolf and Purchase, offers a highly effective solution by converting an intra-articular defect into an extra-articular one via tenodesis of the infraspinatus and posterior capsule.
This comprehensive guide details the operative techniques for both the arthroscopic repair of a PHAGL lesion and the Hill-Sachs remplissage, providing orthopedic surgeons with a rigorous, evidence-based framework for managing these complex instability patterns.
Arthroscopic Repair of Posterior Humeral Avulsion of the Glenohumeral Ligament (PHAGL)
Preoperative Evaluation and Indications
A PHAGL lesion should be suspected in patients with a history of posterior shoulder trauma (often a direct blow to the anterior shoulder with the arm flexed and internally rotated) who exhibit persistent posterior instability without advanced glenoid bone loss. Magnetic Resonance Arthrography (MRA) is the gold standard for diagnosis, classically demonstrating the "J-sign" where contrast extravasates down the humeral neck posteriorly.
Patient Positioning and Setup
Optimal visualization and capsular tensioning are paramount for posterior shoulder arthroscopy.
- Position: Place the patient in the lateral decubitus position. Secure the torso using a vacuum beanbag and a kidney rest to ensure absolute stability during the procedure.
- Arm Suspension: Place the operative arm in 60 degrees of abduction and 20 degrees of forward flexion.
- Traction: Maintain suspension with 10 to 12 lbs of longitudinal traction. This specific vector opens the posterior glenohumeral joint space and places the posterior capsule under appropriate tension for anatomical repair.
🔪 Surgical Pearl: Avoid excessive internal rotation during traction, as this can artificially obliterate the posterior joint space and make visualization of the PHAGL footprint exceedingly difficult.
Portal Strategy
A three-portal technique is standard for isolated posterior capsular repairs:
1. Standard Posterior Portal: Used initially for viewing, then converted to a working portal.
2. Anterosuperior Portal: Established in the rotator interval. Serves as the primary viewing portal during the posterior repair.
3. Posterior 7-o’clock Portal (Accessory Posterior): Essential for achieving the correct angle of approach to the inferior aspect of the humeral neck for anchor placement.
Surgical Technique: Step-by-Step PHAGL Repair
- Diagnostic Arthroscopy: Fully evaluate the shoulder for all pathological entities. Confirm the presence of an isolated posterior avulsion of the glenohumeral ligament and capsular attachment.
- Footprint Preparation: Debride the avulsed capsular edge to healthy tissue. Use a motorized shaver and an arthroscopic burr to lightly decorticate the anatomical footprint on the posterior humeral neck to a bleeding bone bed, promoting biological healing.
- Anchor Placement (Inferior): Establish the posterior 7-o'clock portal. Introduce a biocomposite suture anchor into the inferior aspect of the anatomical attachment on the posterior humeral neck.
- Suture Passing:
- Pass a penetrating device (e.g., a crescent hook or spectrum) through the torn posterior capsule, approximately 7 mm from its free edge.
- Retrieve the inferior suture limb and pull it back out through the inferior capsule.
- Use the anterosuperior portal to maintain tension on the capsule. Employ a "hand-off" technique to aid in retrieving the suture and pulling it back through the capsular tissue.
- Knot Tying: Tie the mattress sutures down snugly, securing the inferior portion of the tear to the humeral neck. Use the inferior cannula to tie arthroscopic sliding-locking knots (e.g., SMC knots), followed by alternating half-hitches.
- Anchor Placement (Superior): Place a second biocomposite anchor in the more superior aspect of the anatomical capsular attachment on the posterior neck.
- Final Suture Passing and Compression:
- Use the penetrating device to grab the inferior suture of the second anchor, passing it through the capsule.
- Grab the superior suture and pass it similarly, ensuring a 7 mm tissue bridge between passes.
- Tie this arthroscopic mattress suture while viewing from the superior portal to obtain excellent compression of the capsule to the neck.
- Vertical Component Repair: If a side-to-side repair of the vertical component of the tear is achievable, use a spectrum with a crescent hook to pass a suture through the superior leaf of the tear. Retrieve it through the inferior leaf and tie it extracapsularly to close the dog-ear.
Management of the Engaging Hill-Sachs Lesion: The Remplissage Procedure
Biomechanics of Remplissage
The Hill-Sachs remplissage technique is conceptually similar to an arthroscopic repair of a partial-thickness, articular-surface rotator cuff tear (PASTA lesion). It consists of the fixation of the infraspinatus tendon and the underlying posterior capsule directly into the abraded surface of the Hill-Sachs lesion. By filling the defect, the procedure prevents the humeral head from engaging the anterior glenoid rim, effectively altering the glenoid track.
Patient Positioning and Setup
- Position: Lateral decubitus position, but with the patient leaned back approximately 30 degrees. This posterior tilt allows superior access to the posterior aspect of the shoulder.
- Arm Suspension: Place the shoulder in 30 degrees of abduction and 15 degrees of forward flexion.
- Traction: Suspend the arm with 15 lbs of distal traction.
Portal Strategy for Remplissage
- Remplissage Posterior Portal: Entered at the lateral aspect of the convexity of the humeral head, centered directly over the Hill-Sachs lesion. This allows initial visualization and working access to the defect.
- Anteroinferior Portal: Placed in the rotator interval; serves as the primary working portal for the concurrent anterior Bankart repair.
- Anterosuperior Portal: Established at the anterior margin of the acromion, entering immediately behind the long head of the biceps tendon.
🚨 Surgical Warning: The anterior labrum and glenoid neck MUST be prepared, and anterior anchors placed, before proceeding with the remplissage. Once the remplissage is tied, posterior capsular tension increases dramatically, severely restricting anterior joint working space.
Surgical Technique: The Purchase et al. (Wolf) Remplissage
Step 1: Defect Assessment and Portal Optimization
Switch the arthroscope from the posterior portal to the anterosuperior portal, and place a working cannula into the posterior portal. While viewing from the anterosuperior portal, assess the Hill-Sachs lesion, the extent of glenoid bone loss, and the anterior labral lesion.
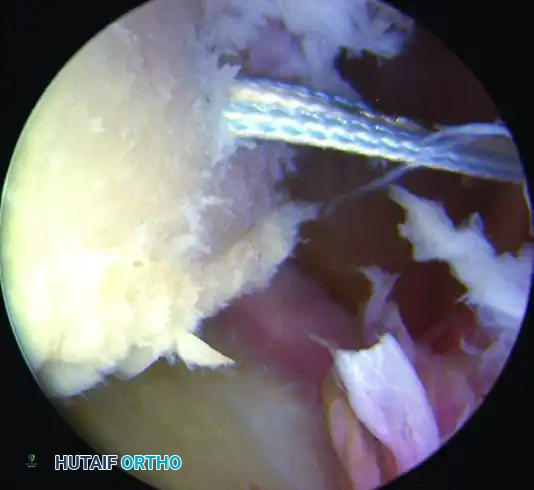
Figure A: Arthroscopic visualization of the engaging Hill-Sachs lesion from the anterosuperior portal.
Evaluate the posterior portal location. It is correct only if located directly over the Hill-Sachs lesion at an angle permitting the orthogonal placement of two suture anchors. If incorrect, optimize the trajectory using a spinal needle.
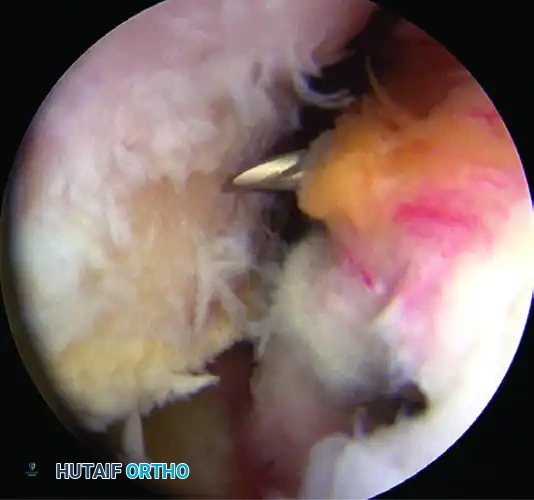
Figure B: Spinal needle localization ensuring optimal trajectory for anchor placement into the Hill-Sachs defect.
Step 2: Bed Preparation
Gently freshen the sclerotic surface of the engaging Hill-Sachs lesion using an arthroscopic burr in reverse mode.
🔪 Clinical Pearl: Using the burr in reverse removes fibrous tissue and creates a bleeding bone bed without excising critical subchondral bone. Removing too much bone will inadvertently deepen the defect, exacerbating the pathology.
Freshen the surface of the entire posterior and inferior capsule with a whisker blade to promote biological healing.
Step 3: Subdeltoid Cannula Retraction
While maintaining the camera in the anterosuperior portal, carefully withdraw the cannula in the posterior portal out of the posterior capsule and infraspinatus tendon, but not through the deltoid muscle. The mouth of the cannula should now rest in the subdeltoid space.
Step 4: Inferior Anchor Placement
Through the preexisting portal, pass the anchor cannula with its obturator percutaneously through the infraspinatus tendon and posterior capsule. Place the first suture anchor into the inferior aspect of the prepared Hill-Sachs lesion.
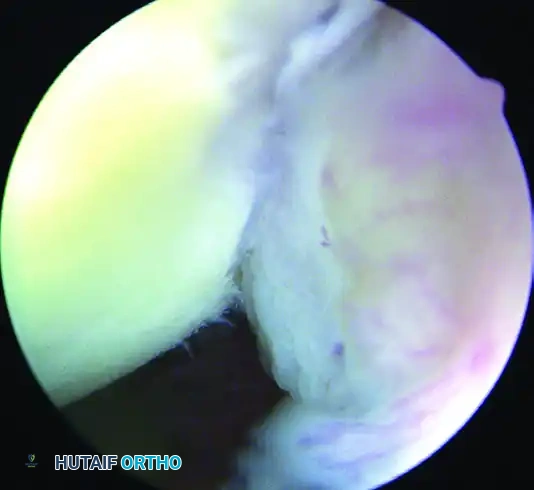
Figure C: First biocomposite anchor placed in the inferior aspect of the Hill-Sachs lesion.
Pass a penetrating grasper through the tendon and posterior capsule to grasp and pull one suture limb approximately 1 cm inferior to the initial portal entry site.
Step 5: Superior Anchor Placement
Place a second anchor in the superior aspect of the Hill-Sachs lesion. Use the grasper penetrator in the same fashion to pass one suture limb 1 cm superior to the initial portal entry site.
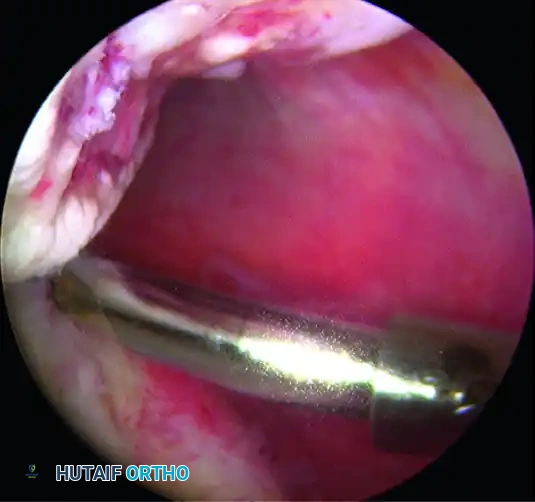
Figure D: Second anchor placed in the superior aspect of the defect, with sutures passed through the infraspinatus and capsule.
Step 6: Extra-articular Knot Tying
Tie the inferior suture first. The knots must remain extra-articular, resting in the subdeltoid space. Tie the superior suture to complete the remplissage. The knots can be directly visualized by opening the posterior wall of the subacromial bursa. These mattress sutures draw the infraspinatus and posterior capsule down into the abraded bony surface, effectively obliterating the defect.
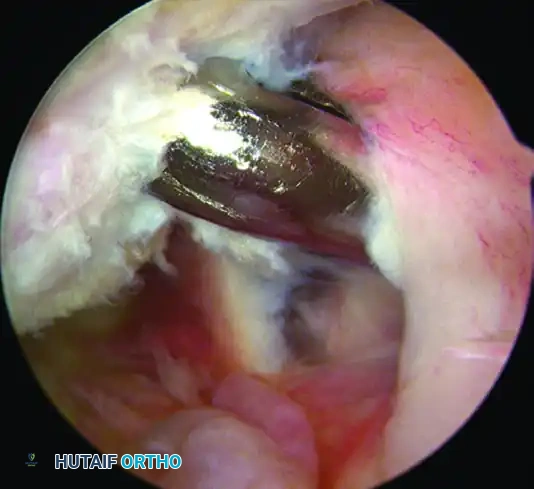
Figure E: Completed remplissage. The intra-articular defect is now filled by the posterior soft tissues.
Step 7: Completion of Anterior Repair
With the remplissage tied, return to the anterior compartment to complete the Bankart repair using the previously placed anchors. On completion, check glenohumeral stability dynamically and close the portals with Monocryl sutures.
Advanced Considerations: The Arthroscopic Latarjet
While the remplissage is highly effective for engaging Hill-Sachs lesions with subcritical glenoid bone loss, it is contraindicated in the setting of critical anterior glenoid bone loss (>20-25%). In such cases, a bone-block augmentation is required.
Lafosse and Boyle have described the all-arthroscopic Latarjet procedure, demonstrating excellent clinical results and minimal complications in expert hands. However, this is an exceptionally demanding procedure. It should be performed only by advanced arthroscopists who have undergone extensive laboratory training to ensure they can safely reproduce results comparable to the gold-standard open Latarjet procedure.
Postoperative Rehabilitation and Care
Postoperative care and immobilization must be strictly individualized based on the patient’s specific pathology, tissue quality, and the exact procedures performed.
Immobilization Phase (Weeks 0-6)
- Sling Use: The patient is placed in an Ultrasling. For isolated posterior repairs (PHAGL), the arm is maintained in neutral to slight external rotation to remove tension from the posterior capsule. For combined anterior Bankart and Remplissage, the arm is kept in neutral rotation.
- Activities of Daily Living (ADLs): Patients are allowed to remove the immobilizer for controlled, waist-level ADLs (e.g., eating, showering, keyboard use) within 1 to 2 days postoperatively.
- Positional Restrictions: During ADLs, the arm must remain strictly adducted. The patient must not abduct the shoulder and must not externally rotate beyond neutral.
Mobilization and Strengthening Phase (Weeks 6+)
- Range of Motion: Active and active-assisted range of motion is initiated at 6 weeks. Stretching into internal rotation (which stresses the remplissage and posterior capsule) should be progressed gradually and cautiously.
- Strengthening: Resistive strengthening begins at 8 to 10 weeks, focusing on dynamic stabilizers (rotator cuff and periscapular musculature).
- Return to Play: No at-risk work activities, heavy overhead lifting, or contact sports are permitted for a minimum of 6 months to allow for complete biological incorporation of the tenodesis and capsular repairs.
