Arthroscopic Repair of Palmer Class 1B Triangular Fibrocartilage Complex Tears
Key Takeaway
Palmer Class 1B triangular fibrocartilage complex (TFCC) tears involve an avulsion of the articular disc from its ulnar insertion. Arthroscopic repair utilizing an outside-in technique restores distal radioulnar joint (DRUJ) stability. This procedure requires meticulous portal placement, precise suture management, and careful protection of the dorsal sensory branch of the ulnar nerve. Successful outcomes depend on restoring the trampoline effect and implementing strict postoperative immobilization.
Introduction to Palmer Class 1B TFCC Tears
The triangular fibrocartilage complex (TFCC) is the primary stabilizer of the distal radioulnar joint (DRUJ) and the ulnocarpal articulation. It functions as a critical load-bearing structure, transmitting approximately 20% of the axial load from the carpus to the ulna. The Palmer classification system categorizes TFCC tears into traumatic (Class 1) and degenerative (Class 2) lesions.
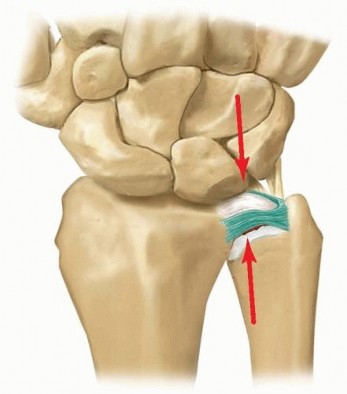
A Palmer Class 1B tear represents an acute, traumatic avulsion of the TFCC from its peripheral ulnar insertion. Unlike the central articular disc (Class 1A), which is avascular, the peripheral 10% to 20% of the TFCC is well-vascularized by branches of the ulnar artery and the anterior and posterior interosseous arteries. This robust blood supply provides excellent healing potential, making Class 1B tears highly amenable to primary surgical repair.
Failure to recognize and adequately treat a Class 1B tear can lead to chronic DRUJ instability, ulnar-sided wrist pain, decreased grip strength, and early-onset ulnocarpal osteoarthritis. Arthroscopic repair has become the gold standard, offering superior visualization, minimal soft tissue morbidity, and the ability to address concomitant intra-articular pathology.
Surgical Anatomy and Biomechanics
A profound understanding of the ulnar-sided wrist anatomy is mandatory for safe portal placement and effective repair.
The Triangular Fibrocartilage Complex
The TFCC is a multifaceted structure comprising:
* The Articular Disc: The central, avascular fibrocartilaginous portion.
* Radioulnar Ligaments (RULs): Dorsal and volar components that originate from the sigmoid notch of the radius and insert onto the ulnar fovea and base of the ulnar styloid. These are the primary stabilizers of the DRUJ.
* Ulnocarpal Ligaments: The ulnolunate and ulnotriquetral ligaments, which prevent volar subluxation of the ulnar carpus.
* Meniscus Homologue: A fibrous reflection connecting the dorsal capsule to the triquetrum.
* Extensor Carpi Ulnaris (ECU) Subsheath: Intimately blended with the dorsal aspect of the TFCC.
The Dorsal Sensory Branch of the Ulnar Nerve (DSBUN)
The DSBUN is the structure most at risk during ulnar-sided wrist arthroscopy and outside-in repair techniques. It typically branches from the main ulnar nerve 5 to 8 cm proximal to the pisiform, traveling deep to the flexor carpi ulnaris (FCU) before piercing the deep fascia to become subcutaneous. It crosses the ulnar border of the wrist at the level of the ulnar styloid, arborizing into dorsal digital nerves.
⚠️ Surgical Warning: DSBUN Injury
Iatrogenic injury to the DSBUN can result in debilitating neuromas and complex regional pain syndrome (CRPS). Always utilize blunt dissection down to the capsule when establishing the 6U portal or making the accessory incision for the outside-in repair.
Preoperative Planning and Patient Positioning
Anesthetic Management
The procedure is typically performed under regional anesthesia (supraclavicular or axillary brachial plexus block) combined with intravenous sedation, or under general anesthesia. Regional anesthesia provides excellent postoperative analgesia and sympathectomy, which may reduce the risk of CRPS.
Positioning and Setup
- Patient Position: Place the patient supine on the operating table with the operative arm extended on a radiolucent hand table.
- Tourniquet: Apply a well-padded pneumatic tourniquet to the proximal arm. Exsanguinate the limb and inflate the tourniquet to 250 mmHg (or 100 mmHg above systolic blood pressure). Tourniquet use is critical when shaving or burring bone and soft tissue to maintain a clear visual field.
- Traction: Apply a wrist traction tower. Place sterile finger traps on the index and long fingers. Apply 10 to 15 lbs of longitudinal traction to distract the radiocarpal and midcarpal joints. Counter-traction is applied via a padded strap across the distal humerus.
Diagnostic Arthroscopy and Pathology Assessment
A systematic diagnostic arthroscopy is the foundation of the procedure. Follow standard protocols for radiocarpal, ulnocarpal, and midcarpal examination.
Portal Placement
- 3-4 Portal: The primary viewing portal. Located between the extensor pollicis longus (EPL, 3rd compartment) and the extensor digitorum communis (EDC, 4th compartment), approximately 1 cm distal to Lister's tubercle.
- 6R Portal: The primary working portal. Located radial to the ECU tendon.
- 6U Portal: An accessory working portal located ulnar to the ECU tendon.
Intra-Articular Evaluation
- Synovectomy: Upon entering the joint via the 3-4 portal, a localized synovitis is frequently encountered in the ulnocarpal space, secondary to the traumatic tear. Introduce a 2.0 mm or 2.9 mm full-radius shaver through the 6R portal to perform a limited synovectomy, clearing the visual field.
- Ligamentous Inspection: Systematically examine the dorsal and palmar radioulnar ligaments, the ulnar lunotriquetral ligaments, and the articular surfaces of the lunate, triquetrum, and ulnar head (if visible through the tear).
- Foveal Attachment: Visualize the ulnar foveal attachment of the TFCC. In a Class 1B tear, the peripheral margin will be detached from the capsule and the ulnar styloid/fovea.
Biomechanical Testing: The Trampoline and Hook Tests
To confirm the diagnosis and assess the integrity of the TFCC, two critical tactile tests must be performed using a calibrated arthroscopic probe introduced through the 6R or 6U portal.
- The Trampoline Test: Press the probe against the central articular disc. A normal, intact TFCC possesses inherent tension, rebounding against the probe much like a trampoline. A loss of this normal tension—resulting in a soft, compliant, or "boggy" feel—strongly indicates a peripheral ulnar-sided detachment (Class 1B tear).
- The Hook Test: Place the tip of the probe under the ulnar edge of the TFCC and pull radially. If the TFCC can be pulled toward the center of the joint without resistance, the foveal attachment is compromised.
Surgical Technique: Outside-In Arthroscopic Repair
The "outside-in" technique is a highly reliable method for repairing Class 1B tears, allowing for precise suture placement and excellent capsular plication.
Step 1: Preparation of the Tear Margins
Healing requires a vascularized bed. Introduce a full-radius shaver or a small arthroscopic burr through the 6R portal. Carefully debride the avascular edges of the torn TFCC to stable tissue. More importantly, decorticate and freshen the adjacent dorsal and ulnar capsule, as well as the ulnar styloid base, to expose punctate bleeding bone and stimulate a robust fibroblastic healing response.
Step 2: The Dorsal Approach and ECU Retraction
- Incision: Gain access to the dorsal capsule by making a 1.5 to 2.0 cm longitudinal skin incision along the dorsoradial aspect of the ECU tendon, centered over the ulnocarpal joint.
- Dissection: Perform blunt dissection using a hemostat to spread the subcutaneous tissues. Strictly avoid injury to the arborizing branches of the dorsal sensory branch of the ulnar nerve.
- ECU Subsheath: Incise the superficial portion of the ECU retinaculum (sheath) dorsoradially for at least 1 cm.
- Retraction: Gently retract the ECU tendon medially (ulnarly) using a small Senn or Ragnell retractor to expose the underlying dorsal capsule.
💡 Clinical Pearl: ECU Tendon Management
Retracting the ECU tendon medially protects it from being inadvertently captured in the suture loop. Capturing the ECU tendon will result in severe postoperative tendinitis, restricted supination, and pain.
Step 3: Needle Placement (Outside-In)
- Under direct arthroscopic visualization from the 3-4 portal, introduce two 18-gauge needles (or specialized spinal needles) through the exposed dorsal capsule.
- Advance the needles across the tear and pierce the meniscus of the TFCC on the opposite side of the detachment. The needles should be spaced approximately 3 to 5 mm apart to ensure an adequate tissue bridge.
Step 4: Suture Passing and Retrieval
- First Needle: Pass a 2-0 or 3-0 absorbable polydioxanone suture (PDS, Ethicon) down the barrel of the first needle until it is visible within the joint space.
- Second Needle: Pass a loop of flexible nylon (e.g., 2-0 Prolene folded on itself) or a specialized wire suture loop down the barrel of the second needle.
- Capture: Manipulate the needles or use an arthroscopic grasper from the 6R portal to feed the free end of the PDS suture through the nylon/wire loop.
- Retrieval: Withdraw the nylon/wire loop out of the second needle, pulling the PDS suture with it. This creates a horizontal mattress suture configuration across the tear.
Step 5: Knot Tying and Capsular Plication
- Remove both needles. The two free ends of the PDS suture now exit the dorsal capsule.
- While viewing arthroscopically, tie the suture ends securely over the capsule. As the knot is tensioned, observe the torn surface of the TFCC meniscus being anatomically apposed to the capsule.
- Repeat this process to place additional horizontal mattress sutures (typically 2 to 3 sutures total) as needed to achieve a watertight, stable repair.
- Re-evaluation: Repeat the trampoline test. The normal tension of the TFCC should now be restored.
Addressing Volar TFCC Tears
While most Class 1B tears involve the dorsal and ulnar periphery, tears can occasionally extend to, or isolate at, the volar aspect of the joint.
If the tear is predominantly volar:
1. Modify the retraction of the ECU tendon. Instead of medial retraction, retract the ECU tendon dorsally and laterally (radially).
2. This maneuver provides a window to access the volar capsule of the DRUJ.
3. Pass the 18-gauge needles from the volar capsule, taking extreme care to avoid the ulnar neurovascular bundle (ulnar artery and nerve), which lies in Guyon's canal just volar to the FCU. Blunt dissection to the capsule is mandatory before needle insertion.
Adjunctive DRUJ Stabilization
Following the arthroscopic repair, the stability of the DRUJ must be assessed clinically. Remove the arm from traction and perform a DRUJ ballottement test in neutral, full supination, and full pronation.
If there is persistent gross instability, concern regarding the biomechanical strength of the soft-tissue repair, or anticipated issues with patient compliance, the DRUJ must be temporarily pinned.
Pinning Technique
- Position the forearm in neutral rotation. (Pinning in extreme supination or pronation can lead to severe postoperative stiffness).
- Drive a 0.062-inch (1.5 mm) or 2.0 mm smooth Steinmann pin (or Kirschner wire) percutaneously from the ulnar shaft into the radius.
- The trajectory should be transverse, located just proximal to the sigmoid notch.
- Confirm pin placement and DRUJ reduction under intraoperative fluoroscopy.
- Cut the pin beneath the skin to prevent pin-tract infections.
Postoperative Protocol and Rehabilitation
The success of a TFCC repair relies as much on strict postoperative immobilization as it does on surgical execution. The repaired peripheral tissues require time to achieve biological union.
Phase 1: Immobilization (Weeks 0-4/6)
- Close the skin portals and the accessory incision with non-absorbable sutures (e.g., 4-0 nylon).
- Apply a bulky sterile dressing and an above-elbow cast (Muenster cast or standard long-arm cast) with the elbow at 90 degrees of flexion and the forearm in neutral rotation.
- Immobilization of the elbow is critical to completely eliminate forearm pronation and supination, which generate sheer forces across the healing TFCC.
- If a Steinmann pin was utilized, it is typically removed in the clinic at 4 to 6 weeks postoperatively.
Phase 2: Transition and Early Motion (Weeks 6-8)
- Remove the above-elbow cast.
- Transition the patient to a custom-molded short-arm splint or a commercially available wrist widget, to be worn at all times except during hygiene and therapy.
- Initiate supervised physical therapy. Focus on active and active-assisted range of motion (ROM) for wrist flexion/extension and gentle forearm pronation/supination.
- Strictly avoid passive stretching and forceful rotation.
Phase 3: Strengthening (Weeks 8-12)
- Wean from the splint.
- Begin progressive isometric and isotonic strengthening of the wrist flexors, extensors, and forearm rotators.
- Incorporate grip strengthening exercises.
Phase 4: Return to Activity (Months 3-6)
- Patients may gradually return to heavy manual labor and sports activities between 4 and 6 months postoperatively, provided they have achieved full, painless ROM and at least 80% of contralateral grip strength.
Complications and Pitfalls
Even in experienced hands, arthroscopic TFCC repair carries potential risks. Anticipating these complications is the hallmark of a master surgeon.
- DSBUN Neuritis/Neuroma: The most common complication. Prevented by meticulous blunt dissection and utilizing an open approach to the capsule rather than blind percutaneous needle punctures.
- ECU Tendinitis: Caused by capturing the ECU tendon or its subsheath in the repair suture. Ensure the ECU is fully retracted and visually cleared before tying the knot.
- Recurrent Instability: Often due to inadequate debridement of the tear margins (failure to stimulate a healing response), failure to recognize a concomitant foveal avulsion (which may require an open transosseous repair or suture anchor), or premature return to activity.
- Wrist Stiffness: Loss of terminal supination and pronation is common. It is mitigated by avoiding over-tensioning of the repair, pinning the DRUJ strictly in neutral rotation, and ensuring timely initiation of physical therapy.
- Infection: Superficial portal infections are rare but can occur. Deep joint space infections require immediate arthroscopic irrigation and debridement.
🔪 Surgical Technique Summary
Arthroscopic repair of Class 1B TFCC tears demands a thorough diagnostic evaluation, restoration of the trampoline effect, meticulous outside-in suture management, and rigid postoperative immobilization. By adhering to these evidence-based principles, surgeons can reliably restore DRUJ kinematics and return patients to high levels of function.
You Might Also Like