Mastering the Approach to the Distal Humerus: Safety & Skills
Key Takeaway
For anyone wondering about Mastering the Approach to the Distal Humerus: Safety & Skills, Six primary surgical approaches target the humerus, mainly for fracture management. These include anterior, minimally invasive anterior, and posterior approaches for the humeral shaft. Anterolateral, lateral, and medial methods constitute the approach to the distal humerus, designed for its lower third. Care is essential due to major nerves like the radial nerve being close to the bone.
Comprehensive Introduction and Patho-Epidemiology
Operations on the humerus, while relatively infrequent compared to those on the lower extremity, present a unique set of challenges to the orthopedic surgeon. The vast majority of these interventions involve the open reduction and internal fixation (ORIF) of complex fractures, though indications extend to tumor resection, osteotomy, and the management of recalcitrant nonunions. The humerus is uniquely unforgiving; all approaches to this bone are potentially perilous because major nerves and vessels run in intimate proximity to the osseous anatomy. Unlike the femur or tibia, where robust muscular envelopes often provide a generous buffer, the axillary, radial, and ulnar nerves maintain a direct, tethered relationship to the humeral shaft and distal articular block.

The epidemiological profile of humeral fractures demonstrates a classic bimodal distribution. High-energy trauma, such as motor vehicle collisions and falls from height, typically afflicts the younger demographic, resulting in comminuted, transverse, or wedge-type fractures of the diaphysis. Conversely, low-energy falls in the elderly population, often compounded by severe osteoporosis, frequently result in spiral fractures of the shaft or complex intra-articular fractures of the distal humerus. While functional bracing (the Sarmiento method) remains the gold standard for many closed, isolated humeral shaft fractures, there is an increasing trend toward operative intervention to facilitate early mobilization, optimize anatomic alignment, and mitigate the psychosocial burden of prolonged bracing.
Mastering the surgical approaches to the humerus requires a profound threedimensional understanding of its cross-sectional anatomy. Six primary approaches to the humerus are classically described in the orthopedic armamentarium. Three of these—the anterior approach, the minimally invasive anterior approach, and the posterior approach—allow extensile access to large portions of the diaphysis. The remaining three—the anterolateral, lateral, and medial approaches—are specifically tailored for the distal third of the bone and its complex articular structures. The anterior and posterior approaches remain the most versatile workhorses. However, the anterior approach to the humeral shaft is particularly favored for its utilization of true internervous planes and its adaptability in the supine trauma patient.
Understanding the nuances of these exposures is not merely an academic exercise; it is a critical safety requirement. Of all the structures at risk, the radial nerve is the most frequently injured during exposure of the humeral shaft. Its spiral course around the posterior humerus and subsequent penetration of the lateral intermuscular septum dictate the limits of our surgical windows. This chapter will exhaustively detail the anterior approach to the humerus, its minimally invasive variants, and the critical transitions required when navigating toward the distal humerus, ensuring the surgeon is equipped with the knowledge to perform these procedures safely and effectively.
Detailed Surgical Anatomy and Biomechanics
Osteology of the Humeral Shaft and Distal Humerus
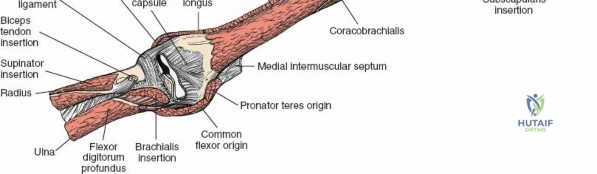
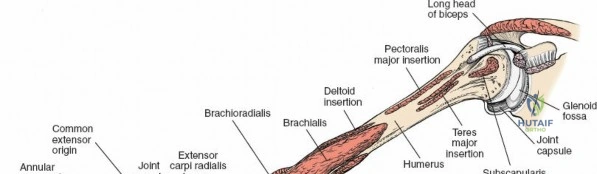
The humerus acts as the structural foundation of the brachium, serving as a critical lever arm for positioning the hand in space. Proximally, the cylindrical diaphysis provides a broad surface area for the origin and insertion of the powerful muscles of the shoulder girdle and arm. The deltoid tuberosity, located on the anterolateral aspect of the middle third of the bone, marks the transition from the proximal to the distal humerus and serves as a vital surgical landmark. As the shaft progresses distally, it undergoes a geometric transformation, transitioning from a cylindrical cross-section to a flattened, triangular shape.
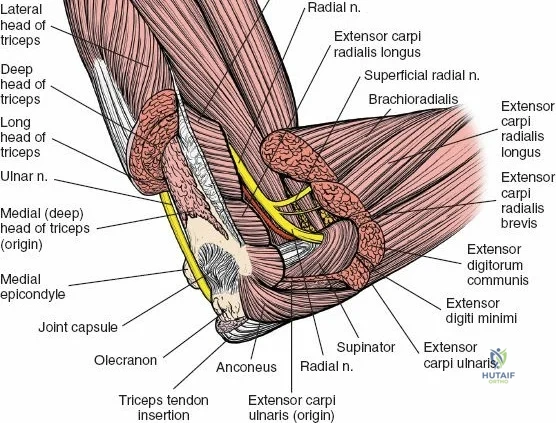
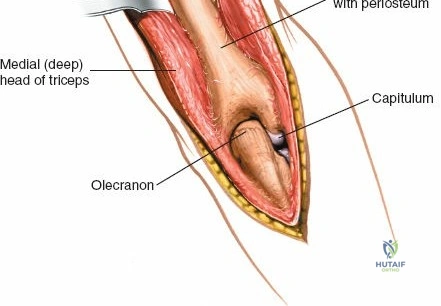
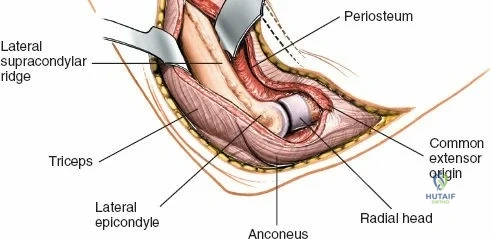
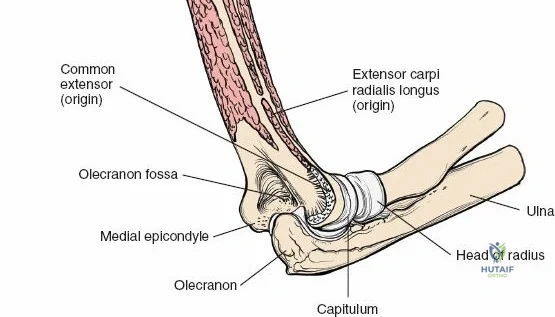
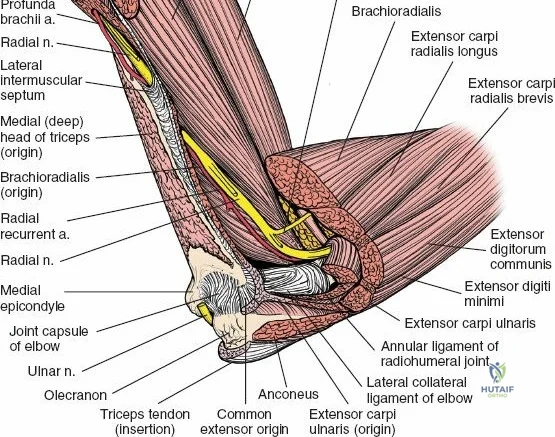
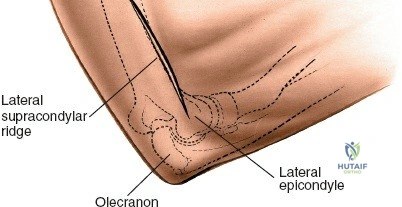
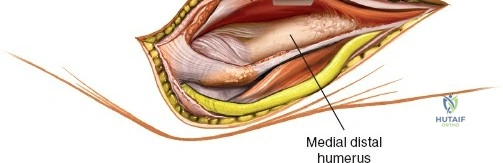
This distal triangular flare is defined by the medial and lateral supracondylar ridges, which terminate in their respective epicondyles. The articular segment of the distal humerus is composed of the capitellum laterally (articulating with the radial head) and the trochlea medially (articulating with the greater sigmoid notch of the ulna). The anterior aspect of the distal humerus features the coronoid and radial fossae, which accommodate the coronoid process of the ulna and the radial head during terminal elbow flexion. Posteriorly, the olecranon fossa accommodates the olecranon process during terminal elbow extension. The bone separating these fossae is exceedingly thin, complicating hardware placement during distal humeral osteosynthesis.
Biomechanically, the humerus is subjected to complex torsional, bending, and compressive forces. The anterior cortex is primarily under tension during active elbow flexion and lifting activities, making it an ideal surface for tension-band plating in specific fracture patterns. However, the anterolateral surface is often preferred for plate application due to the relatively flat contour of the bone and the ability to safely mobilize the radial nerve. Understanding these biomechanical principles is essential for selecting the appropriate implant and positioning it to maximize construct stability while minimizing soft-tissue disruption.
Muscular Compartments and Internervous Planes
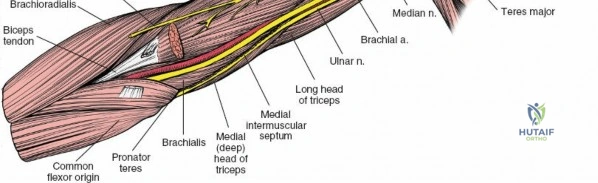
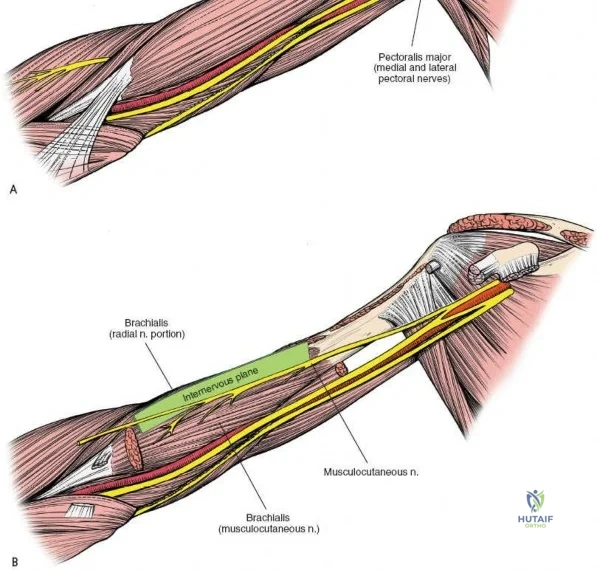
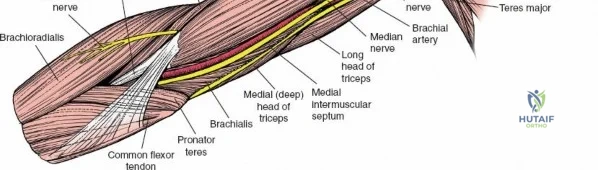
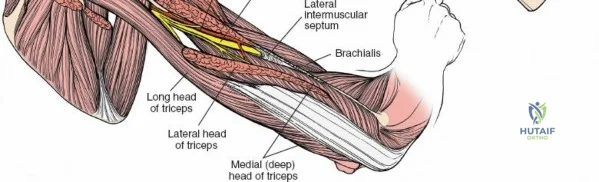
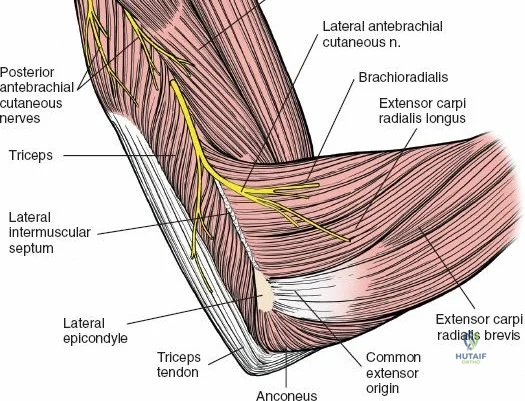
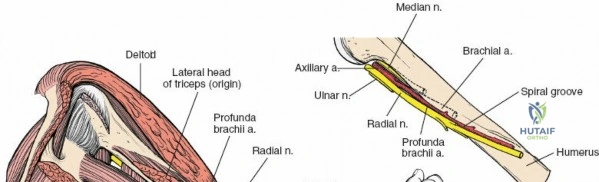
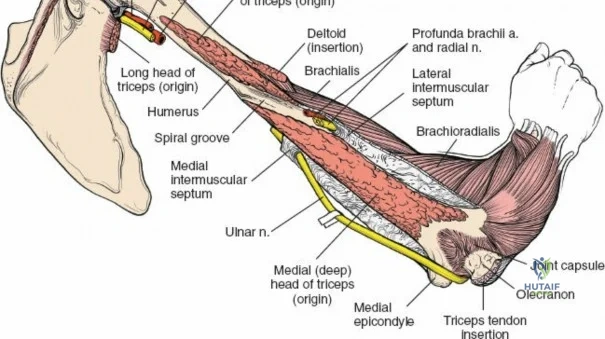
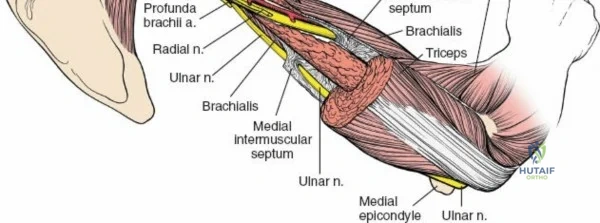
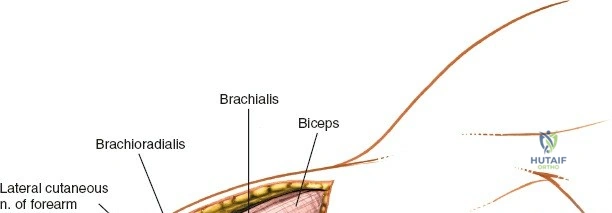
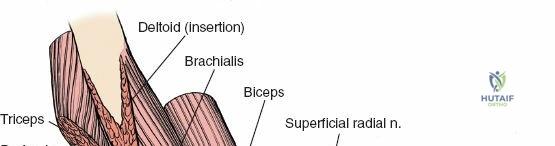
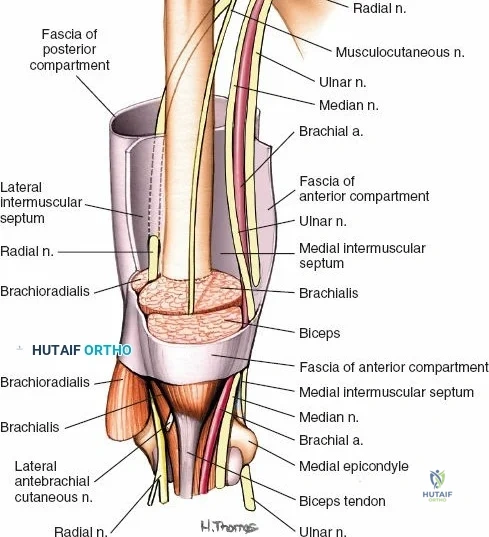
The arm is divided into two distinct fascial compartments—anterior and posterior—separated by the medial and lateral intermuscular septa. The anterior compartment houses the biceps brachii, coracobrachialis, and brachialis muscles, all primarily innervated by the musculocutaneous nerve. The posterior compartment contains the triceps brachii, innervated by the radial nerve. Surgical approaches to the humerus rely heavily on exploiting the internervous planes between these compartments or within the dual-innervated muscles themselves.

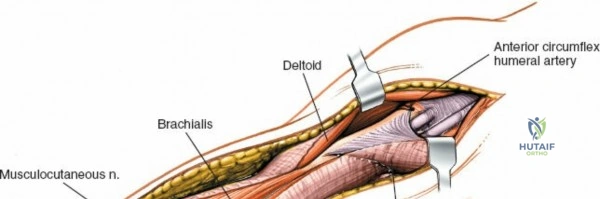
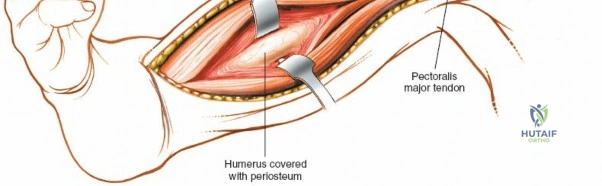
The anterior approach to the humeral shaft is a masterclass in internervous dissection. Proximally, the approach utilizes the deltopectoral groove, a true internervous plane between the deltoid (innervated by the axillary nerve) and the pectoralis major (innervated by the medial and lateral pectoral nerves). This plane allows for bloodless access to the proximal humerus without denervating either muscle. Distally, the approach transitions into the interval between the biceps brachii and the brachialis.
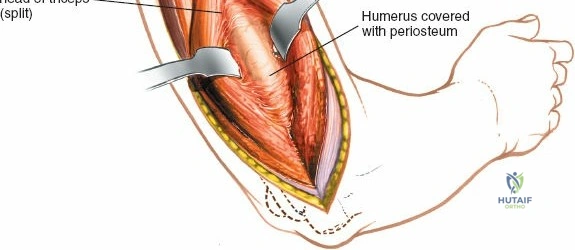
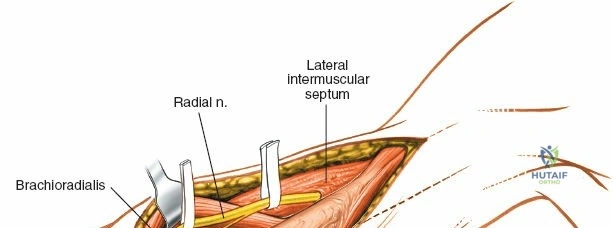
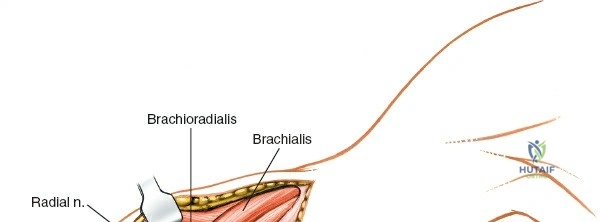
Crucially, the distal exposure requires splitting the brachialis muscle. The brachialis exhibits dual innervation: its medial fibers are innervated by the musculocutaneous nerve, while its lateral fibers receive innervation from the radial nerve. By longitudinally splitting the brachialis along its midline, the surgeon creates a safe, internervous window to the anterior humeral cortex. More importantly, the lateral hemisection of the brachialis serves as a muscular cushion, protecting the radial nerve from retractors as it courses anterior to the lateral intermuscular septum.
Neurovascular Topography
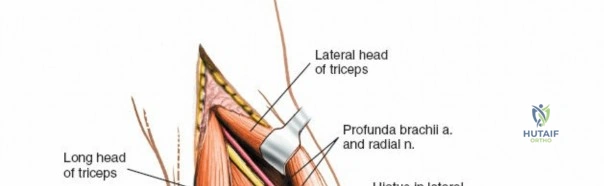
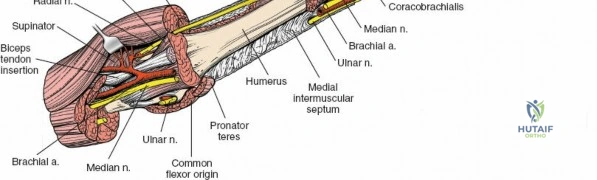
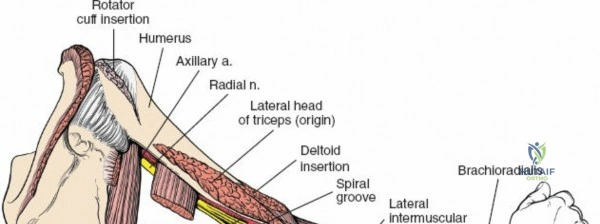
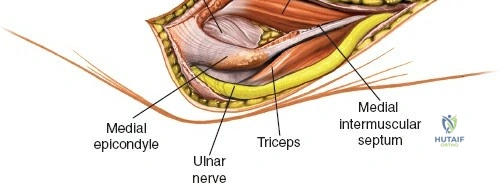
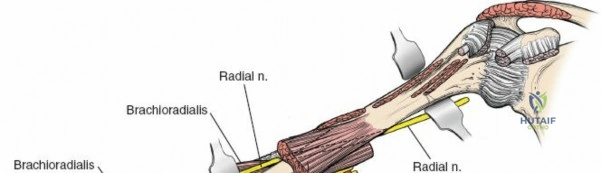
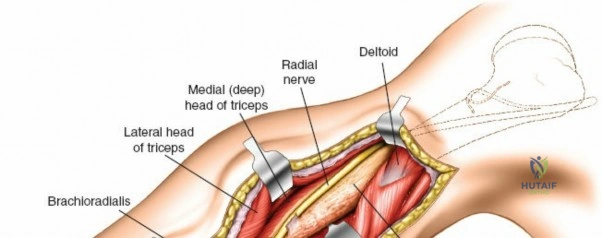
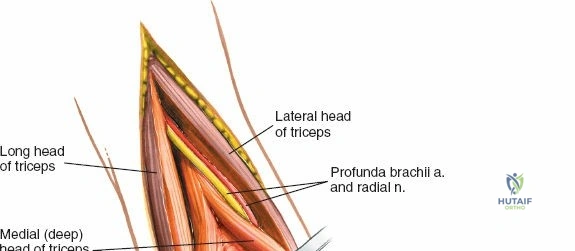
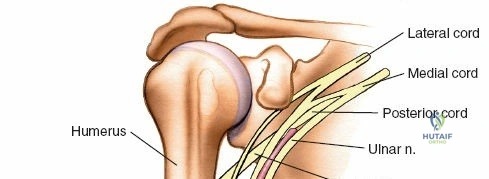
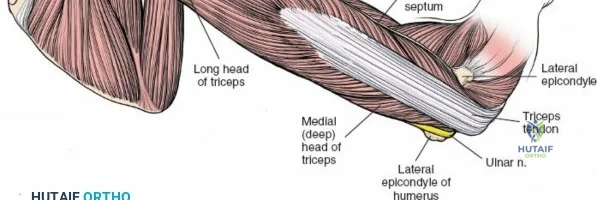
The intimate relationship of the neurovascular structures to the humerus cannot be overstated. The radial nerve is the structure at greatest risk during any humeral shaft surgery. Originating from the posterior cord of the brachial plexus, it exits the axilla and enters the posterior compartment through the triangular interval. It then spirals around the posterior aspect of the humerus in the spiral groove (radial sulcus), accompanied by the profunda brachii artery.
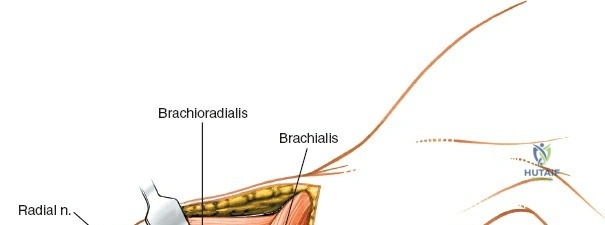
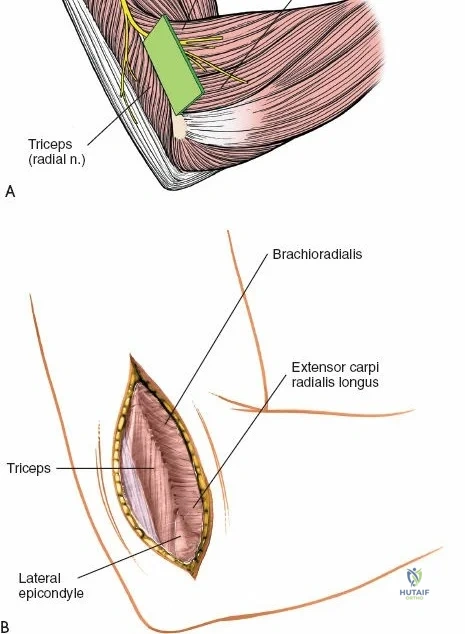
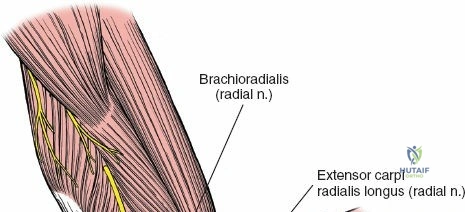
The radial nerve crosses the posterior humerus approximately 20 cm proximal to the medial epicondyle and 14 cm proximal to the lateral epicondyle. It pierces the lateral intermuscular septum to enter the anterior compartment approximately 10 cm proximal to the lateral epicondyle. In the anterior compartment of the distal third of the arm, the nerve lies deeply nestled between the brachioradialis and brachialis muscles. This plane is oblique, not strictly vertical, requiring meticulous dissection.
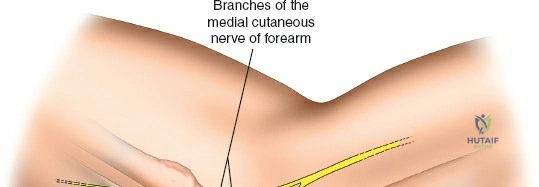
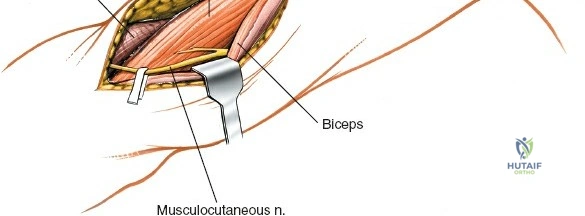
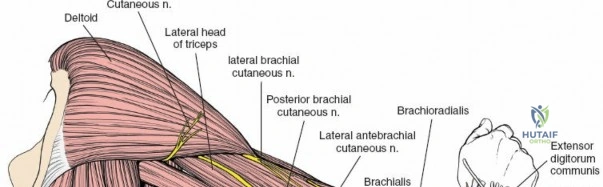
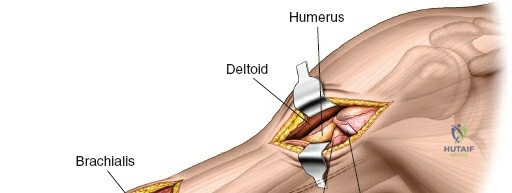
Other critical structures include the axillary nerve, which courses transversely across the deep surface of the deltoid muscle approximately 5 to 7 cm distal to the lateral acromion. Overzealous distal retraction of the deltoid during the proximal phase of the anterior approach can easily cause a traction neurapraxia of the axillary nerve, paralyzing the anterior deltoid. Additionally, the lateral cutaneous nerve of the forearm, the terminal sensory branch of the musculocutaneous nerve, pierces the deep fascia on the lateral border of the biceps just proximal to the elbow crease. This nerve must be identified and protected during the distal extent of the anterior approach to prevent painful neuromas and lateral forearm numbness.
Exhaustive Indications and Contraindications
The decision to proceed with operative management of a humeral shaft or distal humerus fracture requires a careful balancing of patient factors, fracture morphology, and concomitant injuries. While non-operative management with a functional brace yields union rates exceeding 90% in isolated, closed, low-energy fractures, certain clinical scenarios mandate surgical intervention. The anterior approach is highly versatile and is often the approach of choice for these mandatory indications.
| Indications for Operative Intervention (Anterior Approach) | Contraindications (Relative and Absolute) |
|---|---|
| Polytrauma / Damage Control: Multiple extremity fractures where early mobilization is required for patient transfer and pulmonary toilet. | Absolute: Active, uncontrolled soft-tissue infection or cellulitis directly overlying the planned anterior incision. |
| Open Fractures: Gustilo-Anderson Grade II or III requiring aggressive debridement, irrigation, and stable internal fixation. | Absolute: Medically unstable patient unfit for anesthesia (e.g., severe traumatic brain injury with refractory elevated ICP). |
| Vascular Injury: Fractures associated with brachial artery compromise requiring emergent exploration, shunting, and repair. | Relative: Pre-existing severe soft tissue compromise, burn eschar, or massive degloving injury in the anterior arm. |
| Floating Elbow: Concomitant ipsilateral fractures of the humeral shaft and the radius/ulna. | Relative: Isolated, closed, minimally displaced midshaft fractures in a compliant patient (better suited for Sarmiento bracing). |
| Progressive Neurologic Deficit: A radial nerve palsy that develops after closed reduction or bracing, indicating potential nerve entrapment. | Relative: Extreme distal fractures with complex intra-articular comminution (better suited for a posterior olecranon osteotomy approach). |
| Nonunion / Delayed Union: Failure of conservative management requiring rigid osteosynthesis and bone grafting. | Relative: Pathologic fractures requiring massive intercalary resection where a posterior approach might offer better margin control. |
| Pathologic Fractures: Prophylactic or therapeutic stabilization of impending or complete fractures secondary to metastatic disease. | Relative: Severe osteoporosis where screw purchase is questionable (though modern locked plating mitigates this). |

The anterior approach is particularly advantageous in the supine polytrauma patient, as it avoids the need for lateral or prone positioning, which can be hazardous in patients with unstable spinal, pelvic, or pulmonary injuries. Furthermore, it allows simultaneous access to the chest, abdomen, and contralateral extremities for multidisciplinary surgical teams.
Contraindications to the anterior approach primarily revolve around specific fracture locations. For instance, fractures extending into the posterior articular surface of the distal humerus (e.g., capitellar shear fractures extending posteriorly, or complex multi-fragmentary supracondylar fractures) are exceedingly difficult to visualize and reduce through an anterior window. In such cases, a posterior approach with an olecranon osteotomy or a triceps-reflecting approach is vastly superior.
Pre-Operative Planning, Templating, and Patient Positioning
Imaging and Pre-Operative Templating
Meticulous pre-operative planning is the cornerstone of a successful humeral osteosynthesis. Standard orthogonal radiographs (anteroposterior and lateral views) of the entire humerus, including the shoulder and elbow joints, are mandatory. For complex distal third fractures or those with suspected intra-articular extension, a computed tomography (CT) scan with 3D reconstructions is highly recommended. The CT scan delineates coronal and sagittal shear fragments, articular impaction, and the exact morphology of the supracondylar columns, which dictates plate positioning.

Digital templating should be performed to estimate plate length and screw sizes. For the anterior approach to the humeral shaft, a broad or narrow 4.5 mm dynamic compression plate (DCP) or locking compression plate (LCP) is typically selected. The plate must be long enough to achieve a minimum of six to eight cortices of purchase both proximal and distal to the fracture zone. If a minimally invasive plate osteosynthesis (MIPO) technique is planned, templating is even more critical, as the plate acts as a reduction tool, and its contour must perfectly match the native anatomy of the anterior humerus.
Patient Positioning and Operating Room Setup
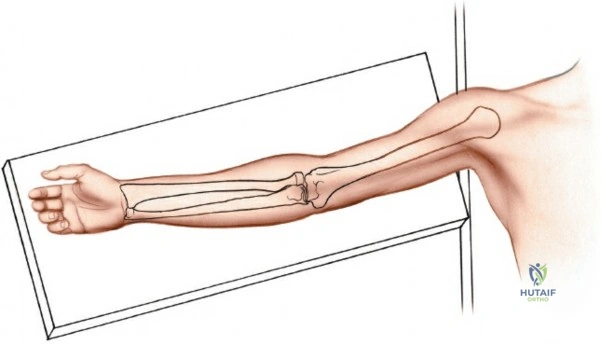
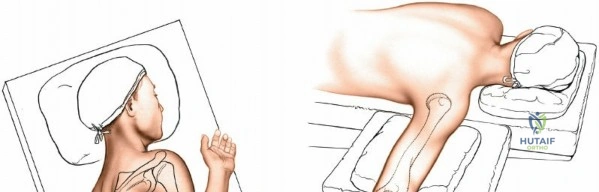
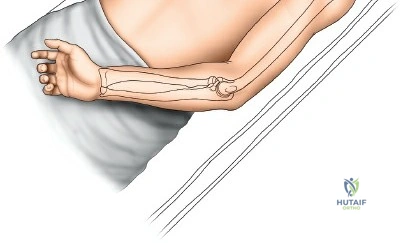
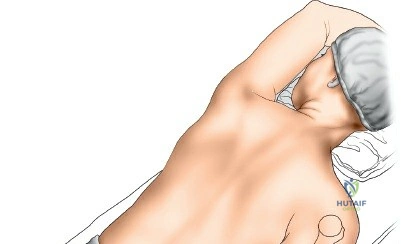
Proper patient positioning is essential for unhindered access and intraoperative fluoroscopy. The patient is placed in the supine position on a radiolucent operating table. The head should be secured and slightly rotated away from the operative side to maximize access to the shoulder girdle.
The operative arm is placed on a radiolucent hand table or arm board. The arm is abducted to approximately 60 degrees. Excessive abduction (greater than 90 degrees) must be strictly avoided, as it places undue traction on the brachial plexus, potentially causing a devastating traction plexopathy. The entire forequarter, from the base of the neck to the fingertips, should be prepped and draped free to allow for full manipulation of the limb during fracture reduction.
A sterile tourniquet can be applied as high as possible on the arm for distal third fractures, though it is often impractical or completely contraindicated for midshaft or proximal fractures due to the required proximal extent of the incision. If a tourniquet is used, it should be inflated only after the limb is exsanguinated with an Esmarch bandage, and inflation time should be strictly monitored. The C-arm fluoroscope should be brought in from the contralateral side or from the head of the bed, ensuring orthogonal views can be obtained without compromising the sterile field.
Step-by-Step Surgical Approach and Fixation Technique
Incision and Superficial Surgical Dissection
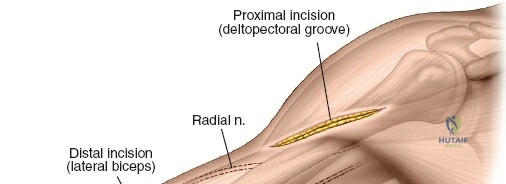
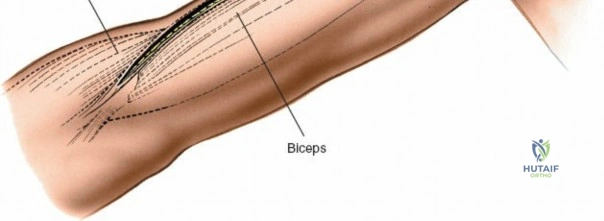
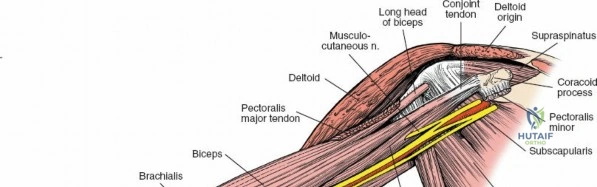
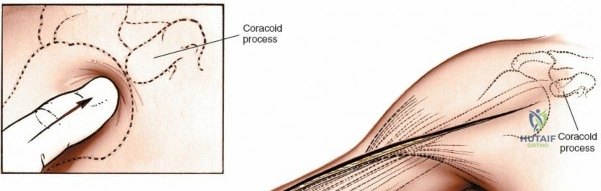
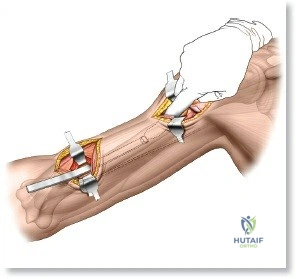
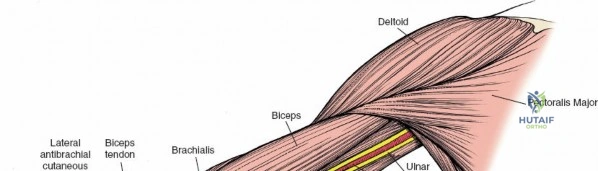
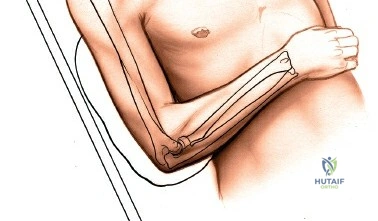
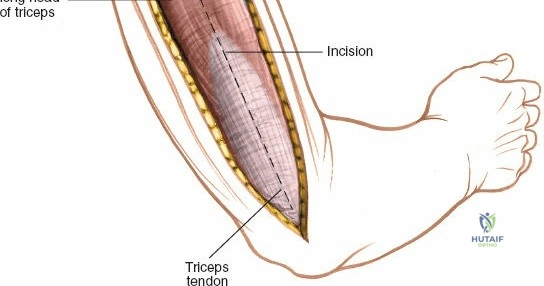
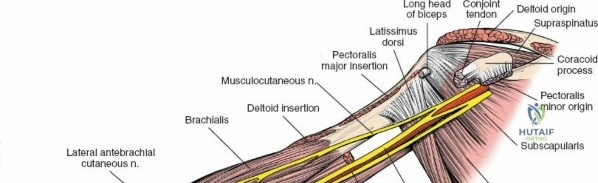
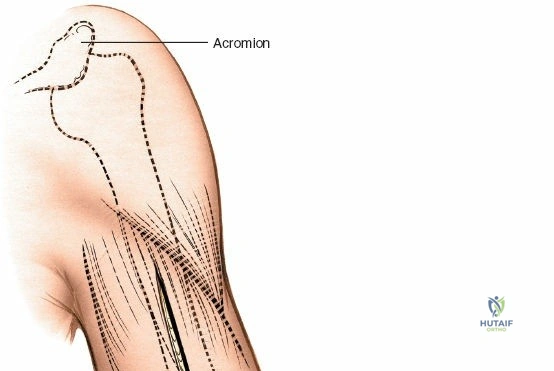
The anterior approach relies on precise identification of superficial landmarks. Begin by palpating the coracoid process of the scapula, located immediately inferior to the junction of the middle and outer thirds of the clavicle. Next, palpate the long head of the biceps brachii as it crosses the anterior shoulder and descends the arm. The lateral border of its mobile muscular belly serves as the primary longitudinal guide.
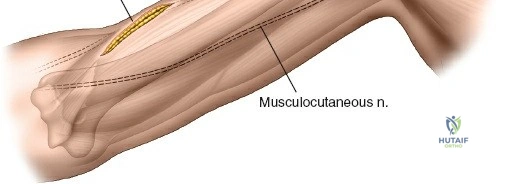
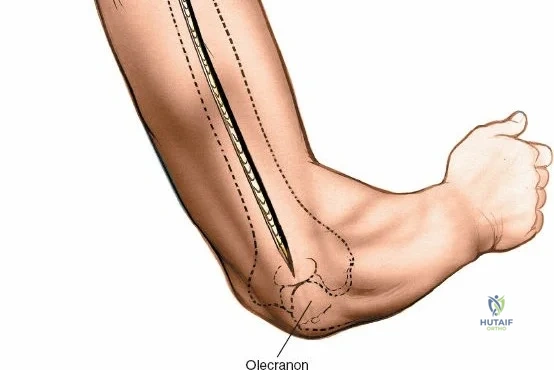
For an extensile anterior approach, make a longitudinal incision starting at the tip of the coracoid process. Proceed distally in line with the deltopectoral groove, continuing along the lateral aspect of the biceps brachii belly. The incision can be extended as far distally as necessary, typically stopping about 5 cm proximal to the flexion crease of the elbow to avoid crossing the crease perpendicularly, which could lead to a restrictive flexion contracture.

Proximal Superficial Dissection:
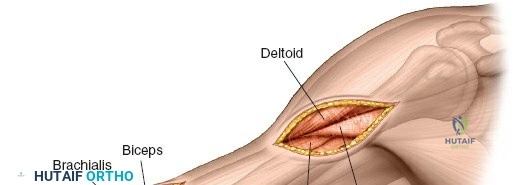
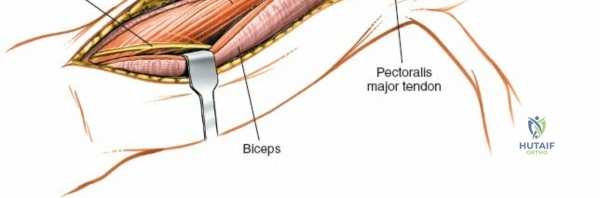
Identify the deltopectoral groove using the cephalic vein as the primary landmark. The cephalic vein can be retracted either medially with the pectoralis major or laterally with the deltoid. Retracting it laterally preserves its major tributary branches from the deltoid, reducing the risk of venous congestion, though medial retraction is often technically easier. Develop this muscular interval distally to expose the insertion of the deltoid into the deltoid tuberosity and the insertion of the pectoralis major into the lateral lip of the bicipital groove. Extreme caution must be exercised when placing retractors under the deltoid; overzealous retraction can compress the axillary nerve against the humerus, leading to paralysis of the anterior deltoid.
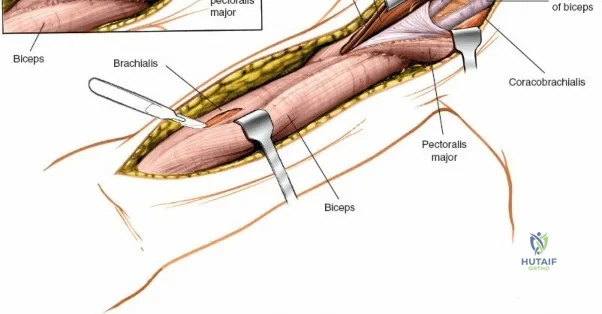
Distal Superficial Dissection:
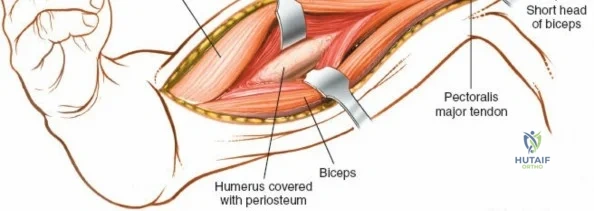
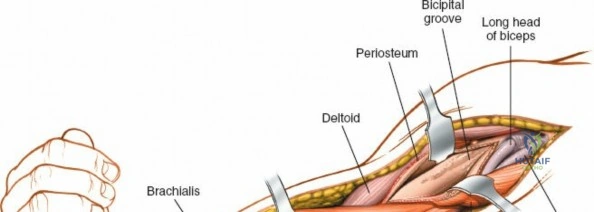
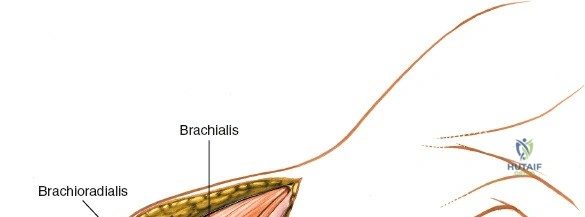
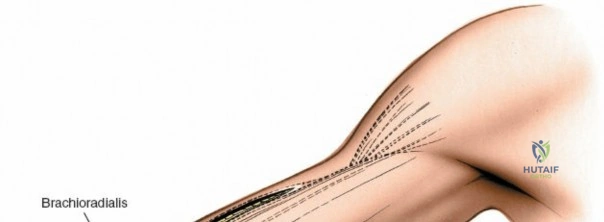
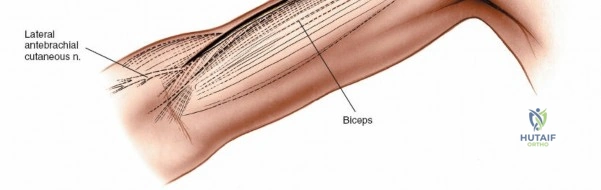
Distal to the deltoid insertion, incise the deep brachial fascia in line with the skin incision. Identify the interval between the biceps brachii medially and the brachialis laterally. Retract the biceps medially. As the dissection proceeds distally, remain vigilant for the lateral cutaneous nerve of the forearm, the terminal sensory branch of the musculocutaneous nerve. It pierces the deep fascia on the lateral border of the biceps just proximal to the elbow crease and must be identified, mobilized, and protected to prevent painful postoperative neuromas.
Deep Surgical Dissection and Fracture Exposure
Proximal Deep Dissection:
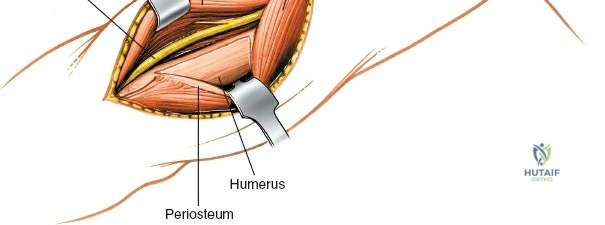
To fully expose the proximal diaphysis, it may be necessary to partially or completely detach the insertion of the pectoralis major from the lateral lip of the bicipital groove. This detachment must be performed strictly subperiosteally to facilitate later repair and minimize bleeding. Preserve as much soft-tissue attachment as possible to maintain vascularity to the fracture fragments.
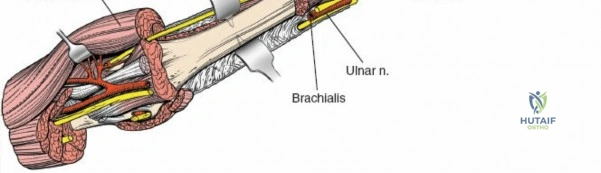
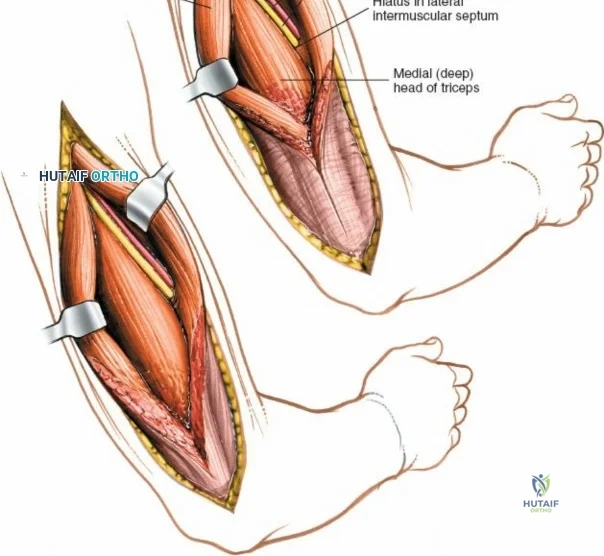
If circumferential dissection is required for reduction or cerclage wiring, it must remain in a strictly subperiosteal plane. Straying outside the periosteum on the posterior aspect of the humerus places the radial nerve at imminent risk in the spiral groove. Avoid the use of pointed, lever-type retractors (e.g., Hohmann retractors) forcefully hooked around the posterior bone, as they can directly crush the nerve within the groove.
Distal Deep Dissection:
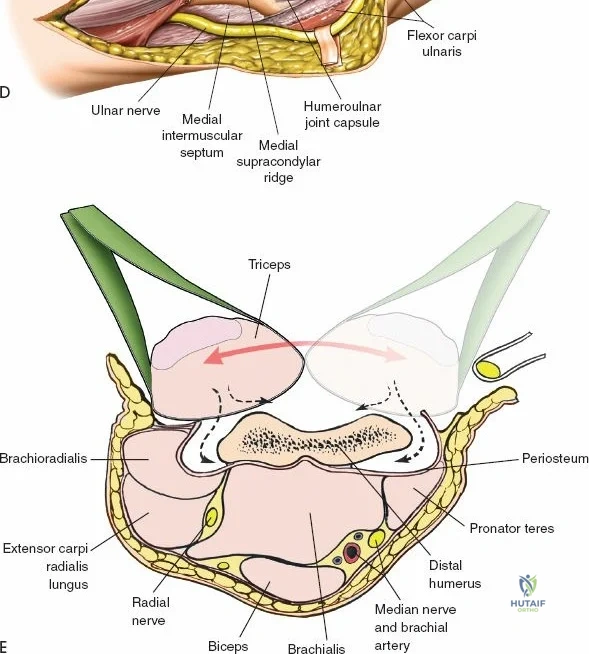
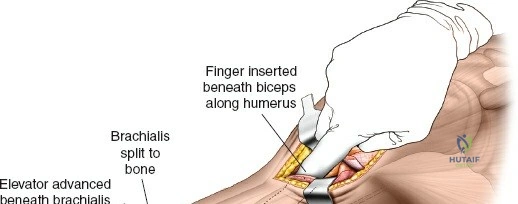
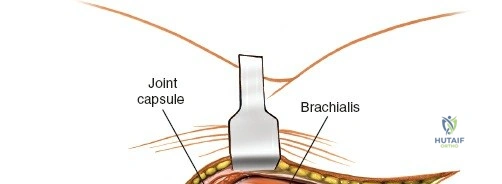
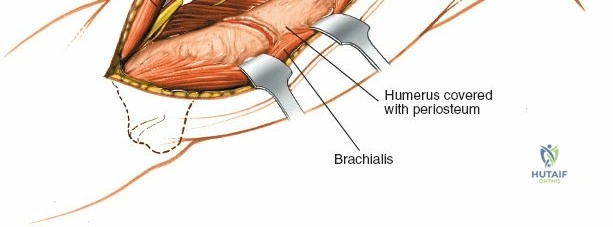
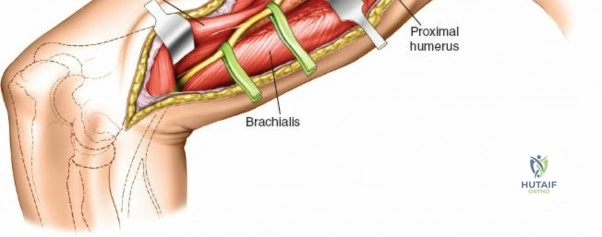
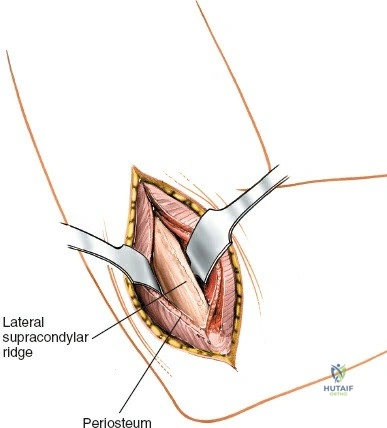
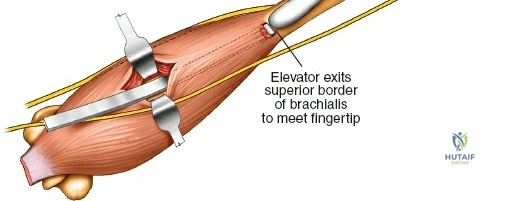
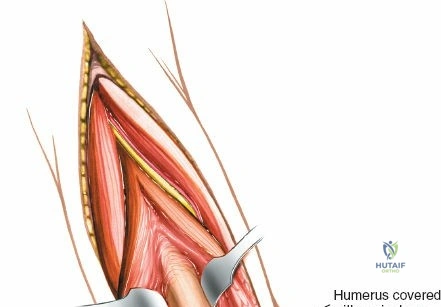
Distally, the deep dissection involves splitting the brachialis muscle. Identify the midline of the brachialis and split its fibers longitudinally down to the anterior humeral periosteum. This split exploits the dual innervation of the muscle. The medial half (musculocutaneous nerve) is retracted medially, and the lateral half (radial nerve) is retracted laterally.
Crucially, the lateral half of the brachialis acts as a muscular buffer between the surgical retractors and the radial nerve, which lies lateral to the muscle belly after piercing the lateral intermuscular septum. Flexing the elbow to 45-60 degrees significantly relaxes both the biceps and brachialis, taking tension off the soft tissues and vastly improving the deep exposure of the anterior humeral cortex. Incise the periosteum longitudinally and elevate it to expose the fracture site.
The Minimally Invasive Anterior Approach (MIPO)
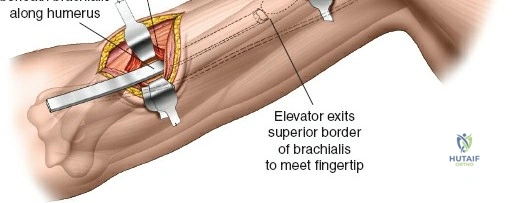
The minimally invasive anterior approach to the humeral shaft is an advanced technique designed to preserve the fracture hematoma and periosteal blood supply, promoting rapid secondary bone healing. This technique utilizes two small soft-tissue windows—one proximal and one distal—connected by a submuscular, extra-periosteal tunnel.
The proximal window utilizes the standard deltopectoral interval, exposing the anterior humerus proximal to the fracture. The distal window is created via a limited anterolateral incision, splitting the brachialis to expose the distal fragment. A long, pre-contoured locking plate is then inserted through the proximal window and tunneled distally deep to the brachialis muscle but superficial to the periosteum.

Fluoroscopy is heavily relied upon to ensure the plate is centered on the bone and that the fracture is adequately reduced (often via indirect reduction techniques like manual traction). The radial nerve remains protected by the lateral half of the brachialis, provided the tunneler and plate are kept strictly on the anterior surface of the bone. Fixation is achieved using percutaneous locking screws placed through the plate holes via stab incisions.
Extension of the Approach
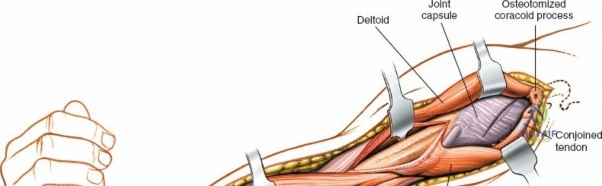
The anterior approach is highly versatile proximally. Because it utilizes the deltopectoral interval, its upper end can be effortlessly modified into a standard anterior approach to the shoulder. By extending the incision proximally over the coracoid, osteotomizing the coracoid tip (or detaching the conjoined tendon), and incising the subscapularis tendon, the surgeon gains complete access to the glenohumeral joint and proximal humerus.
Conversely, the anterior approach cannot be effectively extended distally past the elbow crease. The convergence of the neurovascular bundle (brachial artery, median nerve) and the complex anterior capsular structures of the elbow make distal extension hazardous and impractical. If exposure of the distal articular surface is required, the surgeon must transition to an anterolateral, lateral, or medial approach to the distal humerus, or abandon the anterior position entirely in favor of a posterior olecranon osteotomy.
Complications, Incidence Rates, and Salvage Management
Surgical intervention on the humerus carries a distinct complication profile. The intimate relationship of the osseous anatomy to critical neurovascular structures means that iatrogenic injury is an ever-present threat.
| Complication | Estimated Incidence | Etiology / Risk Factors | Salvage / Management Strategy |
|---|---|---|---|
| Iatrogenic Radial Nerve Palsy | 3% - 15% (varies by approach) | Retractor compression, overpenetration of drills/screws posteriorly, direct laceration during dissection. | Observation if nerve was visualized and intact (neurapraxia). EMG at 6 weeks. Tendon transfers if no recovery by 6-12 months. |
| Nonunion | 2% - 10% | Inadequate fixation stability, excessive periosteal stripping, infection, smoking, open fractures. | Revision ORIF with rigid compression plating, autologous bone grafting (iliac crest), and optimization of host factors. |
| Infection (Deep Surgical Site) | 1% - 5% | Open fractures, prolonged operative time, severe soft tissue crushing, immunocompromise. | Aggressive surgical debridement, hardware removal (if loose), temporary external fixation, targeted IV antibiotics. |
| Axillary Nerve Neurapraxia | 1% - 3% | Vigorous distal retraction of the deltoid muscle during the proximal exposure. | Usually transient. Physical therapy to maintain passive ROM. Observation and serial clinical exams. |
| Hardware Failure | 2% - 5% | Premature weight-bearing, use of undersized plates, insufficient cortical purchase, poor bone quality. | Revision surgery with longer, stronger implants (e.g., broad DCP or dual plating), bone grafting, and strict immobilization. |