Introduction and Biomechanical Principles
Arthroscopic rotator cuff repair represents the gold standard in the management of symptomatic, full-thickness rotator cuff tears. The primary objective of surgical intervention is the anatomic restoration of the rotator cuff footprint, thereby re-establishing the transverse and coronal force couples essential for dynamic glenohumeral stability.
A successful repair hinges on a profound understanding of tear morphology, meticulous soft-tissue mobilization, and the application of biomechanically optimized fixation constructs. Modern techniques, such as margin convergence and transosseous equivalent (TOE) double-row repairs, have significantly improved the biomechanical strength of the repair construct, maximizing the surface area for tendon-to-bone healing while minimizing gap formation and strain at the repair site.
Clinical Pearl: The biological healing of the rotator cuff is as critical as the mechanical repair. Preserving the marrow elements during footprint preparation and avoiding strangulation of the tendon microvasculature during knot tying are paramount to preventing structural failure.
Preoperative Preparation and Patient Positioning
Anesthesia and Hemostasis Management
Optimal visualization during arthroscopic rotator cuff repair is heavily dependent on meticulous hemostasis. Before transferring the patient to the operating room, an interscalene regional block is administered by the anesthesia team. This not only provides excellent intraoperative muscle relaxation but is also the cornerstone of postoperative multimodal analgesia.
Intraoperative bleeding is controlled through a synergistic approach utilizing hypotensive anesthesia and precise fluid pump management. The systolic blood pressure should generally be maintained around 100 mm Hg. Concurrently, the arthroscopic inflow pressure should be set within 30 mm Hg of the systolic blood pressure to create a clear visual field without causing excessive soft-tissue extravasation.
Patient Positioning: The Lateral Decubitus Approach
Place the patient in a lateral decubitus position. This position is maintained securely with a beanbag and a kidney rest.
Surgical Warning: Meticulous attention must be paid to padding. Ensure absolute relief of pressure from the axilla (using an axillary roll) and all dependent bony prominences to prevent devastating perioperative neurapraxias.
Maintain the operative extremity in 30 degrees of abduction and 10 degrees of forward flexion using a sterile balanced suspension system. This specific vector relaxes the deltoid and the superior rotator cuff, opening the subacromial space. Apply serial compression devices (SCDs) to the lower extremities to mitigate the risk of deep vein thrombosis (DVT).
Wide draping is mandatory to ensure that the sterile field does not interfere with the dynamic manipulation of the arm or the arthroscopic instruments. The spatial relationship between the patient’s head and the shoulder is critical; place the head in line with the body, ensuring it does not encroach upon the operating site. The anesthesia team and their equipment should be positioned at a 90-degree angle to the patient's chest to maximize the surgeon's working space.
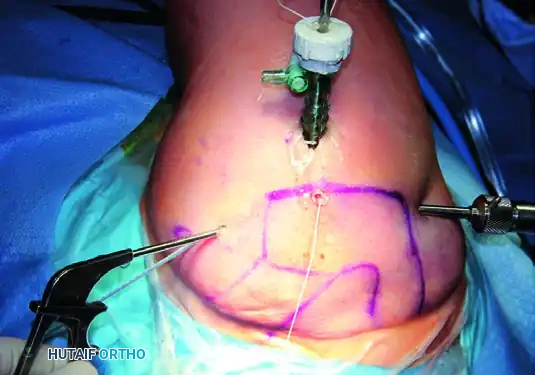
Portal Placement and Diagnostic Arthroscopy
Carefully outline the bony landmarks—the acromion, clavicle, coracoid process, and scapular spine—and mark the potential portals on the skin.
- Posterior Viewing Portal: Established 2 cm distal and 1 cm medial to the posterolateral corner of the acromion. This is the primary viewing portal used to fully evaluate the intraarticular structures and the articular side of the rotator cuff.
- Anterior Portal: Generally established as a percutaneous portal through the rotator interval, guided by an outside-in spinal needle technique. This portal is primarily used for retrieving and storing sutures, as well as managing the anterior cannula.
- Lateral Operating Portal: Created directly over the center of the tear. This is typically located about 3 cm lateral to the edge of the acromion and 2 to 3 cm posterior to the anterior edge of the acromion.
- Accessory Portals: For large, muscular individuals or massive, retracted tears, an accessory posterolateral portal may be necessary to achieve the proper trajectory for anchor insertion and suture management. It is not routinely required for smaller tears.
Clinical Pearl: Lateral distraction applied intermittently by an assistant can significantly increase the subacromial space, enhancing visualization and facilitating complex suture retrieval.
Subacromial Preparation and Tear Assessment
Once the glenohumeral diagnostic arthroscopy is complete, redirect the viewing cannula into the subacromial space.
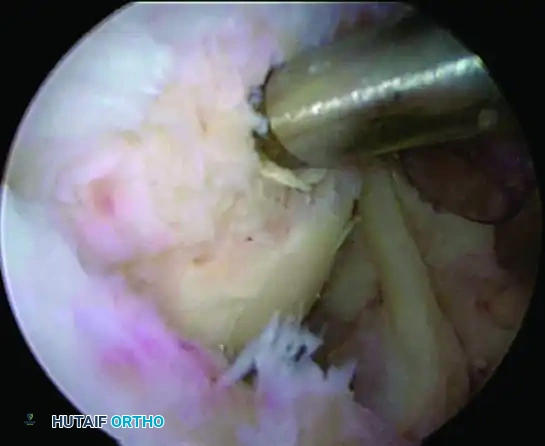
Bursectomy and Decompression
Perform a complete and meticulous bursectomy. A thorough bursectomy is non-negotiable; it ensures unimpeded visualization of the entire rotator cuff footprint, the tear margins, and facilitates the ease of retrieving and managing multiple sutures without soft-tissue entanglement. Perform a subacromial decompression (acromioplasty) only when clinically and anatomically indicated (e.g., a Type III hooked acromion contributing to extrinsic impingement).
Tear Pattern Recognition
Carefully define the depth of the tear and determine its geometric configuration. Recognizing the tear pattern is the most critical step in determining the repair strategy:
* Crescent-shaped tears: Typically avulsions directly off the footprint with minimal medial retraction.
* U-shaped tears: Extend further medially and require margin convergence to restore the anatomy without excessive tension.
* L-shaped or Reverse L-shaped tears: Exhibit a longitudinal split component combined with a transverse avulsion.
Determine the amount of retraction and the intrinsic mobility of the tendon. Assess whether the tendon can be reduced back to its anatomic footprint. If it cannot be easily reduced, you must determine the necessary release techniques to achieve a tension-free repair.
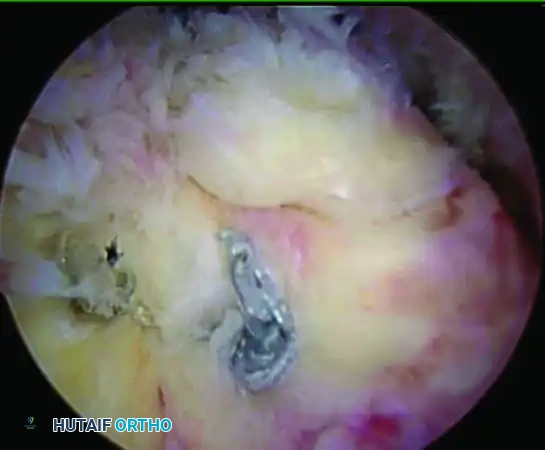
Footprint Preparation
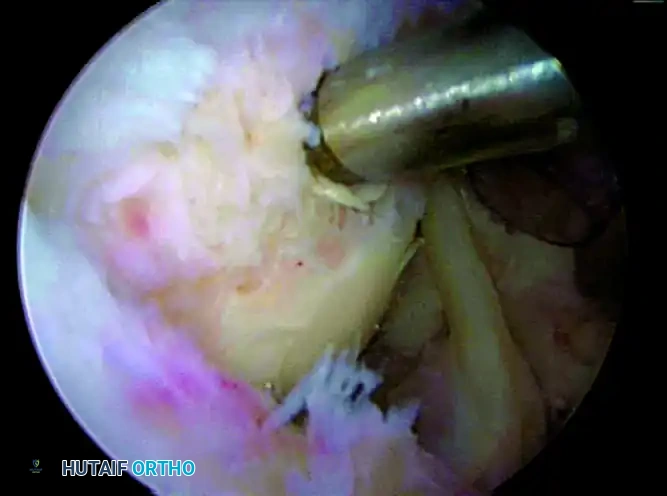
Prepare the greater tuberosity footprint by lightly abrading the cortical surface to a bleeding bed.
Surgical Warning: Do not overly resect or decorticate the bone. Light abrasion removes the soft tissue footprint and stimulates bleeding, releasing essential marrow elements and mesenchymal stem cells when the suture anchors are placed. Over-resection weakens the cortical bone, drastically increasing the risk of anchor pullout.
Advanced Surgical Techniques: Mobilization and Repair
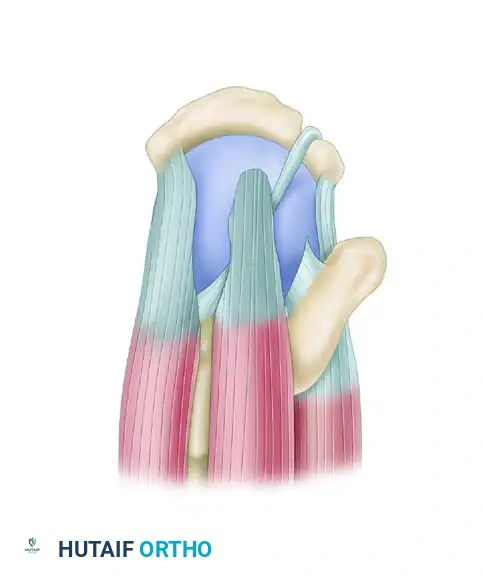
Management of Massive, Contracted Tears
For massive, contracted tears, extensive mobilization is required. A double-interval slide is often necessary to achieve a tension-free reduction.
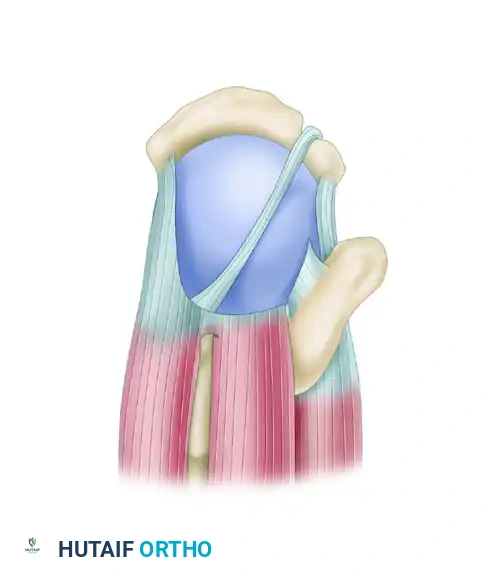
Massive, contracted crescentic rotator cuff tear viewed from the superior aspect.
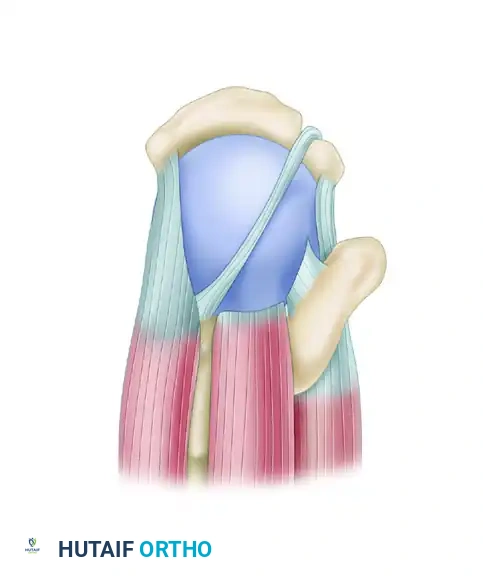
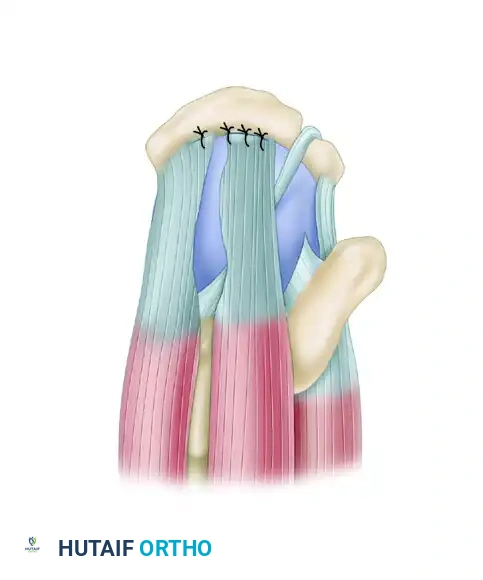
A double-interval slide is performed. First, the anterior interval slide is executed, followed by the posterior interval slide, releasing the interval between the supraspinatus and infraspinatus.
After the release, note the significantly improved mobility of the supraspinatus tendon, as well as the infraspinatus and teres minor tendons posteriorly.
The supraspinatus tendon is now capable of being repaired to the lateral bone bed in a tension-free manner, with the posterior cuff advanced laterally.
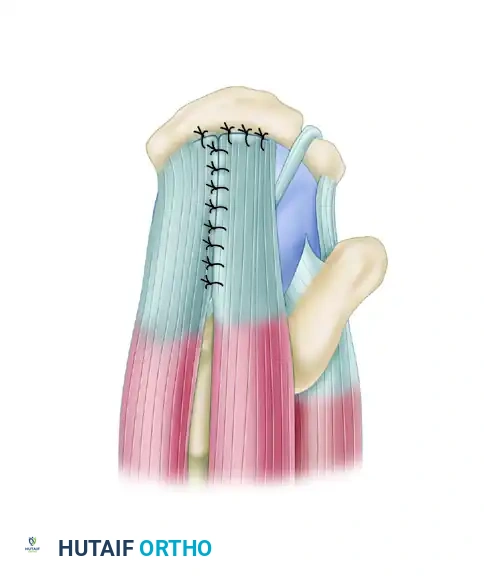
Any residual medial defect is closed with side-to-side sutures to restore the rotator cable.
Margin Convergence
Margin convergence and capsular releases to reduce tension on the repair must be contemplated early in the procedure. For U-shaped tears, margin convergence is almost always performed. This technique reduces the volume and size of the tear, converting a massive U-shape into a smaller crescent shape that can be easily repaired down to the tuberosity.
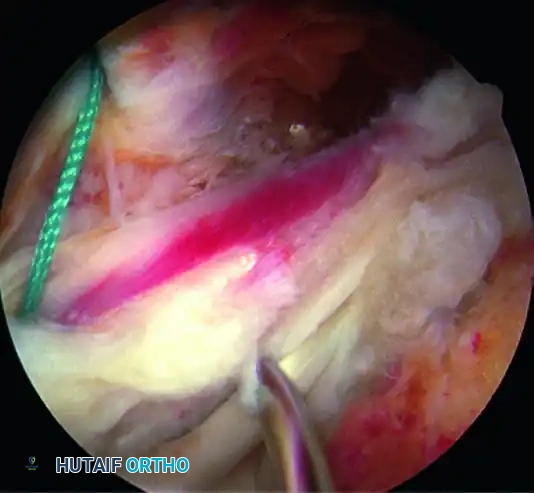
For margin convergence of a U-shaped tear (or the medial extension of an L-shaped tear), utilize a large crescent-type suture shuttle device. Pass the device through both leaves of the tear, and retrieve a No. 2 nonabsorbable suture back through the tissue. Store these sutures for later tying.
Begin the convergence at the medial apex of the tear, working systematically from medial to lateral. It is imperative to visually line up the tear margins to restore the normal anatomical force lines.
Convergence is started at the apex of the tear.

Working from medial to lateral, side-to-side sutures are placed to close the longitudinal component.
The completed margin convergence converts the tear into a manageable crescent shape.
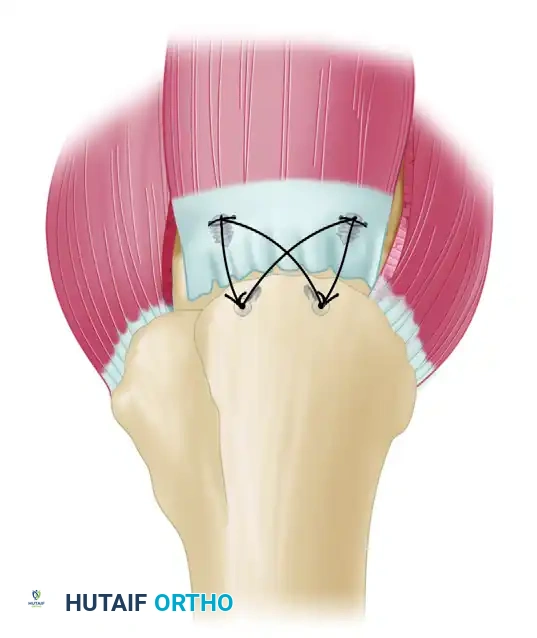
Anchor Strategy and Insertion
Define the potential location of the anchors. It is a strict biomechanical rule to separate the insertion points by 1.2 to 1.5 cm to prevent stress risers and subsequent tuberosity fracture.
- Tears < 1.5 cm: Generally, one double-loaded or triple-loaded anchor is sufficient.
- Tears > 1.5 cm: Two anchors should be planned, separating the starting points by 1.2 to 1.5 cm.
- Tears ≥ 3.0 cm: A transosseous equivalent (TOE) double-row repair is indicated. The medial anchors should start 5 mm off the articular margin, and the lateral row should be placed about 5 mm lateral to the greater tuberosity, effectively separating the rows by 1.2 to 1.5 cm.
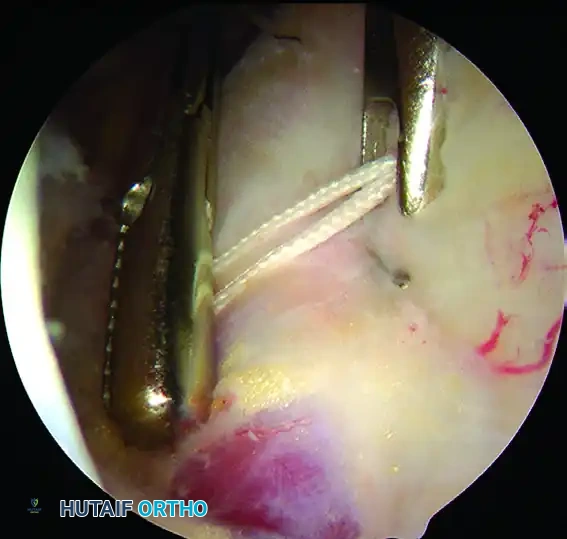
Anchors are inserted just off the edge of the acromion through individual percutaneous stab wounds to achieve the correct trajectory.
Place the suture anchors in a stepwise fashion. Insert the anterior anchor first (at the insertion site of the rotator cable), followed by the posterior anchor. Use small percutaneous stab wounds just off the lateral edge of the acromion, utilizing spinal needle localization to achieve a perfect 45-degree angle to the humeral shaft. Bury the anchors completely to ensure the threads are fully engaged in the dense cortical bone.
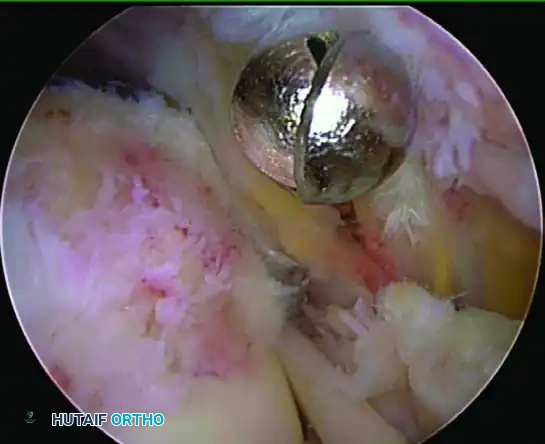
Placement of the starting hole for the medial anchor. Note the 45-degree angle to the shaft and placement 2 mm off the articular edge.
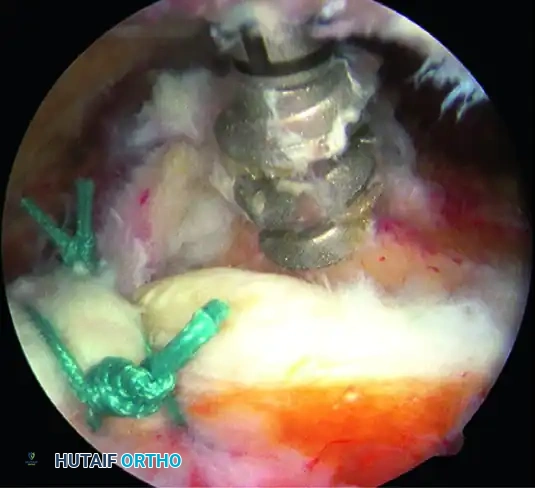
Insertion of a double-loaded anchor for mattress sutures, placed 3 mm lateral to the articular surface.
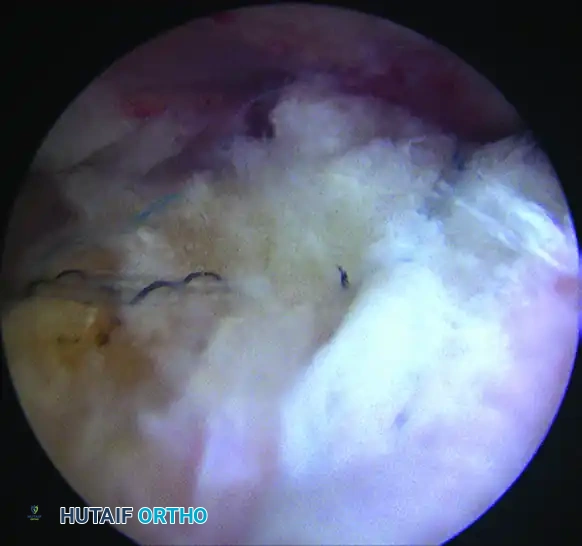
Suture Passing and Management
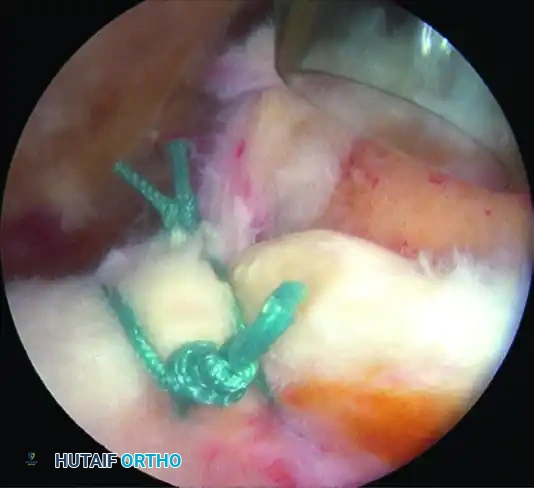
Pass the mattress sutures through the tendon using a scorpion-type suture-passing device. The bite should be taken approximately 4 mm lateral to the musculotendinous junction. Separate the suture limbs by about 7 mm (which is the approximate width of the scorpion device's jaw) to create a robust mattress bridge.
Use of a Scorpion device to place a mattress suture 16 mm medial to the torn edge.
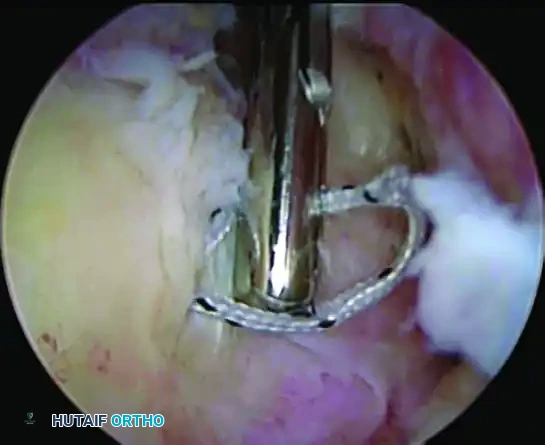
Placement of mattress sutures for the medial row of the cuff repair.
Capture the passed sutures and carry them through an anterior stab wound where they are meticulously paired and clamped to prevent tangling. When passing multiple sutures, always pass the anterior sutures first and work sequentially to the posterior aspect.
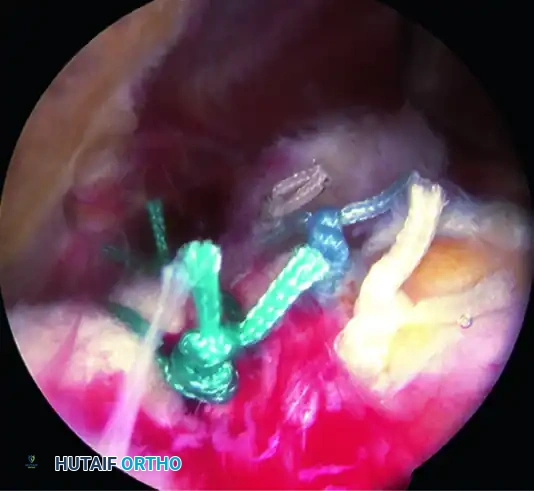
Completion of medial mattress suture placement and storage in the cannula. These sutures can be used to pull the tendon to its tuberosity to help identify the appropriate placement of lateral anchors.
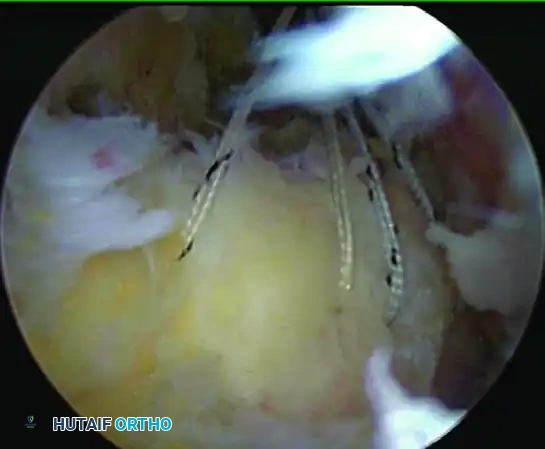
Once all sutures are passed and stored (either through a separate anterior stab wound or through the previous percutaneous anchor portals), begin tying. Tie the sutures starting posteriorly and work toward the anterior suture. The anterior suture is generally tied last to securely lock the anterior edge of the cuff down to its anatomical position. As each suture is tied, store the tails outside the cannula.
Transosseous Equivalent (TOE) Double-Row Repair
For larger tears that can be reduced to the footprint without undue tension, a transosseous equivalent (TOE) repair provides superior biomechanical fixation, maximizing pressurized contact area between the tendon and the bone bed.
After all medial row knots are tied, visualize the planned lateral row anchor sites. Use electrocautery to
Associated Surgical & Radiographic Imaging
📚 Medical References
- rotator cuff repair: which anchors are best to use in patients with low bone quality? Am J Sports Med 32:1466, 2004.
- Tomford WW, Mankin JH, Friedlaender GE, et al: Methods of banking bone and cartilage for allograft transplantation, Orthop Clin North Am 18:241, 1987.
- Tomford WW, Starkweather RJ, Goldman MH: A study of the clinical incidence of infection in the use of banked allograft bone, J Bone Joint Surg 63A:244, 1981.
- Knee Abbott LC, Carpenter WF: Surgical approaches to the knee joint, J Bone Joint Surg 27:277, 1945.
- Brackett EG, Osgood RB: The popliteal incision for the removal of “joint mice” in the posterior capsule of the knee-joint: a report of cases, Boston Med Surg J 165:975, 1911.
- Brown CW, Odom JA Jr, Messner DG, et al: A simplified operative approach for the lateral meniscus, J Sports Med 3:265, 1975.
- Bruser DM: A direct lateral approach to the lateral compartment of the knee joint, J Bone Joint Surg 42B:348, 1960.
- Cave EF: Combined anterior-posterior approach to the knee joint, J Bone Joint Surg 17:427, 1935.
- Chambers GH: The prepatellar nerve: a cause of suboptimal results in knee arthrotomy, Clin Orthop Relat Res 82:157, 1972.
- Charnley J: Horizontal approach to the medial semilunar cartilage, J Bone Joint Surg 30B:659, 1948.
- Erkes F: Weitere Erfahrungen mit physiologischer Schnitt führung zur eröffnung des Kniegelenks, Bruns Beitr zur Klin Chir 147:221, 1929.
- Fernandez DL: Anterior approach to the knee with osteotomy of the tibial tubercle for bicondylar tibial fractures, J Bone Joint Surg 70A:208, 1988.
- Gossling HR, Peterson CA: A new surgical approach in the treatment of depressed lateral condylar fractures of the tibia, Clin Orthop Relat Res 140:96, 1979.
- Henderson MS: Posterolateral incision for the removal of loose bodies from the posterior compartment of the knee joint, Surg Gynecol Obstet 33:698, 1921.
- Hofmann AA, Plaster RL, Murdock LE: Subvastus (Southern) approach for primary
