INTRODUCTION TO MENISCAL PRESERVATION
The paradigm of meniscal surgery has shifted definitively from resection to preservation. The menisci are critical biomechanical structures responsible for load transmission, shock absorption, joint stability, and articular cartilage nutrition. Loss of meniscal tissue exponentially increases contact stresses across the tibiofemoral joint, predictably leading to early-onset osteoarthritis. Consequently, arthroscopic meniscal repair is the gold standard for treatable meniscal lesions.
Among the various repair strategies—inside-out, all-inside, and outside-to-inside—the outside-to-inside technique remains an indispensable skill in the orthopedic surgeon's armamentarium. Originally described by Morgan, Casscells, and Warren as a safe approach to the posterior meniscal horns, the technique has evolved. While some still advocate its use posteriorly, extensive clinical experience has demonstrated that the outside-to-inside technique is most appropriate, highly versatile, and exceptionally safe for tears located in the anterior aspect and middle third of either the medial or lateral meniscus. These anterior zones are notoriously difficult to access with rigid all-inside devices or traditional inside-out cannulas due to the acute angle of approach required from standard anterior portals.
The Johnson modification of this technique utilizes a sophisticated suture retrieval method. By passing a suture through a spinal needle and utilizing a second needle in a vertical or horizontal mattress configuration, a wire loop can retrieve the initial suture, pulling it back through the meniscus to create a robust, low-profile mattress repair.
INDICATIONS AND CONTRAINDICATIONS
Indications
- Anterior Horn Tears: The primary indication for the outside-to-inside technique. The trajectory from the external capsule into the anterior joint space is direct and easily controlled.
- Middle Third (Body) Tears: Highly accessible via percutaneous needle placement.
- Longitudinal Vertical Tears: Tears within the red-red or red-white vascular zones (within 3 to 5 mm of the meniscocapsular junction).
- Bucket-Handle Tears: Used as an adjunct to secure the anterior extent of a reduced bucket-handle tear after the posterior horn has been secured with all-inside or inside-out techniques.
Contraindications
- Degenerative Tears: Complex, highly fibrillated tears with poor tissue quality that cannot hold a suture.
- White-White Zone Tears: Central avascular tears generally have a poor healing prognosis, though repair may be attempted in young, highly active patients using biologic augmentation (e.g., fibrin clot, platelet-rich plasma).
- Root Avulsions: Better managed with transosseous pull-out suture techniques or specialized root repair anchors.
NEUROVASCULAR ANATOMY AND DYNAMIC POSITIONING
The safety of the outside-to-inside technique relies entirely on a profound understanding of the regional neurovascular anatomy and how joint position alters the trajectory of these structures relative to the joint line. Meticulous attention to the degree of knee flexion is mandatory to avoid iatrogenic nerve injury during needle insertion and capsular incision.
⚠️ Surgical Warning: Dynamic Nerve Positioning
The position of the sartorial branch of the saphenous nerve (medially) and the common peroneal nerve (laterally) changes dynamically with knee flexion. Failure to adjust the knee flexion angle appropriately for specific tear locations can result in devastating iatrogenic nerve entrapment or transection.
Posteromedial Repairs
When addressing tears in the posteromedial meniscus, the knee must be placed in 10 to 20 degrees of flexion.
* Biomechanical Rationale: In near extension, the sartorial branch of the saphenous nerve is pulled anteriorly. Making the incision and passing the needles in this position ensures the nerve lies safely anterior to the repair site, protecting it from the percutaneous needle trajectory.
Anteromedial Repairs
For tears located in the anteromedial meniscus, the knee should be positioned in 40 to 50 degrees of flexion.
* Biomechanical Rationale: Flexing the knee to this degree allows the sartorial nerve to drop posterior to the joint line and the intended repair site. This creates a safe, unobstructed window for anterior needle placement.
Lateral Repairs
When repairing the lateral meniscus, the knee must be flexed to 90 degrees.
* Biomechanical Rationale: The common peroneal nerve courses posterior to the biceps femoris tendon and wraps around the fibular neck. Flexing the knee to 90 degrees allows the common peroneal nerve to fall safely posterior and inferior to the lateral joint line, maximizing the distance between the nerve and the percutaneous needles.
PREOPERATIVE PLANNING AND JOINT PREPARATION
Patient Setup
The patient is positioned supine on the operating table. A tourniquet is applied to the proximal thigh. The leg is typically placed in a standard leg holder to allow for valgus/varus stress and dynamic flexion/extension, which is critical for opening the joint compartments and adjusting nerve positions as described above.
Meniscal Preparation
Healing of a meniscal repair is entirely dependent on the biological environment. The meniscus and the adjacent parameniscal tissue must be aggressively prepared before any sutures are passed.
- Debridement: Use an arthroscopic shaver to remove fibrillated, non-viable edges of the tear.
- Rasping: A meniscal rasp must be introduced to abrade the parameniscal synovium and the meniscocapsular junction. This stimulates a healing response by releasing local growth factors and creating a vascular access channel.
- Trephination: For tears extending into the red-white or white-white zones, vascular access channels can be created by passing an 18-gauge spinal needle repeatedly from the vascular periphery into the tear site.
💡 Clinical Pearl: Cannula Placement
A small, 5- to 6-mm working cannula should be placed in the ipsilateral portal (e.g., anteromedial portal for a medial meniscal repair) to facilitate smooth suture management. This prevents soft tissue bridging and suture tangling within Hoffa's fat pad during the retrieval steps.
SURGICAL TECHNIQUE: THE JOHNSON OUTSIDE-TO-INSIDE METHOD
The following step-by-step protocol details the Johnson suture retrieval technique, which allows for the creation of a precise mattress configuration (either horizontal or vertical) using standard spinal needles and a wire loop shuttle.
Step 1: Capsular Exposure
Identify the exact location of the meniscal tear via arthroscopic transillumination. The arthroscope is placed in the contralateral portal, and the light source is directed at the capsule to identify superficial vessels.
* Make a small (1 to 2 cm) longitudinal skin incision directly opposite the site of the meniscal tear.
* Carefully dissect through the subcutaneous tissue down to the level of the joint capsule using a hemostat. Spreading the soft tissues rather than cutting minimizes the risk of injuring superficial cutaneous nerves.
Step 2: First Needle Insertion
- Under direct arthroscopic visualization, introduce an 18-gauge spinal needle from the outside to the inside.
- The needle must penetrate the intact peripheral meniscal rim first, cross the tear interface, and then exit through the inner meniscal fragment.
- Ensure the trajectory is parallel to the joint surfaces to avoid iatrogenic scuffing of the femoral condyle or tibial plateau.
Step 3: Suture Introduction
- Remove the stylet from the spinal needle.
- Pass a specially designed suture passer (or a flexible wire loop/nitinol shuttle) down through the lumen of the needle and into the intra-articular joint space.
- Alternatively, a monofilament suture (such as a #1 PDS) can be fed directly through the needle.
Step 4: Suture Retrieval
- Introduce a specialized arthroscopic grasping instrument through the anterior working cannula.
- Grasp the intra-articular end of the suture or shuttle relay.
- Deliver the end of the suture out through the anterior portal.
- If using a wire loop shuttle, place the definitive repair suture through the loop. Withdraw the spinal needle and the suture passer simultaneously from the outside. This action pulls the definitive suture through the meniscal fragment, across the tear, through the meniscal rim, and out through the external capsule.
Step 5: Second Needle Insertion and Mattress Creation
- Repeat the insertion process by placing a second 18-gauge spinal needle approximately 3 to 4 mm adjacent to the first needle.
- For a horizontal mattress: Place the second needle in the same horizontal plane.
- For a vertical mattress: Place the second needle superior or inferior to the first needle. Vertical mattress sutures generally provide superior biomechanical pull-out strength as they capture the circumferential collagen fibers of the meniscus.
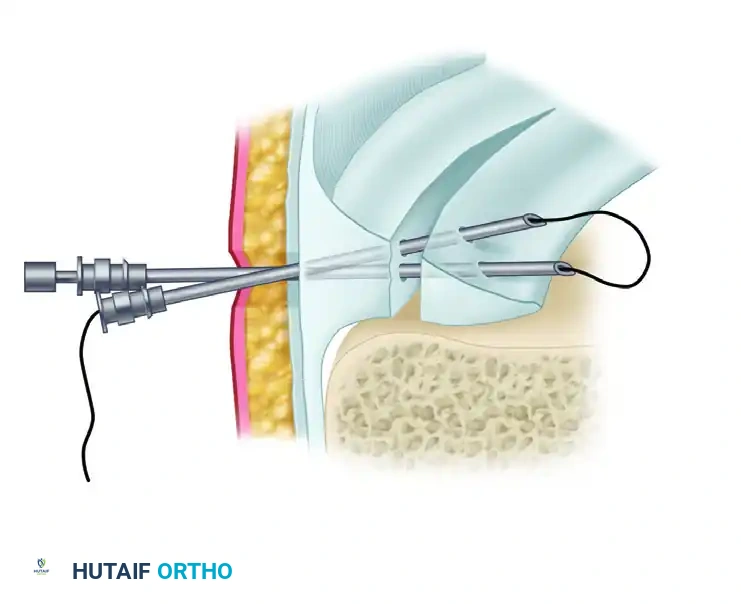
FIGURE 51-25: Outside-to-Inside Technique. Two spinal needles are passed through the meniscal tear. A wire loop is passed through one needle, and a suture is passed through the other, demonstrating the initial steps of suture shuttling.
- Insert the suture passer (wire loop) through this second needle.
- Retrieve the wire loop through the anterior portal using the arthroscopic grasper.
- Take the remaining free end of the definitive suture (which is currently exiting the anterior portal) and thread it through the wire loop.
- Retract the second needle and the suture passer simultaneously. This pulls the second limb of the suture into the joint, through the meniscus, and out the external capsule.
- Both ends of the suture are now located on the outside of the capsule, successfully creating a mattress suture configuration across the meniscal tear.
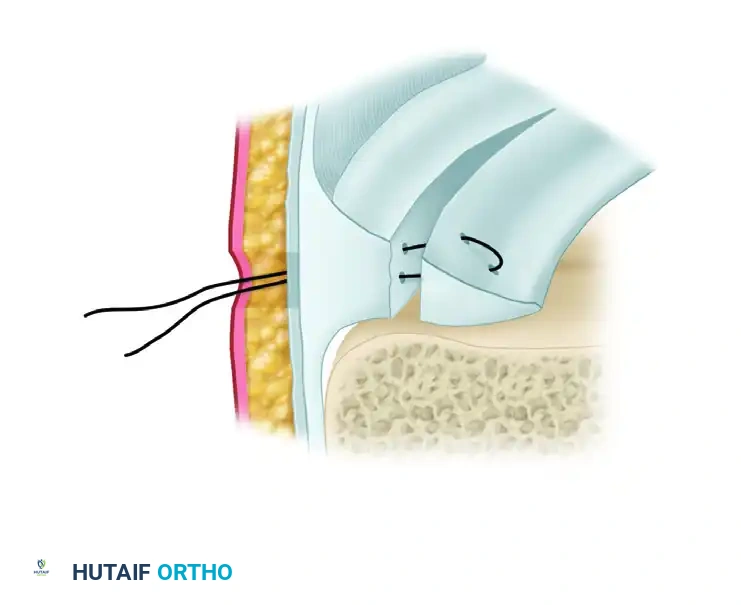
FIGURE 51-26: Johnson technique. A, The second suture limb is pulled through the meniscus to complete the suture attachment. B, The final horizontal mattress configuration is brought into place after the needles and cable loops have been removed, ready for extra-capsular tying.
Step 6: Knot Tying and Tensioning
- With both suture limbs exiting the capsular incision, apply gentle, alternating traction to ensure the meniscal tear is anatomically reduced and the suture slides freely without soft tissue entrapment.
- Tie the suture firmly down over the capsule. It is imperative that the knot rests directly on the capsular tissue and is not tied over subcutaneous fat or superficial fascia, which could lead to knot prominence, skin irritation, or loss of tension.
- Repeat this entire process, placing sutures every 5 to 7 mm, as often as necessary to stabilize the meniscal tear securely.
🔪 Surgical Pitfall: Suture Entrapment
When tying the knot over the capsule, ensure that no branches of the saphenous nerve (medially) or other soft tissues are caught within the suture loop. Blindly tying sutures without adequate capsular exposure is a primary cause of postoperative nerve entrapment pain. Always visualize the capsule directly before securing the knot.
POSTOPERATIVE REHABILITATION PROTOCOL
Successful meniscal repair requires a strict, phased rehabilitation protocol to protect the healing tissue from excessive shear and compressive forces while preventing joint stiffness.
Phase I: Maximum Protection (Weeks 0 to 4)
- Weight-Bearing: Touch-down weight-bearing (TDWB) or non-weight-bearing (NWB) with crutches.
- Bracing: The knee is locked in full extension in a hinged knee brace during ambulation to prevent shear stresses on the repair.
- Range of Motion (ROM): Passive and active-assisted ROM is typically limited to 0 to 90 degrees. Deep flexion (greater than 90 degrees) is strictly avoided as it significantly increases posterior translation of the femoral condyles, placing immense stress on the repaired meniscus.
Phase II: Moderate Protection (Weeks 4 to 8)
- Weight-Bearing: Progressive return to full weight-bearing as tolerated, initially with the brace locked in extension, then unlocking the brace as quadriceps control improves.
- ROM: Gradual progression to full, symmetric range of motion.
- Strengthening: Initiate closed-kinetic-chain exercises (e.g., mini-squats, leg presses) limited to 0 to 60 degrees of flexion.
Phase III: Return to Function (Weeks 8 to 16+)
- Strengthening: Advance closed-chain strengthening, proprioception, and balance training.
- Return to Play: Running is typically permitted at 3 to 4 months. Return to cutting, pivoting, and high-impact sports is generally delayed until 5 to 6 months postoperatively, contingent upon the return of full strength (at least 90% limb symmetry index) and absence of effusion or joint line tenderness.
COMPLICATIONS AND MANAGEMENT
While the outside-to-inside technique is highly effective, surgeons must be prepared to manage potential complications:
- Nerve Injury: The most feared complication. Adherence to the dynamic flexion angles (10-20° for posteromedial, 40-50° for anteromedial, 90° for lateral) is the best prevention. If a patient presents with postoperative paresthesia or radiating pain, immediate evaluation for suture entrapment is required, which may necessitate surgical release.
- Suture Cut-Out: Tying sutures too tightly or placing them in degenerative tissue can cause the suture to slice through the meniscus (the "cheese-wire" effect). Ensure sutures are placed at least 3-4 mm from the tear edge and tensioned just enough to coapt the tissue without strangulation.
- Infection: Though rare in arthroscopic procedures, the mini-open capsular incisions slightly increase the risk of superficial wound infections. Meticulous hemostasis and standard perioperative antibiotic prophylaxis are recommended.
- Failure of Healing: Despite perfect surgical technique, up to 15-20% of meniscal repairs may fail to heal, particularly in chronic tears or those in the avascular zone. Patients should be counseled preoperatively regarding the potential need for future partial meniscectomy if mechanical symptoms recur.
