Introduction to Total Ankle Arthroplasty
Total Ankle Arthroplasty (TAA) has evolved significantly over the past three decades, transitioning from highly constrained, cemented first-generation implants to modern, unconstrained or semi-constrained cementless designs. For patients suffering from end-stage ankle osteoarthritis, post-traumatic arthritis, or inflammatory arthropathies, TAA offers a motion-preserving alternative to traditional ankle arthrodesis. The primary goals of TAA are pain relief, restoration of the instantaneous center of rotation (ICR), preservation of peritalar kinematics, and the prevention of adjacent-joint degenerative disease.
The success of modern TAA relies heavily on meticulous patient selection, precise surgical technique, and rigorous soft-tissue balancing. The operative technique described herein, adapted from the foundational principles of Clare, Sanders, and Walling, provides a comprehensive framework for executing a successful anterior approach to the ankle for prosthetic implantation.
Preoperative Planning and Biomechanical Considerations
Thorough preoperative planning is the cornerstone of a successful TAA. The surgeon must evaluate the entire lower extremity mechanical axis, as supramalleolar or hindfoot deformities will directly impact the survivorship of the ankle prosthesis.
Managing Coronal Plane Deformities
Coronal plane deformities (varus or valgus) must be critically assessed. A deformity of more than 10 degrees can often be corrected intraoperatively through a combination of strategic bony resections and soft-tissue balancing.
Clinical Pearl: If a coronal plane deformity is incongruent, the patient is statistically 10 times more likely to experience progressive edge-loading of the polyethylene bearing. Edge-loading leads to accelerated asymmetric wear, particulate debris generation, osteolysis, and ultimate aseptic loosening.
To address these deformities, the surgeon must be prepared to perform:
* Lateral Ligament Reconstruction: Essential for correcting varus instability and restoring the lateral tension band.
* Superficial Deltoid Release: Often required in chronic varus deformities where the medial structures have contracted.
* Concurrent Arthrodesis: Adjacent joint arthritis or severe instability may necessitate subtalar or triple arthrodesis prior to or concurrent with TAA.
* Tendon Transfers: May be required to restore dynamic balance to the foot and ankle complex.
Addressing Soft-Tissue Contractures
Soft-tissue contractures must be identified and treated to ensure optimal postoperative kinematics. The most common soft-tissue impediment in end-stage ankle arthritis is gastrocnemius-soleus tightness. Equinus contracture forces the talus anteriorly within the mortise, altering the ICR and placing excessive shear stress on the implant interface. If not corrected via a gastrocnemius recession (Strayer procedure) or an Achilles tendon lengthening (percutaneous Hoke or open Z-lengthening), the patient will be unable to achieve the necessary dorsiflexion for a normal heel-to-toe gait, leading to early implant failure.
Implant Selection and Design
Modern TAA systems generally fall into two categories: mobile-bearing (three-component) and fixed-bearing (two-component) designs. The choice of implant depends on regional regulatory approvals, surgeon preference, and specific patient anatomy.
Systems such as the INBONE total ankle replacement device utilize a modular tibial stem to achieve robust diaphyseal fixation, which is particularly useful in revision scenarios or patients with poor metaphyseal bone stock. Conversely, implants like the Salto Talaris utilize a fixed-bearing design with anatomical talar components designed to mimic the natural truncated cone shape of the talus.
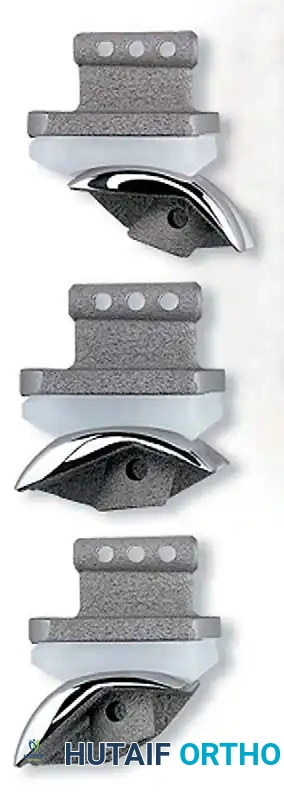
Fig. 5-2 Salto Talaris total ankle replacement device, demonstrating the highly polished talar component and the porous-coated tibial baseplate designed for biologic ingrowth.
Operative Technique: The Anterior Approach
The anterior approach is the workhorse incision for the vast majority of modern TAA systems. It provides excellent exposure of the distal tibia, the ankle mortise, and the talar dome.
Patient Positioning and Preparation
- Positioning: Place the patient in the supine position on a radiolucent operating table.
- Rotational Alignment: Place a well-padded bump beneath the ipsilateral buttock and hip. This internally rotates the lower limb, neutralizing the natural external rotation of the leg and bringing the ankle mortise into a true anteroposterior (AP) plane. This is critical for accurate fluoroscopic imaging and precise bony cuts.
- Local Elevation: Place sterile bumps under the posterior knee and the posterior ankle (Achilles region). This helps level the lower leg and relaxes the posterior soft tissues.
- Surgical Advantage: The distal bump can be temporarily moved out of the path of the oscillating saw when performing the posterior cortical bone cuts. This ensures the posterior soft tissues (including the neurovascular bundle and flexor tendons) fall away from the joint capsule, significantly reducing the risk of iatrogenic injury.
- Hemostasis: Exsanguinate the limb with an Esmarch bandage and inflate the pneumatic thigh tourniquet to the appropriate pressure (typically 250-300 mmHg).
- Note: Some arthroplasty systems require the use of a rigid external fixator to distract the joint. If required, the fixator pins should be applied before the tourniquet is inflated to minimize tourniquet time.
- Equinus Correction: Perform an Achilles tendon lengthening or gastrocnemius recession at this stage if preoperative assessment indicated a tight posterior envelope.
Surgical Incision and Superficial Dissection
- Incision: Make a 10 to 15 cm longitudinal linear incision centered over the anterior ankle joint. The incision should overlie the interval between the anterior tibial tendon (Tibialis Anterior) and the common extensor tendons (Extensor Digitorum Longus and Extensor Hallucis Longus).
- Retinaculum: Continue with sharp dissection through the subcutaneous tissues to expose the extensor retinaculum. Incise the superior and inferior extensor retinaculum in line with the skin incision.
- Tendon Management:
- Carefully mobilize the anterior tibial tendon medially.
- CRITICAL WARNING: Strictly avoid violating the synovial sheath of the anterior tibial tendon. Entering the sheath can lead to severe postoperative scarring, tendon bowstringing, and a significant reduction in active ankle dorsiflexion.
Deep Dissection and Neurovascular Protection
The most hazardous step of the anterior approach is the management of the anterior neurovascular bundle, which consists of the anterior tibial artery and the deep peroneal nerve.
Surgical Pitfall: The neurovascular bundle does not run in a straight vertical line. At the proximal portion of the incision, the bundle courses laterally beneath the Extensor Hallucis Longus (EHL) tendon. As it travels distally toward the talar neck and head, it migrates medially, crossing under the EHL.
- Identify the EHL tendon and carefully retract it laterally in the proximal aspect of the wound, and medially in the distal aspect, to safely expose and protect the neurovascular bundle.
- Gently mobilize the neurovascular bundle and retract it laterally with the EHL and EDL tendons using blunt, atraumatic retractors (e.g., Army-Navy or specialized self-retaining retractors).
Arthrotomy and Joint Exposure
- Capsulotomy: Continue sharp dissection directly down to the anterior bone of the distal tibia and talus. Perform a robust, full-thickness anterior longitudinal arthrotomy.
- Subperiosteal Flaps: Elevate the anterior ankle joint capsule and develop full-thickness subperiosteal flaps medially (over the medial malleolus) and laterally (over the lateral malleolus and syndesmosis) until the entire anterior ankle joint is adequately exposed.
- Biomechanical Rationale: Maintaining the absolute integrity of these thick periosteal flaps is paramount. They act as a physical barrier, preventing the oscillating saw blade from causing inadvertent injury to the medial and lateral tendinous and neurovascular structures during bone resection.
- Debridement: Excise any prominent anterior osteophytes from the distal tibia or the talar neck using a rongeur or a small, sharp osteotome. Retained osteophytes will impinge against the cutting guides, leading to malpositioned bone cuts and subsequent implant malalignment.
Syndesmosis Management (System-Dependent)
Certain older or highly specific arthroplasty systems require a formal syndesmosis arthrodesis to widen the mortise and provide a stable base for the tibial component.
- If a syndesmotic fusion is required, carry the subperiosteal dissection laterally until the medial margin of the fibula is exposed.
- Alternatively, a separate small anterolateral incision can be made directly over the syndesmosis.
- Sharply incise the anterior inferior tibiofibular ligament (AITFL) and the interosseous syndesmotic ligament over the distal syndesmosis.
- Use a lamina spreader to distract the fibula from the tibia, and use a high-speed burr or curettes to decorticate the opposing articular surfaces of the distal tibiofibular joint down to bleeding cancellous bone. This will later be bone-grafted and fixed with trans-syndesmotic screws to achieve fusion.
Bone Resection and Implant Trialing
(Note: The exact sequence of bone cuts is highly specific to the proprietary instrumentation of the chosen TAA system. The following represents the universal principles of TAA bone preparation.)
- Tibial Preparation: Apply the tibial cutting guide, ensuring perfect alignment with the mechanical axis of the tibia in both the coronal and sagittal planes. The tibial cut should be conservative, removing only enough bone to accommodate the implant while preserving the strong subchondral bone of the distal tibial metaphysis.
- Talar Preparation: Apply the talar cutting guides. The talar cuts must be perfectly parallel to the tibial cut to ensure a rectangular flexion-extension gap. Care must be taken not to notch the talar neck, which could lead to a postoperative talar neck fracture.
- Trialing: Insert the trial components. Assess the ankle through a full range of motion.
- Check for impingement in the medial and lateral gutters.
- Assess soft-tissue tension. The joint should be stable in both dorsiflexion and plantarflexion without excessive laxity or overstuffing.
- If the ankle remains tight in dorsiflexion despite adequate bone resection, re-evaluate the need for a posterior capsular release or further Achilles lengthening.
- Final Implantation: Once trialing is satisfactory, thoroughly irrigate the joint to remove all bone debris. Implant the final definitive components. Ensure the porous-coated surfaces are in intimate contact with the bleeding cancellous bone to promote optimal biologic ingrowth.
- Closure: Close the arthrotomy and extensor retinaculum meticulously over a closed suction drain (if preferred). Close the subcutaneous tissue and skin in a layered fashion.
Postoperative Protocol and Aftertreatment
The postoperative rehabilitation phase is as critical to the success of a TAA as the surgical execution. The primary goals of the aftertreatment protocol are to protect the soft-tissue envelope, allow for rigid biologic bone ingrowth into the prosthesis, and ultimately restore functional range of motion.
Phase I: Immediate Postoperative Immobilization (Weeks 0-2)
- Immediately postoperatively, the involved limb is immobilized in a bulky, well-padded short-leg splint in a neutral position (0 degrees of dorsiflexion).
- The patient is strictly non-weight bearing (NWB) on the operative extremity.
- Strict elevation of the limb above the level of the heart is mandated to minimize edema and protect the anterior incision, which is notoriously prone to wound healing complications due to the thin soft-tissue envelope of the anterior ankle.
Phase II: Early Range of Motion and Continued Protection (Weeks 2-8)
- At the first postoperative visit (typically 10 to 14 days), the splint is removed, and the surgical incisions are inspected. Sutures or staples are removed once the wound has healed adequately.
- The patient is transitioned into a removable Controlled Ankle Motion (CAM) walker boot.
- Weight Bearing Status: The patient remains strictly non-weight bearing for approximately 8 to 10 weeks total.
> Clinical Pearl: This extended NWB period is critical. It allows for sufficient early osteoblastic bone ingrowth at the prosthetic-bone interface (achieving secondary stability) and ensures that the distal syndesmosis arthrodesis (if performed) has adequately solidified. Premature weight-bearing can lead to micromotion at the implant interface, resulting in fibrous encapsulation rather than osseointegration, ultimately causing early aseptic loosening. - Rehabilitation: While NWB, the patient is instructed to remove the CAM boot multiple times a day to initiate early, aggressive active and active-assisted range-of-motion (ROM) activities.
- Ideally, ankle ROM should be adequately restored during this 8-week interval to allow for a near-normal heel-to-toe gait once weight-bearing commences.
Phase III: Progressive Weight Bearing (Weeks 8-12)
- At the 8 to 10-week mark, weight-bearing radiographs are obtained to confirm implant stability, absence of radiolucent lines, and consolidation of any arthrodesis sites.
- Weight-bearing is advanced initially within the CAM boot. The boot supports and stabilizes the ankle, limiting shear and rotational forces on the newly integrated prosthesis while allowing the patient to acclimatize to axial loading.
- Physical therapy is intensified, focusing on proprioception, intrinsic foot muscle strengthening, and gait retraining.
Phase IV: Return to Function (Weeks 12 and Beyond)
- The patient is gradually weaned from the CAM boot over the ensuing weeks and transitioned into a supportive athletic shoe.
- Activity levels are gradually increased. Patients are generally cleared for low-impact activities (e.g., swimming, stationary cycling, walking). High-impact activities, heavy lifting, and contact sports are permanently contraindicated to preserve the longevity of the polyethylene bearing and the implant-bone interface.
