Introduction to Subtrochanteric Fractures and Reconstruction Nailing
Subtrochanteric femoral fractures present one of the most formidable challenges in orthopedic trauma surgery. The subtrochanteric region is subjected to the highest biomechanical stresses in the human skeleton, with massive compressive forces acting on the medial cortex and significant tensile forces acting laterally.
The defining characteristic of a subtrochanteric fracture is the profound, predictable deformity of the proximal fragment. The proximal segment is aggressively pulled into flexion (by the iliopsoas), abduction (by the gluteus medius and minimus), and external rotation (by the short external rotators). Conversely, the distal segment is typically adducted by the adductor complex and shortened by the pull of the quadriceps and hamstrings.
To counteract these forces, intramedullary nailing in reconstruction mode is frequently the treatment of choice. Unlike standard antegrade nailing, which utilizes transverse proximal interlocking screws, reconstruction mode employs two cephalomedullary screws directed into the femoral head and neck. This construct bypasses the compromised subtrochanteric zone, anchors securely in the dense cancellous bone of the femoral head, and provides superior biomechanical stability against varus collapse.
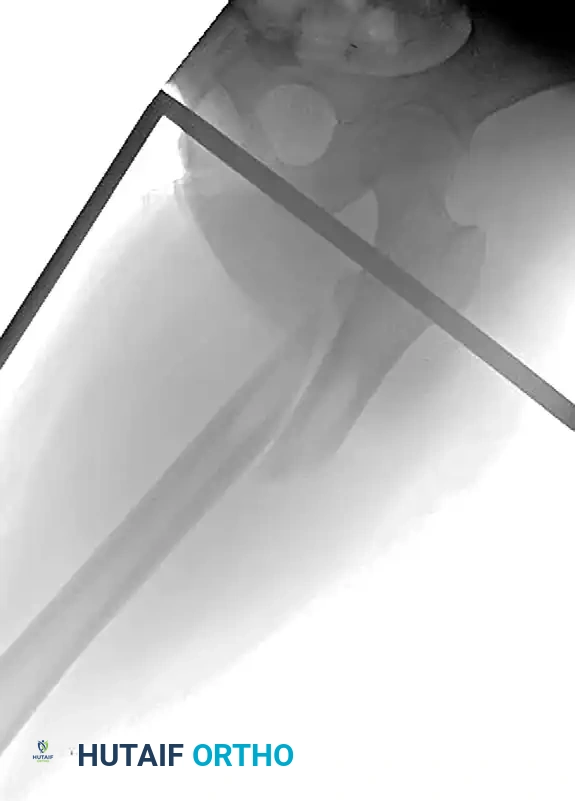
Preoperative radiograph demonstrating a displaced subtrochanteric femoral fracture with characteristic proximal fragment abduction and flexion.
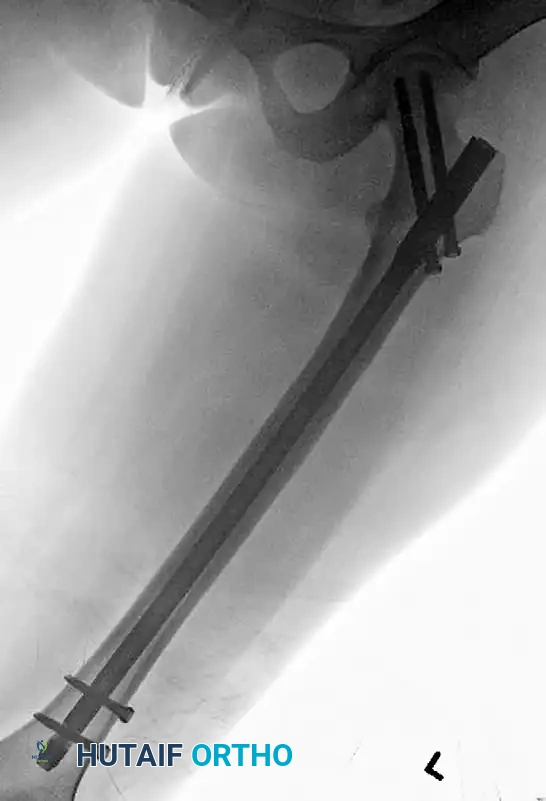
Postoperative anteroposterior radiograph following successful fixation with an antegrade intramedullary nail locked in reconstruction mode.
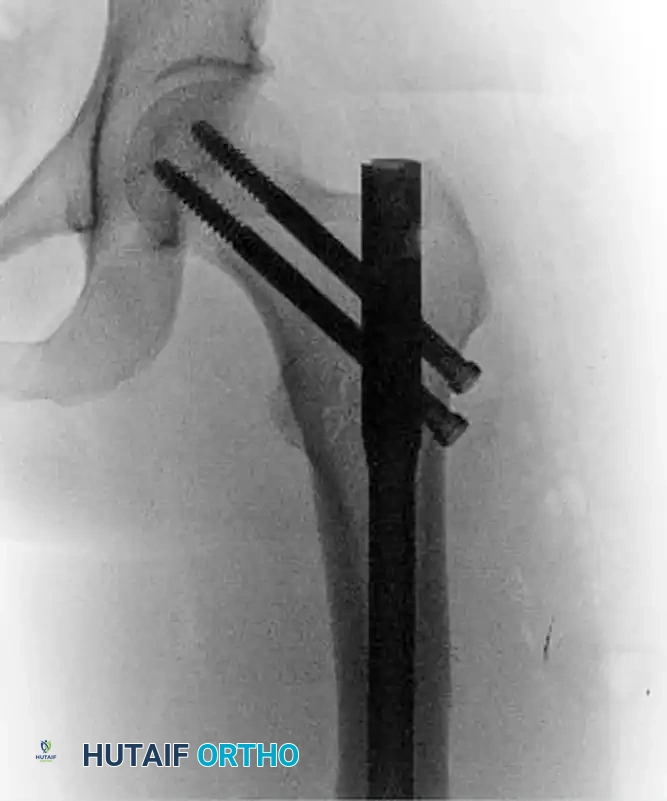
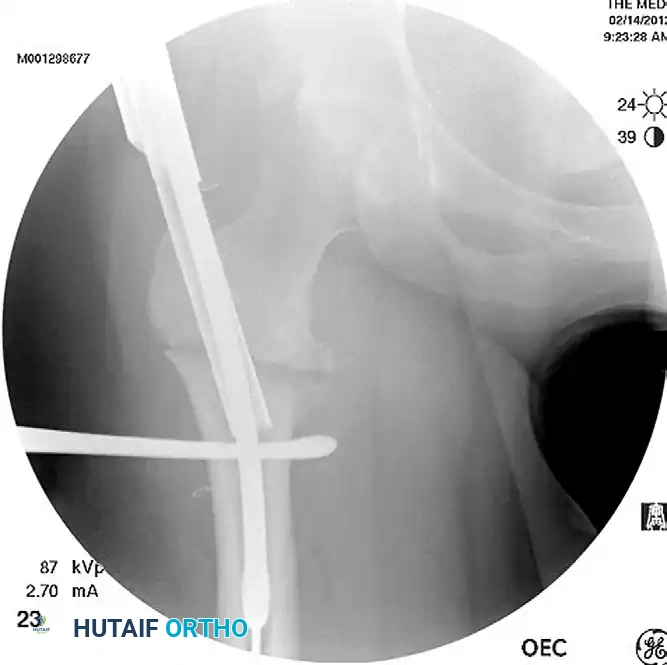
Postoperative lateral radiograph confirming central placement of the cephalomedullary screws within the femoral head.
Preoperative Planning and Patient Positioning
Meticulous preoperative planning is non-negotiable. The surgeon must evaluate the integrity of the greater trochanter and piriformis fossa to determine the optimal entry portal.
Patient Positioning on the Fracture Table
- Positioning: Place the patient supine (or lateral, based on surgeon preference) on a radiolucent fracture table.
- Traction: Secure the injured extremity in traction through a skeletal traction pin (distal femur or proximal tibia) or a specialized traction boot.
- Hip Flexion: Flex the injured hip to 30 to 40 degrees.
Clinical Pearl: Flexing the hip is a critical maneuver. It relaxes the iliopsoas muscle, thereby neutralizing the deforming flexion force on the proximal fragment and facilitating alignment with the distal shaft.
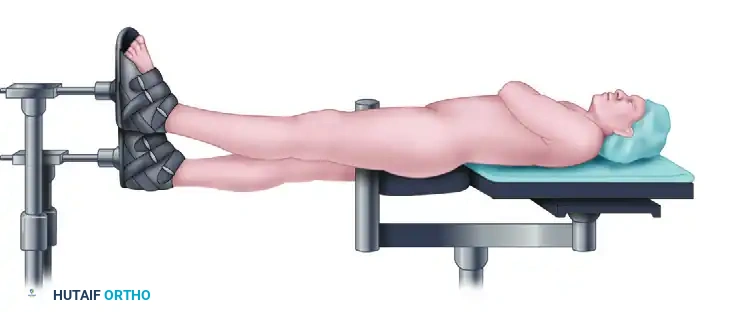
Patient positioned supine on the fracture table with the injured extremity in traction and the hip flexed to neutralize deforming forces.
Calculating Femoral Anteversion and Rotation
Accurate restoration of femoral version is paramount to prevent postoperative gait abnormalities.
- Fluoroscopic Calculation: Use anteroposterior (AP) and lateral fluoroscopy to calculate the rotation of the proximal fragment. Obtain a true lateral image of the femoral neck. Note the angle of the C-arm relative to the horizontal floor, and subtract 15 degrees (the average anatomical anteversion).
- Contralateral Templating (Gold Standard): For superior accuracy, determine the exact anteversion of the contralateral (uninjured) side. Obtain a true lateral image of the uninjured hip and knee. Subtract this patient-specific anteversion value from the C-arm angle obtained on the true lateral view of the injured side.
- Distal Adjustment: Externally rotate the distal fragment through the traction pin or boot to perfectly match the calculated rotation of the proximal fragment (typically 5 to 15 degrees).
Surgical Technique: Step-by-Step Masterclass
1. Incision and Entry Portal Establishment
Make a longitudinal incision beginning approximately 3 cm proximal to the greater trochanter, extending proximally in line with the gluteus maximus fibers.

Small incision beginning proximal to the greater trochanter, allowing access for the entry reamer.
Place a guide pin on the proximal femur. The entry portal depends on the specific nail design:
- Modified Medial Trochanteric Portal: Slightly medial to the tip of the greater trochanter.
- Piriformis Fossa Portal: In line with the femoral canal.
Surgical Warning: If a piriformis entry nail is utilized, the guide pin must be "cheated" approximately 5 mm anteriorly on the lateral fluoroscopic view. This anterior offset is mandatory to allow the subsequent placement of the two cephalomedullary reconstruction screws, which must pass through the center of the femoral neck without impinging on the posterior cortex.

Establishment of the precise entry portal using a guide pin under fluoroscopic guidance.
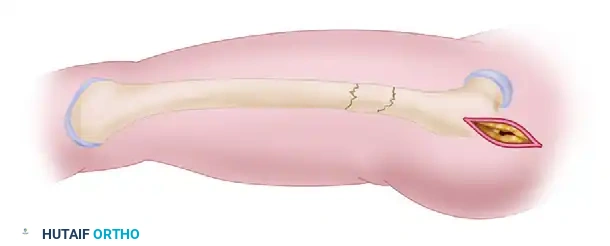
2. Anatomical Reduction of the Proximal Segment
Never ream an unreduced subtrochanteric fracture. Reaming in a malaligned position will create an eccentric track, permanently locking the fracture into a varus or flexed malunion.
- Correct the typical flexion, abduction, and external rotation deformities of the proximal segment before passing the reamer.
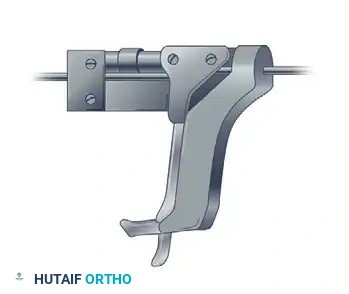
- Use a combination of a ball spike pusher and a Cobb elevator to manually depress the flexed/abducted proximal fragment.
- If manual pressure is insufficient, enlarge the lateral incision (which will later be used for the reconstruction screws) and introduce a large bone-holding forceps (e.g., Jungbluth or Farabeuf clamp) to physically manipulate the proximal segment.
- Adjunct Fixation: If instability persists after clamp removal, pass a percutaneous cerclage wire to hold the anatomical reduction during the reaming process.
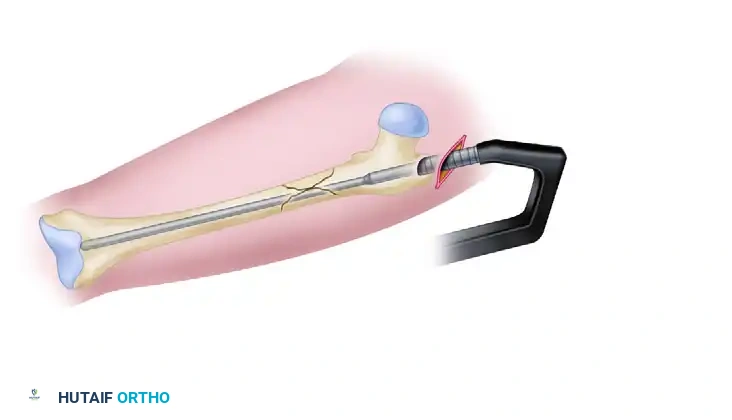
Utilization of a dedicated reduction tool to manipulate the proximal fragment and align the medullary canal.
Achieving and maintaining anatomical fracture reduction prior to the passage of the guide rod.
3. Trajectory Control and Proximal Reaming
A common and devastating error in subtrochanteric nailing is selecting a starting portal that is too lateral. A lateral starting point forces the nail to enter the canal at an angle, pushing the distal segment medially and resulting in a severe varus malalignment.
To ensure "Trajectory Control":
- Use a combination entry reamer/channel reamer to open the proximal femur.
- Maintain strict medial pressure on the reamer to avoid eccentric lateral reaming.

Trajectory control: Establishment of a precise, slightly medial entry portal to prevent varus deviation.
Protection of the entry portal by reaming directly through the established channel, avoiding lateral wall blowout.
Introduction of the combination entry reamer/channel reamer into the proximal femur.

Proximal reaming completed, establishing a centralized track for the intramedullary nail.
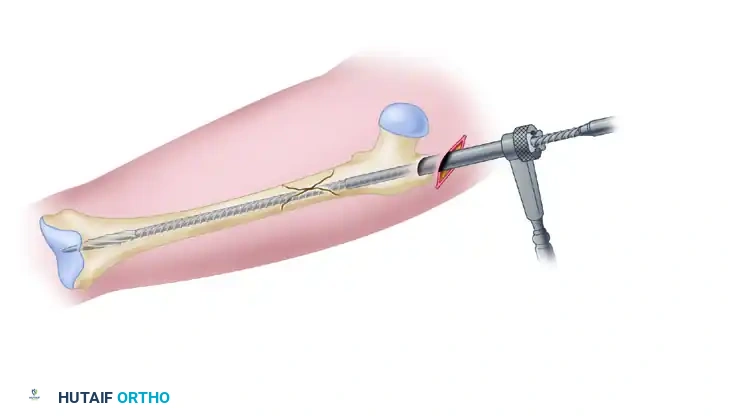
4. Canal Preparation and Nail Insertion
Once the proximal segment is prepared and the fracture is held in anatomic reduction:
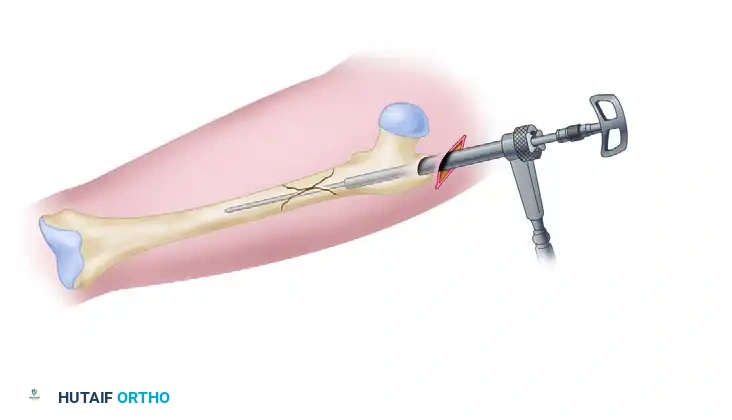
1. Insert a ball-tipped guide rod across the fracture site and advance it to the level of the physeal scar in the distal femur.
2. Measure the required length of the intramedullary nail using the depth gauge over the guide rod.
3. Ream the femoral shaft sequentially (typically in 0.5 mm increments) through the channel reamer until cortical chatter is achieved. Over-ream by 1.0 to 1.5 mm larger than the selected nail diameter.
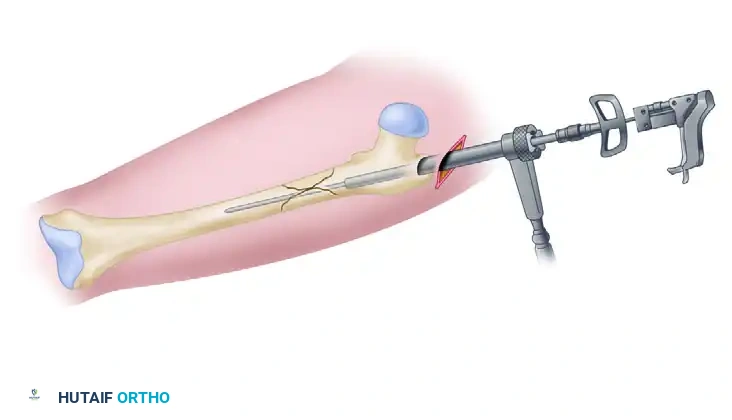
4. Insert the appropriate-size intramedullary nail over the guide rod.
Insertion of the ball-tipped guide rod across the anatomically reduced fracture site.
Measurement for the precise length of the intramedullary nail using a radiolucent ruler or depth gauge.

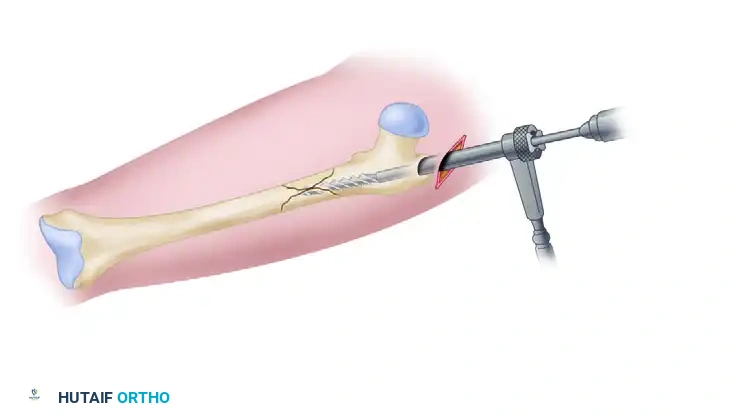
Sequential reaming of the femoral shaft over the ball-tipped guide rod.
Placement of the intramedullary nail, advanced to the appropriate depth for proximal reconstruction locking.
5. Proximal Locking in Reconstruction Mode
Locking the nail proximally in reconstruction mode requires precision to ensure the screws are entirely contained within the femoral neck and head.
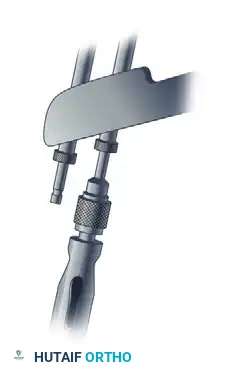
- Attach the reconstruction targeting guide.
- Drill the Distal Screw First: Drill the hole for the most distal of the two cephalomedullary screws first. This screw should rest just superior to the calcar (the calcar buttress).
- Leave the Drill Bit in Place: Do not remove the distal drill bit. Leaving it in place provides rotational stability to the nail while you drill the proximal hole.
- Drill the hole for the proximal screw.
- Insert Screws: Insert the distal cephalomedullary screw first to establish the calcar support, followed by the proximal screw.
- Fluoroscopic Confirmation: Verify on the lateral fluoroscopic view that both screws are perfectly centered within the femoral head and neck.
6. Distal Locking and Rotational Assessment
Lock the nail distally using a standard free-hand fluoroscopic technique (perfect circles method).
Before leaving the operating room, rigorously check for any iatrogenic external or internal rotational malalignment:
- Remove the leg from traction.
- Move the hip through a full range of motion at 90 degrees of flexion.
- Compare this internal/external rotation arc to the contralateral uninjured side.
- If a significant side-to-side discrepancy exists, remove the distal interlocking screws, manually correct the rotation of the distal femur, and re-lock the nail distally.
Managing Complications: The Suboptimal Portal
Despite meticulous technique, a lateral starting portal may inadvertently occur, predisposing the construct to varus malalignment. Proponents of piriformis entry nails argue that they inherently reduce the likelihood of a lateral start compared to trochanteric nails, though definitive literature remains mixed.
If a suboptimal lateral portal is created, the surgeon has two primary salvage options:
1. The Poller (Blocking) Screw Technique: Place an anterior-to-posterior blocking screw in the proximal fragment, medial to the desired nail track. This screw acts as an artificial medial cortex, physically forcing the nail laterally and correcting the trajectory.
2. Lateral Plate Buttress: Place a small reconstruction plate within the reamed lateral track to recreate the lateral cortex, forcing the reamer to establish a new, more medial portal.
Utilization of an anterior-to-posterior blocking screw (Poller screw) to correct a malaligned lateral-to-medial trajectory and prevent varus.
Alternative Fixation: Plate Osteosynthesis
While intramedullary nailing is the gold standard for most subtrochanteric fractures (Russell-Taylor Types IA and IIA), certain fracture patterns make nailing technically prohibitive. Fractures with proximal extension that completely compromises the integrity of the greater trochanter and piriformis fossa (destroying the starting portal) are often better managed with plate fixation.
Proximal Femoral Locking Plates (PFLP)
A proximal femoral locking plate can be applied using either an open or minimally invasive percutaneous technique, depending on fracture comminution. While early iterations of PFLPs faced criticism for hardware failure, modern biomechanical data comparing them favorably to traditional blade plates are highly promising. PFLPs offer fixed-angle stability and are technically less demanding to insert than blade plates.
The 95-Degree Angled Blade Plate
The 95-degree angled blade plate remains a powerful tool, particularly in revision scenarios or nonunions. It provides excellent biomechanical stability and acts as a tension band when applied to the lateral cortex. However, it requires a highly demanding open technique with direct or indirect reduction; percutaneous placement is not an option.
Alternative fixation using a proximal femoral locking plate for a subtrochanteric fracture with proximal extension compromising the nail entry portal.
Postoperative Care and Rehabilitation
The postoperative protocol for subtrochanteric femoral fractures treated with intramedullary nailing in reconstruction mode must balance early mobilization with the protection of the fixation construct.
- Weight Bearing: Patients are typically restricted to touch-down weight bearing (TDWB) or toe-touch weight bearing for the first 6 weeks postoperatively.
- Advancement: Weight-bearing status is advanced sequentially based on clinical exam and the presence of bridging callus observed on follow-up radiographs at the 6-week and 12-week marks.
- Physical Therapy: Early initiation of physical therapy is critical to prevent hip and knee stiffness. Focus on passive and active-assisted range of motion, progressing to abductor strengthening once radiographic healing permits.
By adhering to strict biomechanical principles, ensuring anatomical reduction prior to reaming, and executing precise trajectory control, orthopedic surgeons can achieve excellent union rates and functional outcomes in the management
