Wrist Arthroscopy: Comprehensive Positioning and Portal Placement
Key Takeaway
Wrist arthroscopy requires meticulous patient positioning and precise portal placement to ensure optimal visualization and avoid neurovascular injury. Utilizing longitudinal traction via fingertraps with 4 to 10 pounds of weight allows adequate joint distraction. Dorsal portals, systematically numbered according to the extensor compartments, provide comprehensive access to the radiocarpal, midcarpal, and distal radioulnar joints. Mastery of these foundational techniques is essential for safe and effective diagnostic and therapeutic wrist arthroscopy.
INTRODUCTION TO WRIST ARTHROSCOPY
Wrist arthroscopy has evolved from a purely diagnostic modality into an indispensable therapeutic tool in modern hand and upper extremity surgery. Recognized as the gold standard for evaluating intra-articular pathology of the carpus, it provides unparalleled visualization of the chondral surfaces, interosseous ligaments, and the triangular fibrocartilage complex (TFCC).
The complexity of carpal anatomy, combined with the dense network of superficial neurovascular structures, demands a rigorous understanding of patient positioning, joint distraction biomechanics, and precise portal placement. This comprehensive guide details the evidence-based protocols for establishing safe and effective arthroscopic access to the radiocarpal, midcarpal, and distal radioulnar joints (DRUJ).
INDICATIONS AND CONTRAINDICATIONS
Diagnostic Indications
- Unexplained chronic wrist pain following exhaustive non-operative management and advanced imaging (MRI/CT).
- Evaluation of carpal instability (e.g., scapholunate or lunotriquetral ligament tears).
- Assessment of chondral lesions and staging of osteoarthritis or Kienböck's disease.
Therapeutic Indications
- Debridement or repair of TFCC tears.
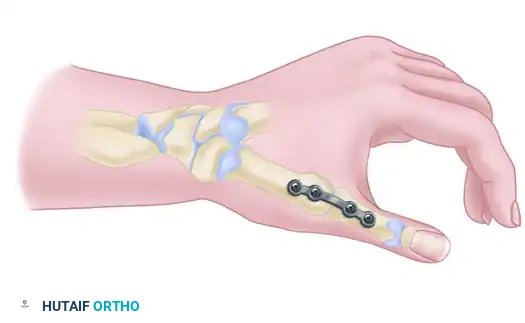
- Arthroscopic-assisted reduction and internal fixation (ARIF) of distal radius fractures and scaphoid fractures.
- Synovectomy for inflammatory arthropathies.
- Resection of dorsal or volar carpal ganglia.
- Wafer procedure (arthroscopic distal ulna resection) for ulnar impaction syndrome.
Contraindications
- Absolute: Active localized soft tissue infection, overlying cellulitis, or advanced radiocarpal ankylosis preventing joint distraction.
- Relative: Severe capsular scarring from previous open trauma, distorted anatomy, or uncorrected coagulopathy.
BIOMECHANICS OF JOINT DISTRACTION
The radiocarpal and midcarpal joints are tightly constrained by robust volar extrinsic ligaments. To safely introduce arthroscopic instruments without causing iatrogenic scuffing of the articular cartilage, longitudinal distraction is mandatory.
Applying traction overcomes the viscoelastic resistance of the joint capsule. However, excessive traction can lead to neuropraxia of the digital nerves or the brachial plexus, while insufficient traction fails to open the joint space. The optimal distraction weight ranges from 4 to 10 pounds (1.8 to 4.5 kg), depending on the patient's muscle mass and ligamentous laxity.
Surgical Warning: Never exceed 10 pounds of continuous traction. Prolonged excessive distraction significantly increases the risk of transient or permanent traction neuritis, particularly affecting the median and ulnar nerves.
OPERATING ROOM SETUP AND PATIENT POSITIONING
Meticulous patient positioning is the foundation of a successful wrist arthroscopy. The setup must provide stable distraction, allow unhindered access to the dorsal and volar aspects of the wrist, and facilitate intraoperative fluoroscopy.
Step-by-Step Positioning Protocol
- Anesthesia and Tourniquet: The procedure is typically performed under regional anesthesia (supraclavicular or axillary block) or general anesthesia. Apply a well-padded pneumatic tourniquet high on the brachium. Exsanguinate the limb with an Esmarch bandage and inflate the tourniquet to 250 mm Hg (or 100 mm Hg above systolic pressure).
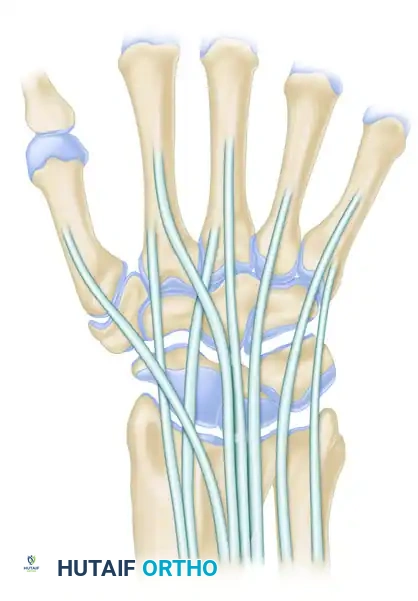
- Traction Application: Suspend the hand using sterile fingertraps. Standard practice involves placing the index and long fingers in the traps. For ulnar-sided pathology, placing the ring and small fingers in the traps may preferentially open the ulnocarpal space. Include the thumb if additional radial-sided stability is required.
- Suspension Systems:
- Overhead Pulley: Suspend the hand from the ceiling or an IV pole with a rope through an overhead pulley. Apply 4 to 10 lbs of weight to move the weight out and away from the operative field.
- Arthroscopy Tower/Traction Bow: A dedicated wrist arthroscopy tower can be used in place of overhead traction. This provides rigid, adjustable distraction and is highly preferred in modern setups.
- Joint Angulation: Maintain the elbow in 80 to 90 degrees of flexion. This relaxes the flexor and extensor musculature crossing the elbow and wrist. Flex the wrist approximately 15 to 20 degrees over a padded roll to open the dorsal radiocarpal space.
- Forearm Stabilization: Stabilize the forearm by securing it to a mechanical, well-padded forearm clamp attached to the hand table. Ensure there is no direct pressure on the ulnar nerve at the cubital tunnel.
Clinical Pearl: Alternatively, the forearm can be extended flat on the hand table, with traction applied longitudinally through fingertraps attached to a rope draped over the end of the table. While this limits volar access, it can be useful for specific dorsal procedures or when a traction tower is unavailable.
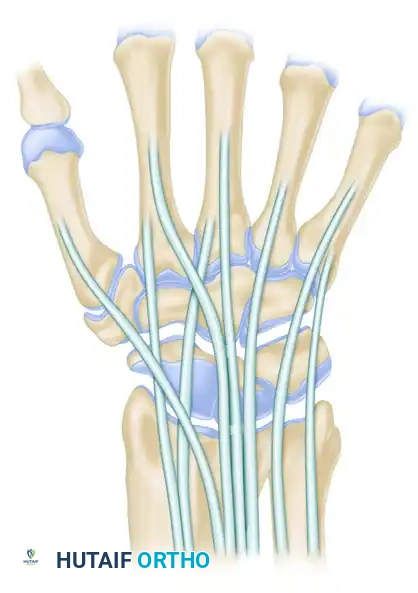
ANATOMY AND GENERAL PRINCIPLES OF PORTAL PLACEMENT
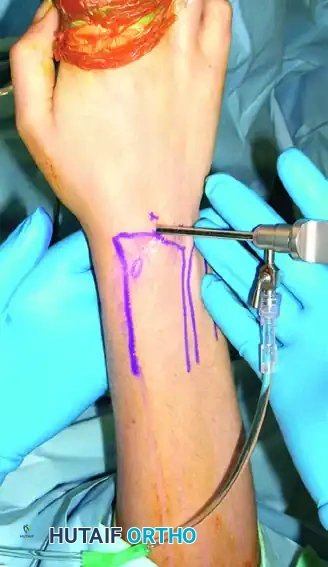
The standard arthroscopic portals are strategically located between the six dorsal extensor compartments of the wrist. This anatomical numbering system provides a universal language for surgeons.
There are 11 primary dorsal portals: nine for radiocarpal and intercarpal access, and two for the DRUJ. Understanding the cross-sectional anatomy is critical to avoiding the superficial radial nerve (SRN) radially, and the dorsal branch of the ulnar nerve (DBUN) ulnarly.
The "Nick and Spread" Technique
To minimize the risk of iatrogenic nerve or tendon injury, all portals must be established using the "nick and spread" technique:
1. Incise only the epidermis with a #15 blade.
2. Use a small hemostat to bluntly dissect the subcutaneous tissues down to the joint capsule.
3. Sweep the superficial nerves and veins out of the trajectory.
RADIOCARPAL PORTALS
The radiocarpal joint is the primary space for evaluating the distal radius articular surface, the proximal carpal row, and the TFCC.
Portal 3-4 (The Primary Viewing Portal)
- Location: Between the 3rd compartment (Extensor Pollicis Longus - EPL) and the 4th compartment (Extensor Digitorum Communis - EDC). Located approximately 1 cm distal to Lister's tubercle.
- Function: The standard initial viewing portal.
- Structures Visualized: Provides an excellent panoramic view of the radioscaphocapitate (RSC) ligament, long radiolunate (LRL) ligament, scapholunate (SL) interosseous ligament, and the radial aspect of the TFCC.
Portal 4-5 (The Primary Working Portal)
- Location: Between the 4th compartment (EDC) and the 5th compartment (Extensor Digiti Minimi - EDM).
- Function: The standard working portal for instrumentation (probe, shaver, radiofrequency wand).
- Structures Visualized: Permits superior inspection of the TFCC, the ulnocarpal ligaments on the palmar side, and the lunotriquetral (LT) ligament.
Portal 6R (Radial to ECU)
- Location: On the dorsoradial aspect of the 6th compartment (Extensor Carpi Ulnaris - ECU tendon).
- Function: Excellent for viewing the ulnar periphery.
- Structures Visualized: The TFCC, ulnolunate (UL) ligament, ulnotriquetral (UT) ligament, and lunotriquetral (LT) ligaments. The scapholunate interosseous ligament—a potential origin for a dorsal ganglion—can also be visualized looking radially from this portal.
Portal 6U (Ulnar to ECU)
- Location: To the ulnar side of the ECU tendon.
- Function: Used for inflow/outflow or as a working portal for TFCC repairs.
- Risk: High risk of injury to the dorsal sensory branch of the ulnar nerve (DBUN). Blunt dissection is mandatory.
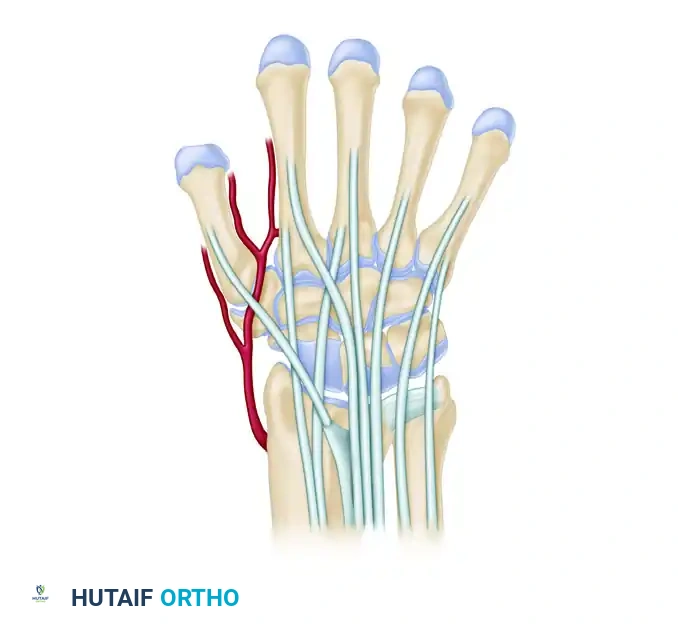
Portal 1-2
- Location: Between the 1st compartment (Abductor Pollicis Longus/Extensor Pollicis Brevis) and the 2nd compartment (Extensor Carpi Radialis Longus/Brevis).
- Function: Allows inspection of the radial palmar ligaments and the radial styloid.
- Risk: The superficial branch of the radial nerve and the radial artery are at significant risk.
Portal 2-3
- Location: Between the 2nd and 3rd compartments.
- Function: Rarely used, but can assist in evaluating the radial palmar ligaments or assisting in radial styloid fracture reduction.
MIDCARPAL PORTALS
The midcarpal joint is a separate synovial cavity. It is essential to evaluate this space to diagnose dynamic carpal instability, as the interosseous ligaments (SL and LT) often tear from the volar to the dorsal direction, and midcarpal step-offs are diagnostic.
Midcarpal Radial (MCR) Portal
- Location: Lies to the radial side of the third metacarpal axis, proximal to the capitate in a soft depression between the capitate and scaphoid. It is in line with Lister's tubercle at the scaphocapitate and scapholunate joint.
- Function: Primary viewing portal for the midcarpal joint. Evaluates the SL interval and the scaphoid-trapezium-trapezoid (STT) articulation.
Midcarpal Ulnar (MCU) Portal
- Location: Located approximately 1 cm distal to the 4-5 portal, aligned with the fourth metacarpal, at the lunotriquetral-capitate-hamate joint.
- Function: Primary working portal for the midcarpal joint. Evaluates the LT interval and the triquetrohamate joint.
STT Portal
- Location: Just distal to the radial styloid, volar to the EPL tendon.
- Function: Specific evaluation of the STT joint for localized osteoarthritis.
DISTAL RADIOULNAR JOINT (DRUJ) PORTALS
Portals for the DRUJ are located just proximal and distal to the ulnar head.
* Proximal DRUJ Portal: Located proximal to the ulnar head. Pitfall: The posterior interosseous nerve (PIN) is at risk when this portal is established too proximally.
* Distal DRUJ Portal: Located just proximal to the TFCC. Pitfall: The triangular fibrocartilage may be inadvertently injured by instruments entering this portal.
VOLAR PORTALS
While dorsal portals are standard, volar portals are occasionally required for specific pathologies, such as volar ganglion excision or repairing volar capsular avulsions.
* Volar Radial Portal: Made lateral to the flexor carpi radialis (FCR) tendon at the proximal wrist flexion crease.
* Volar Ulnar Portal (Slutsky Approach): An approach between the flexor tendons, the ulnar neurovascular bundle, and the flexor carpi ulnaris (FCU).
Surgical Warning: Volar portals carry a significantly higher risk of catastrophic neurovascular injury (median nerve, ulnar nerve, radial/ulnar arteries). They should only be attempted by advanced arthroscopists utilizing strict inside-out or outside-in techniques with a protective cannula.
SURGICAL TECHNIQUE: STEP-BY-STEP PORTAL ESTABLISHMENT
Establishing portals requires a systematic approach to ensure joint access without iatrogenic cartilage damage.
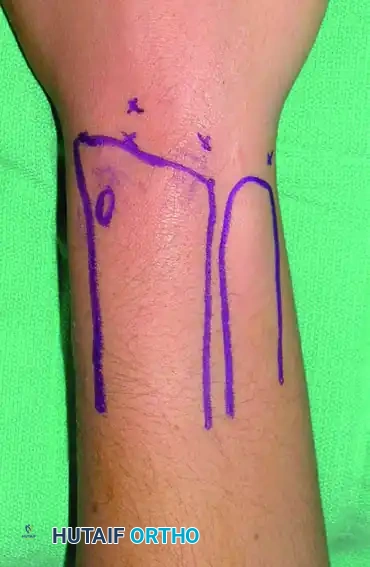
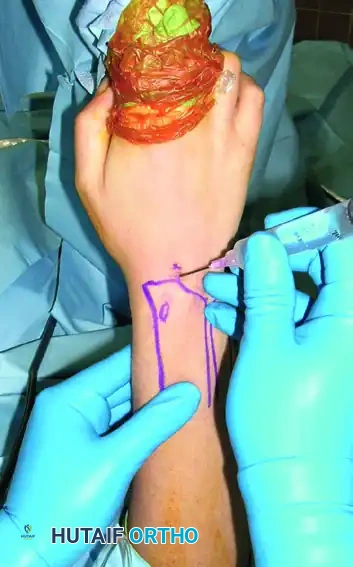
Step 1: Surface Anatomy Marking
Before applying traction, palpate and mark the anatomical landmarks: Lister's tubercle, the radial and ulnar styloids, the distal radius, the distal ulna, and the extensor tendons. Outline the planned portals.
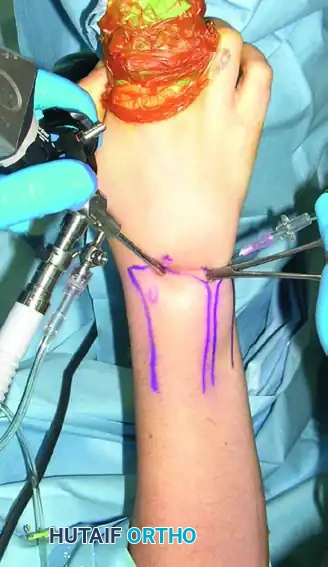
Step 2: Joint Distention and Needle Localization
Apply traction. Palpate the 3-4 soft spot. Insert a 20-gauge or 22-gauge hypodermic needle into the 3-4 portal with the bevel parallel to the extensor tendons. Angle the needle 10 to 15 degrees proximally to match the volar tilt of the distal radius. Inject 3 to 5 mL of sterile normal saline to distend the joint. Fluid backflow confirms intra-articular placement.
Step 3: Incision and Trocar Insertion
Perform a longitudinal skin incision (nick and spread). Insert the arthroscope sheath equipped with a blunt trocar.
* Crucial Step: The use of a blunt trocar, rather than a sharp one, is imperative to avoid gouging the convex articular surface of the proximal carpal row. Aim 15 degrees proximally. Once the capsule is breached, remove the trocar and insert the arthroscope.
Step 4: Establishing Working Portals
Under direct intra-articular visualization, use a spinal needle to localize the optimal trajectory for the working portals (e.g., 4-5, 6R, or 6U). This "outside-in" triangulation ensures the instruments will reach the target pathology without fighting the surrounding soft tissues.
EQUIPMENT AND FLUID MANAGEMENT
Arthroscope Selection
Although larger arthroscopes provide better fields of vision and superior light transmission, they are usually too large and difficult to manipulate within the tight confines of the carpus.
* The standard size for wrist arthroscopy is a 2.7-mm or 1.9-mm short-barrel arthroscope with a 30-degree angle of inclination.
* A 70-degree arthroscope can occasionally be useful for looking "around corners," such as evaluating the volar capsule from a dorsal portal.
Fluid Infusion and Extravasation Management
To see satisfactorily within the joint, the surgeon must maintain joint distraction with weight, maintain capsular distention with saline, and irrigate frequently to clear debris and minor bleeding.
* Gravity vs. Pump: Continuous fluid infusion via gravity is often sufficient. If continuous inflow irrigation via an arthroscopy pump is used, an efficient drainage system (outflow via a dedicated cannula or a large-bore needle in the 6U portal) must be utilized.
* Air Bubbles: Positioning the arthroscope with the camera end pointing toward the ceiling helps avoid air bubble accumulation on the lens.
* Compartment Syndrome Risk: Pumps with automatic monitoring of pressure and flow help avoid fluid extravasation. Unrecognized fluid extravasation into the forearm compartments can lead to devastating acute compartment syndrome. The surgeon must frequently palpate the forearm during the procedure.
POSTOPERATIVE PROTOCOL
Following diagnostic or minor therapeutic wrist arthroscopy:
1. Wound Closure: Portals are typically closed with simple interrupted non-absorbable sutures (e.g., 4-0 nylon) or sterile adhesive strips.
2. Immobilization: A bulky soft dressing and a volar short-arm splint are applied to immobilize the wrist in neutral extension, providing comfort and reducing postoperative edema.
3. Rehabilitation: The splint is generally removed at 7 to 10 days postoperatively. Early active range of motion (ROM) of the digits is encouraged immediately in the recovery room to prevent tendon adhesions and mitigate complex regional pain syndrome (CRPS). Formal hand therapy is initiated based on the specific therapeutic interventions performed (e.g., delayed ROM for TFCC repairs).
CONCLUSION
Mastery of patient positioning and portal placement is the cornerstone of successful wrist arthroscopy. By adhering to strict anatomical landmarks, utilizing appropriate distraction biomechanics, and employing meticulous blunt dissection techniques, the orthopedic surgeon can safely navigate the complex neurovascular landscape of the wrist. This systematic approach ensures optimal visualization, minimizes iatrogenic complications, and maximizes therapeutic outcomes for complex carpal pathology.
You Might Also Like