Open Reduction and Internal Fixation of Radial Head Fractures: A Comprehensive Surgical Guide
Key Takeaway
Open reduction and internal fixation (ORIF) of radial head fractures aims to restore radiocapitellar stability and forearm rotation. Indicated primarily for displaced Mason Type II and reconstructable Type III fractures, successful ORIF requires meticulous surgical exposure via the Kocher or Kaplan interval, precise articular reduction, and rigid fixation within the radial safe zone to protect the posterior interosseous nerve and ensure optimal functional recovery.
INTRODUCTION AND BIOMECHANICAL PRINCIPLES
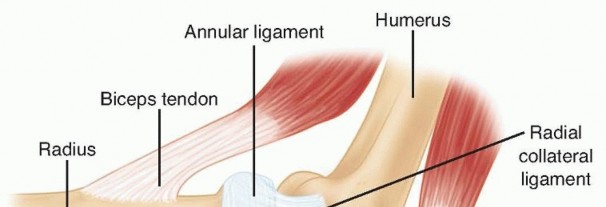
The radial head is a critical secondary stabilizer of the elbow, providing essential resistance against valgus stress and acting as the primary restraint against proximal migration of the radius (longitudinal radioulnar stability). Fractures of the radial head frequently occur following a fall on an outstretched hand, driving the radial head into the capitellum.
When managing these injuries, the orthopedic surgeon must carefully weigh the indications for Open Reduction and Internal Fixation (ORIF) versus radial head arthroplasty. While the primary advantage of prosthetic replacement is the immediate maintenance of the radiocapitellar relationship for elbow and longitudinal stability, it carries a significant risk of overstuffing the radiocapitellar joint.
Surgical Warning: Overstuffing the radiocapitellar joint during prosthetic replacement inevitably leads to capitellar erosion, chronic lateral elbow pain, and a marked decrease in range of motion. Therefore, anatomic ORIF remains the gold standard for reconstructable radial head fractures, preserving native biomechanics and avoiding the pitfalls of arthroplasty.
CLASSIFICATION OF ASSOCIATED INJURIES
Radial head fractures rarely occur in isolation when subjected to high-energy trauma. They are frequently a component of the "terrible triad" of the elbow (radial head fracture, coronoid fracture, and elbow dislocation). Understanding the associated coronoid pathology is paramount for restoring anterior stability.
O’Driscoll Classification of Coronoid Fractures
The Coronoid Fracture Classification (O’Driscoll et al.) categorizes these injuries based on the anatomic location and fragmentation pattern, which directly dictates the surgical approach and fixation strategy.
Type I: Tip Fractures
* Subtype 1: ≤ 2 mm coronoid bony height (i.e., a capsular flake fracture).
* Subtype 2: > 2 mm coronoid height.
Type II: Anteromedial Facet Fractures
* Subtype 1: Anteromedial rim.
* Subtype 2: Anteromedial rim + tip.
* Subtype 3: Anteromedial rim + sublime tubercle (± tip).

Type III: Basal Fractures
* Subtype 1: Coronoid body and base.
* Subtype 2: Transolecranon basal coronoid fracture.

PREOPERATIVE PLANNING AND POSITIONING
Thorough preoperative evaluation requires orthogonal radiographs of the elbow and, frequently, a dedicated CT scan with 3D reconstructions to assess the degree of comminution, articular step-off, and the presence of occult coronoid or capitellar shear fractures.
- Patient Positioning: The patient is positioned supine on the operating table. A hand table or arm board is utilized.
- Tourniquet: A non-sterile pneumatic tourniquet is applied high on the brachium.
- Fluoroscopy: The C-arm should be positioned parallel to the table or brought in from the head of the bed to allow unimpeded orthogonal imaging of the elbow throughout the procedure.
SURGICAL APPROACHES
Exposure of the radial head and neck can be achieved via two primary lateral approaches. The choice depends on surgeon preference and the pattern of associated ligamentous injury.
The Kocher Approach
The Kocher approach utilizes the internervous plane between the anconeus (radial nerve) and the extensor carpi ulnaris (posterior interosseous nerve).
* Advantage: Excellent exposure of the posterior aspect of the radial head and capitellum.
* Disadvantage: Higher risk of iatrogenic injury to the lateral ulnar collateral ligament (LUCL) if the dissection strays too far anteriorly or distally.
The Kaplan Approach
The Kaplan approach utilizes the interval between the extensor digitorum communis (EDC) and the extensor carpi radialis brevis (ECRB).
* Advantage: Provides a more direct, anterior exposure of the radial head and coronoid process.
* Disadvantage: The posterior interosseous nerve (PIN) crosses the operative field more proximally within the supinator muscle, increasing the risk of neurologic injury.
Clinical Pearl: Regardless of the approach chosen, always take meticulous care to preserve the lateral collateral ligament (LCL) complex. In the setting of "terrible triad" injuries, the LCL is often avulsed from its humeral origin. This should be identified, tagged with non-absorbable sutures, and reattached using suture anchors at the conclusion of the procedure.
SURGICAL TECHNIQUE: MASON TYPE II FRACTURES
Mason Type II fractures are partial articular fractures with displacement (>2 mm) or mechanical blocks to rotation. The goal is anatomic reduction and stable internal fixation to allow early mobilization.
- Exposure and Debridement: Expose the fracture site and thoroughly irrigate the joint to evacuate the fracture hematoma. Remove any small, non-viable osteochondral loose bodies.
- Joint Inspection: Inspect the capitellum for associated chondral shear injuries.
- Reduction: Reduce the partial articular fracture anatomically. Take extreme care not to strip or disrupt the remaining periosteal attachments, as the radial head has a tenuous blood supply. Tamps, dental picks, or Freer elevators are highly effective for manipulating the fragments into position.
- Provisional Fixation: Secure the reduction temporarily with 0.045-inch Kirschner wires (K-wires).
- Definitive Fixation: Stabilize the reduction with one or two small screws (typically 1.5 mm to 2.4 mm headless compression screws or cortical lag screws). Ensure the screw heads are countersunk beneath the articular cartilage to prevent capitellar abrasion.
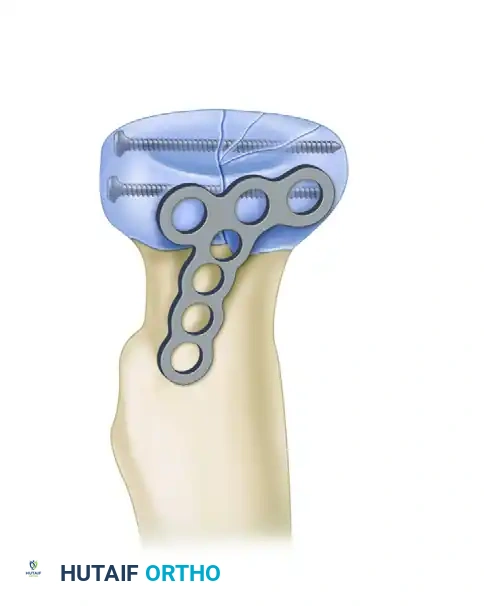
Figure A: Mason Type II fracture stabilized with two small screws.
Surgical Pitfall: Occasionally, the apex of the fracture is highly comminuted, leaving a large metaphyseal defect beneath the articular segment once reduced. In these instances, screw fixation alone is biomechanically insufficient. A small, low-profile buttress plate must be applied to support the articular surface and prevent secondary subsidence.
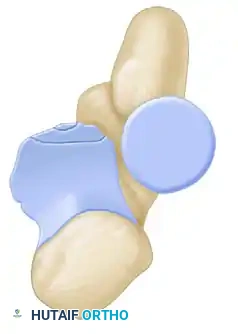
SURGICAL TECHNIQUE: MASON TYPE III FRACTURES
Mason Type III fractures involve complete articular comminution. Historically treated with excision, modern orthopedic principles dictate that ORIF should be attempted if the fracture is reconstructable (typically 3 or fewer major articular fragments). If reliable fixation cannot be obtained, the surgeon must proceed to radial head arthroplasty.
- Extended Exposure: If needed for improved visualization of the comminuted fragments, release the origin of the lateral collateral ligament from the lateral epicondyle. Tag it for anatomic repair at the end of the procedure.
- Fragment Mobilization and Ex Vivo Assembly: Carefully mobilize the articular fragments. In cases of severe comminution, removing the fragments entirely and assembling them on the back table (ex vivo reconstruction) using fine K-wires can greatly facilitate anatomic reduction.
- Nerve Protection: Protect the posterior interosseous nerve (PIN) at all times.
- Crucial Step: Pronating the forearm moves the PIN anteriorly and medially, safely distancing it from the lateral surgical field and the distal extent of the incision.
- Plate Application: Apply a small, pre-contoured radial head plate along the lateral surface of the proximal radius.
- The Safe Zone: The plate must be positioned strictly within the "safe zone" of the radial head to prevent impingement on the proximal radioulnar joint (PRUJ) during forearm rotation. The safe zone is a 110-degree non-articulating arc. It can be identified intraoperatively by marking the midpoint of the lateral radial head with the forearm in neutral rotation, bounded by the radial styloid and Lister's tubercle.
- Fixation: Secure the plate with locking screws proximally and cortical screws distally. Utilize lag screws through the plate or independently as needed to compress the articular fragments.
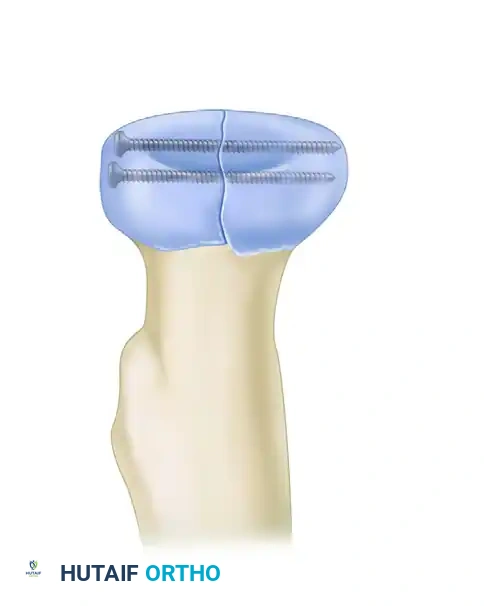
Figure B: Mason Type III fracture stabilized with a pre-contoured plate and screws.
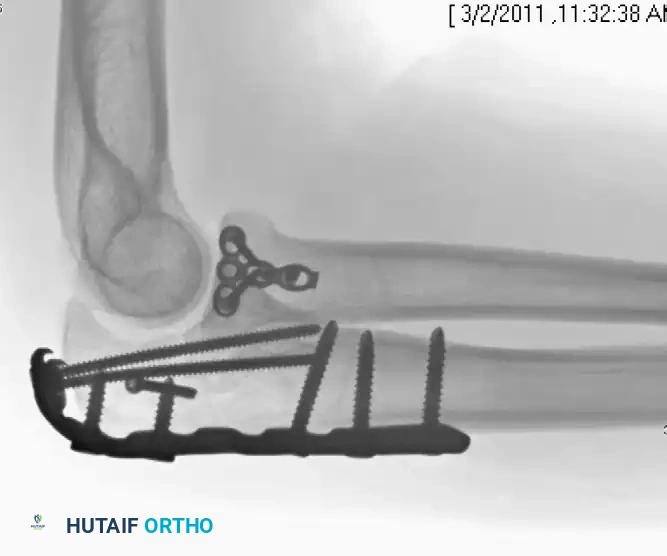
Figure C: Lateral fluoroscopic view demonstrating plate fixation of a Mason Type III fracture.
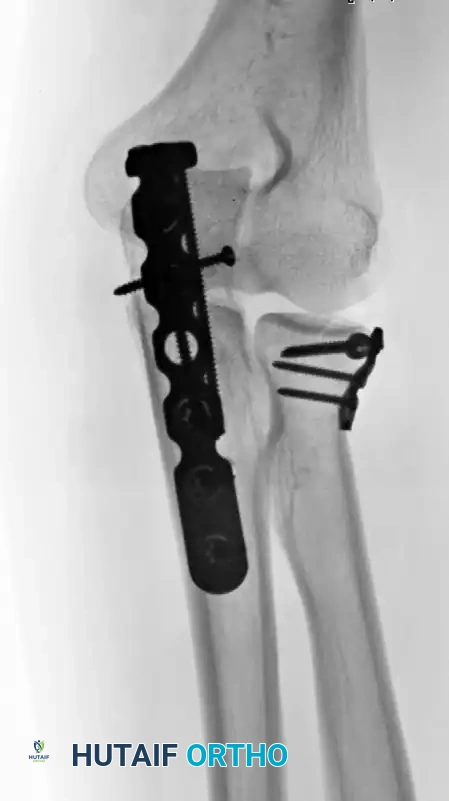
Figure D: AP fluoroscopic view confirming anatomic reduction and appropriate hardware placement.
- Bone Grafting: If a structural void exists within the radial neck following reduction, pack the defect with cancellous autograft or allograft to promote osteoinduction and provide mechanical support.
- Dynamic Assessment: Before closure, take the elbow through a full range of motion. Check pronation and supination of the forearm to ensure there is no hardware impingement at the PRUJ and that the radiocapitellar tracking is smooth and stable.
- Ligamentous Repair: Reattach the LCL to the isometric point on the lateral epicondyle using suture anchors.
POSTOPERATIVE CARE AND REHABILITATION PROTOCOL
The success of radial head ORIF is heavily dependent on a strict, well-managed postoperative rehabilitation protocol. The primary goal is to prevent elbow stiffness while protecting the osteosynthesis and any ligamentous repairs.
- Immediate Postoperative Phase (Days 0-7): The arm is placed in a well-padded, molded posterior plaster splint with the elbow immobilized at 90 degrees of flexion and the forearm in neutral rotation.
- Early Mobilization (Days 3-7): At 3 to 7 days postoperatively, the posterior splint is removed, and the arm is transitioned to a supportive sling. At this time, active and active-assisted range of motion exercises are initiated. Early motion is critical to nourish the articular cartilage and prevent capsular contracture.
- Progression (Weeks 3-6): The patient should discontinue the sling entirely at 3 weeks. Exercises are gradually increased as tolerated, focusing on terminal extension and full supination/pronation.
- Restrictions: Forceful manipulation of the elbow is strictly prohibited. Passive stretching by physical therapists should be avoided in the early phases to prevent heterotopic ossification and hardware failure. Strengthening exercises are typically delayed until radiographic evidence of fracture consolidation is observed (usually 6 to 8 weeks).
COMPLICATIONS AND MANAGEMENT
- Posterior Interosseous Nerve (PIN) Palsy: Usually transient and secondary to traction. Prevented by meticulous retractor placement and maintaining the forearm in pronation during distal exposure.
- Hardware Impingement: Occurs if plates or screws are placed outside the 110-degree safe zone, leading to a mechanical block to pronation/supination. Requires hardware removal once the fracture has healed.
- Nonunion / Avascular Necrosis: The radial head has a precarious retrograde blood supply. Extensive soft tissue stripping can lead to AVN or nonunion. If symptomatic, this may necessitate late radial head excision or arthroplasty.
- Post-Traumatic Stiffness: The most common complication following elbow trauma. Emphasize early, patient-directed active motion to mitigate capsular contracture.
You Might Also Like