Arthroscopic Repair of Acetabular Labral Tears: A Comprehensive Surgical Guide
Key Takeaway
Arthroscopic repair of acetabular labral tears aims to restore the hip's native suction seal and biomechanical stability. Indicated for symptomatic tears failing conservative management, the procedure involves precise portal placement, meticulous debridement, and anatomic refixation using suture anchors. Superior long-term outcomes are observed with labral preservation compared to simple debridement, particularly in the setting of femoroacetabular impingement without advanced osteoarthritis.
INTRODUCTION AND BIOMECHANICAL RATIONALE
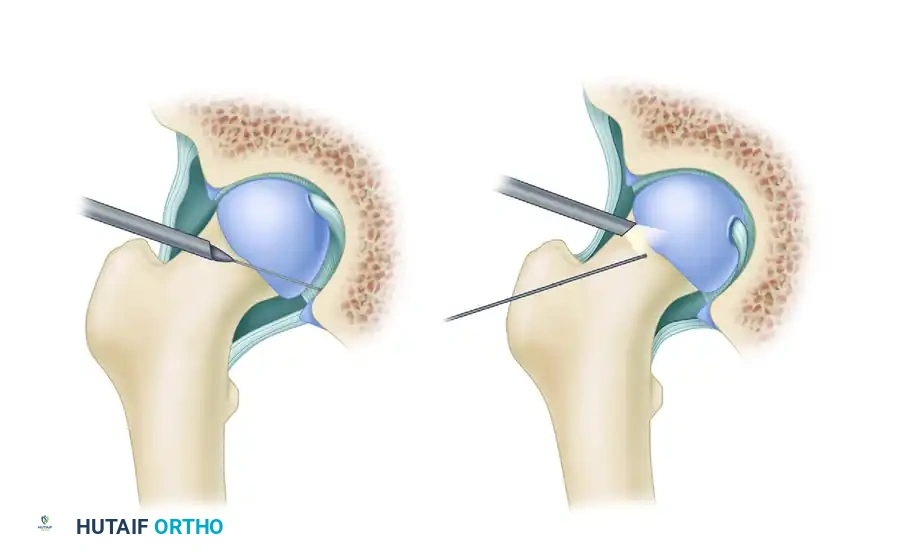
The acetabular labrum is a critical fibrocartilaginous structure that deepens the acetabulum, increases the articular surface area by approximately 22%, and increases the acetabular volume by 33%. More importantly, it provides a fluid "suction seal" that pressurizes the intra-articular synovial fluid, thereby protecting the articular cartilage from excessive contact stress and contributing significantly to the microstability of the hip joint.
Historically, labral tears were treated with simple excision or debridement. However, contemporary orthopedic understanding dictates that loss of the labral seal leads to accelerated chondral degeneration and early-onset osteoarthritis. Therefore, the paradigm has shifted toward labral preservation and anatomic refixation whenever viable tissue is present. Arthroscopic repair of labral tears, particularly in the setting of femoroacetabular impingement (FAI) or mild dysplasia, is now the gold standard for restoring native hip biomechanics.
CLINICAL PRESENTATION AND DIAGNOSIS
Patients with acetabular labral tears typically present with insidious onset anterior groin pain, often accompanied by mechanical symptoms such as clicking, catching, or locking.
💡 Clinical Pearl: The "C-Sign"
As described by Byrd, patients will frequently demonstrate the "C-sign." When asked to localize their pain, they will cup their hand, forming a "C" over the greater trochanter, with the thumb positioned posteriorly and the fingers resting deep in the anterior groin.
Pain is characteristically positional and exacerbated by deep flexion and internal rotation. Symptoms frequently increase with prolonged sitting, driving, putting on shoes, or crossing the legs. Conversely, pain may be minimal during level walking.
Diagnostic Imaging
- Radiographs: Anteroposterior (AP) pelvis, false-profile, and Dunn lateral views are mandatory to assess for underlying pathomorphology, including cam lesions (decreased head-neck offset), pincer lesions (coxa profunda, acetabular retroversion), and dysplasia.
- Magnetic Resonance Arthrography (MRA): The gold standard for evaluating the labrum and articular cartilage. The intra-articular gadolinium distends the capsule, allowing contrast to interpose between the torn labrum and the acetabular rim.
- Diagnostic Injection: An intra-articular injection of a local anesthetic (e.g., bupivacaine) can confirm the intra-articular source of the pain, differentiating it from extra-articular etiologies such as athletic pubalgia or iliopsoas tendinitis.
INDICATIONS AND CONTRAINDICATIONS
Initial treatment for labral tears is strictly nonoperative, consisting of rest, activity modification, nonsteroidal anti-inflammatory drugs (NSAIDs), and targeted physical therapy focusing on core and pelvic/gluteal stabilization.
Indications for Surgery:
* Persistent, debilitating pain failing a minimum of 6 to 12 weeks of conservative management.
* Mechanical symptoms significantly impairing activities of daily living or athletic participation.
* Concomitant symptomatic FAI requiring osteochondroplasty.
Contraindications:
* Advanced osteoarthritis (Tönnis Grade 2 or 3, or joint space < 2 mm).
* Severe, uncorrected developmental dysplasia of the hip (DDH) with a lateral center-edge angle (LCEA) < 20 degrees (requires periacetabular osteotomy).
* Active joint infection.
SURGICAL ANATOMY AND PATIENT POSITIONING
The procedure can be performed with the patient in either the supine or lateral decubitus position, depending on surgeon preference. The supine position on a specialized hip distraction table is most commonly utilized.
- Positioning: The patient is placed supine with a well-padded, oversized perineal post positioned laterally against the medial thigh of the operative leg to direct the traction vector laterally and distally.
- Traction: The hip is placed in slight flexion (10° to 15°), neutral extension, and slight internal rotation to relax the anterior capsule. Traction is applied under fluoroscopic guidance until a vacuum seal breaks, achieving approximately 10 to 12 mm of joint distraction.
- Preparation: The entire hemipelvis and lower extremity are prepped and draped in a standard sterile fashion.
⚠️ Surgical Warning: Traction Time
Strict adherence to traction time limits is paramount to prevent pudendal and sciatic neurapraxia. Total continuous traction time should ideally not exceed 90 to 120 minutes. If the procedure extends beyond this, traction must be released for 10 to 15 minutes to allow for tissue reperfusion.
STEP-BY-STEP SURGICAL TECHNIQUE (KELLY ET AL.)
1. Portal Placement
Establishment of precise portals is the foundation of successful hip arthroscopy. Standard portals include the anterior, anterolateral (AL), and posterolateral (PL) portals.
- Anterolateral (AL) Portal: Established first under fluoroscopic guidance, entering the joint just superior and anterior to the tip of the greater trochanter.
- Midanterior Portal (MAP): Often established under direct arthroscopic visualization from the AL portal. This portal is critically helpful because it creates an optimal, orthogonal angle to place anchors into the anterior and anterosuperior acetabular rim without penetrating the articular joint surface.
- Posterolateral (PL) Portal: Used for viewing the posterior compartment and managing posterior labral pathology.
2. Diagnostic Arthroscopy and Labral Debridement
Upon entering the central compartment, a systematic diagnostic sweep is performed. The ligamentum teres, articular cartilage, and labrum are meticulously inspected.
- Margin Definition: When a labral tear is identified, define the margins and depth of the tear using a calibrated flexible probe.
- Tissue Contraction: Controlled use of monopolar radiofrequency (RF) energy through the same flexible probe can be utilized to gently contract the torn, frayed portion of the labrum and better define the viable edges.
- Detachment: Use a flexible ligament chisel to carefully detach the torn, non-viable part of the labrum from the intact labrum, leaving only a small portion attached to maintain spatial orientation.
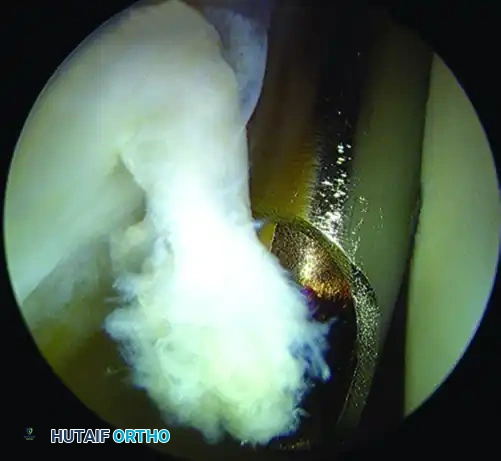
- Debridement: Complete the debridement and remove the irreparably torn, macerated portion of the labrum with a motorized shaver. The overarching goal is to leave as much healthy, robust labrum intact as possible to preserve the suction seal.
Arthroscopic view of a right hip demonstrating a labral tear being probed and prepared for debridement and subsequent repair.
3. Acetabular Rim Preparation
If the labrum is detached from the bone (a classic chondrolabral junction failure), the fibrocartilaginous tissue must be stabilized back to the rim of the acetabulum.
* Use a motorized burr or arthroscopic rasp to lightly decorticate the acetabular rim. This creates a bleeding bone bed, which is essential for stimulating a robust biological healing response. Care must be taken not to over-resect the rim, which could inadvertently create a dysplastic environment.
4. Suture Anchor Placement
The labrum is refixed using bioabsorbable or all-suture anchors.
* Trajectory: Typically, the anchor should be placed on the acetabular rim, positioned more on the capsular side than the articular side of the labrum. This achieves an appropriate trajectory angle that will not result in iatrogenic penetration of the anchor into the articular cartilage.
* Fluoroscopic Confirmation: Ensure appropriate drill guide placement and trajectory using intraoperative fluoroscopy prior to drilling. Anchors can be placed through any portal, though the midanterior portal is most frequently utilized for anterior tears.
* Insertion: After the drill sleeve for the anchor is placed in the appropriate position, drill the pilot hole. Tap the anchor into place while continuously viewing the articular surface of the acetabulum to ensure no subchondral breach occurs.
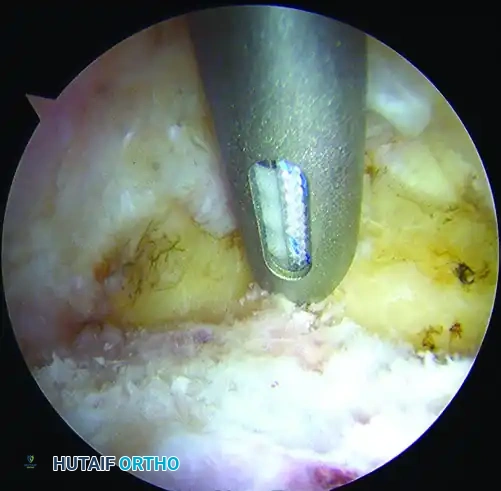
Placement of a bioabsorbable suture anchor into the acetabular rim for labral repair. Note the trajectory favoring the capsular side to avoid articular penetration.
5. Suture Passing and Knot Tying
Once the anchor is securely seated, suture management begins.
* Vertical Mattress Configuration: Use an arthroscopic suture passer (e.g., a crescent or bird-beak device) to deliver one limb of the suture through a small portion of the substance of the labrum. Retrieve the suture, and pass it through the labrum a second time, creating a vertical mattress suture configuration. This provides excellent biomechanical compression of the labrum against the decorticated rim.
* Knot Tying: Pull the working cannula back slightly to an extra-articular position within the capsule. Tie the suture down using standard arthroscopic sliding-locking knots (e.g., Weston or SMC knot) backed up by alternating half-hitches. Ensure the knot rests away from the articular surface.
6. Management of Intrasubstance Splits
An intrasubstance split or cleavage tear in the labrum can be repaired if the labrum remains well-fixed to the acetabulum and possesses a stable outer rim.
* Fully define and debride the cleavage plane in the labrum, removing all frayed, nonviable tissue.
* Use a spectrum device to deliver a looped monofilament suture between the junction of the articular cartilage and the fibrocartilage labrum.
* Pull the working cannula back to the capsule, and deliver a bird-beak suture passer through the outer edge of the labrum, peripheral to the tear.
* Grasp the loop and bring it out through the working cannula. Pass a bioabsorbable suture around the labral split using the looped monofilament as a "suture lasso."
* Using tactile sensation, tie the knot in an extra-articular position and use an automatic suture cutter to cut the remaining suture tails flush above the knot.
7. Dynamic Examination and Concomitant Procedures
After the labral repair is complete, traction is released. The hip is brought through a dynamic range of motion under direct arthroscopic visualization.
* Assess Impingement: Evaluate the femoral head-neck junction to determine if cam impingement is present. If so, an osteochondroplasty (femoral neck reshaping) is performed.
* Capsular Management: Assess the capsule. Depending on the patient's baseline laxity and the extent of the capsulotomy performed, capsular plication or routine capsular closure should be executed to prevent postoperative microinstability.
POSTOPERATIVE REHABILITATION PROTOCOL
Successful outcomes rely heavily on strict adherence to a phased postoperative rehabilitation protocol.
- Phase I (Weeks 0-4): Protection Phase. Patients are typically restricted to 20 lbs flat-foot weight-bearing using crutches. A hip brace may be used to limit flexion to 90 degrees and prevent external rotation and extension, protecting the anterior capsule and the labral repair. Continuous passive motion (CPM) or stationary biking with zero resistance is initiated early to prevent adhesions.
- Phase II (Weeks 4-8): Mobility Phase. Crutches are weaned as the patient normalizes their gait. Active range of motion is progressed. Emphasis is placed on isometric core, gluteus medius, and pelvic floor strengthening.
- Phase III (Weeks 8-12): Strengthening Phase. Progression to closed-kinetic chain exercises, proprioception training, and progressive resistance exercises.
- Phase IV (Months 3-6): Return to Sport. Plyometrics, sport-specific agility drills, and dynamic stabilization. Full return to competitive athletics is typically permitted between 5 and 6 months postoperatively, provided functional testing criteria are met.
EVIDENCE-BASED OUTCOMES
The literature strongly supports labral repair over debridement when viable tissue is present, particularly in the setting of FAI.
In a landmark 2009 study, Byrd and Jones reported a 10-year follow-up of patients with labral lesions treated with simple debridement. They found that hips without any signs of preexisting arthritis had a significant increase in Harris Hip Scores, an improvement that remained durable throughout the 10-year period. However, the presence of osteoarthritis was a poor prognosticator; seven of the eight patients with associated arthritis required a total hip arthroplasty (THA) within the study period.
Further advancing the paradigm, Larson and Giveans compared the clinical outcomes of labral debridement versus labral repair in patients with femoroacetabular impingement. Their comparative analysis demonstrated that the improvement in postoperative Harris Hip Scores was significantly greater in the labral refixation (repair) group compared to the debridement group. This underscores the biomechanical importance of restoring the labral suction seal to optimize joint kinematics and delay the progression of degenerative joint disease.
📚 Medical References
- arthroscopic labral repair in the hip: surgical technique and review of the literature, Arthroscopy 21:1496, 2005.
- Kelly BT, Williams RJ, Philippon MJ: Hip arthroscopy: current indications, treatment options, and management issues, Am J Sports Med 31:1020, 2003.
- Kim SJ, Choi NH, Kim HJ: Operative hip arthroscopy, Clin Orthop Relat Res 353:156, 1998.
- McCarthy JC, Busconi B: The role of hip arthroscopy in the diagnosis and treatment of hip disease, Orthopedics 18:753, 1995.
- McCarthy JC, Day B, Busconi B: Hip arthroscopy: applications and technique, J Am Acad Orthop Surg 3:115, 1995.
- McCarthy JC, Lee, JA: Hip arthroscopy: indications, outcomes, and complications, J Bone Joint Surg 87A:1138, 2005.
- McCarthy JC, Mason JB, Wardell SR: Hip arthroscopy for acetabular dysplasia: a pipe dream? Orthopedics 21:977, 1998.
- O’Leary JA, Berend K, Vail TP: The relationship between diagnosis and outcome in arthroscopy of the hip, Arthroscopy 17:181, 2001.
You Might Also Like