Supracondylar Humerus Fracture: A Comprehensive Guide to Diagnosis & Treatment
Key Takeaway
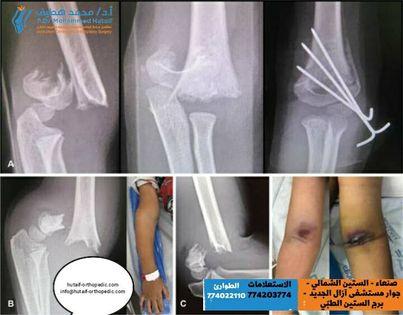
Supracondylar humerus fractures (SCHF) are common pediatric elbow injuries, primarily classified by Gartland types (I-IV) based on displacement. They carry significant neurovascular risk. Gold standard treatment for displaced fractures is closed reduction and percutaneous pinning (CRPP), though open reduction may be necessary for complex cases to ensure optimal outcomes and prevent complications like cubitus varus.
Supracondylar Humerus Fracture A Comprehensive Guide to Diagnosis and Treatment
Introduction and Epidemiology
Supracondylar humerus fractures (SCHF) represent the most prevalent elbow fractures in the pediatric population, accounting for approximately 60% of all elbow fractures and 3% of all pediatric fractures. The typical demographic involves children between 5 and 8 years of age, a period characterized by increased activity and skeletal immaturity, with the physis still open and bone elasticity favoring plastic deformation over direct comminution. The vast majority, approximately 95-98%, are extension-type fractures, resulting from a fall onto an outstretched hand (FOOSH) with the elbow in hyperextension. This mechanism drives the olecranon into the olecranon fossa, causing the distal fragment to displace posteriorly and proximally relative to the shaft. Conversely, flexion-type fractures, which constitute a rare 2-5%, occur due to a direct blow to the posterior aspect of the flexed elbow, leading to anterior displacement of the distal fragment. While less common, flexion-type fractures are often associated with higher energy trauma and a greater incidence of open injuries or associated neurovascular compromise.
The Gartland classification system, a widely accepted method, categorizes SCHF based on radiographic appearance and degree of displacement. This classification guides treatment algorithms and prognostication:
* Type I: Nondisplaced or minimally displaced fractures. Radiographically, the anterior humeral line (AHL), drawn along the anterior cortex of the humerus, intersects the middle one-third of the capitellum. The posterior fat pad sign may be evident, indicating an intra-articular effusion, but the fracture line itself may be subtle. These fractures are inherently stable.
* Type II: Displaced posteriorly with an intact posterior cortex, but with significant angulation such that the AHL no longer intersects the capitellum. The posterior cortex often acts as a hinge. These are further subdivided into:
* Type IIA: Posterior angulation only, with minimal or no rotation or displacement in other planes. These typically remain stable in flexion once reduced.
* Type IIB: Posterior angulation with associated rotation and/or medial/lateral displacement, indicating increased instability. These fractures have a higher propensity for malunion and require careful reduction.
* Type III: Completely displaced fractures, characterized by a complete loss of cortical contact between the proximal and distal fragments. These fractures are highly unstable, often associated with significant periosteal disruption, and carry the greatest risk of neurovascular injury. They frequently present with obvious deformity and severe pain.
* Type IV (recently added): Multidirectionally unstable fractures after reduction. These fractures are characterized by instability in both flexion and extension, often due to extensive periosteal tearing around the fracture site, particularly both medial and lateral columns. They may appear reduced on radiographs but lose stability with manipulation or casting, necessitating robust fixation.
The critical nature of SCHF lies in the intimate anatomical relationship of the brachial artery and median nerve to the fracture site, alongside the potential for iatrogenic ulnar nerve injury during medial pin placement. Inadequate reduction or unstable fixation can lead to malunion, most commonly cubitus varus (gunstock deformity), which, while primarily cosmetic, can also cause functional impairment, albeit rarely leading to significant disability. Other complications include loss of range of motion, neurovascular compromise, and compartment syndrome. While closed reduction and percutaneous pinning (CRPP) is the gold standard for displaced fractures, open reduction is sometimes required, particularly in cases of irreducible fractures or concomitant neurovascular injury.
Surgical Anatomy and Biomechanics
A thorough understanding of the surgical anatomy of the distal humerus is paramount for safe and effective management of supracondylar fractures. The distal humerus flares out to form medial and lateral epicondyles, connected by the supracondylar ridges. The capitellum articulates with the radial head, and the trochlea articulates with the ulna. The olecranon fossa posteriorly and the coronoid fossa anteriorly accommodate the olecranon and coronoid processes during elbow flexion and extension, respectively.
Key neurovascular structures traverse the supracondylar region:
* Brachial Artery: Located anterior to the distal humerus, passing through the cubital fossa. It lies deep to the bicipital aponeurosis and medial to the biceps tendon. It is highly susceptible to injury or entrapment in extension-type SCHF due to its close proximity to the anterior aspect of the fracture apex.
* Median Nerve: Travels alongside the brachial artery, typically immediately medial to it in the antecubital fossa. It is also vulnerable to entrapment or injury, often accompanying brachial artery compromise.
* Radial Nerve: Lies more laterally, passing anterior to the lateral epicondyle, innervating the extensor muscles. It is less commonly injured in SCHF compared to the median nerve.
* Ulnar Nerve: Located posteromedially, passing through the cubital tunnel posterior to the medial epicondyle. It is particularly at risk of iatrogenic injury during medial pin placement due to its superficial and exposed course. It is critical to palpate and protect the ulnar nerve during medial pin insertion.
The soft tissue envelope, including periosteum, muscle attachments (brachialis anteriorly, triceps posteriorly), and fascial structures, plays a significant role in fracture stability and potential for entrapment. The anterior periosteum and brachialis muscle can become interposed between fracture fragments, preventing closed reduction.
Biomechanically, the supracondylar region is relatively weak due to the thinning of the bone at the olecranon fossa and coronoid fossa, making it a common site for fracture under axial load and hyperextension. The forces involved in a FOOSH injury create a bending moment across the distal humerus, leading to failure in tension on the anterior cortex and compression on the posterior cortex. Rotational stability is provided by intact periosteal hinges, and loss of these hinges, particularly the medial and lateral columns, contributes to the multidirectional instability seen in Gartland Type IV fractures. The blood supply to the distal humerus is robust, originating from the brachial artery and its branches, ensuring good healing potential, though severe displacement can compromise local perfusion. The physes of the distal humerus (capitellum, trochlea, medial and lateral epicondyles) are critical growth centers, and fracture patterns must be assessed relative to these structures to avoid growth disturbances.
Indications and Contraindications
The management of supracondylar humerus fractures is primarily guided by the Gartland classification, patient age, associated injuries, and neurovascular status.
Non-Operative Management Indications
Gartland Type I fractures, which are nondisplaced or minimally displaced, are typically managed non-operatively. The primary goal is to protect the fracture site while allowing for healing.
* Gartland Type I Fractures: Stable, nondisplaced fractures with an intact anterior humeral line intersecting the capitellum. These fractures often present with a positive posterior fat pad sign but without significant angulation or displacement.
* Minimally Displaced Fractures: Fractures with subtle displacement or angulation that spontaneously reduce or are easily reduced with gentle manipulation, confirmed by fluoroscopy.
Treatment involves immobilization, typically in a long-arm cast or splint with the elbow flexed to 90 degrees and the forearm in neutral rotation. Serial radiographs (e.g., at 5-7 days) are crucial to monitor for any secondary displacement, which may occur as swelling resolves. Close neurovascular monitoring is essential.
Operative Management Indications
Operative intervention, predominantly closed reduction and percutaneous pinning (CRPP), is the gold standard for displaced and unstable supracondylar humerus fractures.
- Gartland Type II Fractures:
- Type IIA (Posterior Angulation Only): While some Type IIA fractures may be treated with casting after successful closed reduction, instability in flexion or inability to maintain reduction reliably often warrants CRPP.
- Type IIB (Posterior Angulation with Rotation/Displacement): These fractures are inherently unstable and nearly universally require CRPP to achieve and maintain reduction, preventing cubitus varus or other malunions.
- Gartland Type III Fractures: Completely displaced fractures are highly unstable and universally require CRPP. The primary goals are accurate reduction and stable fixation to minimize neurovascular complications and malunion.
- Gartland Type IV Fractures: Multidirectionally unstable fractures that cannot be maintained in reduction even after successful closed reduction maneuvers. CRPP is mandatory to provide stability.
- Open Fractures: Any supracondylar humerus fracture with an open wound requires surgical debridement, irrigation, and stabilization, regardless of displacement. Tetanus prophylaxis and appropriate antibiotics are also critical.
- Neurovascular Compromise:
- "Pink Pulseless Hand": In the absence of definitive signs of ischemia (pallor, paresthesia, paralysis, poikilothermia), observe after reduction and pinning. If the pulse does not return or neurovascular status deteriorates, surgical exploration of the brachial artery and median nerve is indicated.
- "White Pulseless Hand" (Limb Ischemia): An absolute indication for emergent reduction and pinning, followed by immediate surgical exploration of the brachial artery if the pulse does not return. Time is critical to prevent permanent ischemia.
- Progressive Neurological Deficit: Worsening neurological status post-reduction or pre-existing significant deficit (e.g., complete nerve palsy) may warrant open exploration, though many nerve palsies resolve spontaneously.
- Irreducible Closed Fractures: Fractures that cannot be anatomically or near-anatomically reduced by closed manipulation, often due to soft tissue interposition (e.g., brachialis muscle, median nerve, brachial artery), necessitate open reduction.
- Flexion-Type Fractures: Due to their inherent instability and often higher energy mechanism, these typically require CRPP, particularly for Gartland Type II and III equivalents.
Contraindications
Absolute contraindications to surgical intervention for SCHF are rare, especially in the context of high-grade displacement or neurovascular compromise. Relative contraindications may include:
* Severe Comorbidities: Life-threatening medical conditions that preclude safe anesthesia, though in the context of limb-threatening ischemia, these are often overridden.
* Severe Local Soft Tissue Damage: Extensive crush injuries or degloving may complicate percutaneous pinning and necessitate careful planning or alternative stabilization.
* Pre-Existing Conditions: Pre-existing neurological deficits or vascular anomalies should be documented but do not typically contraindicate surgery; rather, they influence pre-operative assessment and counseling.
* Stable Gartland Type I Fractures: As discussed, these are managed non-operatively.
Table 1: Operative vs. Non-Operative Indications for Supracondylar Humerus Fracture
| Feature/Gartland Type | Non-Operative Management | Operative Management (CRPP) |
|---|---|---|
| Gartland Type I | Nondisplaced, anterior humeral line intact | Rarely, if secondary displacement occurs |
| Gartland Type II | Select Type IIA after successful and stable closed reduction (controversial) | Most Type IIA (unstable reduction), all Type IIB |
| Gartland Type III | Not indicated | All |
| Gartland Type IV | Not indicated | All |
| Open Fracture | Not indicated | All (with debridement and antibiotics) |
| Neurovascular Compromise | "Pink Pulseless" with good perfusion (observe after reduction) | "White Pulseless" (ischemia), progressive neurological deficit, persistent "pink pulseless" post-reduction and observation |
| Irreducible Fracture | Not indicated | All (often requiring Open Reduction Internal Fixation) |
| Flexion-Type Fracture | Select Type I equivalent (rare) | Most Type II and III equivalents |
Pre Operative Planning and Patient Positioning
Thorough pre-operative planning is essential to optimize surgical outcomes and mitigate complications.
Pre-operative Assessment
-
Clinical Evaluation:
- Neurovascular Assessment: Meticulous documentation of pre-injury and pre-operative neurovascular status is paramount. This includes palpation of radial and ulnar pulses, capillary refill time, assessment of motor function (flexion/extension of wrist and fingers, thumb opposition), and sensory function (light touch, two-point discrimination) for the median, ulnar, and radial nerves. Specific attention to the "pink pulseless hand" (good capillary refill, absent radial pulse) versus the "white pulseless hand" (absent pulse, poor capillary refill, pallor, cold limb, severe pain, paresthesias) is critical.
- Soft Tissue Assessment: Inspect for skin integrity, ecchymosis, swelling, and any open wounds.
- Associated Injuries: Evaluate for other upper extremity injuries, head injury, or abdominal trauma, especially in high-energy mechanisms.
-
Imaging:
- Standard Radiographs: AP and true lateral views of the elbow are mandatory. The true lateral view is crucial for assessing displacement (posterior, anterior, sagittal plane angulation) and identifying fat pad signs. The AP view helps assess coronal plane alignment and medial/lateral displacement.
- Oblique Views: Can be helpful in complex cases to delineate fracture patterns.
- Traction Views: May be useful in Gartland Type III fractures to visualize fragment alignment without superimposed deformity, aiding in planning reduction strategy.
- Comparison Views: While less commonly performed, comparison views of the contralateral elbow can assist in assessing anatomical variations.
-
Anesthesia Consultation: Discussion with the anesthesiologist regarding patient age, comorbidities, and potential need for post-operative analgesia (e.g., regional blocks) is important.
Operating Room Setup
The operating room should be prepared with specific equipment to ensure an efficient and safe procedure.
* Fluoroscopy (C-arm): Essential for closed reduction and percutaneous pinning. The C-arm must be able to obtain true AP and lateral views without repositioning the arm. A sterile drape for the C-arm is required.
* Operating Table: Standard operating table with an arm board or hand table extension.
* Instrumentation:
* Sterile orthopedic pack with basic instruments.
* Small fragment sets, pediatric sets.
* K-wire driver and various sizes of K-wires (e.g., 0.045", 0.062", 0.070").
* Wire cutters, bending pliers.
* Weitlaner retractors, periosteal elevators.
* Bone clamps (e.g., Verbrugge, mini-fragment).
* Small osteotomes, rongeurs (if open reduction anticipated).
* Dressings and Splinting Material: Cast padding, fiberglass/plaster casting material for post-operative immobilization.
* Tourniquet: Applied to the upper arm, though frequently not inflated for the majority of the procedure to allow for real-time neurovascular assessment.
Patient Positioning and Preparation
- Anesthesia: General anesthesia is typically employed. Regional blocks (e.g., supraclavicular or axillary block) can be considered pre-operatively to aid in post-operative pain management.
- Positioning:
- Supine Position: The patient is placed supine on the operating table.
- Arm Table/Hand Table: The affected arm is positioned on a radiolucent arm board or hand table, allowing for free movement for reduction maneuvers and C-arm access.
- Towel Roll/Bumper: A towel roll placed under the ipsilateral scapula helps elevate the shoulder and allows for full elbow extension during reduction maneuvers and C-arm visualization.
- C-arm Positioning: The C-arm image intensifier is positioned to allow for immediate AP and lateral views of the elbow without significant repositioning of the patient or arm. This typically involves placing the C-arm perpendicular to the table for AP views and then rotating it 90 degrees for lateral views, or using a "diagonal" C-arm position.
- Lead Shielding: Appropriate lead shielding for the patient and surgical team is mandatory due to frequent fluoroscopy use.
- Prep and Drape: The entire upper extremity, from the axilla to the fingertips, is prepped with an antiseptic solution (e.g., chlorhexidine or povidone-iodine). The arm is then draped in a sterile fashion, often with a stockinette and impervious drapes, allowing free access to the elbow joint and proximal forearm. Ensure sufficient sterile draping around the C-arm to maintain sterility.
Detailed Surgical Approach and Technique
The mainstay of surgical treatment for displaced supracondylar humerus fractures is closed reduction and percutaneous pinning (CRPP). Open reduction internal fixation (ORIF) is reserved for specific indications.
Closed Reduction and Percutaneous Pinning (CRPP)
1. Reduction Maneuvers
The goal is an anatomical or near-anatomical reduction, confirmed by fluoroscopy. The specific maneuvers depend on the fracture type:
- Traction: Initial maneuver involves applying longitudinal traction to the forearm, with the elbow in slight flexion (approximately 20-30 degrees). This helps disengage fragments and align the bone along its axis, often reducing muscle spasm.
- Correction of Medial/Lateral Displacement: While maintaining traction, varus or valgus stress is applied to correct any medial or lateral displacement.
- Correction of Rotation: This is a crucial step and often the most challenging aspect.
- For extension-type fractures with posteromedial displacement (most common), the distal fragment is often internally rotated. The forearm should be pronated to externally rotate the distal fragment relative to the proximal fragment. This maneuver aligns the medial column and helps prevent iatrogenic ulnar nerve injury during medial pin insertion.
- For posterolateral displacement, the forearm should be supinated.
- Correction of Angulation (Flexion): Once longitudinal alignment and rotation are addressed, the elbow is flexed to approximately 100-110 degrees (or to the point of palpable pulse obliteration, then backed off slightly). This maneuver uses the triceps and posterior periosteum as a fulcrum to reduce the posterior displacement. The surgeon may apply direct pressure over the olecranon to further reduce the distal fragment anteriorly.
- Fluoroscopic Confirmation: After each step, fluoroscopy (AP and lateral views) is used to assess the reduction. Key radiographic parameters include:
- Lateral View: Anterior humeral line (AHL) passing through the middle third of the capitellum. Böhler's angle (or Baumann's angle for lateral pins) can also be assessed.
- AP View: Restoration of the physiological carrying angle and absence of medial/lateral displacement. Overlap of the medial and lateral epicondyles indicates adequate rotation.
If closed reduction is not satisfactory, gentle repeated attempts may be performed. If irreducible after 3-4 attempts, consider soft tissue interposition.
2. Pinning Techniques
Once a satisfactory reduction is achieved and confirmed, stable fixation is achieved using K-wires. The choice of pinning configuration remains a subject of debate, primarily between lateral-entry and medial-and-lateral cross-pinning.
-
Lateral-Entry Pinning (Two or Three Pins):
- Technique: All pins are inserted from the lateral epicondyle.
- Typically, two divergent pins are used, starting from the lateral epicondyle. The first pin is directed proximally and medially to engage the medial cortex of the humerus. The second pin is started more anteriorly or posteriorly on the lateral epicondyle and directed proximally and medially, crossing the fracture site into the medial column, but ideally not crossing the first pin in the distal fragment. A third pin may be added for additional stability if needed, often targeting the posterior cortex.
- Advantages: Eliminates the risk of iatrogenic ulnar nerve injury, as all pins are placed away from the medial epicondyle. Biomechanically, it provides excellent stability if the pins are divergent and well-placed.
- Disadvantages: Historically, some studies suggested inferior rotational stability compared to cross-pinning, though modern techniques with divergent and robust pin placement minimize this. If pins are placed too close to the olecranon fossa, they may compromise stability.
- Critical Points: Ensure pins engage both medial and lateral cortices of the proximal humerus. Aim for divergence and avoid parallel pins. Ensure pins are well within the bone and do not penetrate the olecranon fossa or anterior cortex of the humerus.
-
Medial and Lateral Cross-Pinning:
- Technique: One pin is inserted from the medial epicondyle, and one or two pins are inserted from the lateral epicondyle.
- Lateral Pin(s): Similar to lateral-entry pinning, starting from the lateral epicondyle and directed proximally and medially into the medial column.
- Medial Pin: This pin is critical for stability but carries the risk of ulnar nerve injury.
- Ulnar Nerve Protection: The elbow is typically positioned in maximal flexion (approximately 110-120 degrees) to tension the ulnar nerve anteriorly and away from the medial epicondyle. However, this position may compromise reduction. Therefore, the forearm is typically kept pronated to externally rotate the distal fragment.
- Palpation/Direct Visualization: Before inserting the medial pin, the ulnar nerve should be palpated posterior to the medial epicondyle. Many surgeons advocate for a small incision over the medial epicondyle to directly visualize and protect the ulnar nerve before inserting the medial K-wire. This significantly reduces the risk of iatrogenic injury. The pin is then inserted through the medial epicondyle, directed proximally and laterally across the fracture into the lateral cortex of the proximal humerus.
- Advantages: Biomechanically proven to offer superior rotational stability due to pins engaging both medial and lateral columns proximal to the fracture.
- Disadvantages: Significant risk of iatrogenic ulnar nerve injury if proper technique and protection are not used.
-
Hybrid Pinning: A combination of two divergent lateral pins and one medial pin (often placed with open protection of the ulnar nerve) for maximum stability, particularly in complex or Type IV fractures.
3. Final Assessment
- Neurovascular Check: Crucially, after pin insertion, pulses (radial, ulnar) and capillary refill must be re-assessed. If a pulse is lost or significantly diminished, pins should be removed and reduction re-evaluated. If the pulse remains absent after successful reduction, a vascular exploration may be warranted.
- Radiographic Confirmation: Final AP and lateral fluoroscopic views are obtained to confirm satisfactory reduction, pin position, and pin penetration. Pins should be well-seated in both fragments, divergent, and not impinging on the joint or growth plate. The carrying angle should be restored.
- Pin Management: K-wires are cut short, bent at a comfortable angle, and left exposed for easy removal, or buried beneath the skin if desired (though exposed pins are generally preferred in pediatric fractures for ease of removal).
Open Reduction Internal Fixation (ORIF)
ORIF is reserved for specific situations where closed reduction is not feasible or appropriate.
-
Indications for ORIF:
- Irreducible Closed Fractures: Due to soft tissue interposition (e.g., brachialis muscle, median nerve, brachial artery) or severe comminution preventing closed manipulation.
- Vascular Impairment Requiring Repair: If exploration reveals a lacerated or thrombosed brachial artery, open reduction is performed to facilitate vascular repair.
- Open Fractures with Gross Contamination: Requires debridement and stabilization.
- Flexion-Type Fractures: May require open reduction more frequently due to anterior soft tissue impingement.
-
Surgical Approaches for ORIF:
- Anterior Approach (Henry's approach variation): Incision centered over the distal humerus, between the brachialis muscle and the biceps. This approach provides excellent visualization of the brachial artery and median nerve, facilitating their protection or repair. It is particularly useful for irreducible extension-type fractures. The brachialis muscle is carefully split or retracted.
- Posteromedial Approach (Medial Column): Incision along the medial supracondylar ridge. Allows access to the medial epicondyle and ulnar nerve, often used for medial column fractures or irreducible flexion-type fractures. The ulnar nerve is identified and protected.
- Posterolateral Approach (Lateral Column): Less common for primary SCHF, but may be used in highly comminuted fractures or associated lateral condyle injuries.
- Combined Approaches: Rarely, a combination of approaches may be necessary.
-
Reduction and Fixation in ORIF:
- Once the fracture is exposed, interposed soft tissues are removed.
- Reduction is achieved under direct visualization, using gentle manipulation, elevators, and bone clamps.
- Fixation is typically performed with K-wires, similar to CRPP, but with the added benefit of direct visualization. Rarely, small screws or plates may be used in adolescents with larger bones or very unstable patterns.
- Thorough irrigation is performed, and the wound is closed in layers.
Complications and Management
Supracondylar humerus fractures, despite appropriate management, can be associated with a range of complications, both pre-existing and iatrogenic. Prompt recognition and appropriate salvage strategies are crucial for optimizing patient outcomes.
1. Neurovascular Injury
- Pre-existing Nerve Palsy: Most commonly involves the median or anterior interosseous nerve, followed by the radial nerve. The ulnar nerve is less frequently injured pre-operatively in extension-type fractures.
- Incidence: Varies widely, generally 10-20% for nerve injury, 5-10% for vascular injury.
- Management: The majority (90-95%) of pre-existing nerve palsies are neurapraxias and resolve spontaneously within 6-12 weeks. Observation post-reduction is typically sufficient. Surgical exploration is indicated for complete nerve transection (rare), open fractures with visible nerve injury, or failure to improve after several months.
- Iatrogenic Nerve Injury: Most commonly affects the ulnar nerve during medial pin placement.
- Incidence: Up to 8% for ulnar nerve injury with cross-pinning without open protection; significantly reduced with lateral-entry pinning or ulnar nerve protection during cross-pinning.
- Management: If recognized intraoperatively, the pin should be removed and re-directed. Postoperatively, if new ulnar nerve palsy develops, the pin causing it should be removed. Most iatrogenic palsies are neurapraxias and resolve spontaneously. Persistent or complete deficit may warrant exploration and neurolysis.
- Brachial Artery Injury: Can range from spasm to intimal tear, partial laceration, or complete transection.
- Incidence: Up to 10-15%, higher in Type III fractures.
- Management:
- "Pink Pulseless Hand": After successful reduction and pinning, if pulses are absent but the hand is warm, pink, and has good capillary refill, with no signs of ischemia, close observation is warranted. Many pulses return spontaneously with reduction, relief of spasm, or collateral flow.
- "White Pulseless Hand" (Limb Ischemia): An absolute emergency. After reduction and pinning, if the pulse does not return and there are signs of ischemia, immediate surgical exploration of the brachial artery is required. This often involves an anterior approach, fasciotomy (if needed), thrombectomy, repair (e.g., primary anastomosis, vein graft), or ligation (rarely, if collateral flow is sufficient).
2. Compartment Syndrome
- Incidence: Rare, but potentially devastating (0.1-0.5%). Risk factors include severe initial swelling, vascular injury, and prolonged ischemia.
- Management: High index of suspicion for rapidly increasing pain, pain with passive stretch, paresthesias, tense forearm compartments. Emergent fasciotomy of the forearm compartments is indicated.
3. Malunion (Cubitus Varus)
- Incidence: The most common long-term complication (up to 30% in historical series, 5-10% with modern techniques). Primarily cosmetic, known as "gunstock deformity."
- Mechanism: Typically due to inadequate reduction of rotation and medial displacement during initial treatment.
- Management: Often asymptomatic and requires no treatment. For severe cosmetic deformity or very rarely, functional issues (e.g., tardy ulnar nerve palsy due to altered valgus load), corrective osteotomy of the distal humerus may be performed, usually after skeletal maturity.
4. Loss of Reduction/Re-displacement
- Incidence: 1-5%, higher in unstable Type IIB, III, or IV fractures with inadequate fixation.
- Management: Depends on the degree of re-displacement and timing. If significant displacement occurs early, repeat closed reduction and pinning or open reduction may be necessary. Minor displacement that does not significantly affect the carrying angle or function may be observed.
5. Infection
- Incidence: Pin site infection is common (up to 10-15%), but deep osteomyelitis is rare (less than 1%).
- Management:
- Pin Site Infection: Local wound care, oral antibiotics. If severe or unresponsive, pin removal.
- Deep Infection: Surgical debridement, intravenous antibiotics, and pin removal (if present).
6. Pin-Related Complications
- Pin Migration: Can occur with loose pins.
- Pin Breakage: Rare.
- Irritation/Pain at Pin Sites: Common.
- Management: Pin removal, local care.
7. Stiffness/Loss of Range of Motion
- Incidence: Mild loss of extension or flexion (up to 10-15 degrees) is common, but rarely functionally significant. Severe stiffness is rare.
- Management: Early mobilization protocols help prevent stiffness. Physical therapy, though usually not aggressive in the immediate post-operative phase, can be used for persistent stiffness. Rarely, surgical manipulation under anesthesia or arthroscopic release may be considered for severe cases.
8. Heterotopic Ossification (HO)
- Incidence: Rare, typically seen in severe injuries or those requiring extensive soft tissue dissection.
- Management: Non-steroidal anti-inflammatory drugs (NSAIDs) may be used prophylactically in high-risk patients. For established HO, observation or surgical excision after maturation may be considered for functional impairment.
Table 2: Common Complications of Supracondylar Humerus Fracture
| Complication | Incidence (Approximate) | Salvage Strategies |
|---|---|---|
| Nerve Injury (Pre-existing) | 10-20% (Median/AION > Radial > Ulnar) | Observation for spontaneous recovery (90-95% resolve). Exploration for complete transection, non-recovery after 3-6 months. |
| Nerve Injury (Iatrogenic Ulnar) | 2-8% (with unprotected cross-pinning) | Intraoperative: remove/redirect pin. Postoperative: remove pin, observe. Exploration for non-recovery. Prevent with lateral pins or open ulnar nerve protection. |
| Brachial Artery Injury | 5-15% | "Pink Pulseless": Observe closely. "White Pulseless": Emergent open exploration, thrombectomy/repair/graft. Fasciotomy if indicated. |
| Compartment Syndrome | 0.1-0.5% | Emergent fasciotomy. |
| Malunion (Cubitus Varus) | 5-10% (up to 30% historically) | Usually asymptomatic, cosmetic. Corrective osteotomy for severe deformity or functional impairment (after skeletal maturity). |
| Loss of Reduction/Re-displacement | 1-5% | Re-reduction and re-pinning if significant and early. Observation for minor, stable displacement. |
| Pin Site Infection | 10-15% | Local wound care, oral antibiotics. Pin removal if persistent or severe. |
| Deep Infection | <1% | Surgical debridement, IV antibiotics, hardware removal. |
| Stiffness/Reduced ROM | 5-10% (mild) | Early gentle mobilization. Physical therapy. Rarely, manipulation under anesthesia or surgical release. |
| Heterotopic Ossification | Rare | Prophylaxis with NSAIDs for high risk. Observation. Surgical excision for symptomatic, mature HO. |
Post Operative Rehabilitation Protocols
Post-operative rehabilitation following supracondylar humerus fracture fixation aims to facilitate fracture healing, prevent stiffness, restore range of motion (ROM), and ultimately return the child to full function. The protocol must be tailored to the individual patient, fracture stability, and method of fixation.
Immediate Post-Operative Period (0-3 Weeks)
- Immobilization: The elbow is typically immobilized in a long-arm cast or splint, with the elbow flexed to approximately 70-90 degrees and the forearm in neutral or slight pronation (depending on the stability of the reduction and surgeon preference). For lateral entry pins, 90 degrees of flexion and pronation are generally well-tolerated. The cast should be well-padded, especially around the elbow, to prevent pressure sores.
- Neurovascular Monitoring: Meticulous neurovascular checks continue in the post-anesthesia care unit and during the initial hospital stay. Swelling and potential for compartment syndrome must be closely monitored.
- Pain Management: Appropriate pain medication, often including a regional nerve block placed intraoperatively, is crucial for patient comfort.
- Elevation: The extremity should be elevated to reduce swelling.
- Finger/Shoulder ROM: Encourage active range of motion of the fingers, wrist, and shoulder to prevent stiffness in adjacent joints.
Pin Removal and Early Mobilization (3-6 Weeks)
- Timing of Pin Removal: K-wires are typically removed at 3-4 weeks post-operatively, once radiographic evidence of early fracture healing (callus formation) is present and the fracture is clinically non-tender.
- Post-Removal Immobilization: Following pin removal, some surgeons opt for a brief period (e.g., 3-7 days) of continued immobilization in a removable splint or cast for comfort and protection, especially in younger children or those with less robust healing. Others allow immediate gentle mobilization.
- Initiation of ROM:
- Passive Range of Motion (PROM): Gentle, gravity-assisted passive range of motion can be initiated, with parents or therapists guiding the movements. Avoid aggressive stretching or forced manipulation, as this can lead to heterotopic ossification or re-fracture.
- Active Range of Motion (AROM): Encourage active flexion and extension, supination and pronation of the forearm. Play-based therapy is highly effective in children to encourage natural movement (e.g., reaching for toys, stacking blocks).
- Activities to Avoid: No lifting, pushing, pulling, or weight-bearing through the arm. Avoid contact sports or activities that could put the elbow at risk.
Progressive Strengthening and Return to Activity (6-12 Weeks)
- Progression of ROM: Continue to encourage full, pain-free active and passive range of motion. Most children regain near-normal ROM by 6-8 weeks. Persistent stiffness may warrant formal physical therapy.
- Gentle Strengthening: Once comfortable ROM is achieved and the fracture is clinically stable, gentle strengthening exercises can be introduced. This often begins with isometric exercises and progresses to light resistance activities, focusing on regaining strength in the biceps, triceps, and forearm muscles.
- Return to Play/Activity:
- Light Activities: Return to light, non-contact activities (e.g., swimming, biking) can typically begin around 6-8 weeks post-operatively, provided there is good ROM and no pain.
- Contact Sports/Heavy Lifting: Return to contact sports, activities involving heavy lifting, or activities with a high risk of re-injury is generally permitted after 10-12 weeks, contingent on full, pain-free ROM, good strength, and radiographic evidence of solid bony union.
- Monitoring: Continued monitoring for signs of malunion (cubitus varus), persistent neurovascular deficits, or chronic pain.
Long-Term Follow-up
- Radiographic Healing: Final radiographs are usually taken at 3 months to confirm complete fracture healing.
- Clinical Evaluation: Assess elbow function, any residual deformity (e.g., cubitus varus), and overall satisfaction.
- Addressing Complications: Any persistent issues, such as significant stiffness, non-resolving nerve palsies, or severe cubitus varus, should be addressed with further specialist consultation. While mild loss of motion is common, it rarely impacts functional activities.
Summary of Key Literature and Guidelines
The current understanding and treatment protocols for supracondylar humerus fractures are based on decades of clinical experience and evolving scientific literature. The management strategy, particularly the choice between different pinning configurations, has been extensively studied.
Gartland Classification and Treatment Algorithm
The Gartland classification, originally described in 1959 and later modified, remains the cornerstone for guiding treatment decisions. Current consensus, as reflected in guidelines from bodies like the American Academy of Orthopaedic Surgeons (AAOS) and the Pediatric Orthopaedic Society of North America (POSNA), advocates for:
* Gartland Type I: Non-operative management with cast immobilization.
* Gartland Type II, III, and IV: Operative management, primarily closed reduction and percutaneous pinning (CRPP). Open reduction is reserved for irreducible fractures, open fractures, or those requiring emergent vascular repair.
Pinning Configurations Debate
A significant body of literature addresses the relative merits of lateral-entry pinning versus medial-and-lateral cross-pinning:
* Biomechanical Studies: Generally, biomechanical studies suggest that cross-pinning (medial and lateral pins) provides superior rotational stability compared to two lateral pins, especially if the lateral pins are parallel. However, modern lateral-entry techniques using three pins or two widely divergent pins have demonstrated comparable stability.
* Clinical Outcomes:
* Lateral-Entry Pinning: Offers the distinct advantage of virtually eliminating the risk of iatrogenic ulnar nerve injury. Numerous clinical studies and meta-analyses have shown comparable rates of satisfactory outcomes (reduction maintenance, functional recovery, complication rates) between lateral-entry and cross-pinning, particularly when sufficient lateral pins (two or three divergent) are used.
* Medial and Lateral Cross-Pinning: While providing excellent stability, the risk of iatrogenic ulnar nerve injury is a recognized complication, particularly if the medial pin is placed blindly. Many surgeons advocate for a small incision and direct visualization of the ulnar nerve when placing the medial pin to mitigate this risk.
* Consensus: The literature supports both techniques as viable options. The choice often comes down to surgeon preference, experience, and careful consideration of the risk-benefit profile, particularly regarding ulnar nerve safety. The critical factors for successful pinning, regardless of configuration, include achieving stable reduction, maintaining proper anatomical alignment, and ensuring sufficient pin purchase across the fracture site.
Management of Neurovascular Compromise
Guidelines emphasize a systematic approach to neurovascular compromise:
* Pulseless but Perfused Hand ("Pink Pulseless"): Initial management involves careful closed reduction and stabilization. If the pulse does not return, observation is often recommended, as collateral circulation frequently provides adequate perfusion, and the majority of these limbs remain viable without exploration. However, close monitoring for any signs of worsening perfusion or compartment syndrome is paramount.
* Pulseless and Ischemic Hand ("White Pulseless"): This is a limb-threatening emergency. Immediate reduction and stabilization are followed by emergent surgical exploration of the brachial artery if perfusion is not rapidly restored. A delay in revascularization significantly increases the risk of Volkmann's ischemic contracture.
Importance of Reduction Quality
Studies consistently show that the quality of the initial reduction is the most critical determinant of long-term outcomes, particularly in preventing cubitus varus malunion. A stable, anatomical or near-anatomical reduction, confirmed by fluoroscopy in multiple planes (ensuring the anterior humeral line intersects the capitellum and appropriate carrying angle), is paramount.
Overall Principles
The current evidence-based guidelines for supracondylar humerus fractures emphasize:
1. Early and Accurate Diagnosis: Prompt clinical and radiographic assessment.
2. Meticulous Neurovascular Assessment: Baseline and serial monitoring.
3. Anatomical Reduction: The primary goal for displaced fractures.
4. Stable Fixation: With minimal risk of iatrogenic complications.
5. Appropriate Post-operative Care: Immobilization and controlled rehabilitation.
While specific techniques may vary, adherence to these fundamental principles ensures optimal outcomes for pediatric patients with supracondylar humerus fractures. Continual vigilance for complications and timely intervention are essential components of high-quality care.
You Might Also Like


