Extensor Tendons: Anatomy, Surgical Repair & Tenodesis
Key Takeaway
Extensor tendon injuries require precise anatomical knowledge of the six dorsal compartments and juncturae tendinum for optimal surgical outcomes. This guide details the biomechanics, anatomical variations, and step-by-step surgical techniques for extensor tendon repair and tenodesis. Proper identification of the extensor indicis proprius and understanding the masking effect of juncturae tendinum are critical to preventing missed lacerations and ensuring successful postoperative rehabilitation.
INTRODUCTION TO EXTENSOR TENDON SURGERY
The extensor mechanism of the hand is a highly sophisticated, delicate network of tendons, retinacular structures, and intrinsic muscle insertions. Unlike flexor tendons, which are robust and housed within well-defined synovial sheaths, extensor tendons are flatter, thinner, and possess less collagen density. This anatomical reality makes them highly susceptible to lacerations, attrition ruptures, and complex adhesions following trauma.
For the operating orthopedic surgeon, mastering the extensor tendons requires an intimate understanding of the six dorsal compartments of the wrist, the intricate web of the juncturae tendinum, and the myriad anatomical variations that present during surgical exploration. This comprehensive guide details the surgical anatomy, clinical evaluation, and advanced operative techniques—including tenodesis and pull-out wire fixation—required for the successful management of extensor tendon injuries.
SURGICAL ANATOMY AND BIOMECHANICS
The Six Dorsal Compartments
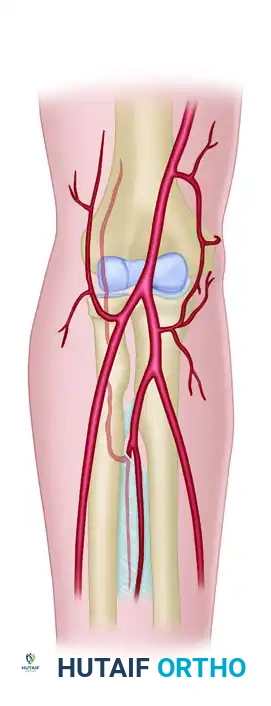
As classically described, the extensor tendons pass from the forearm onto the dorsum of the hand through six distinct compartments beneath the extensor retinaculum. The retinaculum acts as a critical biomechanical pulley, preventing bowstringing of the tendons during active wrist extension.
From the radial (lateral) side to the ulnar (medial) side of the retinaculum, the compartments contain the following numbers of tendons: two, two, one, five, one, and one.
- First Compartment (Two Tendons): Contains the extensor pollicis brevis (EPB) and the abductor pollicis longus (APL). This compartment is the anatomical site of De Quervain's tenosynovitis. Multiple slips of the APL are frequently encountered here.
- Second Compartment (Two Tendons): Contains the extensor carpi radialis longus (ECRL) and extensor carpi radialis brevis (ECRB). These are the primary dorsiflexors of the wrist.
- Third Compartment (One Tendon): Contains the extensor pollicis longus (EPL). The EPL uniquely angles around Lister's tubercle, a critical bony landmark, before heading toward the thumb.
- Fourth Compartment (Five Tendons): Contains the four tendons of the extensor digitorum communis (EDC) plus the extensor indicis proprius (EIP).
- Fifth Compartment (One Tendon): Contains the extensor digiti quinti (EDQ), also known as the extensor digiti minimi (EDM).
- Sixth Compartment (One Tendon): Contains the extensor carpi ulnaris (ECU), which sits in a distinct groove on the ulnar head and is stabilized by a dedicated subsheath.
Surgical Warning: The extensor retinaculum should be preserved whenever possible during surgical exposure. If division is necessary to access the compartments, it should be stepped or Z-lengthened to allow for anatomical repair and prevent postoperative bowstringing.
Anatomical Variations of the Extensor Tendons
The anatomy of the extensor tendons is notoriously variable. Relying on textbook descriptions without anticipating anatomical anomalies often leads to surgical errors, particularly during tendon transfers or when identifying lacerated stumps.
In a landmark cadaver study, the anatomical patterns of the extensors to the fingers were further defined. The most common patterns observed include:
* A single extensor indicis proprius (EIP) inserting to the ulnar side of the index extensor digitorum communis (EDC).
* A single EDC to the index finger.
* A single EDC to the long finger.
* A double EDC to the ring finger.
* An absent EDC to the small finger.
* A double extensor digiti quinti (EDQ) with a double insertion.
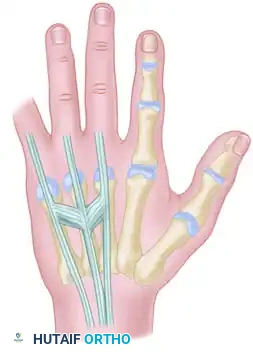
FIGURE 66-62: Most common pattern of extensor tendons on the dorsum of the hand, illustrating the single EIP, single EDC to index and long fingers, double EDC to the ring finger, absent EDC to the small finger, and double EDQ.
Extensor indicis proprius (EIP) anatomy, demonstrating its classic ulnar relationship to the EDC of the index finger.
The Juncturae Tendinum
The juncturae tendinum are intertendinous connections located proximal to the metacarpophalangeal (MCP) joints. They serve a vital biomechanical role by coordinating digital extension and distributing forces across the dorsal hand. However, they also act as a double-edged sword in trauma, as they can mask complete tendon lacerations.
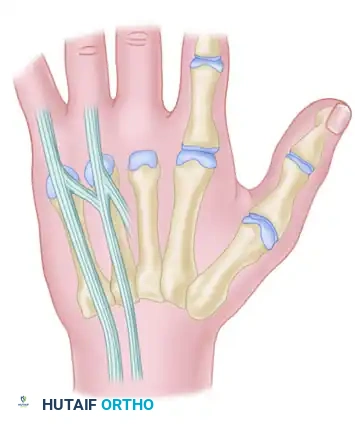
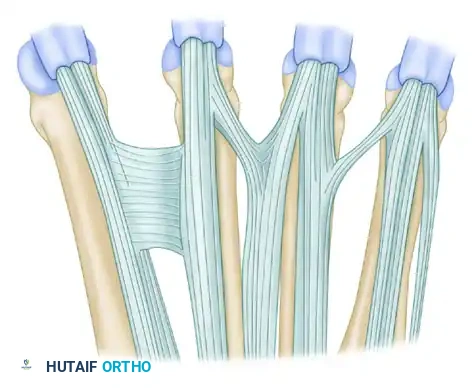
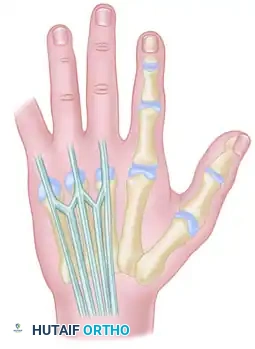
FIGURE 66-63: Overview of the Juncturae Tendinum classifications.
The juncturae are classified into three primary types based on their morphology and location:
Type 1 (Thin Filamentous Type):
Found predominantly between the EDC tendons of the long (EDC m) and index (EDC i) fingers. Notably, these juncturae do not connect to the EIP tendon. They are present in the second and third intermetacarpal spaces.
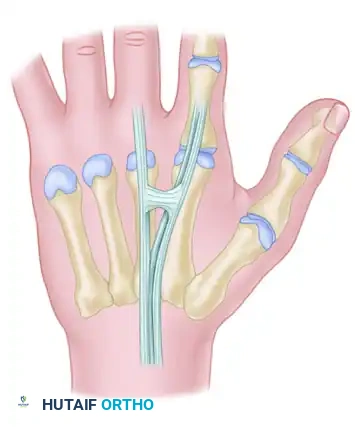
Type 2 (Thicker Type):
These are thicker, more robust connections found between the EDC tendons of the ring (EDC r) and long (EDC m) fingers. They are located exclusively in the third and fourth intermetacarpal spaces.

Type 3 (Subtype y):
In this variation, a Y-shaped tendon and juncturae appear as a split tendon inserting into two adjacent digits. This is most commonly seen between the EDC tendons of the ring (EDC r) and long (EDC m) fingers.
Type 3 (Subtype r):
This is a more oblique, R-shaped junctura between the EDC to the ring finger (EDC r) and the most radial of the three EDQ tendons to the small finger.
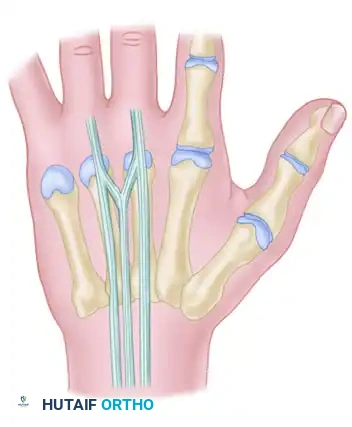
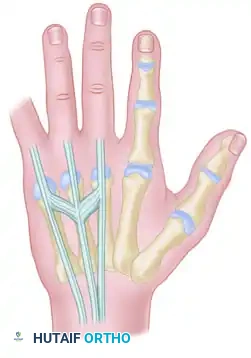
Additional anatomical variations and interconnections of the dorsal extensor mechanism are illustrated below, highlighting the complexity surgeons must navigate during dorsal hand reconstruction:
CLINICAL EVALUATION AND DIAGNOSTIC PEARLS
Accurate clinical evaluation of extensor tendon injuries requires isolating specific tendon functions. The presence of the juncturae tendinum and intrinsic muscle contributions can easily deceive an unwary examiner.
The Masking Effect of Juncturae Tendinum
Clinical Pearl: When a single extensor tendon is divided at the wrist or proximal dorsum, partial or even complete extension of the finger may still be possible. This occurs because the intact adjacent tendons transmit extensor forces through the accessory communicating tendons (juncturae tendinum).
Conversely, when the extensor tendon is divided just proximal to the metacarpophalangeal joint (distal to the juncturae), the two distal finger joints can still be extended by the lateral bands and their connecting transverse fibers (driven by the intrinsic muscles), but active extension of the metacarpophalangeal joint will be incomplete or absent.
Evaluating the Extensor Pollicis Longus (EPL)
The EPL is frequently ruptured following distal radius fractures (attrition rupture) or lacerated in dorsal wrist trauma. Testing it requires strict isolation.
Diagnostic Pitfall: Division of the EPL tendon is often overlooked because an intact short thumb extensor (EPB) can actively extend the thumb as a unit. Furthermore, while the EPB cannot extend the interphalangeal (IP) joint alone, the thumb intrinsic muscles (specifically the abductor pollicis brevis and adductor pollicis) assist with IP extension in some patients.
Proper EPL Testing Technique:
When checking the long extensor tendon of the thumb, the examiner must stabilize the metacarpophalangeal joint in neutral. The examiner must then test carefully for:
1. Active extension of the interphalangeal joint.
2. Active retropulsion of the thumb (lifting the thumb off the table with the palm resting flat).
SURGICAL TECHNIQUE: EXTENSOR TENDON REPAIR & TENODESIS
Surgical intervention is indicated for complete lacerations, ruptures, or severe attritional thinning of the extensor tendons. While primary end-to-end repair (using a modified Kessler or Krackow technique) is the gold standard for acute lacerations, chronic ruptures or specific reconstructive scenarios require advanced techniques such as tenodesis.
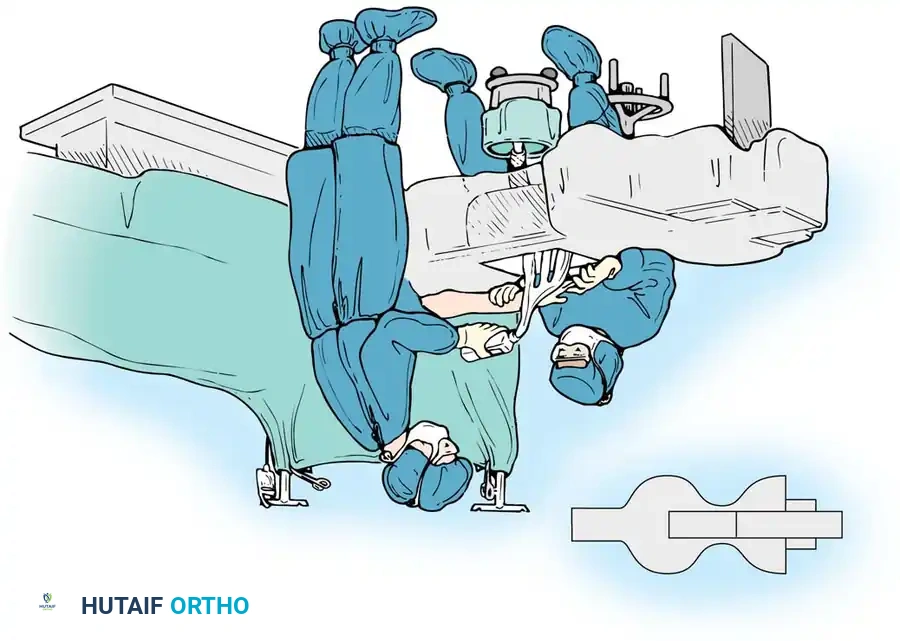
Preoperative Preparation and Positioning
- Anesthesia: Regional block (axillary or supraclavicular) or general anesthesia. Wide-awake local anesthesia no tourniquet (WALANT) is increasingly popular for extensor tendon repairs to allow intraoperative active motion testing.
- Positioning: Supine with the arm on a radiolucent hand table. A pneumatic tourniquet is applied to the upper arm (unless utilizing WALANT).
- Preparation: Standard surgical prep and drape, ensuring the entire hand and forearm are exposed.
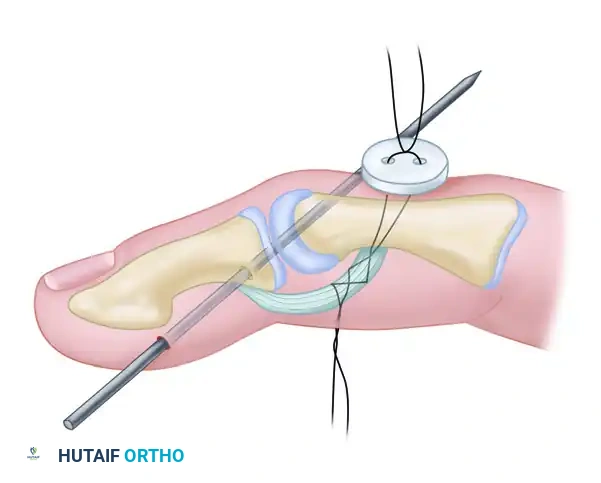
Technique of Tenodesis (Button and Pull-Out Wire)
When anchoring an extensor tendon to bone (e.g., distal phalanx avulsions, mallet finger reconstructions, or specific central slip repairs), a robust fixation method is required. The pull-out wire technique combined with Kirschner wire (K-wire) stabilization provides excellent biomechanical rigidity.
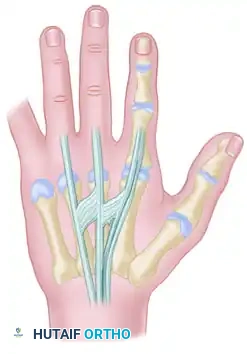
Surgical diagram illustrating the trajectory of tendon repair and the complex interplay of the dorsal apparatus during fixation.
Step-by-Step Surgical Protocol:
- Joint Stabilization:
Begin by reducing the joint to the desired anatomical position (usually full extension for mallet injuries or neutral for central slip repairs). Drive a smooth Kirschner wire (typically 0.035 or 0.045 inch) across the joint to neutralize deforming forces. The Kirschner wire is cut off beneath the skin at the points indicated by the surgical plan to prevent pin tract infections. - Bone Preparation:
Create a small cortical window or drill holes at the anatomical insertion footprint of the tendon using a micro-burr or fine drill bit. - Tendon Preparation (Bunnell Suture):
A pull-out technique using the Bunnell retrograde or the antegrade technique is usually required. Weave a heavy non-absorbable suture (or stainless steel wire, depending on surgeon preference and chronicity) through the distal stump of the tendon. - Passing the Suture:
With straight needles, thread the ends of the wires through the prepared bony holes. This action leads the tendon directly into the cortical opening. - Dorsal Button Fixation:
Pass the needles through the dorsum of the finger. Tie the sutures securely through a sterile surgical button over the middle or distal phalanx (depending on the zone of injury). The button distributes the pressure, preventing skin necrosis. - Pull-Out Wire Routing:
Bring the Bunnell pull-out wire through the volar surface of the finger. This allows for easy removal of the construct once bony healing or robust fibrous union has occurred. - Wound Closure:
Irrigate the wound copiously. Close the skin with 5-0 nylon in a simple interrupted or horizontal mattress fashion. Ensure the paratenon is approximated if possible to prevent skin adherence to the tendon.
POSTOPERATIVE CARE AND REHABILITATION
The success of an extensor tendon repair is equally dependent on the surgical execution and the postoperative rehabilitation protocol. Extensor tendons are highly prone to adhesions, which can severely limit digital flexion, while overly aggressive therapy can stretch the repair, leading to an extensor lag.
Immediate Postoperative Phase (0-3 Weeks)
- Dressing and Splinting: Apply a bulky, non-compressive bandage immediately post-surgery. Although external splinting is sometimes deemed unnecessary in rigid tenodesis, a small volar splint is highly recommended. It provides excellent protection from postoperative bumping, accidental trauma, and pain.
- Suture Removal: The splint is temporarily removed for wound checks, and skin sutures are removed at 10 to 14 days.
- Motion: Active motion of the uninvolved fingers is encouraged immediately to prevent global hand stiffness and promote tendon gliding through the juncturae tendinum.
Intermediate Phase (3-6 Weeks)
- Hardware Removal: The pull-out wire suture is removed at 3 weeks. This is done in the clinic by cutting the dorsal button sutures and pulling the volar wire.
- K-Wire Removal: The transarticular Kirschner wire is removed at 5 or 6 weeks, once sufficient tendon-to-bone healing has occurred.
- Therapy: Once the K-wire is removed, active range of motion (AROM) of the involved joint is initiated. Flexion is introduced gradually to avoid stretching the repair.
Late Phase (6+ Weeks)
- Strengthening: Heavy resistance activities and forceful gripping are strictly prohibited early on and are not begun for 6 to 8 weeks.
- Complication Management: If an extensor lag develops, nighttime extension splinting is reinstituted. If severe adhesions limit flexion, dynamic flexion splinting may be required after the 8-week mark.
CONCLUSION
The surgical management of extensor tendon injuries demands a profound respect for the dorsal anatomy of the hand. Surgeons must be acutely aware of the six dorsal compartments, the highly variable nature of the EIP and EDC tendons, and the deceptive masking effect
You Might Also Like