Mastering Monteggia Fracture-Dislocations in Adults: An Intraoperative Guide
Key Takeaway
This masterclass provides an exhaustive, real-time surgical guide for Monteggia fracture-dislocations in adults. We delve into intricate anatomy, meticulous preoperative planning, and granular intraoperative execution, from initial incision to definitive hardware application. Fellows will learn critical pearls, pitfalls, and advanced techniques for managing both ulnar and radial head injuries, ensuring optimal functional outcomes and comprehensive postoperative care protocols.
Welcome, colleagues, to the operating theater. Today, we are tackling a Monteggia fracture-dislocation in an adult patient—a complex, high-energy injury pattern that severely disrupts the structural integrity of the forearm axis and demands absolute surgical precision. This is not merely a diaphyseal ulna fracture; it is a critical fracture-dislocation of the radiocapitellar joint. If this dual-lesion pathology is not recognized and addressed anatomically, it will inexorably lead to devastating long-term disability, including chronic elbow instability, post-traumatic radiocapitellar arthrosis, and profound losses in forearm rotation.
The successful management of an adult Monteggia lesion requires a masterful understanding of elbow biomechanics, meticulous preoperative templating, and flawless execution of rigid internal fixation. Let us delve deeply into the evidence-based principles and advanced surgical techniques required to master this challenging clinical entity.
Comprehensive Introduction and Patho-Epidemiology
The term "Monteggia lesion" was originally coined by Bado to describe any fracture of the ulna associated with a dislocation of the radiocapitellar joint. Historically, the Italian surgeon Giovanni Battista Monteggia first reported this injury pattern in 1814, describing an ulnar shaft fracture coupled with an anterior dislocation of the radial head. While pediatric Monteggia lesions can occasionally be managed with closed reduction and casting due to the robust remodeling potential of the pediatric skeleton, the adult Monteggia fracture-dislocation is an entirely different beast. In adults, this is an absolute surgical indication, as the forces required to disrupt the radiocapitellar joint and fracture the ulnar diaphysis invariably result in massive soft tissue disruption and inherent bony instability.
The Bado classification remains the foundational framework for understanding these injuries, categorized by the direction of the radial head dislocation. Type I (anterior dislocation with anterior ulnar angulation) is the most classical presentation, often resulting from a direct blow to the posterior forearm or a hyperpronation injury. Type II (posterior or posterolateral dislocation with posterior ulnar angulation) is the most common variant seen in adults, typically resulting from an axial load on a slightly flexed elbow. Jupiter profoundly enhanced our understanding of Type II lesions by subclassifying them based on the anatomical location of the ulnar fracture (IIA involving the coronoid, IIB at the metaphyseal-diaphyseal junction, IIC diaphyseal, and IID comminuted). Type III (lateral dislocation) and Type IV (anterior dislocation with concomitant radial shaft fracture) represent higher-energy variants with significant soft tissue stripping.
Beyond the classic Bado types, orthopedic surgeons must maintain a high index of suspicion for "Monteggia equivalents." These are complex injury patterns that share the same pathomechanical disruption of the forearm axis but may present atypically. Examples include an ulnar diaphyseal fracture associated with a radial neck fracture (instead of a dislocation), or a proximal ulnar fracture with a pulled elbow syndrome. The unifying principle across all true Monteggia lesions and their equivalents is that the ulna dictates the length and alignment of the forearm; if the ulnar anatomy is not perfectly restored, the radiocapitellar joint cannot be stably reduced.
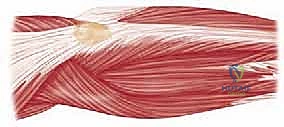
Detailed Surgical Anatomy and Biomechanics
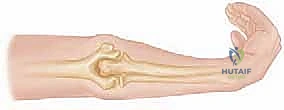
To master the surgical reconstruction of a Monteggia lesion, one must possess an intimate understanding of the osseous and ligamentous anatomy of the forearm. The forearm functions biomechanically as a complex joint ring, analogous to the pelvis. The ulna serves as the straight, stable axis around which the laterally bowed radius rotates during pronation and supination. The proximal radioulnar joint (PRUJ) and the distal radioulnar joint (DRUJ) are mechanically linked by the interosseous membrane (IOM). A disruption in the length, alignment, or rotation of the ulna directly translates to a mechanical incongruity at the PRUJ or radiocapitellar joint.
The most critical, yet frequently overlooked, anatomical landmark in the proximal ulna is the Proximal Ulnar Dorsal Angulation (PUDA). The proximal ulna is not perfectly straight; it possesses a subtle dorsal bow, typically measuring between 4 and 7 degrees, located approximately 4 to 5 centimeters distal to the tip of the olecranon. In Bado Type II (posterior) Monteggia fractures, this dorsal bow is frequently flattened or reversed. If the surgeon utilizes a perfectly straight dynamic compression plate and fails to contour it to recreate the native PUDA, the proximal ulnar fragment will be forced into extension. This iatrogenic malreduction acts as a lever, continuously subluxating or dislocating the radial head posteriorly. Recognizing and restoring the PUDA is the biomechanical imperative of Monteggia surgery.
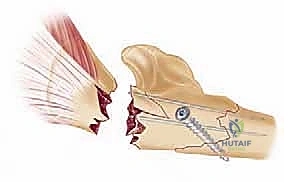
The stability of the radiocapitellar joint relies on both primary and secondary stabilizers. The primary stabilizer is the annular ligament, which acts as a sling holding the radial head in the lesser sigmoid notch of the ulna. Secondary stabilizers include the quadrate ligament, the lateral ulnar collateral ligament (LUCL), and the radiocapitellar articular congruity itself. In a Monteggia lesion, the annular ligament is frequently torn, avulsed, or interposed within the joint. However, extensive clinical experience has proven that if the ulnar length and alignment are perfectly restored, the radial head will typically reduce spontaneously and remain stable, even without direct repair of the annular ligament.
Neurovascular anatomy dictates our surgical approach and dictates our complication profile. The posterior interosseous nerve (PIN), a deep branch of the radial nerve, wraps around the radial neck within the substance of the supinator muscle. It is at extreme risk during anterior or lateral radial head dislocations (Bado Types I and III) due to traction or direct contusion. Medially, the ulnar nerve runs posterior to the medial epicondyle and enters the forearm between the two heads of the flexor carpi ulnaris (FCU). Our surgical approaches must meticulously respect these neurovascular boundaries to prevent iatrogenic catastrophic deficits.
Exhaustive Indications and Contraindications
In the adult population, the diagnosis of a Monteggia fracture-dislocation is virtually synonymous with the necessity for operative intervention. Closed management in adults universally leads to loss of reduction, chronic radial head dislocation, severe restriction in forearm rotation, and early-onset osteoarthritis. The goals of surgery are absolute: rigid anatomic fixation of the ulna, concentric and stable reduction of the radiocapitellar joint, and early mobilization to prevent debilitating elbow stiffness.
While surgery is the gold standard, the timing and specific surgical strategy must be tailored to the patient's physiologic status and the local soft tissue envelope. Open fractures, compartment syndrome, or acute vascular compromise necessitate emergent surgical intervention. Conversely, closed injuries with massive soft tissue swelling or fracture blisters may require a brief period of spanning external fixation or strict elevation before definitive internal fixation can be safely performed.
Below is a comprehensive breakdown of the indications and contraindications for the operative management of adult Monteggia lesions.
| Clinical Scenario | Status | Rationale and Management Strategy |
|---|---|---|
| Acute Closed Monteggia (Adult) | Absolute Indication | Non-operative management fails in adults. Requires ORIF of the ulna to restore length/alignment and reduce the radial head. |
| Open Monteggia Fracture | Absolute Indication | Requires emergent irrigation, debridement, and stabilization (internal or external depending on contamination/soft tissue). |
| Associated Vascular Injury | Absolute Indication | Emergent exploration. Shunting or repair of the brachial/radial artery followed by rigid skeletal stabilization. |
| Acute Compartment Syndrome | Absolute Indication | Emergent fasciotomies of the forearm (volar and dorsal) combined with skeletal stabilization. |
| Severe Soft Tissue Compromise | Relative Contraindication | Delay definitive ORIF. Utilize a spanning external fixator across the elbow until soft tissues permit safe surgical incisions. |
| Medically Unstable Patient | Absolute Contraindication | Life over limb. Delay orthopedic intervention until the patient is hemodynamically stable and cleared by critical care. |
Pre-Operative Planning, Templating, and Patient Positioning
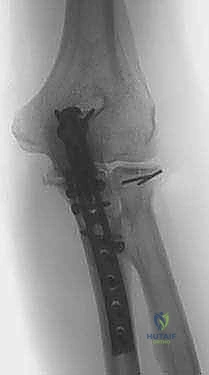
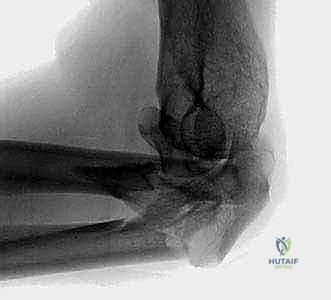
Flawless execution in the operating room begins days before the incision is made, rooted in meticulous preoperative planning. The initial diagnostic cornerstone is high-quality, orthogonal plain radiography. We require true anteroposterior (AP) and lateral views of the elbow, as well as full-length views of the forearm and wrist. The most critical radiographic metric is the radiocapitellar line. Drawn through the center of the radial shaft and radial head, this line must bisect the capitellum in every single radiographic view (AP, lateral, and oblique). If it does not, the radial head is subluxated or dislocated.
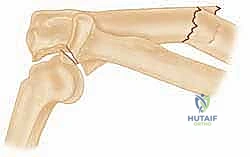
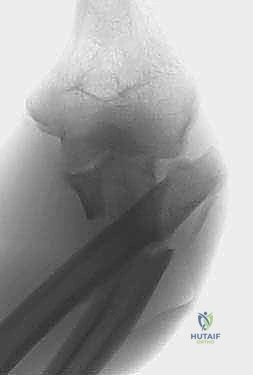
FIG 1 • Plain AP radiograph typically demonstrates the ulnar fracture pattern and the radiocapitellar relationship.
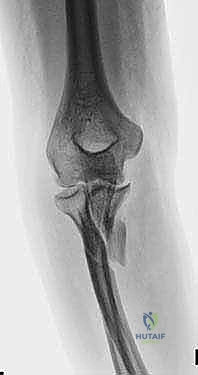
FIG 1 • Plain lateral radiograph is critical for assessing the direction of radial head dislocation and ulnar apex angulation.
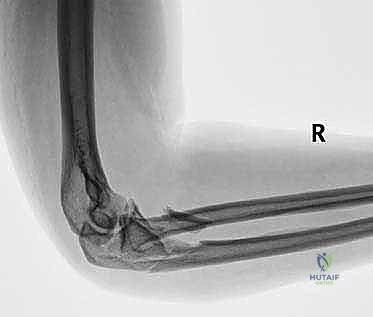
FIG 1 • Plain oblique radiograph can help identify subtle coronoid or radial head fractures.
For virtually all adult Monteggia lesions, a preoperative Computed Tomography (CT) scan is mandatory. Plain radiographs invariably underestimate the degree of comminution, particularly at the coronoid base (Jupiter Type IIA) and the radial head. Three-dimensional (3D) CT reconstructions allow the surgeon to virtually manipulate the fracture fragments, understand the specific morphology of the ulnar fracture, and select the appropriate implants. Preoperative templating involves selecting a plate of adequate length—biomechanical principles dictate that we need a minimum of three, preferably four, bicortical screws in both the proximal and distal intact ulnar segments to withstand the massive deforming forces of the forearm musculature.
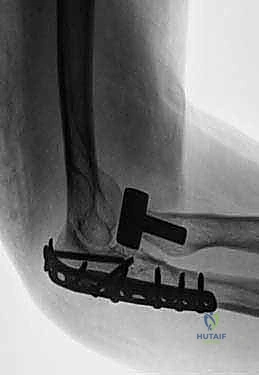
Equipment preparation must account for all contingencies. The standard implant is a 3.5mm limited contact dynamic compression plate (LC-DCP) or an anatomically pre-contoured proximal ulna locking plate. If the radial head is fractured, the surgeon must have a mini-fragment set (1.5mm/2.0mm/2.4mm) available for open reduction and internal fixation (ORIF). Furthermore, a modular radial head arthroplasty system must be in the room and sterilized; if the radial head is deemed unreconstructable (e.g., more than 3 fragments, severe osteopenia), immediate replacement is required to restore the lateral column strut.
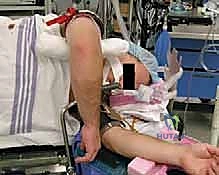
FIG 2 • Lateral decubitus positioning is highly preferred, allowing gravity to assist with reduction and providing unhindered access to the posterior elbow.
Patient positioning is critical for surgical efficiency and intraoperative fluoroscopy. We strongly advocate for the lateral decubitus position. The patient is placed on a beanbag, and the operative arm is draped over a well-padded L-bar or a dedicated arm positioner. This position allows gravity to assist in reducing posterior subluxations, provides excellent, unhindered access to the posterior aspect of the elbow and the entire ulnar shaft, and allows the C-arm to be brought in parallel to the floor for effortless AP and lateral imaging without constantly repositioning the patient's arm. A sterile tourniquet is applied high on the brachium to ensure a bloodless field during the critical phases of deep dissection and nerve identification.
Step-by-Step Surgical Approach and Fixation Technique
Incision and Superficial Dissection
The surgical approach must be extensile, safe, and provide simultaneous access to both the ulnar diaphysis and the radiocapitellar joint. The posterior midline approach is the workhorse for this pathology. We begin by identifying the tip of the olecranon. A longitudinal incision is made slightly lateral to the tip of the olecranon to prevent the final scar from resting directly over the bony prominence, which can cause severe postoperative discomfort when the patient rests their elbow on a table. The incision is extended distally along the subcutaneous border of the ulna as far as necessary to bypass the fracture by at least four screw holes.
TECH FIG 1 • Posterior midline incision positioned just off the lateral aspect of the olecranon to avoid painful scar adherence.
Full-thickness fasciocutaneous flaps are elevated medially and laterally. It is critical to maintain the subcutaneous tissue on the deep fascia to preserve the vascularity of the skin flaps. Medially, the dissection stops at the fascia of the flexor carpi ulnaris (FCU). Laterally, the dissection exposes the anconeus and the extensor carpi ulnaris (ECU). Care must be taken not to aggressively undermine the medial flap to avoid injuring the medial antebrachial cutaneous nerve.
Deep Dissection and Internervous Planes
The deep dissection utilizes the true internervous plane of the proximal forearm. We incise the deep fascia precisely along the subcutaneous border of the ulna. The interval is developed between the FCU (innervated by the ulnar nerve) medially and the anconeus/ECU complex (innervated by the posterior interosseous nerve) laterally.
TECH FIG 2 • Developing the internervous plane between the FCU and the Anconeus/ECU complex.
Using a Cobb elevator and sharp dissection, the anconeus and ECU are elevated subperiosteally off the lateral face of the ulna. This lateral reflection exposes the supinator muscle. If access to the radial head is required (for a concomitant fracture or an irreducible dislocation), the Kocher interval (between the anconeus and ECU) can be utilized proximally, or the supinator can be carefully elevated off the ulna and reflected laterally. When elevating the supinator, the surgeon must stay strictly subperiosteal to protect the PIN, which lies within the muscle belly.
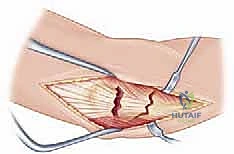
TECH FIG 3 • Wide exposure of the ulnar fracture site, demonstrating the massive soft tissue disruption typical of these injuries.
Ulnar Reduction and Fixation Strategy
The crux of the operation is the anatomic reduction of the ulna. The ulna must be perfectly restored in length, rotation, and angular alignment. For simple fracture patterns (transverse or short oblique), the fracture ends are meticulously cleaned of hematoma and interposed periosteum using a curette. Pointed reduction forceps are applied to achieve provisional reduction. The surgeon must carefully read the cortical interdigitations to ensure perfect rotational alignment.
TECH FIG 4 • Provisional reduction of the ulnar diaphysis using pointed reduction forceps, restoring the critical ulnar length.
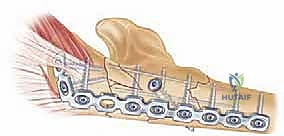
Once provisional reduction is achieved, a 3.5mm LC-DCP or a pre-contoured proximal ulnar plate is applied to the dorsal or lateral surface of the ulna. If a straight plate is used for a proximal third fracture, it must be under-contoured slightly using plate benders to recreate the Proximal Ulnar Dorsal Angulation (PUDA). Failure to do so will result in apex-anterior angulation of the ulna and persistent posterior subluxation of the radial head.
TECH FIG 5 • Application of a robust 3.5mm plate. Note the contouring to match the native anatomy of the proximal ulna.
For comminuted fractures (Jupiter Type IID), anatomic reduction of every fragment is often impossible and attempting it will strip the crucial periosteal blood supply, leading to nonunion. In these cases, we employ bridge plating techniques. The plate is secured to the intact proximal and distal segments, spanning the zone of comminution. Ulnar length is restored by applying manual traction and referencing the reduction of the radial head on fluoroscopy. If the radial head is perfectly reduced, the ulnar length is correct.
TECH FIG 6 • Drilling and screw insertion. Biomechanical stability requires a minimum of 3-4 bicortical screws per main fragment.
TECH FIG 7 • Sequential screw placement, utilizing compression techniques for simple fracture patterns to ensure primary bone healing.
TECH FIG 8 • Final tightening of the construct. The rigidity of this fixation is paramount for allowing early postoperative mobilization.
Assessing and Managing the Radiocapitellar Joint
After the ulna is rigidly fixed, attention is immediately turned to the radiocapitellar joint. In the vast majority of cases, once the ulnar length and alignment are anatomically restored, the radial head will spontaneously reduce. The elbow must be taken through a full range of motion (flexion, extension, pronation, supination) under live fluoroscopy. The radiocapitellar line must remain perfectly aligned in all planes.
TECH FIG 9 • Intraoperative fluoroscopy confirming anatomic reduction of the ulna and spontaneous, concentric reduction of the radial head.
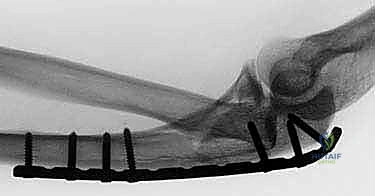
TECH FIG 10 • Lateral fluoroscopic view confirming the radiocapitellar line bisects the capitellum, verifying joint stability.
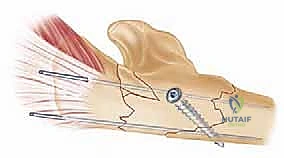
If the radial head remains dislocated or subluxated after ulnar fixation, the surgeon must not accept it. The most common cause of persistent dislocation is a subtle malreduction of the ulna (usually a failure to restore the PUDA or a slight rotational malalignment). The ulnar fixation must be critically re-evaluated and revised if necessary. If the ulna is perfectly reduced and the radial head remains out, there is likely a mechanical block to reduction. This requires opening the radiocapitellar joint via the Kocher interval. The offending structure is typically an infolded annular ligament, a trapped osteochondral fragment from the capitellum, or the capsule itself. The joint is cleared, the radial head is reduced, and the annular ligament is repaired if possible. If the radial head is fractured and preventing stable reduction, it must be addressed via ORIF or arthroplasty.
TECH FIG 11 • Meticulous layered closure over a suction drain, followed by the application of a well-padded posterior splint.
Complications, Incidence Rates, and Salvage Management
Despite meticulous surgical technique, Monteggia fracture-dislocations are fraught with potential complications. The high-energy nature of the injury, combined with the complex biomechanics of the forearm, makes these lesions unforgiving. Anticipating these complications and understanding the salvage pathways is a hallmark of a master surgeon.
Neurologic injury is the most common acute complication. Posterior Interosseous Nerve (PIN) palsy is classically associated with Bado Type I and Type III lesions due to the massive stretch placed on the nerve as the radial head dislocates anteriorly or laterally. Fortunately, the vast majority of these are neurapraxias. If the nerve was functioning preoperatively and is out postoperatively, it is typically a traction injury from retractors and will recover. If a PIN palsy is present preoperatively, the nerve should be explored during the approach to ensure it is not incarcerated in the radiocapitellar joint.
Ulnar nonunion is a catastrophic complication that inevitably leads to failure of the radiocapitellar joint. It is usually the result of inadequate mechanical fixation (using a plate that is too short or too thin) or excessive biological stripping of comminuted fragments. Management requires revision surgery with radical debridement of the nonunion site, application of a larger, more robust plate (often a 4.5mm system or dual plating), and generous application of autologous iliac crest bone graft.
| Complication | Estimated Incidence | Pathoetiology and Management Strategy |
|---|---|---|
| PIN Palsy | 10 - 15% | Typically neurapraxia from traction. Observe for 3-6 months. Explore if no clinical/EMG recovery by 6 months. |
| Ulnar Nonunion | 5 - 10% | Inadequate fixation or biologic stripping. Requires revision rigid plating and autologous bone grafting. |
| Chronic Radial Head Dislocation | 5 - 20% | Caused by ulnar malreduction (missed PUDA). Salvage requires ulnar osteotomy to restore length/bow, +/- annular ligament reconstruction. |
| Radioulnar Synostosis | 2 - 5% | High-energy trauma, crossing surgical planes (Boyd approach). Requires delayed excision (at 6-12 months) and interposition grafting. |
| Hardware Prominence | 20 - 30% | Subcutaneous nature of the ulna. Treated with symptomatic hardware removal after confirmed radiographic union (typically >18 months). |
Chronic radial head dislocation is the most difficult complication to salvage. It is almost always secondary to a malunited ulna. The patient presents with a progressive loss of elbow flexion and severe pain. The salvage procedure is technically demanding: it requires an opening wedge or lengthening osteotomy of the proximal ulna to recreate the normal anatomy, followed by open reduction of the radial head. Often, the annular ligament is completely incompetent by this stage and requires reconstruction using a slip of the triceps tendon or a palmaris longus autograft. In older, lower-demand patients with severe radiocapitellar arthritis resulting from the chronic dislocation, radial head excision may be the most pragmatic salvage option.
Phased Post-Operative Rehabilitation Protocols
The ultimate functional outcome of a Monteggia fracture-dislocation is dictated just as much by the postoperative rehabilitation as it is by the surgical fixation. The guiding principle of rehabilitation is that the elbow is highly prone to profound stiffness, and prolonged immobilization is strictly contraindicated. The rigidity of our internal fixation must be sufficient to allow for early, controlled motion.
Phase I: Immediate Postoperative Period (0 - 2 Weeks)
Immediately following surgery, the arm is placed in a bulky, well-padded posterior splint with the elbow at 90 degrees of flexion and the forearm in neutral rotation. This allows the acute surgical inflammation to subside and protects the soft tissue envelope. However, this immobilization is brief. Within 3 to 5 days, the patient is seen in the clinic, the splint is removed, and a hinged elbow brace is applied. Active and active
Clinical & Radiographic Imaging Archive

