Mastering the Inside-Out Meniscal Repair: A Comprehensive Surgical Guide
Key Takeaway
The inside-out meniscal repair technique remains the gold standard for addressing complex, peripheral, and posterior horn meniscal tears. This approach provides superior biomechanical fixation through stacked vertical mattress sutures while minimizing iatrogenic neurovascular injury via dedicated posterior safety incisions. Proper execution requires meticulous tear preparation, precise cannula trajectory, and rigorous adherence to zone-specific anatomical safe zones during needle passage to ensure optimal healing and restoration of meniscal hoop stresses.
INTRODUCTION AND BIOMECHANICAL RATIONALE
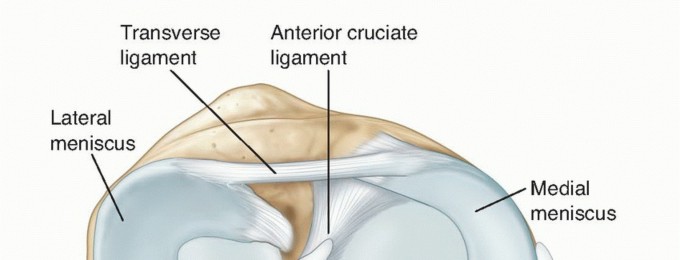
The preservation of meniscal tissue is a paramount objective in contemporary orthopaedic surgery. The menisci play a critical role in load transmission, shock absorption, joint stability, and articular cartilage nutrition. Loss of meniscal integrity inevitably alters the contact mechanics of the tibiofemoral joint, exponentially increasing peak contact stresses and predisposing the knee to early-onset osteoarthritis.
Among the various techniques available, the Inside-to-Outside (Inside-Out) Technique remains the gold standard for meniscal repair, particularly for tears involving the posterior and middle thirds of both the medial and lateral menisci. This technique allows for the precise placement of multiple, biomechanically superior vertical mattress sutures. Because the primary collagen bundles of the meniscus are oriented circumferentially, vertical mattress sutures capture these fibers perpendicularly, providing the highest pull-out strength and effectively restoring the physiological "hoop stresses" required for normal meniscal function.
💡 Clinical Pearl: The Gold Standard
While all-inside devices have gained popularity for their convenience, the inside-out technique remains the most versatile and biomechanically robust method, especially for large bucket-handle tears, complex multi-planar tears, and tears extending into the posterior horn where all-inside devices may risk neurovascular impingement or inadequate tissue capture.
PREOPERATIVE SETUP AND DIAGNOSTIC ARTHROSCOPY
Meticulous preoperative planning and patient positioning are essential for a successful inside-out meniscal repair.
- Anesthesia and Positioning: The procedure is typically performed under general or regional anesthesia. A well-padded high-thigh tourniquet is applied.
- Leg Holder Application: It is mandatory to have a rigid leg holder in place. This allows the surgeon to apply sustained valgus stress (for the medial compartment) or varus stress (for the lateral compartment), effectively opening the joint space to make viewing and instrumentation of the peripheral meniscus possible.
- Diagnostic Arthroscopy: Perform a systematic and complete diagnostic arthroscopy. Thoroughly probe the meniscal lesion to assess its pattern, length, chronicity, and reducibility. Ensure that no additional, irreparable meniscal damage is present that might necessitate a partial meniscectomy instead.
- Tourniquet Inflation: Once a repairable lesion is confirmed, exsanguinate the extremity and inflate the tourniquet to provide a bloodless surgical field, which is critical for visualizing the posterior compartments and performing the open safety incisions.
MENISCAL TEAR PREPARATION
The biological healing potential of a meniscal tear is heavily dependent on the vascularity of the tear zone and the preparation of the tear edges. The meniscus receives its blood supply from the peripheral genicular arteries, creating a vascular "red-red" zone at the periphery, a transitional "red-white" zone, and an avascular "white-white" central zone.
Acute Tears in the Vascular Zone
If the tear is acute and located strictly within the highly vascular red-red zone of the periphery, minimal preparation of the rim is required before suturing.
⚠️ Surgical Warning: Avoid Over-Resection
If the tear is clearly within the vascular red zone, do not resect the meniscal tissue peripheral to the tear. Resection of this peripheral material decompresses the meniscus from the capsular side, effectively narrowing the meniscus and producing biomechanical detriments similar to those of a partial meniscectomy.
Chronic or Transitional Zone Tears
If the tear is chronic or extends into the red-white zone, the torn surfaces must be meticulously freshened and débrided to stimulate a healing response.
- Débridement Limits: Limit the excision to no more than 0.5 mm of meniscal tissue if possible. The goal is to remove fibrotic, avascular tissue without compromising the structural width of the meniscus.
- Instrumentation: This preparation can be accomplished using arthroscopic basket forceps, motorized shavers, curved meniscal knives, or small angled rasps.
- Technique: Introduce the instruments through the anteromedial, accessory medial, or posteromedial portals while viewing the tear through the anterolateral portal.
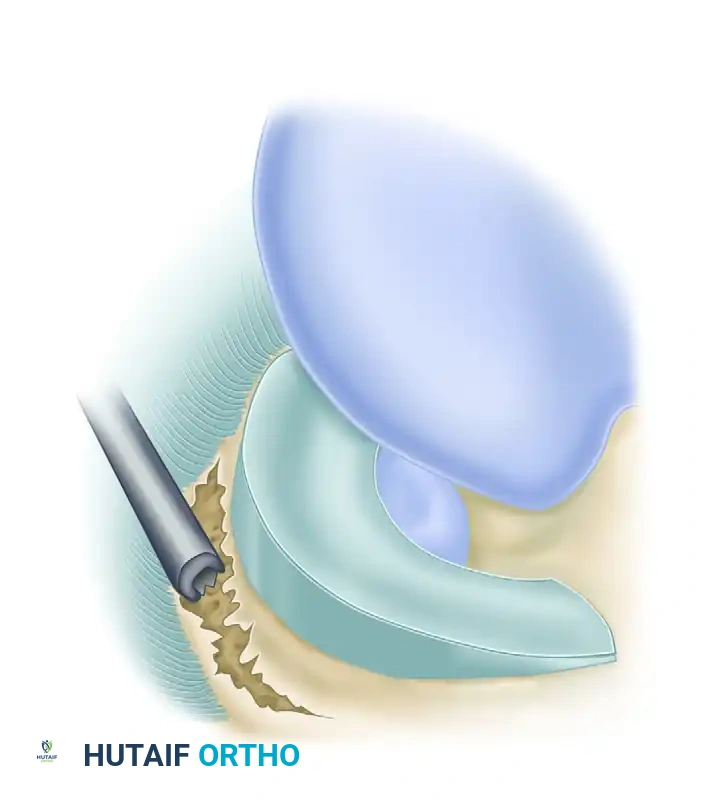
Preparation of a meniscocapsular tear of the medial meniscus. A small angled rasp is highly preferred for excoriating and abrading the meniscal surfaces and the superior and inferior parameniscal synovium to stimulate a vascular healing response.
MEDIAL MENISCUS REPAIR: SURGICAL TECHNIQUE
Repairing the medial meniscus via the inside-out technique requires a dedicated posteromedial safety incision to protect the neurovascular structures of the popliteal fossa.
The Posteromedial Safety Incision
- Incision: Make a 5- to 7-cm longitudinal incision over the posteromedial aspect of the knee. Dissect through the subcutaneous tissue down to the posteromedial corner.
- Interval Identification: Identify the interval between the medial head of the gastrocnemius and the posterior capsule of the joint.
- Retraction: Carefully retract the medial head of the gastrocnemius posteriorly, lifting it off the posterior capsule.
- Protection: Place a popliteal retractor (or a broad malleable retractor) into this interval. This step is non-negotiable; it protects the popliteal vessels from the advancing needles and aids the assistant in capturing the needles as they exit the capsule.
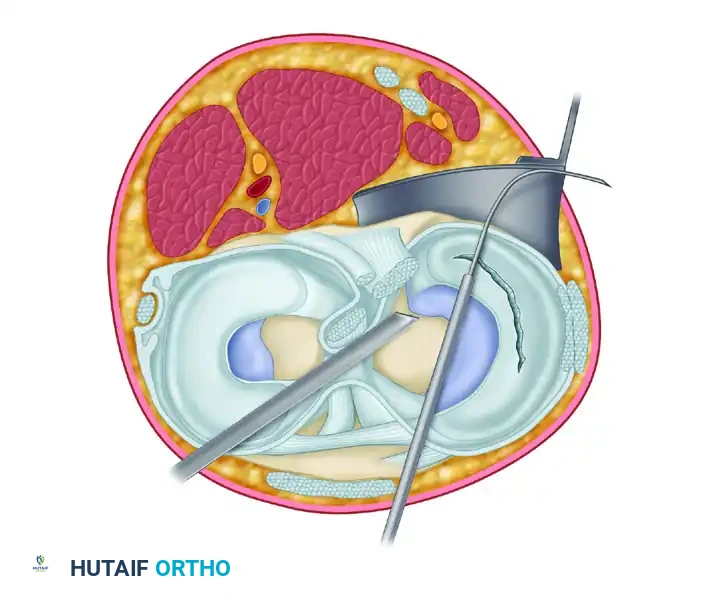
Top view of the joint demonstrating the complex posteromedial anatomy. Note the relationship of the Gracilis tendon, Semitendinosus tendon, Sartorius muscle, and Saphenous nerve. The popliteal retractor is positioned anterior to the medial head of the gastrocnemius and posterior to the capsule to safely capture the exiting needle.
Arthroscopic Needle Passage
Specific zone-dependent cannulas are utilized to achieve the optimal trajectory. The cannula must be positioned to angle the needle away from the posterior midline structures and perpendicular to the tear site.
- Cannula Insertion: Pass the cannula of the suturing instrumentation through the anterolateral portal (for posterior tears) or the contralateral portal, placing its tip near the posterior limit of the tear.
- Needle Advancement: Remove the needle cradle and have an assistant load the first needle. Pass the needle through the cannula to enter the meniscus 3 to 4 mm from the torn edge.
- Trajectory: Aim the needle in a slightly vertical direction so it exits at or above the center of the torn edge.

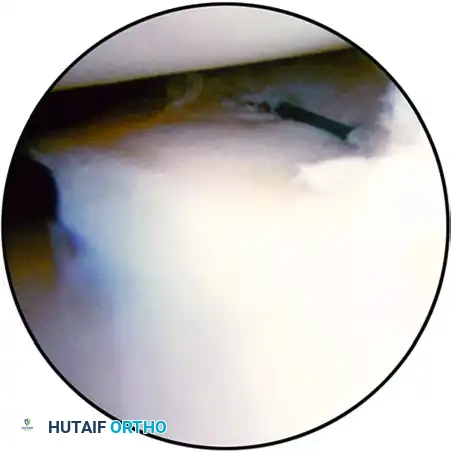
Arthroscopic view demonstrating the precise exit of the needle through the meniscal tissue. The needle is used as a "joystick" to anatomically reduce the meniscus before advancing it through the outer rim.
- Reduction and Capture: Observe the needle as it advances through the outer portion of the tear. Use the needle to align the meniscus anatomically. Once good positioning is confirmed, use the needle driver to advance the needle 1 cm further through the capsule until it is captured by the assistant in the posterior incision.
Portal selection is critical for trajectory. (A) The most posterior sutures are placed with the cannula in the ipsilateral portal. (B) Anterolateral and mid-medial sutures are inserted with the cannula through the contralateral portal to maintain a perpendicular approach to the tear.
Suture Configuration and Biomechanics
Pass the second needle to enter the meniscus or meniscosynovial junction peripheral to the first needle. The goal is to form a stacked vertical mattress or an oblique mattress suture.
- Joint Position: Pass the needles out through the capsule with the knee flexed 15 to 20 degrees. During this step, the assistant must actively retract the pes anserinus and the saphenous nerve posteriorly.
- Spacing: Vertical mattress sutures should be placed from both the femoral and tibial surfaces of the meniscus in an alternating fashion every 3 to 4 mm along the length of the tear.
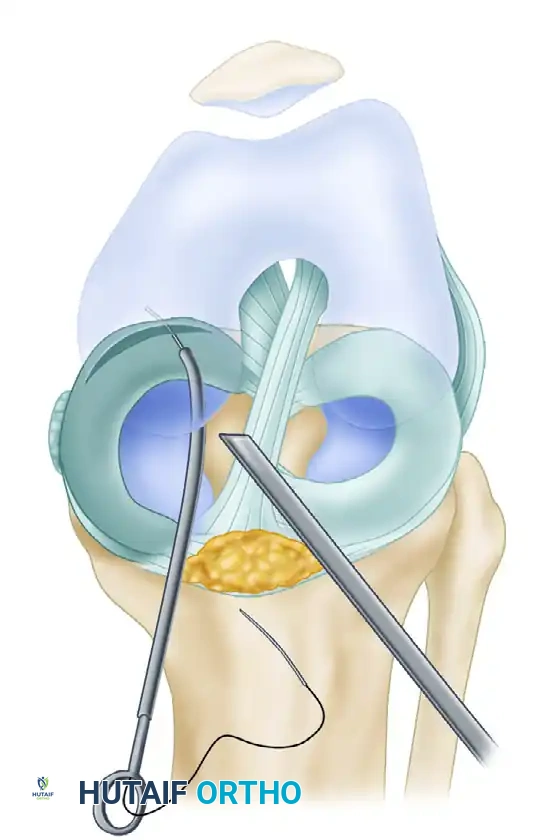
Meniscal repair demonstrating oblique mattress sutures, which are "stacked" to obtain the most secure biomechanical fixation. This configuration captures the circumferential collagen fibers, preventing suture pull-through.
💡 Clinical Pearl: Managing Bucket-Handle Tears
If it is difficult to maintain the reduction of a large, displaced bucket-handle tear, place the first mattress suture anteriorly (in the mid-body). This acts as a traction/reduction suture, holding the meniscus in its anatomical position while the subsequent, more technically demanding posterior sutures are passed.
Knot Tying and Capsular Management
If the tear involves mainly the middle third of the medial meniscus, make an incision over the medial joint line before pushing the initial needle through the capsule. Expose the capsule parallel to the peripheral tear throughout its length to prevent cutting the sutures during subsequent dissection.
Once all sutures are passed and clamped in pairs, tie them directly over the capsule. Crucially, the surgeon must arthroscopically view the meniscus as the knots are tied. This ensures that the tear site is anatomically reduced without puckering, overlapping, or deformation of the meniscal rim.
LATERAL MENISCUS REPAIR: SURGICAL TECHNIQUE
The lateral meniscus requires a distinct anatomical approach due to the proximity of the common peroneal nerve and the popliteus tendon.
The Posterolateral Safety Incision
- Knee Positioning: The safest position of the knee for suturing lateral meniscus tears is near 90 degrees of flexion. In this position, the common peroneal nerve drops more inferiorly and posteriorly, moving away from the joint line and the path of the needles.
- Incision: Make a 3- to 4-cm posterolateral skin incision. Extend it distally just anterior to the tip of the fibula, with two-thirds of the incision extending distal to the joint line.
- Interval Dissection: Develop the interval between the iliotibial (IT) band and the biceps femoris tendon. Retract the biceps posteriorly.
- Capsular Exposure: Use careful, blunt dissection to reflect the lateral head of the gastrocnemius off the posterior capsule. Place a hip skid or a broad needle deflector between the capsule and the gastrocnemius head.
Protecting Neurovascular Structures
If the posterior extent of the lateral tear approaches the midline (the meniscal root), the popliteal vessels must be explicitly protected. Place a wide metallic retractor between the vessels and the posterior capsule.
⚠️ Surgical Warning: The Peroneal Nerve
The common peroneal nerve lies slightly posterior to the posterior aspect of the biceps femoris tendon. Needles must always exit anterior to the biceps tendon. It is imperative to make the posterior skin incision and visually expose the area of the posterior capsule and peroneal nerve before bringing any sutures through the posterolateral capsule. Blind needle passage in this compartment carries an unacceptable risk of iatrogenic nerve injury.
SUTURE MATERIAL SELECTION
The choice of suture material in meniscal repair remains a topic of academic debate, balancing the need for prolonged tensile strength against the risks of articular abrasion.
- Absorbable Sutures (e.g., PDS): Some surgeons prefer long-lasting absorbable sutures, fearing that nonabsorbable knots left permanently could act as stress risers, cause abrasive wear to the femoral or tibial articular cartilage, or cause chronic inflammatory reactions.
- Nonabsorbable Sutures (e.g., FiberWire, Ethibond): Other surgeons argue that absorbable sutures may degrade before the avascular or slow-healing zones of the meniscus achieve biological union.
Evidence-Based Consensus: To date, high-level clinical studies have shown no significant deleterious effects or differences in failure rates between high-quality absorbable sutures with a long tensile life and nonabsorbable sutures. However, for larger, more centrally located tears (red-white or white-white zones) that require prolonged healing times, nonabsorbable sutures are generally preferred to maintain mechanical reduction until fibrocartilaginous scar tissue fully matures.
POSTOPERATIVE REHABILITATION PROTOCOL
Postoperative care must be meticulously tailored to protect the biological healing of the repaired meniscus while preventing arthrofibrosis. Management differs significantly depending on whether the repair was isolated or performed concomitantly with ligamentous reconstruction.
Isolated Meniscal Repair
There is no universally accepted, rigid protocol, but the following represents a standard, evidence-based approach:
- Immobilization: The extremity is placed in a hinged knee brace or immobilizer locked in extension for the first 7 to 10 days during ambulation.
- Range of Motion (ROM): Controlled ROM exercises (20 to 80 degrees) are initiated immediately, performed for 20 minutes, four times daily. Deep flexion (past 90 degrees) is avoided early on to prevent excessive posterior shear forces on the repair.
- Weight Bearing:
- Weeks 0-2: Touch-down weight bearing (TDWB) with crutches.
- Weeks 2-4: Progressive partial weight bearing.
- Weeks 4-6: Transition to full weight bearing as tolerated.
- Return to Activity: Light jogging is permitted at 3 months. Deep squatting, pivoting, and full return to competitive sports are restricted until 6 months postoperatively to allow complete biological maturation of the repair site.
Meniscal Repair with Concomitant ACL Reconstruction
When an inside-out meniscal repair is performed in conjunction with an Anterior Cruciate Ligament (ACL) reconstruction, the rehabilitation protocol is dictated primarily by the ACL graft.
- Hemarthrosis and Healing: The bone marrow elements released during ACL tunnel drilling create a nutrient-rich, hemarthrotic environment that significantly enhances meniscal healing rates.
- Protocol Adjustments: The knee is placed in full extension immediately postoperatively. Early, full range of motion is encouraged to prevent stiffness, which is a higher risk in combined procedures.
- Weight Bearing: Touch-down weight bearing on crutches is typically continued for the first 6 weeks to protect the meniscal repair, even though isolated ACL protocols might allow earlier weight bearing.
- Return to Sports: If a stable repair in the highly vascular red-red zone was achieved alongside a stable ACL reconstruction, patients may be cleared to return to sports at approximately 3 to 4 months, provided that complete return of neuromuscular function, strength, and proprioception has been objectively documented.
CONCLUSION
The inside-to-outside meniscal repair technique is a fundamental skill for the comprehensive orthopaedic surgeon. By combining meticulous arthroscopic tear preparation with precise, anatomically safe open posterior exposures, surgeons can achieve biomechanically superior fixation. Adherence to strict surgical principles—including the use of stacked vertical mattress sutures, protection of the popliteal and peroneal neurovascular bundles, and appropriate postoperative rehabilitation—ensures the highest probability of meniscal preservation and long-term joint health.
You Might Also Like