Mastering Posterior Cruciate Ligament Reconstruction: Patellar Tendon and Allograft Techniques
Key Takeaway
Posterior cruciate ligament (PCL) reconstruction demands meticulous surgical precision to restore knee biomechanics and stability. Utilizing bone-patellar tendon-bone (BPTB) or Achilles tendon allografts requires exact tunnel placement to avoid the "killer turn" effect and neurovascular compromise. This comprehensive guide details the step-by-step operative techniques, including posteromedial approaches, inside-out femoral tunneling, and biomechanically optimized graft fixation protocols essential for orthopedic surgeons managing complex ligamentous knee injuries.
INTRODUCTION TO POSTERIOR CRUCIATE LIGAMENT RECONSTRUCTION
Reconstruction of the posterior cruciate ligament (PCL) remains one of the most technically demanding procedures in orthopedic sports medicine. The PCL is the primary restraint to posterior tibial translation, and its disruption—often resulting from high-energy trauma or dashboard injuries—can lead to profound patellofemoral and medial compartment arthrosis if left untreated.
The utilization of a bone-patellar tendon-bone (BPTB) autograft or allograft, as well as Achilles tendon allografts, provides robust biomechanical constructs capable of withstanding the high tensile forces experienced by the native PCL. The surgical techniques pioneered by Sallay, McCarroll, and Harner emphasize precise anatomical tunnel placement, meticulous protection of the posterior neurovascular bundle, and rigid fixation to restore the native kinematics of the knee.
This comprehensive academic guide details the operative steps for transtibial PCL reconstruction, exploring both medial and lateral safety approaches, inside-out femoral tunneling, and the critical nuances of graft tensioning.
PREOPERATIVE PLANNING AND ARTHROSCOPIC PREPARATION
Successful PCL reconstruction begins with a thorough diagnostic arthroscopy to evaluate concurrent meniscal, chondral, or collateral ligament injuries.
Arthroscopic Debridement and Footprint Preservation
The initial step involves clearing the intercondylar notch. The surgeon must carefully identify the plane between the scarred PCL and the intact anterior cruciate ligament (ACL).
🔪 Surgical Pearl: Footprint Preservation
When excising the remnants of the ruptured PCL, it is imperative to preserve a minimal amount of native tissue at the femoral and tibial attachment sites. This preserved tissue serves as an invaluable anatomical landmark for the native footprint, ensuring accurate tunnel placement, and may also contribute to postoperative proprioception and graft vascularization.
SURGICAL APPROACHES FOR NEUROVASCULAR PROTECTION
Because the tibial insertion of the PCL lies in close proximity to the popliteal artery and neurovascular bundle, a safety incision is highly recommended. Many surgeons elect to make a small posteromedial or posterolateral incision to safely drill the tibial tunnel and facilitate graft passage, regardless of whether the primary procedure is arthroscopic or open.
The Posteromedial Approach (Standard)
In the absence of a concurrent lateral-sided injury, a standard 4-cm posteromedial incision is utilized.
- Incision: Begin the proximal portion of the incision below and posterior to the medial femoral epicondyle. Extend it vertically downward, parallel to the lines of skin cleavage.
- Superficial Dissection: Incise the investing fascia (Layer I) in line with the skin incision, superior to the leading edge of the sartorius muscle.
- Nerve Protection: Strictly protect the infrapatellar branch of the saphenous nerve in the inferior aspect of the wound.
- Deep Exposure: Retract the pes anserinus tendons posteriorly to expose the medial collateral ligament (MCL) and the posterior oblique ligament (POL).
- Arthrotomy: Make a vertical arthrotomy between the POL and the medial head of the gastrocnemius tendon.
- Capsular Reflection: Sharply dissect the capsule off its tibial attachment while leaving the meniscotibial ligament intact.
🚨 Surgical Warning: The Chronic Tear
In chronic PCL tears, the tissue plane may be severely obscured by scarring of the posterior capsule to the PCL remnants. To prevent catastrophic injury to the popliteal contents, carefully mobilize the scar tissue using blunt dissection to reflect the capsule off the tibial insertion.
Once the capsule is reflected, identify the posterior tibial sulcus by direct observation and palpation.
The Posterolateral Approach (For Concurrent PLC Injuries)
If there is an associated injury to the posterolateral corner (PLC), a lateral approach is preferred to address both pathologies simultaneously.
- Incision: Make a short, oblique incision (approximately 6 cm long) just posterior to the lateral collateral ligament (LCL).
- Fascial Incision: Incise the iliotibial band (Layer I) in line with its fibers.
- Layer Dissection: The LCL lies beneath a superficial lamina (Layer II). Divide this layer posterior to the LCL to expose the deep capsular lamina (Layer III).
- Capsular Division: Divide the capsule in line with the posterior aspect of the LCL, exposing the posterolateral joint space. Protect the popliteus tendon in the inferior aspect of the wound.
- Release: Release the capsule and its attachment to the popliteus and meniscotibial ligament. In acute injuries involving both the PCL and PLC, much of this dissection may have already been accomplished by the traumatic disruption itself.
TIBIAL TUNNEL PREPARATION
Creating the tibial tunnel requires extreme vigilance to avoid posterior cortex blowout and neurovascular injury.
Guide Pin Placement
- Periosteal Flap: Create an L-shaped periosteal flap 1 cm medial to the distal portion of the tibial tubercle, just proximal to the insertion of the pes anserinus tendon group.
- Drilling: Using a commercially available PCL drill guide, advance a guide pin from this anterior site in a posterolateral and proximal direction. The pin must exit at the inferior and lateral quadrant of the posterior tibial sulcus.
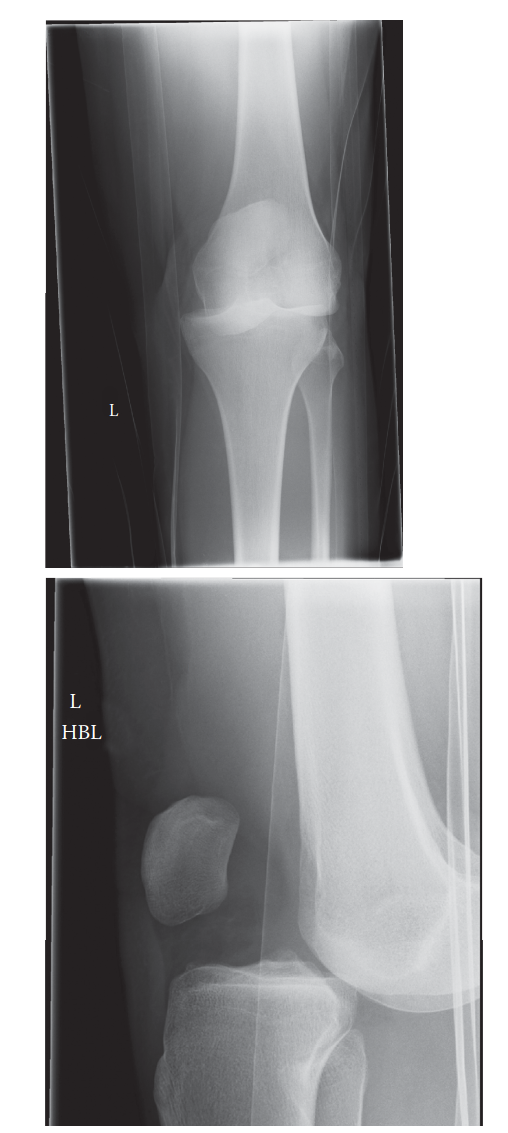
- Radiographic Confirmation: Always confirm and document the proper position of the guide pin with an intraoperative lateral radiograph or fluoroscopy.
Reaming the Tibial Tunnel
Bone guides allow for the calculation of the tibial tunnel distance. The guide pin should be "chucked down" to the exact length to prevent overpenetration into the popliteal fossa.
🔪 Surgical Pearl: The "Finger in the Back" Technique
Place a gloved finger through the posteromedial safety incision to directly palpate the tibial fovea. This tactile feedback is the most reliable method to protect the neurovascular structures from guide pin or reamer overpenetration.
- Overreaming: Overream the pin with a 10-mm reamer. Some surgeons prefer to remove the power source and complete the final millimeters of reaming by hand, as aggressive fluted reamers can pull posterior soft tissues into the joint.
- Reamer Selection: Standard square-profile reamers have been shown to cut out the posterior tibial cortex up to 2 cm inferior to the intended exit site. Utilizing a reamer with a conical profile (as advocated by Sallay and McCarroll) mitigates this risk.
- Avoid Counterpressure: Do not apply counterpressure at the level of the popliteal fossa during reaming, as this compresses the popliteal artery directly against the posterior tibia.
- Tunnel Debridement: Using an angled curette or sharp dissection over the tip of the reamer (while it remains in the tunnel), meticulously debride the posterior edge of the tunnel. Residual soft tissue here will entrap the bone plug during graft passage. Chamfer the edges with a rasp to reduce graft abrasion.
FEMORAL TUNNEL PREPARATION
The femoral tunnel can be prepared using either an outside-in (anteromedial cortex) or an inside-out (blind-end) technique.
Method 1: The Standard Outside-In Technique
- Exposure: Begin with the exposure of the anteromedial femoral cortex using the superior portion of the medial incision.
- Muscle Elevation: Elevate the vastus medialis proximally to access the anteromedial aspect of the distal femur.
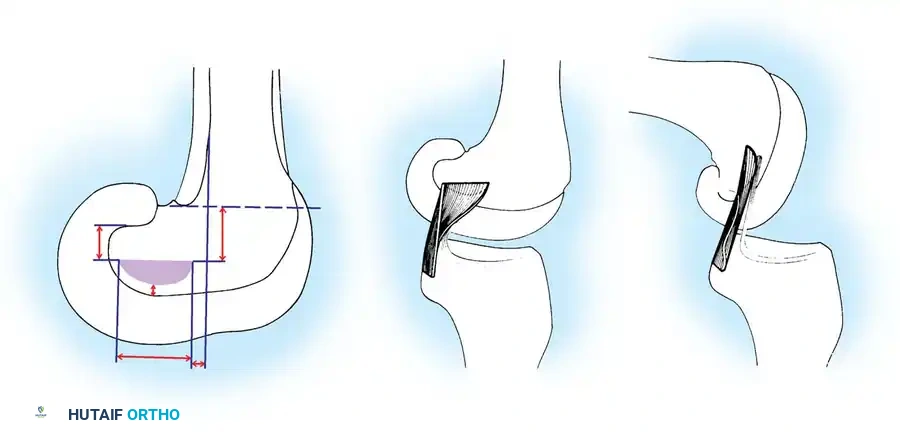
- Pin Placement: Use a commercial drill guide to advance a guide pin from a point just proximal to the medial femoral epicondyle into the intercondylar notch.
- Anatomical Target: Pin entry into the notch should be at the junction of the anterior and middle thirds of the intercondylar notch (roughly 10 mm proximal to the articular surface). For the right knee, this is the 2-o’clock position; for the left knee, the 10-o’clock position. This corresponds to the center of the anatomical insertion of the anterolateral bundle.
- Reaming: Overream the pin with a 10-mm reamer and chamfer the tunnel edges.
Method 2: The Inside-Out (Blind-End) Technique
This technique avoids the morbidity of dissecting the medial femoral cortex.
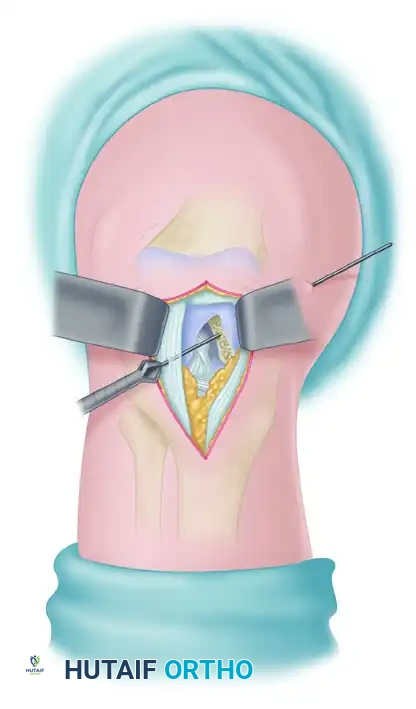
- Trajectory: Advance a long Beath pin through the capsule lateral to the patellar tendon to obtain the appropriate tunnel trajectory. The intra-articular point of entry must correspond to the anatomical insertion of the anterior fibers.
- Advancement: Advance the pin through the medial condyle, exiting through the vastus medialis muscle and skin.
- Blind-End Reaming: Ream over the guide pin from the intercondylar side with a 10-mm reamer, stopping short of the medial femoral cortex to create a blind-end socket.
FIGURE 45-141: “Inside-out” method of drilling femoral tunnel uses lateral arthroscopic capsulotomy to advance Beath guide pin and to drill blind-end tunnel through intercondylar notch.
- Completion: Withdraw the reamer, leaving the Beath pin in place to assist with subsequent graft passage.
GRAFT PASSAGE TECHNIQUES
Passing a BPTB graft through the acute angle of the posterior tibia (the "killer turn") is notoriously difficult. Two primary techniques are utilized.
Technique 1: Anterior-to-Posterior Tibial Passage
- Initial Passage: Pass the smaller, bullet-shaped bone plug through the tibial tunnel from anterior to posterior.
- Suture Retrieval: Use a suture passer to retrieve the traction sutures into the posteromedial (or posterolateral) safety wound.
- Delivery: Apply constant tension parallel to the direction of the tibial tunnel to deliver the bone plug into the posterior recess.
🚨 Pitfall Avoidance: Graft Bending
Avoid pulling the sutures at an oblique angle to the tunnel. Doing so will cause the bone plug to jam and bend at the posterior tunnel aperture, potentially fracturing the graft or damaging the tendinous portion.
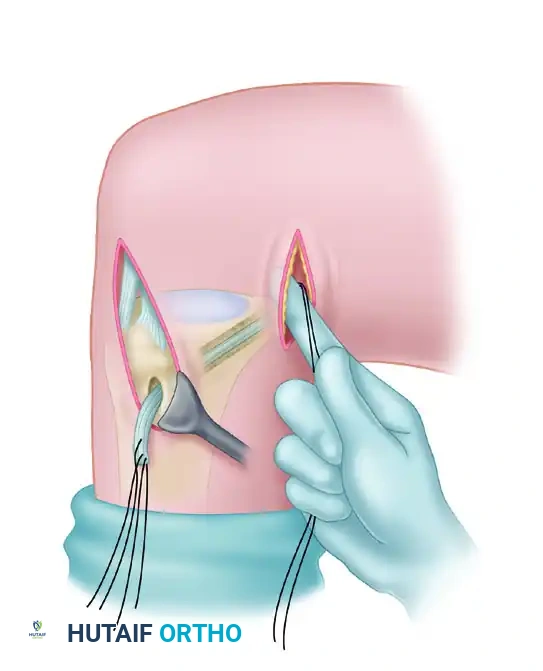
FIGURE 45-142: Graft is passed through tibial tunnel from anterior to posterior, pulling in line with the direction of the tunnel.
- Notch Retrieval: Use the suture passer to retrieve the bone plug into the intercondylar notch, then direct it into the femoral tunnel using the traction sutures.
Technique 2: Retrograde Passage with Graft Passer
- Femoral Seating: Thread the traction sutures of the femoral bone plug through the eyelet of the Beath pin (left in place from the inside-out technique). Withdraw the pin medially, pulling the sutures through the soft tissues.
- Flush Placement: Advance the bone plug into the femoral tunnel with the tendon portion facing the articular surface. Ensure the end of the bone plug is flush with the wall of the intercondylar notch. This minimizes abrasion, as the tendon does not rest against the sharp edge of the tunnel.
- Tibial Passage: Thread the sutures of the tibial bone plug through a specialized graft passer (e.g., DePuy). Advance the free end of the passer through the notch into the posterior recess.
- Delivery: Thread the free end of the graft passer through the tibial tunnel from posterior to anterior using an arthroscopic clamp. Apply firm tension to deliver the graft into the tibial tunnel. Maintaining an anterior drawer force on the tibia significantly aids in graft passage.
GRAFT FIXATION AND TENSIONING
Biomechanical stability relies heavily on the sequence of fixation and the angle of the knee during tensioning.
- Femoral Fixation: Fix the femoral bone plug first using a cannulated interference screw.
- Graft Cycling: Move the knee through a full range of motion (ROM) to evaluate the relative motion of the tibial bone plug within the tibial tunnel. An appropriately placed, isometric graft should exhibit no more than 2 mm of relative excursion.
- Tibial Fixation: Fix the tibial side with the knee flexed to 90 degrees. Apply a strong anterior drawer force to re-create the normal step-off and femoral-tibial relationship.
- Hardware: Secure the bone plug with a 9 × 20-mm cannulated interference screw. If visualization is poor, place the arthroscope directly into the tibial tunnel to ensure accurate screw placement. Alternatively, sutures can be tied over a ligament button.
- Stability Check: Perform a posterior drawer test. Residual laxity should be Grade I or less.
ALTERNATIVE GRAFTS: ACHILLES TENDON AND BPTB ALLOGRAFTS
Allografts are highly popular for PCL reconstruction due to their large cross-sectional area and the avoidance of donor-site morbidity. The Achilles tendon allograft is particularly advantageous because it provides extra length and features soft tissue at one end, greatly simplifying passage through the "killer turn."
Harner’s Achilles Allograft Technique
Harner described a refined arthroscopic technique specifically optimized for Achilles tendon allografts:
- Tibial Tunnel Trajectory: The tibial guide pin should course just anterior and parallel to the slope of the posterior tibial cortex (approximated by a line parallel to the slope of the proximal tibiofibular joint).
- Femoral Tunnel Placement: To re-create the anterolateral bundle, the femoral tunnel is placed within the anterior portion of the PCL footprint. The guide pin enters 5 to 10 mm from the intra-articular cartilage of the medial femoral condyle. Extra-articularly, it should exit 1.0 to 1.5 cm from the articular margin to prevent subchondral bone disruption.
- Graft Seating: The bone plug is advanced until the bone-tendon junction is perfectly flush with the cortex, minimizing graft bending.
- Fixation Protocol: The femoral bone plug is fixed with an interference screw. The knee is cycled to pretension the graft. The soft-tissue end of the Achilles tendon is then secured outside the anterior tibial tunnel using a screw and spiked washer (or a staple).
- Tensioning Angle: Crucially, the tibial side is secured with the knee in 70 to 80 degrees of flexion with 10 pounds of tension. The anterolateral bundle is under maximal tension in this position, which minimizes the risk of overtensioning the graft and capturing the joint.
ADDRESSING THE "KILLER TURN": TIBIAL INLAY RECONSTRUCTION
All transtibial techniques require the graft to turn at an acute right angle as it exits the tibial tunnel posteriorly and heads anteriorly toward the intercondylar notch. This acute bend—often termed the "killer turn"—creates a high potential for graft abrasion, attenuation over time, and makes effective graft tensioning difficult.
To circumvent this, Tibial Inlay Reconstruction techniques have been developed.
* Concept: The tibial bone plug is fixed directly into a trough created at the posterior tibial PCL footprint, completely avoiding the transtibial tunnel.
* Positioning: This requires either placing the patient in the lateral decubitus position (allowing access to both anterior and posterior knee compartments by rotating the table) or utilizing a two-stage supine-to-prone repositioning technique.
* Outcomes: Both laboratory and cadaveric biomechanical studies have found no significant differences in stability between transtibial and inlay techniques at any knee flexion angle. Furthermore, systematic reviews of clinical outcomes demonstrate satisfactory and comparable results for both methods, leaving the choice largely to surgeon preference and experience.
POSTOPERATIVE REHABILITATION PROTOCOL
The postoperative rehabilitation following PCL reconstruction is distinct from ACL protocols, primarily due to the need to protect the graft from posterior tibial sag caused by gravity and hamstring activation.
Phase I: Immediate Postoperative (Weeks 0-3)
- Immobilization: The knee is placed in a commercially available knee brace locked in full extension. If concurrent medial or lateral capsuloligamentous structures were repaired, strict extension is maintained for 3 weeks.
- Weight Bearing: Limited weight bearing (or weight-bearing as tolerated, depending on surgeon preference) is allowed in the locked extension brace using crutches.
- Range of Motion: A controlled ROM program of 0 to 90 degrees is initiated immediately to prevent arthrofibrosis.
- Muscle Activation: Quadriceps exercises are started immediately, including active knee extension from 90 to 0 degrees and straight-leg raises.
🚨 Rehabilitation Warning: Hamstring Avoidance
Active hamstring exercises must be strictly avoided in the early postoperative phases. Hamstring contraction creates a direct posterior translation stress on the tibia, which can stretch and attenuate the healing PCL graft.
Phase II: Intermediate to Advanced Recovery (Months 4-6)
- Progression: Strengthening and functional activities are introduced in a stepwise, highly supervised program.
- Return to Activity: Straight-line running typically begins at the fourth month.
- Sport-Specific Drills: Agility drills and plyometrics are introduced at 5 to 6 months.
-
Clearance: A full return to competitive sports is only permitted when adequate, symmetrical quadriceps and hamstring strength has been achieved, and sport-specific proprioceptive skills have been fully mastered.
You Might Also Like