Epineurial Neurorrhaphy: A Comprehensive Microsurgical Guide
Key Takeaway
Epineurial neurorrhaphy is the gold standard microsurgical technique for repairing transected peripheral nerves. By meticulously approximating the outer epineurium without excessive tension, surgeons facilitate optimal fascicular alignment and axonal regeneration. This guide details the critical steps of nerve preparation, neuroma resection, topographical alignment, and tension-free suturing using 8-0 or 9-0 nylon under microscopic magnification to maximize functional recovery.
INTRODUCTION TO EPINEURIAL NEURORRHAPHY
Epineurial neurorrhaphy remains the fundamental workhorse of peripheral nerve surgery. It is the most widely utilized technique for the primary and secondary repair of transected peripheral nerves. The primary objective of this procedure is to achieve a tension-free, anatomically precise coaptation of the severed nerve ends, thereby providing an optimal biological conduit for regenerating axons to traverse the zone of injury and reach their target end-organs.
Unlike perineurial (fascicular) repair, which involves suturing the individual fascicles or groups of fascicles, epineurial repair relies on the meticulous approximation of the outer connective tissue sheath—the epineurium. When performed correctly under microscopic magnification, epineurial neurorrhaphy minimizes intraneural scarring, reduces surgical trauma to the delicate fasciculi, and yields functional outcomes that are comparable, if not superior, to more complex fascicular repairs in mixed peripheral nerves.
This comprehensive guide details the indications, biomechanical principles, preoperative planning, and step-by-step surgical execution of epineurial neurorrhaphy, tailored for the practicing orthopedic microsurgeon.
INDICATIONS AND PATIENT SELECTION
The decision to perform an epineurial neurorrhaphy hinges on the nature of the injury, the timing of the intervention, and the anatomical characteristics of the nerve defect.
Primary Indications
- Acute Sharp Transections: Clean, sharp lacerations (e.g., glass or knife wounds) are ideal for immediate primary epineurial repair.
- Short Gap Secondary Repairs: Delayed repairs where the nerve ends can be mobilized and coapted without excessive tension.
- Oligofascicular Nerves: Nerves with a simple internal topography (few, large fascicles) are particularly well-suited for epineurial approximation.
Contraindications
- Excessive Tension: If the nerve gap cannot be closed without undue tension after maximal safe mobilization, an interpositional nerve graft (e.g., sural nerve autograft) or a nerve transfer is mandated.
- Severe Crush or Avulsion Injuries: In high-energy trauma where the zone of injury is extensive and poorly demarcated, primary repair is contraindicated. These injuries require delayed exploration once the extent of intraneural scarring becomes clinically and histologically apparent.
Surgical Warning: Tension is the absolute enemy of nerve regeneration. Excessive tension across the neurorrhaphy site compromises the vasa nervorum, leading to localized ischemia, robust fibroblast proliferation, and the formation of a dense scar barrier that prevents axonal crossing.
BIOMECHANICS AND NERVE HEALING PRINCIPLES
Understanding the biological and biomechanical environment of a healing nerve is critical for surgical success. Following transection, the distal nerve segment undergoes Wallerian degeneration, a process wherein the axons and myelin sheaths degrade, leaving empty endoneurial tubes.
The proximal stump attempts regeneration by sprouting growth cones. For these growth cones to successfully navigate into the distal endoneurial tubes, the surgical repair must provide:
1. Accurate Topographical Alignment: Motor axons must be directed to motor channels, and sensory axons to sensory channels.
2. Minimal Gap: The distance the growth cones must traverse through the fibrin clot must be minimized.
3. Favorable Microenvironment: Free of necrotic tissue, excessive foreign body reaction (suture material), and ischemia.
The epineurium itself is a robust, collagenous structure that holds sutures well. However, it is also the primary source of fibroblasts. Therefore, precise coaptation that prevents epineurial inversion into the fascicular interface is paramount to prevent neuroma-in-continuity formation.
PREOPERATIVE PLANNING AND EQUIPMENT
Successful epineurial neurorrhaphy requires specialized microsurgical equipment and an optimized operating room setup.
Essential Equipment
- Operating Microscope: High-quality optics with adjustable magnification (typically 10x to 40x) and coaxial illumination are non-negotiable. Loupe magnification (e.g., 4.5x) may be used for initial exposure but is insufficient for the final coaptation.
- Microsurgical Instruments: Non-toothed jeweler's forceps, microscissors (straight and curved), and a micro-needle holder.
- Cutting Tools: A sharp razor blade, a diamond-bladed knife, or specialized sharp nerve scissors. A sterile wooden tongue depressor or a specialized nerve miter box is required to provide a firm cutting surface.
- Suture Material: 8-0 or 9-0 monofilament nylon on a spatulated or taper-point micro-needle.
- Hemostatic Agents: Thrombin or Gelfoam to control intraneural oozing without the use of thermal cautery.
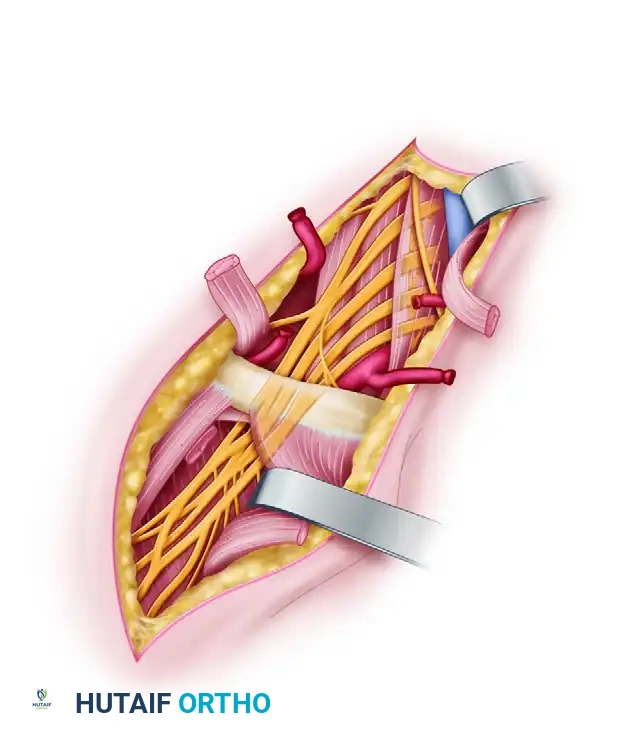
SURGICAL APPROACH AND NERVE EXPOSURE
1. Extensile Exposure
The surgical incision must be extensile, allowing for wide exposure of the nerve both proximal and distal to the zone of injury.
* Always identify the nerve in virgin, unscarred tissue planes proximally and distally.
* Carefully trace the nerve toward the site of transection or neuroma.
* Utilize vessel loops to gently handle and retract the nerve, avoiding direct grasping of the epineurium with forceps whenever possible.
2. Neurolysis and Mobilization
To achieve a tension-free repair, the nerve must be mobilized.
* Perform a careful external neurolysis, freeing the nerve from surrounding fascial attachments.
* Respect the segmental blood supply; mobilize only as much as necessary to close the gap. Over-mobilization can devascularize the nerve, impairing regeneration.
PREPARATION OF THE NERVE STUMPS
The preparation of the nerve ends is arguably the most critical step in determining the biological success of the repair. Coaptation must occur between healthy, unscarred fascicles.
Resection of Neuroma and Glioma
After exposing and dissecting the ends of the nerves, determine that any remaining gap can be closed by end-to-end repair without excessive tension.
- Initial Resection: Resect the proximal neuroma and the distal glioma. This must be done with a perfectly sharp instrument to avoid crush artifact. Use a sharp razor blade or a diamond-bladed knife against a sterile wooden tongue depressor in a nerve miter box, or use highly specialized sharp nerve scissors.
- Serial Sectioning: Make serial cuts about 1 mm apart in the end of the nerve until normal-appearing fasciculi are exposed. This is best determined by the use of the operating microscope. Healthy fascicles will exhibit a characteristic "mushrooming" or pouting effect, protruding slightly from the surrounding epineurium.
- Histological Verification: If doubt remains concerning the amount of any remaining scar in the nerve end, frozen histological sections of the nerve are highly helpful. Have permanent histological sections made for later review to help in determining the prognosis.
- Additional Trimming: If the distal end contains residual glioma, or if more than one-third of the proximal end consists of neuroma, carry out additional trimming as required until pristine tissue is reached.
Clinical Pearl: A common cause of failure in secondary nerve repair is inadequate resection of the neuroma. Surgeons are often hesitant to resect too much nerve for fear of creating an unbridgeable gap. However, suturing scarred nerve ends guarantees failure. If healthy fascicles cannot be reached without creating a gap that requires excessive tension, pivot immediately to a nerve grafting strategy.
Hemostasis
Control excessive bleeding from the vasa nervorum or the cut surface of the nerve with topical thrombin or Gelfoam. Bipolar electrocautery should be strictly avoided on the cut surface of the nerve to prevent thermal necrosis of the fascicles.
TENSION MANAGEMENT AND TOPOGRAPHICAL ALIGNMENT
Relieving Tension
If positioning of the extremity (e.g., flexing a joint) is required to relieve tension, use an assistant at this point to maintain the posture.
* Sometimes a traction or sling suture of 7-0 or 8-0 nylon passed through the nerve may be required to hold the ends in proximity.
* Preferred Technique: Our preference in such a situation is the gentle placement of a straight stainless steel Keith or Bunnell needle transversely through each of the nerve stumps with the nerve ends approximated, transfixing the nerve to the adjacent soft tissues. This acts as a temporary mechanical scaffold, removing tension from the micro-sutures during the repair process.
Rotational Alignment
Accurate rotational alignment is vital to ensure that corresponding motor and sensory fascicles are matched.
* Surface Landmarks: Determine appropriate rotational alignment by observing the orientation of longitudinal surface vessels (vasa nervorum) on the epineurium.
* Fascicular Topography: Examine the appearance, size, and location of fasciculi within the nerve cross-section. Match the "map" of the proximal stump to the distal stump.
* Orientation Sutures: Epineurial orientation sutures placed 1 cm from each cut edge are highly helpful in maintaining alignment during the manipulation of the nerve.
STEP-BY-STEP MICROSURGICAL TECHNIQUE
With the nerve ends prepared, aligned, and temporarily stabilized, the microscopic suturing begins.
1. Background Preparation
Place a piece of plastic or rubber glove material (often blue or green) beneath the nerve. This provides excellent visual contrast under the microscope, prevents the micro-sutures from snagging on underlying soft tissues, and allows for less cumbersome handling of the delicate needles.
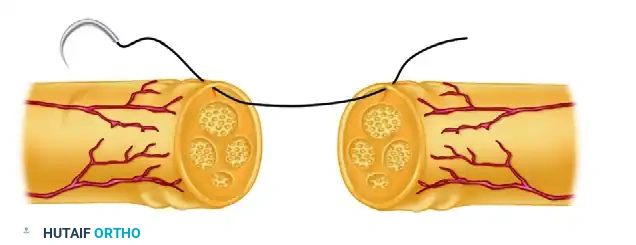
2. Suture Selection and Placement
For this repair, 8-0 or 9-0 monofilament nylon is usually sufficient. The needle should pass only through the epineurium, avoiding the underlying fascicles.
The micro-needle is introduced into the epineurium of the proximal stump, taking a bite of approximately 1 to 2 mm from the cut edge. The trajectory must remain superficial to the fascicular bundles.
3. The Quadrant Technique
To ensure a circumferential, tension-free, and perfectly aligned coaptation, a quadrant suturing technique is employed.
- First Suture (Posterior): Place the first suture in the posterior (deep) surface of the nerve in the epineurium. Tie the knot securely, but leave the suture ends long. Leaving this suture long makes later rotation of the nerve significantly easier.
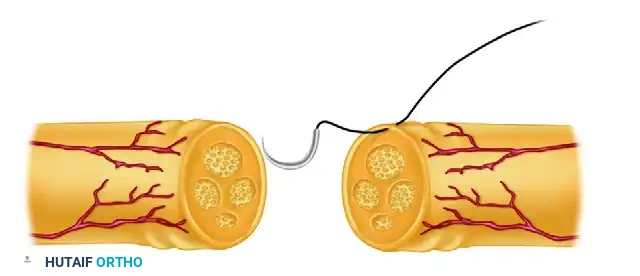
The needle is then passed through the corresponding epineurial edge of the distal stump. Careful attention is paid to matching the depth and width of the bite to ensure symmetrical approximation.
- Subsequent Quadrant Sutures: Place the next three sutures in the remaining three quadrants of the nerve (anterior, medial, lateral). Tie these and leave them long as well. These four sutures act as the primary structural pillars of the repair.
4. Interrupted Suturing and Inspection
Determine as accurately as possible that no kinking, buckling, or deviation of the fasciculi has occurred. The fascicles should meet flush, without overlapping or mushrooming out of the repair site.
- Place sufficient interrupted sutures of 8-0 or 9-0 nylon between the quadrant sutures to produce a satisfactory, watertight neurorrhaphy.
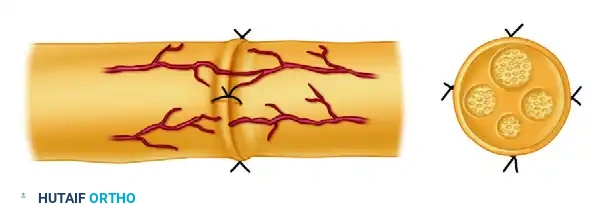
Completed epineurial neurorrhaphy. Notice the even distribution of interrupted sutures circumferentially, ensuring that no fascicular tissue escapes through the epineurial gaps.
- Rotating the Nerve: Rotate the nerve using the long ends of the quadrant sutures to ensure satisfactory visualization and repair of the posterior surface. Once the posterior gaps are closed, the long ends of the quadrant sutures can be trimmed.
5. Radiographic Markers (Optional)
A 5-0 stainless steel suture can be placed 1 cm from each end of the repair in the epineurium to act as a radiographic marker. This allows the surgeon to detect a postoperative rupture via plain radiographs if sudden loss of function or a popping sensation occurs during rehabilitation. (Note: We rarely use this in modern practice, as clinical examination and ultrasound are usually sufficient).
INTRAOPERATIVE ASSESSMENT AND CLOSURE
Before proceeding with wound closure, the integrity of the repair must be dynamically tested.
- Remove Temporary Fixation: Carefully remove the sling suture or the stainless steel Keith/Bunnell needles from the nerve ends and adjacent soft tissues.
- Assess Positional Tension: Place the extremity through a limited, controlled range of motion while directly observing the repair site under the microscope.
- Determine Safe Mobilization: Note the exact angle of joint extension or flexion at which tension begins to transmit across the neurorrhaphy. This critical step dictates the postoperative immobilization position and helps to determine the extent to which the extremity can be safely mobilized postoperatively without risking dehiscence.
Once the safe range of motion is established, the surgical bed is thoroughly irrigated. The wound is closed in layers, ensuring that the nerve repair is covered by a healthy, well-vascularized soft-tissue bed (e.g., muscle belly) to prevent desiccation and minimize extraneural scarring.
POSTOPERATIVE PROTOCOL AND REHABILITATION
The postoperative management following epineurial neurorrhaphy is a delicate balance between protecting the fragile repair and preventing debilitating joint contractures.
Phase 1: Immobilization (Weeks 0-3)
- The extremity is immobilized in a custom orthosis or cast in the position determined intraoperatively to yield zero tension on the repair.
- For example, following a median nerve repair at the wrist, the wrist is typically immobilized in 20 to 30 degrees of flexion.
- Strict elevation is maintained to reduce edema, which can increase compartmental pressure and compromise nerve microcirculation.
Phase 2: Protected Mobilization (Weeks 3-6)
- At approximately 3 weeks, the tensile strength of the healing nerve is sufficient to tolerate gentle, controlled stress.
- The joint is gradually extended (usually at a rate of 10 degrees per week) using a dynamic or serial static splinting program.
- Active range of motion of joints not affecting the nerve tension (e.g., digits in a proximal nerve injury) is encouraged from day one to prevent tendon adhesions.
Phase 3: Strengthening and Sensory Re-education (Weeks 6+)
- Once full range of motion is achieved and the splint is discontinued, progressive strengthening begins.
- As axonal regeneration progresses (typically at a rate of 1 mm per day), patients will experience an advancing Tinel's sign.
- Sensory re-education programs are initiated as soon as protective sensation begins to return to the distal targets, helping the brain remap the altered sensory input.
COMPLICATIONS AND PITFALLS
Despite meticulous technique, complications can arise. Recognizing and mitigating these risks is essential for the orthopedic microsurgeon.
- Repair Dehiscence: Usually caused by excessive tension at the time of surgery or premature, aggressive postoperative mobilization. Results in complete failure of regeneration.
- Neuroma-in-Continuity: Occurs when regenerating axons escape the epineurial repair site due to inadequate suturing, gaps between sutures, or excessive intraneural scarring blocking the endoneurial tubes. This presents as a painful, palpable mass with halted distal recovery.
- Joint Contracture: A consequence of prolonged immobilization. Emphasizes the need for precise intraoperative tension assessment to allow for the earliest possible safe mobilization.
- Infection: Deep infection can destroy the repair. Meticulous sterile technique and appropriate perioperative antibiotics are mandatory.
CONCLUSION
Epineurial neurorrhaphy is a demanding but highly rewarding microsurgical procedure. Success is predicated on a profound respect for nerve biology, meticulous handling of delicate tissues, and the absolute avoidance of tension. By adhering to the principles of adequate neuroma resection, precise topographical alignment, and secure, tension-free epineurial coaptation, the surgeon provides the optimal environment for axonal regeneration and maximal functional recovery for the patient.
You Might Also Like