Dynamic Multiplanar Hallux Varus Correction: Advanced Surgical Strategies
Key Takeaway
Dynamic multiplanar hallux varus is a complex deformity requiring meticulous surgical intervention. When the metatarsophalangeal joint remains passively correctable, soft tissue reconstructions, such as extensor hallucis brevis tenodesis, offer excellent outcomes. Conversely, rigid deformities necessitate resection arthroplasty or arthrodesis. This guide details the biomechanical principles, step-by-step surgical techniques, and postoperative protocols essential for restoring first ray alignment and preventing recurrence in the adult foot.
INTRODUCTION TO DYNAMIC MULTIPLANAR HALLUX VARUS
Dynamic, or multiplanar, hallux varus is a complex and often debilitating deformity of the first metatarsophalangeal (MTP) joint. Most frequently encountered as an iatrogenic complication following overzealous hallux valgus correction, the deformity is characterized by a combination of transverse plane varus, coronal plane supination, and sagittal plane instability—typically manifesting as MTP joint extension and interphalangeal (IP) joint flexion (the "clawed hallux").
The pathoanatomy usually involves an over-resection of the medial eminence, excessive lateral soft tissue release (including the lateral head of the flexor hallucis brevis or fibular sesamoidectomy), and overtightening of the medial capsule. This creates a severe biomechanical imbalance where the extensor hallucis longus (EHL) and extensor hallucis brevis (EHB) gain a mechanical advantage, pulling the hallux into a dynamic, multiplanar deformity during the gait cycle.
Successful management requires a rigorous preoperative assessment to determine the flexibility of the deformity. The treatment algorithm bifurcates based on passive correctability: flexible deformities are amenable to soft tissue reconstruction (such as EHB tenodesis or EHL transfer), whereas rigid, arthritic, or long-standing static deformities necessitate bony procedures, primarily MTP joint arthrodesis or resection arthroplasty.
PREOPERATIVE EVALUATION AND SURGICAL DECISION MAKING
Clinical Assessment of Flexibility
The critical decision-making node in treating dynamic hallux varus is assessing the passive correctability of the MTP joint.
1. Passive Correction Test: The surgeon must evaluate if all components of the deformity (axial, coronal, and sagittal planes) can be passively reduced to a neutral, anatomic alignment.
2. Range of Motion (ROM): Passive motion at the MTP joint must approach normal parameters in both flexion and extension once the joint is held in a reduced position.
If the joint is passively correctable and lacks significant degenerative changes, soft tissue repair and tendon transfer are highly successful. If the joint is rigid, contracted, or exhibits advanced osteoarthritis, soft tissue procedures will fail, and the surgeon must proceed to arthrodesis or resection arthroplasty.
Clinical Pearl: A dynamic deformity often presents with a flexible MTP joint but a rigid IP joint flexion contracture. Addressing the IP joint is a mandatory step in the comprehensive correction of the first ray, even when the MTP joint is preserved.
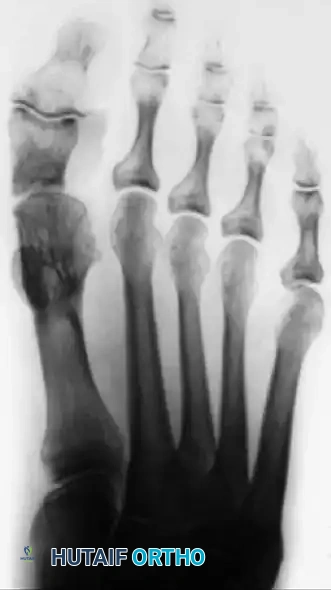
Radiographic Evaluation
Standard weight-bearing anteroposterior, lateral, and sesamoid axial radiographs are mandatory. The surgeon should assess the intermetatarsal angle (often negative or zero in iatrogenic cases), the hallux valgus angle (which will be negative), the condition of the MTP and IP joint spaces, and the presence or absence of the fibular sesamoid.
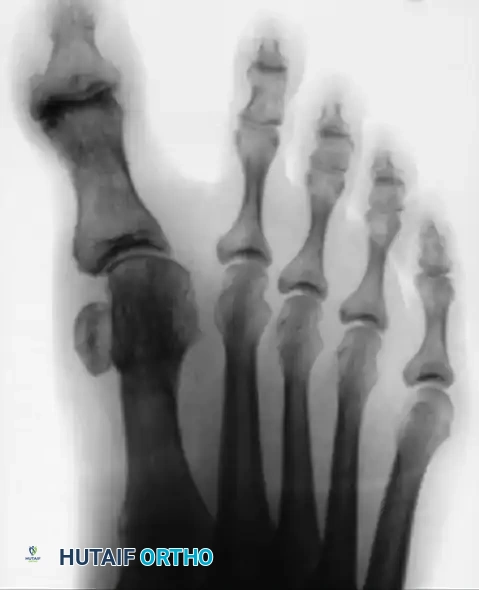
Preoperative radiograph of a middle-aged woman demonstrating a severe multiplanar hallux varus deformity (clawed hallux) with medial subluxation of the MTP joint.
SOFT TISSUE RECONSTRUCTION: EXTENSOR HALLUCIS BREVIS (EHB) TENODESIS
For passively correctable dynamic hallux varus, tenodesis utilizing the extensor hallucis brevis (EHB) or transfer of the extensor hallucis longus (EHL) are the gold standard soft tissue procedures. The EHB tenodesis (described by Juliano, Myerson, and Cunningham) effectively recreates the lateral collateral ligament complex and provides a dynamic tether against medial deviation.
Step 1: Incision and Tendon Harvest
A dorsal longitudinal incision is made over the first web space, extending proximally over the first metatarsal and distally to the MTP joint. The EHB tendon is identified. It is transected proximally at its musculotendinous junction to ensure maximum length for the transfer.
Dorsal incision and identification of the extensor hallucis brevis tendon prior to proximal transection.
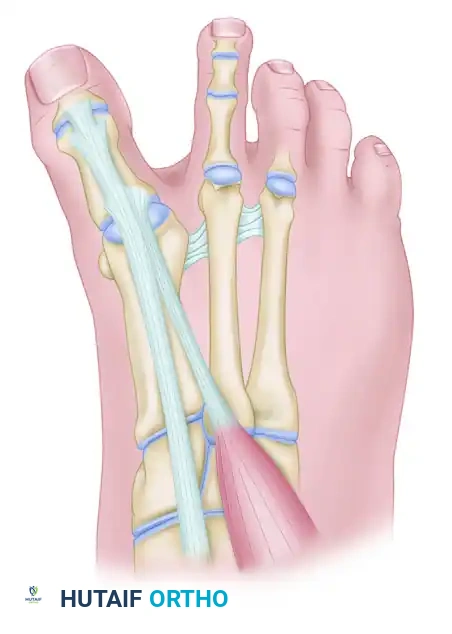
Step 2: Tendon Preparation and Routing
The transected EHB tendon is mobilized distally to its insertion on the proximal phalanx. The tendon should exhibit free excursion with gentle traction and relaxation.
1. Pass a nonabsorbable suture (e.g., 2-0 or 0 braided polyester) back and forth through the distal 1.5 cm of the free tendon end using a Krackow or whipstitch technique. Lay it aside temporarily.
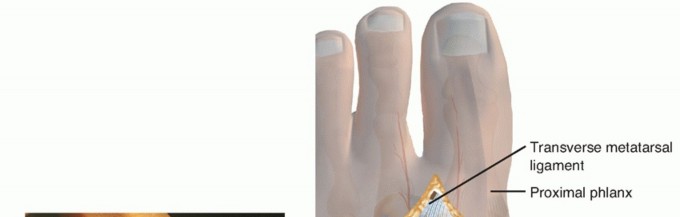
2. Identify the deep transverse intermetatarsal ligament.
Surgical Warning: The transferred tendon cannot correct the hallux extensus or hallux varus if it is not passed plantar to a pulley that is located plantar to the flexion-extension axis of the first MTP joint. The deep transverse intermetatarsal ligament serves as this critical pulley.
With a hemostat, grasp the suture in the end of the tendon and pass it deep (plantar) to the transverse metatarsal ligament from distal to proximal. Johnson and Spiegl noted that earlier surgical scar tissue in this region rarely interferes with the use of the ligament as a suitable and robust pulley.
The transected EHB tendon is passed deep to the transverse metatarsal ligament from distal to proximal, utilizing the ligament as a biomechanical pulley.
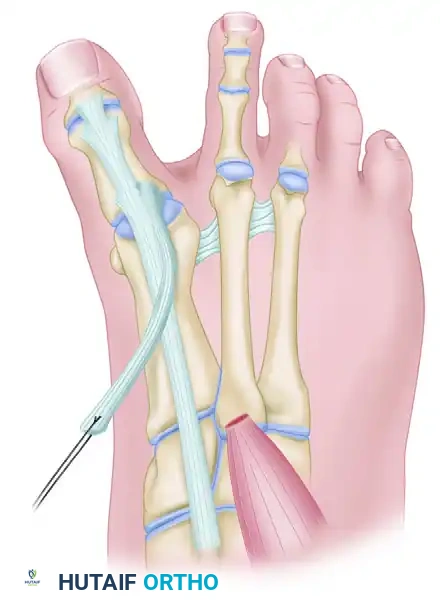
Step 3: Metatarsal Preparation and Fixation
To secure the tenodesis, a bone tunnel must be created in the first metatarsal.
1. Drill a 3.6-mm hole in the dorsomedial aspect of the first metatarsal neck. The trajectory should accommodate the tension vector required to hold the hallux in neutral alignment.
2. A medial capsulotomy of the MTP joint is almost always required to allow the hallux to be positioned properly without tension. In cases of severe iatrogenic medial capsular contracture, a complete medial release is performed.
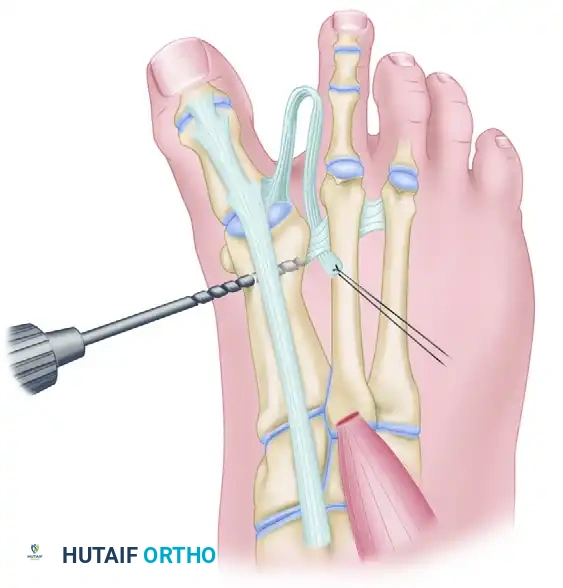
A drill hole is created in the dorsomedial aspect of the first metatarsal to accept the transferred tendon.
- Pull the EHB tendon through the drill hole.
- Place the hallux in the desired corrected position (approximately 10 to 15 degrees of valgus and neutral dorsiflexion).
- Tension the tendon appropriately and secure it with robust nonabsorbable sutures to the adjacent periosteum or directly to the bone using a tenodesis screw or suture anchor, depending on surgeon preference and bone quality.
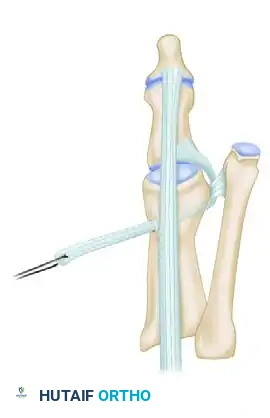
The EHB tendon is pulled through the drill hole under tension and secured with sutures, effectively tethering the proximal phalanx and correcting the varus and extensus deformity.
Alternative: EHL Transfer (Johnson and Spiegl Technique)
If the EHB is insufficient, the EHL can be utilized. The EHL is split or transferred entirely.
1. A 3.6-mm hole is drilled in a dorsoplantar direction in the lateral side of the proximal phalanx.
2. The EHL is passed plantar to the deep transverse intermetatarsal ligament.
3. The tendon is passed through the hole in the phalanx from plantar to dorsal.
4. The EHL is pulled distally, tensioned with the toe in the corrected position, and sutured back onto itself.
Step 4: Temporary Joint Stabilization
To protect the soft tissue transfer during the initial healing phase, the MTP joint is temporarily pinned.
Insert a 0.062-inch Kirschner wire (K-wire) obliquely across the MTP joint. Extreme care must be taken not to impale the newly transferred tendon, which could weaken it or cause it to rupture.
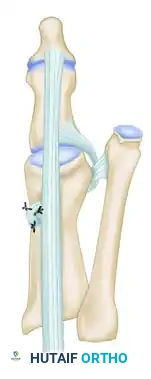
A 0.062-inch Kirschner wire is driven obliquely across the MTP joint to maintain the corrected position and protect the tenodesis during the initial healing phase.
MANAGEMENT OF THE INTERPHALANGEAL (IP) JOINT
The dynamic clawing of the hallux frequently results in a fixed or dynamic flexion contracture of the IP joint. Addressing this is paramount for a successful functional outcome.
Scenario A: MTP Joint Arthrodesis is Performed
If the MTP joint is rigid and requires arthrodesis, the IP joint flexion contracture must be corrected to allow the toe to sit flat during gait.
1. Perform a release of the plantar plate and both collateral ligaments of the IP joint.
2. Bring the IP joint into a fully corrected, neutral position.
3. Hold the joint in extension with a 0.062-inch K-wire driven antegrade through the distal phalanx and retrograde into the proximal phalanx.
Scenario B: MTP Joint is Preserved (Soft Tissue Reconstruction)
If the MTP joint does not require arthrodesis (e.g., following EHB tenodesis), the surgeon should strongly consider an arthrodesis of the IP joint.
This serves two critical biomechanical purposes:
1. It permanently corrects the dynamic flexion deformity of the IP joint.
2. If the deformity is static, arthrodesis allows for relative shortening of the extensor hallucis longus and flexor hallucis longus muscle-tendon units, significantly decreasing their deforming forces on the first ray.
IP Joint Arthrodesis Technique (Johnson Method):
1. Expose the IP joint via a dorsal transverse or longitudinal incision.
2. Resect the articular cartilage from the head of the proximal phalanx and the base of the distal phalanx down to bleeding subchondral bone, ensuring flat, congruent cancellous surfaces.
3. Drill a hole into the distal phalanx from the articular surface, exiting through the tip of the hallux just beneath the nail plate.
4. Reverse the drill bit and advance it proximally into the medullary canal of the proximal phalanx.
5. Fix the arthrodesis using a 4-mm partially threaded, cancellous, small fragment screw (typically 40 to 50 mm in length) or crossed K-wires. The screw provides superior compression and rotational stability.
RESECTION ARTHROPLASTY AND MTP ARTHRODESIS
In older, lower-demand patients, or in cases where the MTP joint is rigid, arthritic, and not amenable to soft tissue balancing, resection arthroplasty or MTP arthrodesis is indicated.
Resection Arthroplasty:
This involves resecting the proximal one-third of the proximal phalanx (Keller-type procedure). While it reliably decompresses the joint and corrects the deformity, it sacrifices the windlass mechanism and push-off power. It is generally reserved for elderly patients with low functional demands.
Postoperative radiograph of the same patient demonstrating correction of the multiplanar hallux varus deformity via resection arthroplasty. The joint is decompressed, and the axial alignment is restored.
MTP Arthrodesis:
Arthrodesis is the procedure of choice for active patients with a rigid or arthritic hallux varus. The joint is prepared with cup-and-cone reamers and fixed in 10 to 15 degrees of valgus and 15 degrees of dorsiflexion (relative to the first metatarsal) using a dorsal plate and a compression screw.
CLOSURE AND VASCULAR EVALUATION
Following the completion of all bony and soft tissue procedures, meticulous attention to closure is required.
- Tourniquet Release: Remove the tourniquet and rigorously evaluate the vascularity of the hallux. The correction of a chronic varus deformity into valgus can stretch the medial neurovascular bundle, potentially compromising perfusion. Ensure brisk capillary refill before proceeding.
- Positioning: Hold the hallux in 10 to 15 degrees of valgus with the IP joint (if arthrodesed) in a neutral position.
- Skin Closure: Close the skin with simple, interrupted, small nonabsorbable sutures (e.g., 4-0 nylon).
Pitfall: Place the stitches close to the skin edge. Bringing the hallux from a chronic varus posture to a corrected valgus posture places the medial skin under significant tension. Some degree of medial wound necrosis frequently occurs after hallux varus repair. The patient must be explicitly advised of this risk during the preoperative informed consent process.
Apply a sterile, well-padded forefoot compression dressing.
POSTOPERATIVE CARE PROTOCOL
The postoperative rehabilitation protocol is designed to protect the soft tissue transfers and bony fusions while mitigating edema.
Phase 1: Immediate Postoperative (Days 0-2)
* A bulky compression dressing is worn.
* The patient is strictly encouraged to rest and elevate the foot above heart level to minimize swelling and protect the medial skin incision.
Phase 2: Maximum Protection (Weeks 1-3)
* The initial dressing is removed, and wounds are inspected.
* A short-leg, non-weight-bearing cast (or a rigid splint) that extends past the toes is applied.
* Only non-weight-bearing or touch-down weight-bearing ambulation with crutches is permitted.
Phase 3: Transitional Weight Bearing (Weeks 3-6)
* At 3 weeks, the cast is changed.
* If the surgeon permits, weight bearing to tolerance in a removable walking boot (or a new short-leg walking cast) is allowed for the next 3 weeks. Even with this protection, partial weight bearing is often recommended to prevent hardware failure or tendon pull-out.
Phase 4: Hardware Removal and Maturation (Weeks 4-12)
* The transarticular K-wire stabilizing the MTP joint is removed in the clinic at 4 to 6 weeks. The timing depends on the severity of the initial deformity; the more difficult the deformity correction, the longer the temporary fixation should remain in place.
* Once the K-wire is removed, full weight bearing is allowed in standard, wide-toe-box footwear.
* Night Splinting: Night splinting of the hallux in the desired corrected position for an additional 10 to 12 weeks should be strongly considered to prevent soft tissue creep and recurrence of the varus deformity.
You Might Also Like