Comprehensive Surgical Management of Tibial Diaphyseal Fractures: Locking Compression Plating and Intramedullary Nailing
Key Takeaway
The surgical management of tibial diaphyseal fractures requires a nuanced understanding of biomechanics, soft tissue envelopes, and implant selection. This comprehensive guide details the operative techniques for Locking Compression Plate (LCP) fixation and Intramedullary (IM) Nailing. Emphasizing evidence-based protocols, it covers indications, patient positioning, step-by-step surgical approaches, and postoperative care to optimize clinical outcomes and minimize complications in both closed and open tibial fractures.
Introduction to Tibial Diaphyseal Fixation
The surgical management of tibial shaft fractures represents a cornerstone of orthopedic trauma surgery. Due to the tibia's subcutaneous anteromedial border and tenuous blood supply, fractures in this region are highly susceptible to soft tissue complications, delayed union, and nonunion. The evolution of internal fixation has provided the modern orthopedic surgeon with two primary modalities for diaphyseal stabilization: the Locking Compression Plate (LCP) and the Intramedullary (IM) Nail.
The selection between these modalities, as well as the specific techniques employed (such as reamed versus unreamed nailing, or the adjunctive use of lag screws), must be meticulously tailored to the fracture morphology, the integrity of the soft tissue envelope, and the patient's physiological status. This masterclass delineates the biomechanical principles, step-by-step surgical techniques, and evidence-based protocols for optimizing outcomes in tibial diaphyseal fractures.
Locking Compression Plate (LCP) with Bicortical Screw Fixation
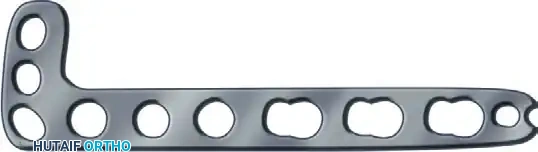
The advent of the Locking Compression Plate (LCP) revolutionized the management of complex, comminuted, and osteoporotic tibial fractures. Unlike conventional plates that rely on friction between the plate and bone generated by screw torque, the LCP functions as an internal fixator. The threaded screw heads lock directly into the plate, creating a fixed-angle construct that preserves periosteal blood supply and provides superior stability in poor-quality bone.
Biomechanics and Implant Design
The LCP system utilizes a unique "combi-hole" design, allowing the surgeon to choose between dynamic compression and locked fixed-angle stabilization within the same plate.
The combi-hole consists of two distinct sections:
1. The Dynamic Compression Unit (DCU): The unthreaded portion designed for standard cortical screws. Eccentric placement of a cortical screw in this section allows for dynamic axial compression across the fracture site.
2. The Threaded Section: Designed to engage the threads of a locking screw head, providing angular stability.
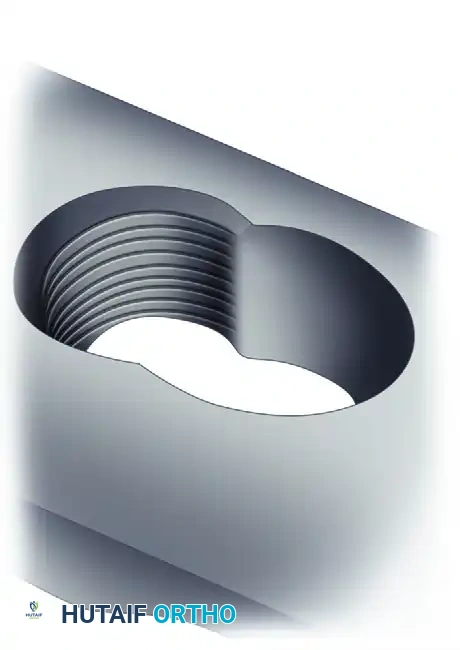
Biomechanical Pearl: When utilizing a combination of conventional and locking screws, conventional lag or compression screws must be inserted and fully tightened before the insertion of any locking screws. Once a locking screw is engaged, the plate-to-bone distance is fixed, and further interfragmentary compression is impossible.
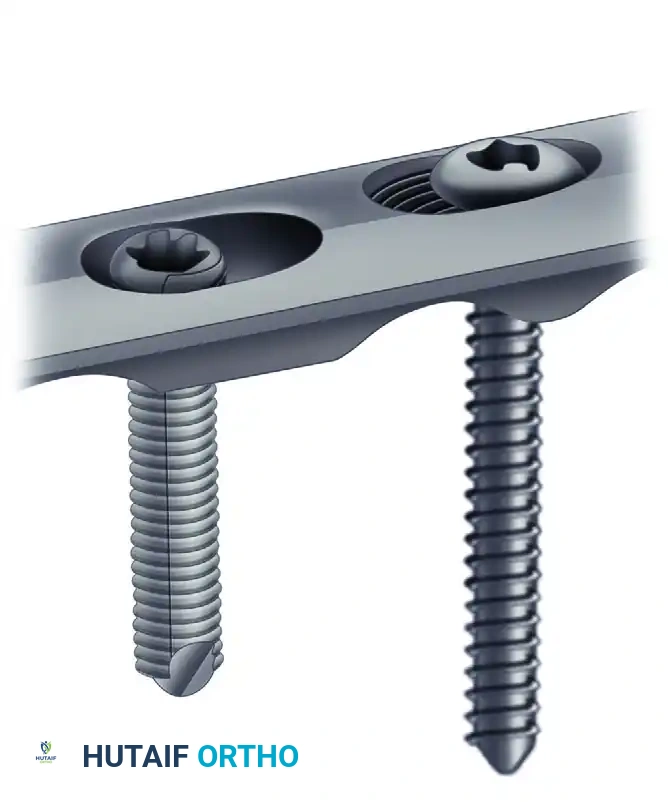
The locking screws themselves feature a specialized StarDrive recess for improved torque transmission and a distinct cortical thread profile designed to maximize purchase without relying on plate-to-bone compression.

Surgical Technique: Step-by-Step LCP Fixation
1. Approach and Exposure
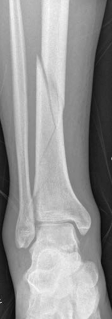
Make a longitudinal incision approximately 1 cm lateral to the tibial crest. This lateral placement prevents the surgical incision from resting directly over the hardware, thereby reducing the risk of wound dehiscence and hardware exposure. Deepen the dissection and retract the anterior compartment musculature laterally.
Surgical Warning: Do not strip the periosteum circumferentially. Adhere strictly to the principles of biologic osteosynthesis. Subperiosteally elevate only the minimal tissue necessary to achieve accurate fracture reduction and plate application.
2. Plate Selection and Contouring
Determine the appropriate plate length. The working length of the plate should be sufficient to span the zone of comminution, typically requiring a minimum of three to four bicortical screws in each main fracture fragment. Use bending instruments to contour the plate to the patient's specific anatomy. For tibial shaft fractures amenable to plate fixation, 3.5-mm implants are frequently preferred over 4.5-mm systems to significantly decrease hardware prominence beneath the thin anteromedial soft tissue envelope.
3. Temporary Fixation
Position the contoured plate over the fracture site. Temporarily secure it using standard plate-holding forceps. Alternatively, threaded push-pull plate holders can be utilized to fine-tune the plate's position on the bone.
4. Conventional Screw Insertion (If Compression is Desired)
If dynamic compression is indicated, utilize the 2.5-mm drill and the corresponding drill guide. For eccentric insertion (dynamic compression), place the drill guide at the edge of the DCU portion of the combi-hole furthest from the fracture line, ensuring no downward pressure is applied that might alter the trajectory. As the conventional cortex screw is tightened, the spherical head glides down the ramp of the DCU, translating the bone fragment and compressing the fracture.
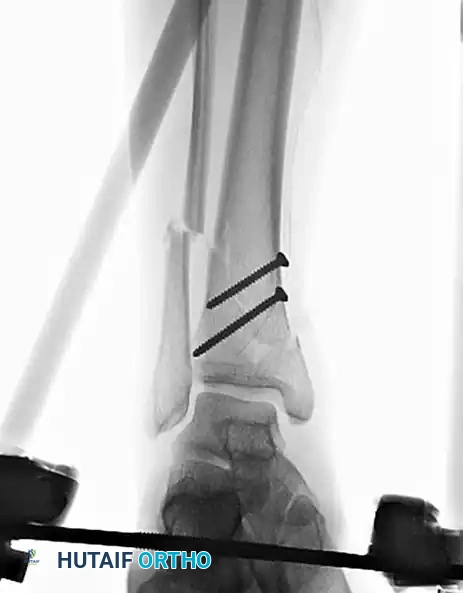
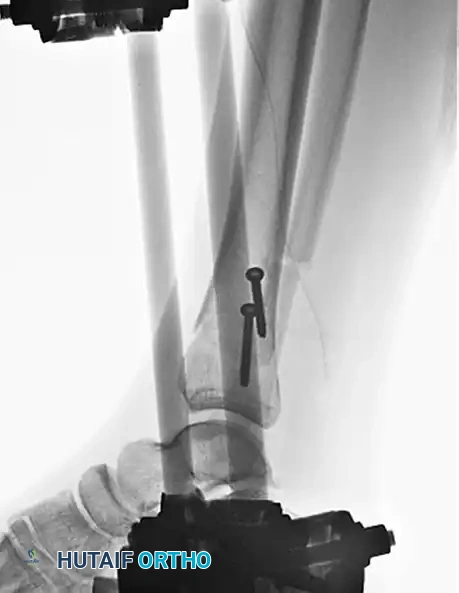
5. Interfragmentary Lag Screw Fixation
Anatomically reduce the fracture. If the fracture pattern allows (e.g., a spiral or oblique component), insert independent interfragmentary lag screws to achieve absolute stability before inserting the first locking screw.
6. Locking Screw Insertion
Once reduction and compression are achieved, proceed with locking screw insertion to create the fixed-angle construct.
* Screw the threaded drill guide directly into the threaded portion of the combi-hole until it is fully seated. This ensures the drill trajectory perfectly matches the locking mechanism.
* Use the appropriate drill bit to penetrate both cortices.
* Measure the required screw length using a standard depth gauge.
* Verify the drill bit and plate placement under multi-planar image intensification (fluoroscopy).
* Insert the locking screw under power using a torque-limiting adapter. The adapter is critical; it prevents cold-welding of the screw head to the plate and ensures the screw is securely locked. Stop insertion when an audible "click" is heard from the torque limiter.
Transfixation by Screws (ASIF) as an Adjunct
While diaphyseal fractures are rarely treated with lag screws alone due to the lack of a neutralization device (which leads to unacceptable failure rates under torsional and bending loads), transfixation by screws remains a vital adjunctive technique.
Indications in Complex Trauma
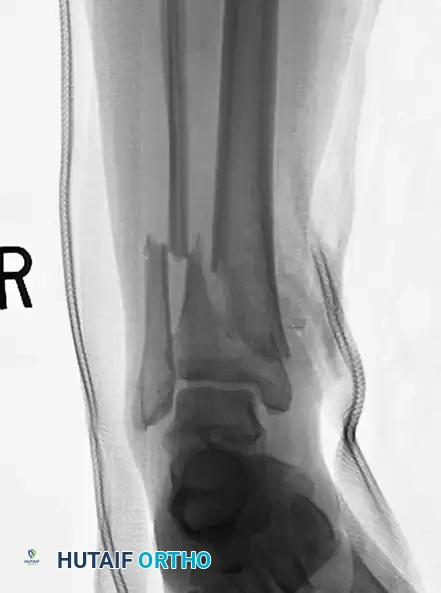
Lag screws are highly effective for the fixation of long oblique or spiral fractures (defined as having a length greater than three times the diaphyseal diameter) that extend into the metaphysis. The screws must be placed perfectly perpendicular to the fracture plane to achieve maximal interfragmentary compression and must be spaced evenly, avoiding the narrow, brittle apices of the fracture ends.
In the context of severe open fractures, interfragmentary screw fixation is an invaluable temporizing or supplementary measure. When applying a uniplanar external fixator to an open fracture, coronal plane stability can sometimes be difficult to control.
In such scenarios, large butterfly fragments or displaced metaphyseal spikes can continue to endanger the overlying soft tissue envelope. Anatomical reduction of the tibia and the strategic placement of interfragmentary lag screws can provide immediate stability as an adjunct to the external fixator.
Pitfall: Avoid complete interfragmentary fixation of open diaphyseal fractures neutralized only by external fixation, as this construct often yields poor long-term results due to stress shielding and inadequate mechanical support. Mixing these two systems is generally reserved for intraarticular fractures with shaft extensions, where screws are strictly confined to the periarticular region.
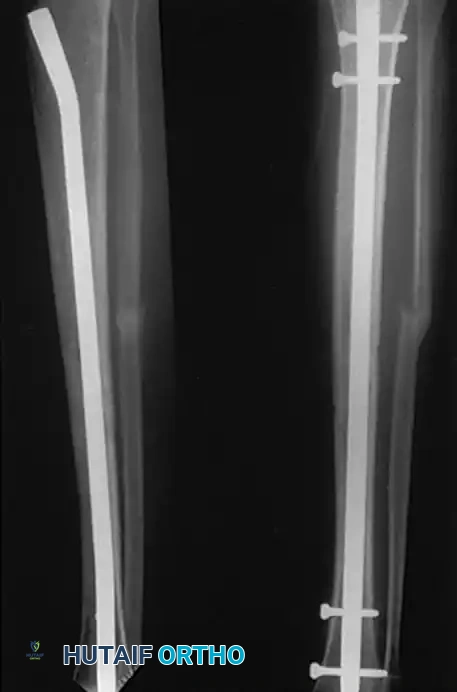
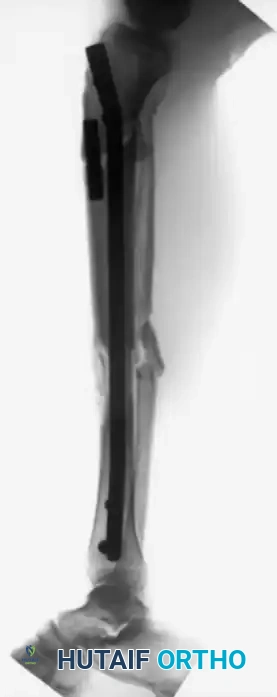
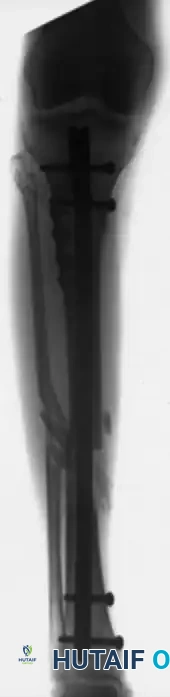
Intramedullary Fixation of Tibial Shaft Fractures
Locked intramedullary (IM) nailing is universally recognized as the gold standard and treatment of choice for the vast majority of type I, type II, and type IIIA open, as well as closed, tibial shaft fractures.
Biomechanical Advantages and Indications
IM nailing offers superior biomechanical advantages by acting as a load-sharing device positioned at the mechanical axis of the bone. This minimizes bending moments compared to eccentrically placed plates. Furthermore, IM nailing preserves the critical soft tissue sleeve and periosteal blood supply around the fracture site, promoting secondary bone healing via callus formation and allowing for early mobilization of adjacent joints.
The ability to lock the nails proximally and distally provides absolute control over length, alignment, and rotation in unstable, comminuted, or segmental fractures. Modern interlocking designs permit the stabilization of fractures located as far proximal as the tibial tubercle or as far distal as 3 to 4 cm proximal to the ankle joint plafond.
Contraindications:
IM nailing is generally contraindicated in patients with open physes (due to the risk of growth arrest), severe pre-existing anatomical deformities of the medullary canal, active burns or infected wounds directly over the entry portal, and most Gustilo-Anderson type IIIC open fractures requiring complex vascular reconstruction.
Patient Positioning and Setup
Proper patient positioning is paramount for successful IM nailing. The patient is typically placed supine on a radiolucent fracture table.
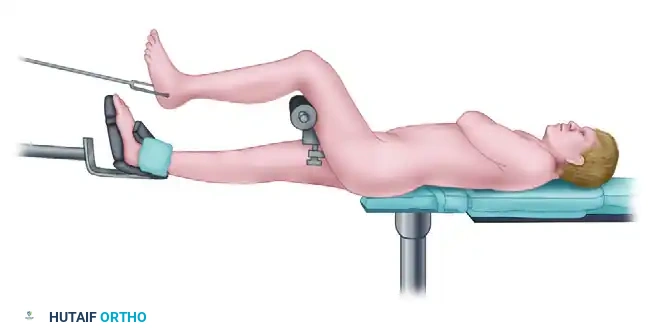
The injured limb is positioned with the knee flexed to at least 90 degrees to allow unimpeded access to the proximal tibial entry point (usually via a medial parapatellar or transpatellar tendon approach). Traction is applied through a calcaneal pin or a specialized boot to restore length and assist in preliminary reduction. The fluoroscopic C-arm must be positioned to allow seamless orthogonal (AP and lateral) views of the entire tibia, from the knee to the ankle.
The Reamed Versus Unreamed Controversy
The debate regarding reamed versus unreamed IM nailing in tibial fractures has evolved significantly over the past decades.
Historically, studies in the 1970s and 1980s reported unacceptably high infection rates (up to 33%) when reamed nailing was utilized for open tibial fractures. Animal models demonstrated that medullary reaming severely disrupts endosteal cortical blood flow, theoretically increasing susceptibility to infection and cortical necrosis. This led to the widespread adoption of unreamed, smaller-diameter solid nails for open injuries.
However, unreamed nailing introduced its own set of complications. Hardware failure (nail breakage and locking screw shear) became prevalent, particularly with smaller 8-mm implants subjected to axially unstable fractures, delayed unions, or severe comminution. Biomechanical data indicates a substantial improvement in fracture site stability (30% to 59% reduction in mobility) when increasing the implant diameter from 9 mm to 11 mm—a size often requiring reaming.
Current Evidence-Based Consensus:
With the advent of modern perioperative antibiotic protocols and advanced soft tissue coverage techniques, the paradigm has shifted.
* Closed Fractures: Reamed IM nailing is the definitive treatment of choice. Meta-analyses and landmark trials, such as the SPRINT (Study to Prospectively Evaluate Reamed Intramedullary Nails in Patients with Tibial Fractures) study, have demonstrated a statistically significant decrease in nonunion rates and secondary interventions with reamed nails in closed injuries.
* Open Fractures: The use of reamed nails in Gustilo type I and type II open fractures is now widely accepted, demonstrating infection rates comparable to unreamed nails (1.8% to 3.8%) but with significantly lower rates of hardware failure. The use of reamed nailing in severe type III open fractures remains controversial, though many trauma centers now prioritize the adequacy of surgical débridement and soft tissue coverage over the specific choice of reamed versus unreamed implants.
Surgical Warning: Tourniquets should never be inflated during the reaming process. Reaming generates significant thermal energy; without the cooling effect of active blood flow, thermal necrosis of the diaphyseal bone can occur, leading to catastrophic sequestration and infection.
Intramedullary Nailing of Proximal Third Tibial Fractures
The success of locked IM nailing in diaphyseal fractures has naturally led surgeons to expand its indications to include more proximal and distal metaphyseal fractures. However, nailing fractures of the proximal third of the tibial shaft presents unique and formidable geometric challenges.
Biomechanical Challenges and Malalignment
Malalignment is a notoriously common complication in proximal-third fractures treated with IM nails. This is primarily due to the large discrepancy in size between the relatively narrow tibial nail and the wide, capacious proximal tibial metaphysis. The nail lacks cortical contact to guide its trajectory, leading to the "wedge effect."
The two most common deformities encountered are:
1. Valgus Angulation: Often caused by an entry portal that is initiated too far medially (e.g., via a medial parapatellar incision) and directed laterally. As the nail is advanced, it forces the proximal fragment into valgus.
2. Apex Anterior Angulation (Procurvatum): This occurs if the entry portal is started too distally or directed too posteriorly. Furthermore, Henley et al. demonstrated that if the proximal bend of the IM nail rests at or below the fracture site, it acts as a wedge against the posterior cortex, driving the proximal fragment into anterior translation and apex anterior angulation. Additionally, the pull of the extensor mechanism (patellar tendon) on the tibial tubercle exacerbates this procurvatum deformity.
Surgical Solutions and Adjunctive Plating
To counteract these deforming forces, several advanced surgical techniques must be employed:
* Optimal Entry Point: A highly accurate, slightly higher, and more lateral entry point (often utilizing a suprapatellar approach in the semi-extended position) can mitigate the valgus and procurvatum forces.
* Blocking (Poller) Screws: The strategic placement of blocking screws in the wide metaphysis artificially narrows the medullary canal, guiding the nail trajectory and preventing translation of the fragments.
* Adjunctive Plating: In highly unstable proximal third fractures, the use of a provisional or definitive lateral plate in conjunction with the IM nail provides exceptional multi-planar stability.
This hybrid technique neutralizes the deforming forces of the extensor mechanism and ensures anatomical alignment while the IM nail is passed and locked.
Postoperative Care and Rehabilitation
The postoperative protocol is dictated by the stability of the fixation and the status of the soft tissue envelope.
For LCP Fixation:
If rigid fracture fixation has been achieved with a plate, the injured limb is initially immobilized in a well-padded splint to protect the soft tissues and allow for swelling subsidence. This is transitioned early to a removable fracture brace. Protected, partial weight-bearing is strictly enforced until early radiographic signs of bridging callus are noted, which typically requires a minimum of 6 to 8 weeks. Highly comminuted fractures secured with a bridge plating technique (relying on relative stability) may require extended periods of protected weight-bearing to prevent hardware fatigue failure before consolidation.
For IM Nailing:
One of the primary benefits of IM nailing is the ability to initiate early mobilization. Patients are encouraged to begin active and active-assisted range of motion exercises of the knee and ankle immediately postoperatively. Depending on the fracture pattern (e.g., axially stable transverse fractures), patients may be allowed weight-bearing as tolerated immediately. For axially unstable or highly comminuted fractures, weight-bearing may be restricted initially, though the load-sharing nature of the nail generally allows for a faster return to full weight-bearing compared to plate fixation.
Long-term functional outcomes following tibial diaphyseal fixation are generally excellent. As demonstrated by Lefaivre et al., patients typically return to functional baselines comparable to the normal population, provided that anatomical alignment is restored, the soft tissue envelope is respected, and evidence-based biomechanical principles are strictly adhered to during the index procedure.
You Might Also Like