Mastering Subtrochanteric Femoral Fracture Fixation With a Proximal Femoral Locking Plate
Key Takeaway
Subtrochanteric femoral fractures present significant biomechanical challenges due to powerful deforming muscular forces. Fixation utilizing a proximal femoral locking plate (PFLP) is indicated when cephalomedullary nailing is contraindicated. This technique emphasizes indirect reduction, bridge plating, and meticulous restoration of length, alignment, and rotation. Proper execution requires precise patient positioning, strategic screw placement to optimize working length, and careful evaluation of the lesser trochanter to ensure accurate rotational alignment.
Introduction to Subtrochanteric Femoral Fractures
Subtrochanteric femoral fractures represent one of the most biomechanically demanding injuries in orthopedic traumatology. Defined anatomically as fractures occurring within the zone extending from the lesser trochanter to approximately 5 centimeters distally into the proximal femoral shaft, these injuries are subjected to immense physiological loads. The subtrochanteric region consists primarily of cortical bone with a relatively tenuous blood supply compared to the highly vascularized metaphyseal bone of the intertrochanteric region, making it prone to delayed union or nonunion.
While cephalomedullary nailing remains the gold standard for the majority of subtrochanteric fractures due to its load-sharing biomechanics and minimally invasive insertion, Proximal Femoral Locking Plates (PFLPs) remain an indispensable tool in the orthopedic surgeon's armamentarium.
Indications for Proximal Femoral Locking Plates
PFLPs are specifically indicated in complex clinical scenarios where intramedullary nailing is either contraindicated or technically unfeasible. These include:
* Narrow Medullary Canals: Patients with excessive femoral bowing or congenital anomalies preventing nail passage.
* Pre-existing Hardware: Ipsilateral total hip arthroplasty (THA) stems, dynamic hip screws, or distal femoral plates that obstruct the medullary canal.
* Complex Fracture Morphology: Fractures with severe comminution extending into the piriformis fossa or greater trochanter, which compromises the starting point for an intramedullary nail.
* Polytrauma: Cases requiring simultaneous fixation of multiple injuries where positioning for nailing is detrimental to patient stability.
Surgical Warning: The subtrochanteric region is subjected to the highest compressive forces (medial cortex) and tensile forces (lateral cortex) in the human body. Implants placed laterally, such as PFLPs, act as load-bearing devices rather than load-sharing devices. Therefore, meticulous surgical technique, restoration of the medial cortical buttress, and adherence to biological plating principles are paramount to prevent catastrophic implant failure.
Biomechanics and Deforming Forces
Understanding the muscular anatomy of the proximal femur is critical for achieving and maintaining reduction. The proximal fragment is subjected to a classic triad of deforming forces:
1. Flexion: Driven by the iliopsoas muscle inserting on the lesser trochanter.
2. Abduction: Driven by the gluteus medius and minimus inserting on the greater trochanter.
3. External Rotation: Driven by the short external rotators (piriformis, gemelli, obturator internus/externus, quadratus femoris).
Conversely, the distal fragment is typically adducted by the adductor musculature (longus, brevis, magnus) and shortened proximally by the hamstrings and quadriceps. Overcoming these forces requires strategic patient positioning, pharmacological paralysis, and the judicious use of reduction aids.
Preoperative Planning and Templating
Preoperative templating is mandatory. High-quality anteroposterior (AP) and true lateral radiographs of the affected femur, along with full-length views of the contralateral intact femur, must be obtained.
- Length Assessment: The contralateral femur serves as the template for restoring leg length.
- Implant Selection: Determine the appropriate plate length. For bridge plating, a long plate is required to achieve a plate-span ratio of >3:1 (comminuted fractures) or >8:1 (simple fractures), ensuring a low screw density (<0.5) to optimize the working length and distribute strain evenly across the construct.
- Neck-Shaft Angle: Templating ensures the correct trajectory of the proximal locking screws into the femoral head and neck, avoiding joint penetration.
Patient Positioning and Setup
Proper positioning is the foundation of a successful subtrochanteric fracture fixation.
- Table Selection: Position the patient supine on a radiolucent fracture table. This allows for continuous traction and unobstructed fluoroscopic access.
- Contralateral Limb: Position the unaffected limb in a hemilithotomy position or scissored posteriorly to allow the C-arm to swing freely for true lateral imaging of the affected hip.
- Rotational Referencing (The Lesser Trochanter Technique):
- If the lesser trochanter on the affected side is intact, obtain a fluoroscopic AP view of the contralateral hip.
- Ensure the contralateral patella is facing directly anteriorly toward the ceiling (confirm with a true AP view of the knee).
- Save this image to the fluoroscopy machine. The specific contour and profile of the lesser trochanter on this image will serve as your intraoperative reference for restoring perfect version to the fractured femur.
- Affected Limb Imaging: Obtain a true lateral image of the affected hip and calculate the amount of external rotation of the proximal segment. This dictates the degree of internal rotation required during reduction.
Surgical Approach: Lateral Proximal Femur
Incision and Dissection
- Make a direct lateral approach to the proximal femur. The incision length depends on whether a minimally invasive percutaneous osteosynthesis (MIPO) technique or an open reduction is planned.
- Split the fascia lata longitudinally in line with the skin incision.
- Identify the vastus lateralis. Split the fascia of the vastus lateralis and carefully elevate the muscle belly anteriorly off the lateral intermuscular septum.
- Release the origin of the vastus lateralis from the trochanteric ridge to expose the proximal femur fully.
Clinical Pearl: When elevating the vastus lateralis, be highly vigilant of the perforating branches of the profunda femoris artery. These vessels cross the lateral intermuscular septum and must be meticulously identified, ligated, or cauterized to prevent massive postoperative hematoma.
Step-by-Step Surgical Technique
1. Fracture Reduction Strategies
Based on preoperative imaging, the surgeon must choose between bridge plating (for comminuted fractures) or direct reduction with interfragmentary fixation and neutralization plating (for simple, short oblique, or transverse patterns). We typically advocate for a bridge plating technique to preserve the fracture hematoma and periosteal blood supply, relying on preoperative templating of the contralateral side for assessing length.
When dealing with severe residual deformities of the proximal segment, reduction aids are essential.
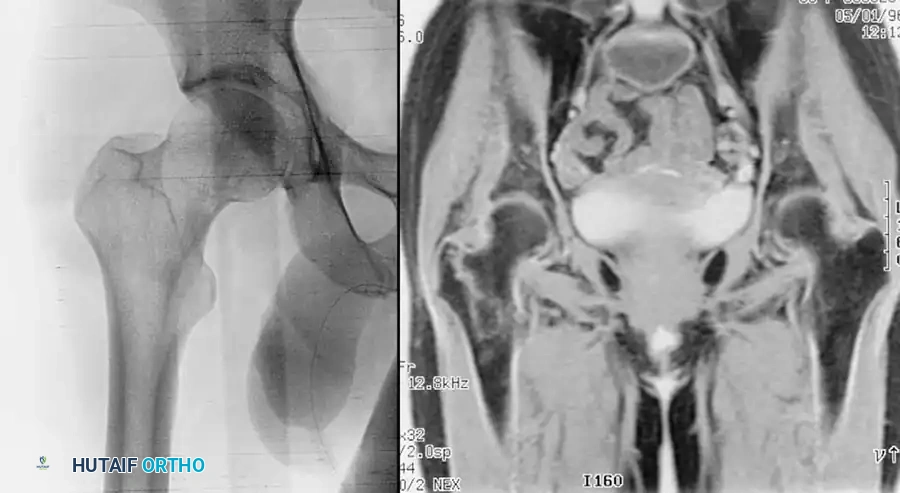
Figure A: Preoperative radiograph demonstrating the classic flexion, abduction, and external rotation deformity of the proximal subtrochanteric fragment.
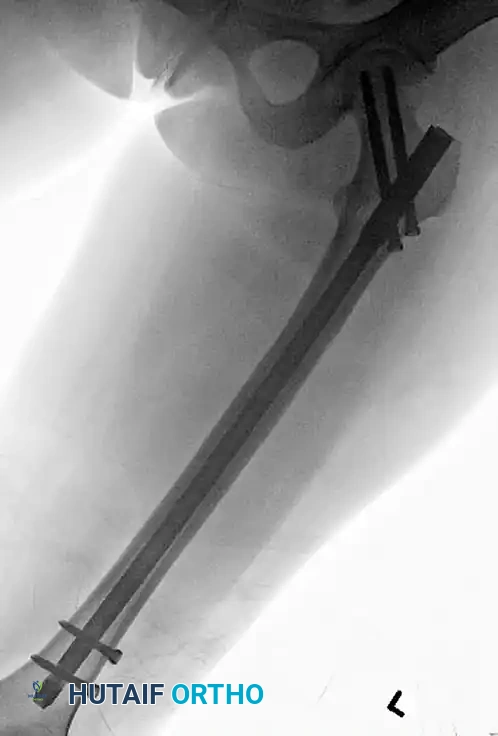
Figure B: Intraoperative lateral fluoroscopic image without reduction aids, showing persistent malalignment.
To correct sagittal and coronal plane deformities, utilize a Cobb elevator and a ball spike pusher. The elevator can be used to lever the proximal fragment out of flexion, while the ball spike pusher controls abduction and rotation.
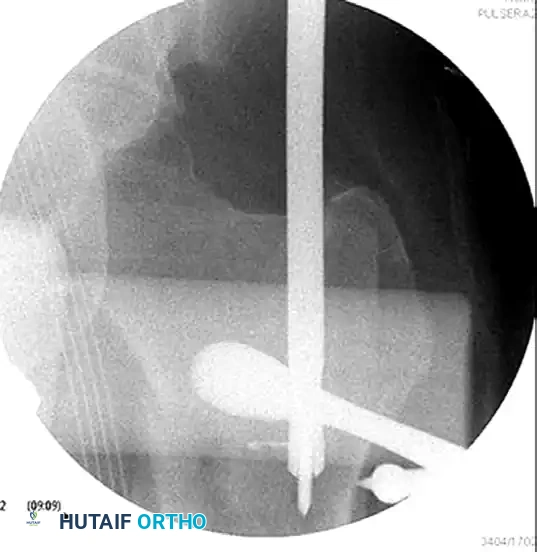
Figure C: Intraoperative AP fluoroscopic image showing the elevator and ball spike pusher actively correcting the coronal deformity.
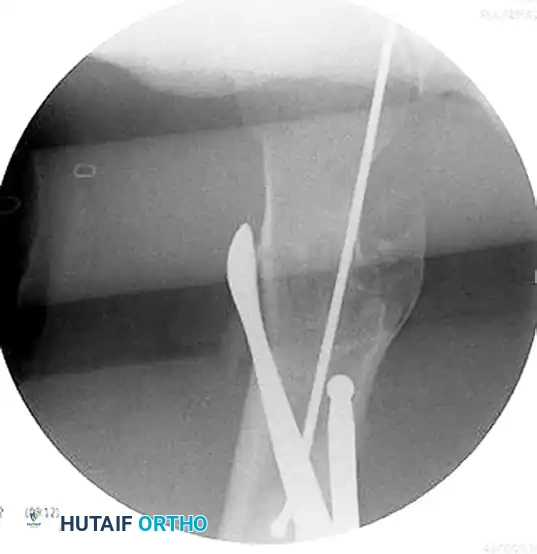
Figure D: Intraoperative lateral fluoroscopic image demonstrating the correction of the sagittal plane deformity using the same reduction aids.
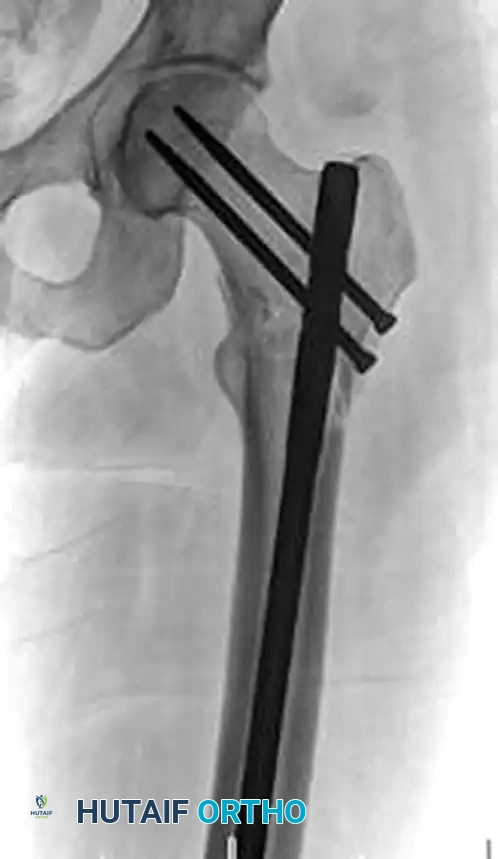
Figure E: Fluoroscopic confirmation of successful reduction prior to definitive plate application.
In cases where the reduction is highly unstable, a strategically placed cerclage wire can be utilized to hold the correction of the proximal segment deformity temporarily or definitively.
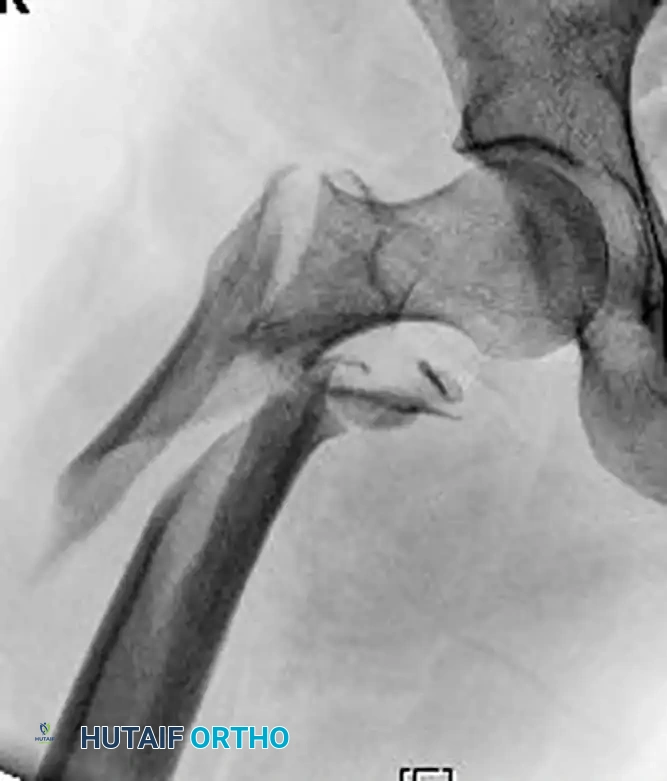
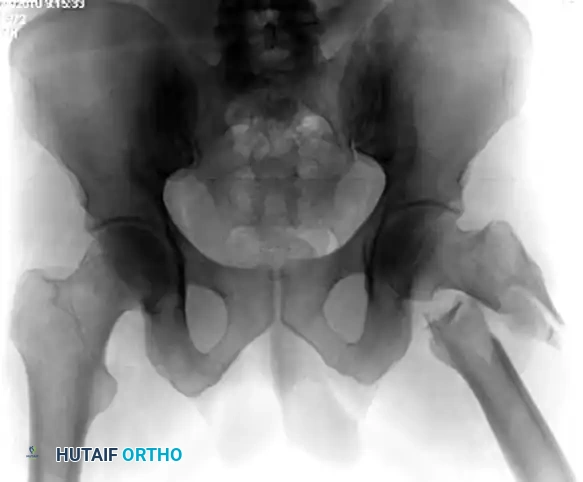
Figure F: Preoperative radiograph showing a long oblique subtrochanteric fracture highly susceptible to shear forces.
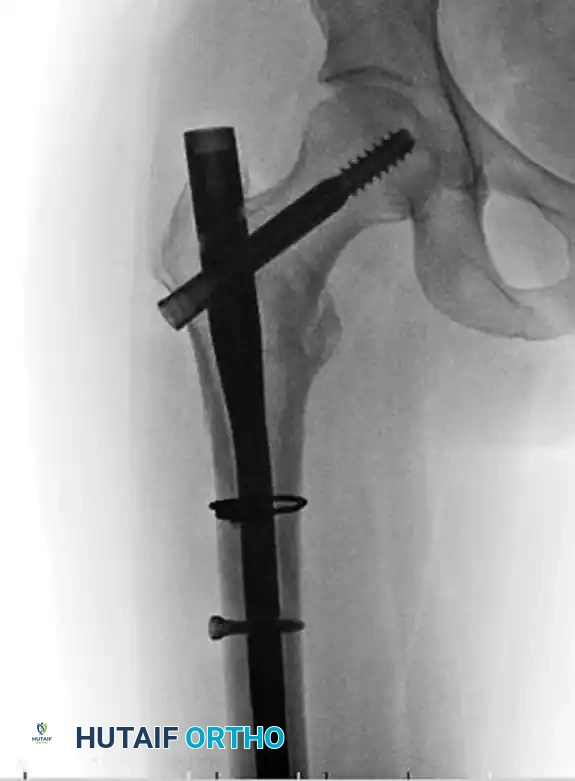
Figure G: Postoperative radiograph demonstrating the use of a cerclage wire to anatomically reduce and hold the proximal segment deformity, supplemented by a locking plate.
2. Plate Introduction and Provisional Fixation
Once appropriate alignment has been achieved, introduce the proximal femoral locking plate through the proximal wound. Slide it submuscularly along the lateral cortex of the femoral shaft.
- Position the plate at a level that allows the placement of a guide pin just proximal to the calcar femorale.
- We generally use a long plate that allows the placement of four or five well-spaced screws in the distal segment, adhering to the principle of low screw density to increase the working length of the construct.
- Pin the plate in place proximally and distally with provisional K-wires or olive wires.
- If the plate is sitting proud off the bone, a standard non-locking cortical screw can be placed dynamically to reduce the plate to the bone as necessary.
3. Definitive Screw Sequence
The sequence of screw insertion is critical to avoid malreduction and ensure biomechanical stability.
- The Calcar Screw: Place the first locking screw just above the calcar. This screw is the most critical for preventing varus collapse, as it provides a direct buttress against the compressive forces transmitted through the medial femoral neck.
- Distal Shaft Reduction: Place a non-locking cortical screw distal to the fracture into the femoral shaft. Tightening this screw will reduce the shaft to the plate. Pay particular attention to the fracture alignment during this step, ensuring no varus or valgus malalignment is introduced.
- Managing the Distal-Most Hole: Place a cortical screw into the distalmost hole in the plate.
> Pitfall: Avoid placing a bicortical locking screw in the distalmost hole of the plate. A rigid bicortical locking screw at the very end of a long construct creates a massive stress riser at the bone-implant interface, significantly increasing the risk of a peri-prosthetic fracture. Alternatively, place a unicortical locking screw or a standard cortical screw in the distalmost portion of the plate to allow for a gradual transition of stress. If an external outrigger or targeting jig has been used, we place this distalmost screw last. - Proximal Fixation: Fill the plate proximally with as many locking screws as possible based on the individual patient’s anatomy. The proximal femur requires maximum fixation density due to the high pull-out forces. If an initial proximal cortical screw was placed to pull the plate to the bone, remove it and change it to a locking screw to complete the fixed-angle construct.
4. Final Evaluation of Rotation
Malrotation is a common and poorly tolerated complication of subtrochanteric fracture fixation. At this point, rigorously evaluate the rotation.
- If the lesser trochanter is intact, rotate the patient's foot to face the patella directly anteriorly.
- Take an AP fluoroscopic view of the affected hip.
- Compare the contour and size of the lesser trochanter on the affected side to the saved image of the contralateral lesser trochanter obtained during the initial setup.
- If the profiles match perfectly, correct version has been restored. If the affected lesser trochanter appears larger (more prominent), the femur is internally rotated. If it appears smaller or hidden, the femur is externally rotated. Adjust the distal fixation accordingly before final tightening.
Complications and Pitfalls
Varus Malalignment and Implant Failure
The most devastating complication of PFLP fixation in the subtrochanteric region is varus collapse leading to catastrophic implant failure. This typically occurs due to a failure to restore the medial cortical buttress or an improper starting point/trajectory that places the implant too far laterally, increasing the bending moment on the plate.
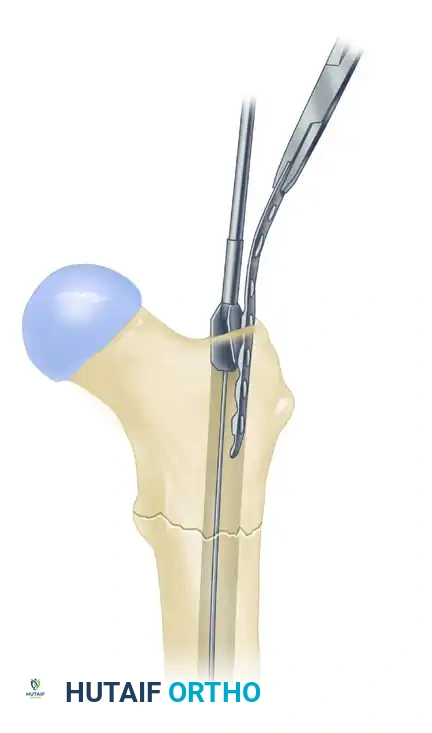
Figure H: Radiographic example of severe varus malalignment with subsequent implant failure resulting from a lateral starting point and inadequate medial support.
Correcting Suboptimal Portals
Occasionally, during the preparation of the proximal femur (especially if converting from a failed nailing attempt or dealing with complex anatomy), a suboptimal lateral portal or track may be created. If a new, more medial portal is required to optimize the trajectory into the femoral neck, the lateral defect must be managed to prevent stress shielding or fracture propagation.

Figure I: To correct a suboptimal portal, a small neutralization plate can be placed in the reamed lateral track, allowing a more medial, anatomically correct portal to be established for the definitive fixation device.
Postoperative Protocol and Rehabilitation
The postoperative management of subtrochanteric fractures fixed with a PFLP requires a delicate balance between early mobilization to prevent systemic complications and protection of the construct to allow for biological healing.
- Weight-Bearing Status: Unlike intramedullary nails, which often allow immediate weight-bearing as tolerated, PFLPs are load-bearing constructs. Patients are typically restricted to toe-touch weight-bearing (TTWB) or flat-foot weight-bearing (max 10-15% body weight) for the first 6 to 8 weeks.
- Deep Vein Thrombosis (DVT) Prophylaxis: Mandatory chemical prophylaxis (e.g., LMWH or DOACs) combined with mechanical compression devices, continued for a minimum of 28 to 35 days postoperatively, per ACCP guidelines.
- Physical Therapy: Immediate initiation of passive and active-assisted range of motion (ROM) exercises for the hip and knee. Strengthening of the abductors is delayed until radiographic evidence of early callus formation is observed to prevent excessive tensile strain on the lateral plate.
- Radiographic Follow-up: AP and lateral radiographs are obtained at 2 weeks, 6 weeks, 12 weeks, and 6 months. Progression to full weight-bearing is strictly contingent upon the radiographic visualization of bridging callus across at least three cortices.
By adhering strictly to biological plating principles, respecting the deforming muscular forces, and executing a flawless surgical technique, orthopedic surgeons can achieve excellent union rates and functional outcomes in the management of complex subtrochanteric femoral fractures using Proximal Femoral Locking Plates.
You Might Also Like