Extensive Release of the Flexor-Pronator Origin: The Williams and Haddad Technique
Key Takeaway
The Williams and Haddad extensive release of the flexor-pronator origin is a powerful surgical intervention designed to address severe flexion contractures of the wrist and fingers. By systematically freeing the flexor muscle mass from the medial epicondyle down to the distal forearm, this technique restores functional resting tension. This guide details the precise neurovascular protection, stepwise aponeurotic release, and postoperative protocols required for optimal outcomes.
Introduction to the Extensive Flexor-Pronator Origin Release
Severe flexion contractures of the wrist and fingers present a formidable challenge in reconstructive upper extremity surgery. These deformities, often resulting from spastic hemiplegia, cerebral palsy, severe traumatic brain injury, or Volkmann’s ischemic contracture, severely compromise hand function and hygiene. When conservative measures such as dynamic splinting and targeted botulinum toxin injections fail, surgical intervention becomes necessary to restore a functional resting posture and facilitate active or passive extension.
While limited releases of the flexor-pronator origin may suffice for mild to moderate contractures, severe cases require a more aggressive approach. Williams and Haddad described a highly effective, extensive release of the flexor-pronator origin. Unlike limited procedures, this technique completely frees the origins of the flexor mass almost to the level of the wrist, allowing the entire muscle-tendon unit to slide distally. This effectively lengthens the myotendinous units without the need for individual tendon lengthenings, preserving the continuity and relative tension of the flexor mechanism.
This comprehensive guide details the academic principles, biomechanical rationale, and step-by-step surgical execution of the Williams and Haddad technique, providing orthopedic surgeons with the knowledge required to perform this complex procedure safely and effectively.
Clinical Anatomy and Biomechanics
A profound understanding of the volar forearm anatomy is non-negotiable when performing an extensive flexor-pronator slide. The procedure requires meticulous dissection through multiple fascial layers while protecting critical neurovascular structures.
The Superficial and Intermediate Flexor Compartments
The superficial flexor-pronator group originates from the medial epicondyle of the humerus via the common flexor tendon. This group includes:
* Pronator Teres (PT): Possesses a humeral head (from the medial epicondyle) and an ulnar head (from the coronoid process). The median nerve classically passes between these two heads.
* Flexor Carpi Radialis (FCR): Originates from the medial epicondyle and inserts into the base of the second metacarpal.
* Palmaris Longus (PL): Often absent, but when present, originates from the medial epicondyle and inserts into the palmar aponeurosis.
* Flexor Carpi Ulnaris (FCU): Features a humeral head (medial epicondyle) and an ulnar head (olecranon and posterior border of the ulna). The ulnar nerve enters the forearm between these two heads.
The intermediate layer consists solely of the Flexor Digitorum Sublimis (FDS), which has a humeroulnar head (medial epicondyle and coronoid process) and a radial head (anterior border of the radius).
The Deep Flexor Compartment
The deep compartment includes:
* Flexor Digitorum Profundus (FDP): Originates extensively from the proximal three-quarters of the volar and medial surfaces of the ulna and the adjacent interosseous membrane.
* Flexor Pollicis Longus (FPL): Originates from the anterior surface of the radius and the interosseous membrane.
* Pronator Quadratus (PQ): Located distally, spanning the distal ulna and radius.
Neurovascular Considerations
The extensive release places several critical structures at risk:
1. Median Nerve: Must be protected as it dives deep to the lacertus fibrosus, passes between the heads of the pronator teres, and travels deep to the FDS arch. Its motor branches to the superficial flexors must be meticulously preserved to maintain postoperative flexor power.
2. Ulnar Nerve: Highly vulnerable at the cubital tunnel and as it passes between the heads of the FCU. It requires early identification and often anterior transposition at the conclusion of the procedure.
3. Anterior Interosseous Nerve (AIN) and Artery: Located on the volar surface of the interosseous membrane. These must be identified and protected during the deep release of the FDP.
4. Radial and Ulnar Arteries: The radial artery is at risk during the release of the FDS radial origin, while the ulnar artery is vulnerable during deep ulnar dissection.
BIOMECHANICAL PEARL:
The primary biomechanical advantage of the Williams and Haddad release is the preservation of the distal myotendinous junctions. By releasing the proximal aponeurotic origins and allowing the muscle belly to slide distally, the surgeon achieves significant lengthening (often 3 to 5 cm) while maintaining the physiological length-tension relationship of the muscle fibers better than fractional tendon lengthening would allow.
Preoperative Planning and Patient Positioning
Indications
- Severe spastic flexion contractures of the wrist and fingers (e.g., cerebral palsy, traumatic brain injury, stroke).
- Volkmann’s ischemic contracture with diffuse muscle fibrosis.
- Failure of conservative management (splinting, therapy, chemodenervation).
Contraindications
- Fixed, rigid joint contractures (unless concomitant capsular releases or proximal row carpectomies are planned).
- Athetosis or severe dystonia where release may lead to unpredictable postoperative posturing.
- Lack of any voluntary motor control, where a simpler hygiene-focused procedure (e.g., superficial flexor tenotomies) might be more appropriate.
Positioning and Setup
- The patient is placed supine on the operating table.
- The affected upper extremity is extended onto a radiolucent hand table.
- A well-padded sterile tourniquet is applied high on the brachium.
- The arm is prepped and draped in a standard sterile fashion, allowing full visualization of the arm from the mid-humerus to the fingertips.
- Loupe magnification (2.5x to 3.5x) is highly recommended for neurovascular dissection.
Surgical Technique: The Williams and Haddad Approach
The Williams and Haddad technique is a systematic, layer-by-layer release of the flexor-pronator mass. Meticulous hemostasis and precise identification of neurovascular structures are paramount.
Step 1: Incision and Superficial Exposure
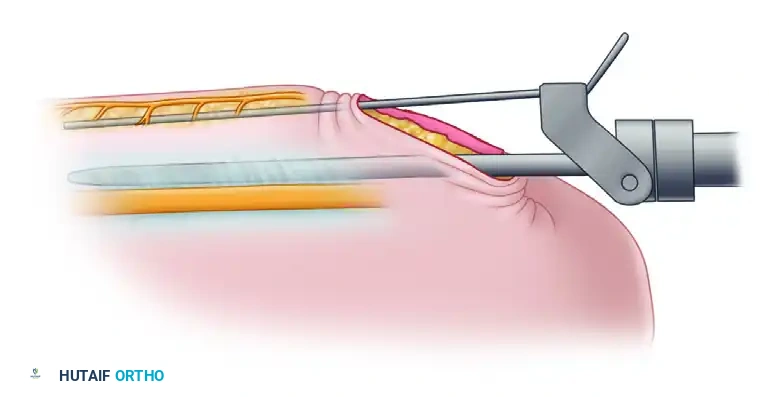
Make a generous, curvilinear incision over the medial aspect of the arm and forearm. The incision should begin approximately 5 cm proximal to the elbow joint, anterior to the medial epicondyle of the humerus, and extend distally along the ulnar border of the volar forearm to about 5 cm proximal to the wrist joint.
Figure 72-8A: The extensive medial and volar incision, extending from the distal arm to the distal forearm.
During the initial superficial dissection, it is critical to identify and protect the medial antebrachial cutaneous nerve and the basilic vein. Anteriorly dissect a full-thickness flap of skin and subcutaneous tissue to expose the deep fascia, the lacertus fibrosus (bicipital aponeurosis), and the antecubital fossa.
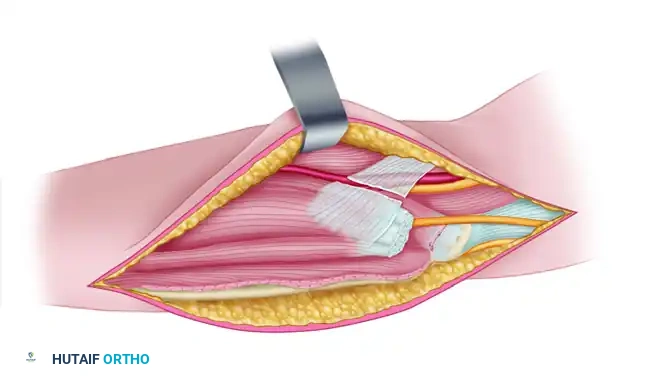
Step 2: Antecubital Dissection and Ulnar Nerve Identification
Divide the lacertus fibrosus to decompress the antecubital space and expose the underlying brachial artery and median nerve. Trace the median nerve distally to identify its motor branches to the superficial flexor group.
Next, direct attention medially to the cubital tunnel. Identify the ulnar nerve as it passes posterior to the medial epicondyle and enters the forearm between the two heads of origin of the flexor carpi ulnaris. Carefully neurolyse the ulnar nerve to protect it during the subsequent muscle releases.
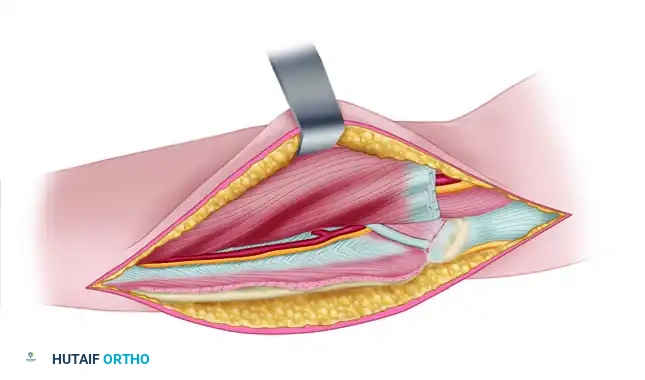
Figure 72-8B: Exposure of the structures anteriorly and medially at the elbow, including the lacertus fibrosus, median nerve, and ulnar nerve.
Step 3: Release of the Superficial Flexor Origin
With the neurovascular structures protected, begin the release of the superficial muscle group. Divide the common tendon of origin of the superficial flexor muscles (PT, FCR, PL, FCU) just distal to the medial epicondyle.
SURGICAL WARNING:
When dividing the common flexor tendon, stay strictly superficial to the joint capsule. Inadvertent division of the anterior band of the ulnar collateral ligament (UCL) will result in severe iatrogenic valgus instability of the elbow.
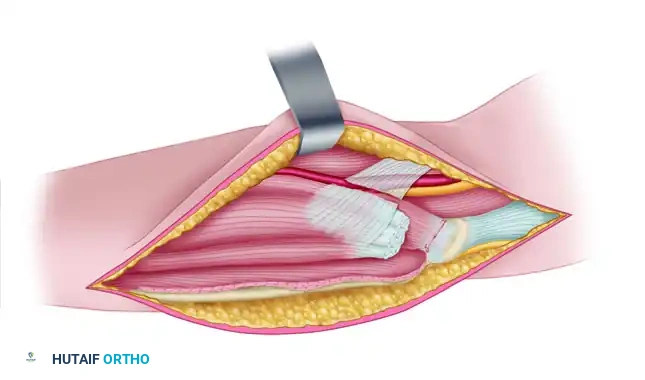
Figure 72-8C: The lacertus fibrosus has been divided, and the origin of the superficial flexors has been released from the medial epicondyle.
Step 4: Mobilization of Pronator Teres and FDS
Protecting the median nerve and its delicate motor branches, free the ulnar origin of the pronator teres. Extend the dissection distally along the lateral border of the pronator teres toward its insertion on the radius.
At this level, identify the aponeurotic radial origin of the flexor digitorum sublimis (FDS). Divide this radial origin to allow the FDS to slide distally. Extreme caution must be exercised here to avoid injuring the radial artery, which runs in close proximity to the radial border of the FDS.
Step 5: Deep Aponeurotic Release of FCU and FDP
Retract the ulnar nerve and the stump of the common flexor tendon anteriorly. Proceed to free the origin of the flexor carpi ulnaris from the medial border of the olecranon. During this dissection, you will encounter the posterior ulnar recurrent artery; ligate and divide it to allow full mobilization of the muscle belly.
Continue distally along the ulna. Avoiding the periosteum, release the aponeurotic origin of the flexor carpi ulnaris and the flexor digitorum profundus (FDP) from the ulna throughout its entire length.

Figure 72-8D: The origin of the flexor carpi ulnaris has been released from the olecranon, and the common origin of the FCU and FDP has been released from the ulna.
Step 6: Volar Ulnar and Interosseous Membrane Release
To achieve maximum excursion, the deep volar attachments must be released. Identify the common interosseous artery, its volar branch, and the anterior interosseous nerve (AIN).
Carefully release the origin of the flexor digitorum profundus from the volar aspect of the ulna and the adjacent interosseous membrane. Carry this dissection as far distally as the proximal border of the pronator quadratus.
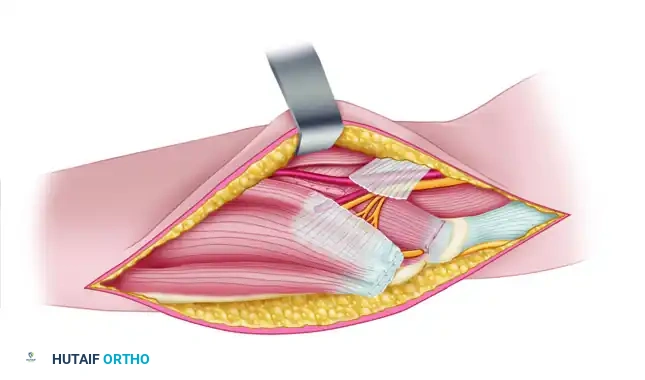
Figure 72-8E: The origin of the flexor digitorum profundus has been released from the volar aspect of the ulna and the interosseous membrane.
Next, release the specific origin of the flexor digitorum profundus to the index finger from the radius. Finally, release any remaining origin of the flexor digitorum sublimis from the medial side of the coronoid process, remaining proximal to the common interosseous artery.
Figure 72-8F: The origin of the FDP to the index finger has been released from the radius, and the remaining FDS origin has been released from the coronoid process.
Step 7: Final Assessment and Ulnar Nerve Transposition
Once all releases are complete, passively extend the patient's wrist and fingers. The flexor mass should slide distally by several centimeters. Palpate the surgical bed to identify and release any remaining tight fascial bands that restrict full extension.
Assess the tension on the ulnar nerve. Because the elbow will be splinted in extension or because the nerve may bowstring across the released medial compartment, the ulnar nerve is frequently under tension. If any tension is noted, perform a routine anterior transposition of the ulnar nerve, securing it loosely into the brachialis muscle or subcutaneous tissue to prevent subluxation.
If a persistent elbow flexion contracture remains despite the flexor-pronator release, carefully divide the brachialis tendon.
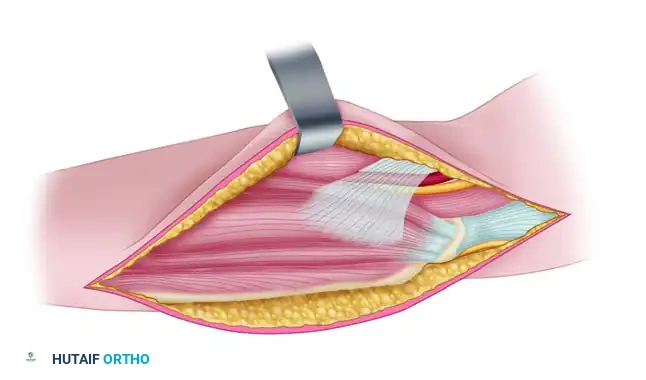
Figure 72-8G: The ulnar nerve has been transplanted anteriorly into the brachialis muscle to relieve tension.
CLINICAL PEARL:
The flexor pollicis longus (FPL) is often not fully addressed by the proximal slide alone due to its distal radial origin. If the thumb remains tightly flexed at the interphalangeal joint after the proximal release, perform a separate fractional lengthening or Z-lengthening of the FPL tendon through a separate incision proximal to the wrist.
Prior to closure, deflate the tourniquet and achieve meticulous hemostasis. Hematoma formation in this extensive dead space can lead to severe fibrosis and recurrent contracture. Insert a closed suction drain if necessary. Close the subcutaneous tissue and skin in layers.
Postoperative Care and Rehabilitation Protocol
The success of an extensive flexor-pronator release relies heavily on strict adherence to a phased postoperative rehabilitation protocol. The goal is to allow the muscles to heal in their new, lengthened position while preventing joint stiffness.
Phase 1: Strict Immobilization (Weeks 0 - 3)
Immediately postoperatively, the extremity is placed in a bulky, well-padded long-arm splint.
* Positioning: The elbow is flexed to approximately 90 degrees (to minimize tension on the median nerve and brachial artery), while the wrist and fingers are splinted in maximal safe extension. The thumb is held in palmar abduction and extension.
* The patient is monitored for signs of compartment syndrome or neurovascular compromise, though the extensive fascial release inherently decompresses the forearm.
Phase 2: Controlled Mobilization (Weeks 3 - 12)
At 3 weeks, the initial surgical splint and sutures are removed.
* A custom-molded thermoplastic splint is fabricated by an occupational therapist. This splint maintains the wrist and fingers in extension and the thumb in abduction.
* Wear Schedule: The splint is worn continuously (23 hours a day) for the next 3 months.
* Therapy: The splint is removed only for structured physical and occupational therapy sessions. Therapy focuses on active and passive range of motion of the elbow, wrist, and digits. Tendon gliding exercises are initiated to prevent adhesions within the sliding muscle mass.
Phase 3: Night Splinting and Strengthening (Months 3 - 4.5)
After 3 months of continuous splinting, daytime wear is discontinued to encourage functional use of the extremity.
* The extension splint is worn only at night for an additional 6 weeks to
You Might Also Like