Transfemoral (Above-Knee) Amputations: Master Surgical Techniques and Protocols
Key Takeaway
Transfemoral amputation is a major orthopedic procedure requiring meticulous soft tissue handling and precise bone resection to optimize prosthetic fitting. Preserving stump length and performing adductor magnus myodesis are critical to maintaining the femoral lever arm and preventing abduction drift. This guide details evidence-based surgical techniques for both ischemic and nonischemic limbs, emphasizing biomechanics, myoplastic stabilization, and postoperative rehabilitation protocols to maximize patient mobility and functional outcomes.
Introduction to Transfemoral Amputations
Transfemoral (above-knee) amputation is a major ablative and reconstructive orthopedic procedure, second in frequency only to transtibial (below-knee) amputation. The loss of the anatomical knee joint profoundly alters human locomotion, exponentially increasing the energy expenditure required for ambulation. Consequently, the overarching surgical goal is to construct a robust, dynamic, and well-padded residual limb that maximizes the biomechanical advantage for prosthetic control.
Amputation levels above the knee are anatomically classified into four distinct categories based on the length of the retained femur:
* Supracondylar: Transection just proximal to the femoral condyles.
* Long Transfemoral: Transection through the distal third of the femoral diaphysis.
* Medial Transfemoral: Transection through the middle third of the femoral diaphysis.
* Short Transfemoral: Transection through the proximal third of the femoral diaphysis.
💡 Clinical Pearl: The Hip Disarticulation Threshold
Amputation stumps in which the level of bone section is less than 5 cm distal to the lesser trochanter lack sufficient lever arm to control a transfemoral prosthesis. These extremely short residual limbs function biomechanically as hip disarticulations and must be prosthetically fitted as such.
Biomechanics and Prosthetic Considerations
The functional success of a transfemoral amputation relies heavily on the length of the residual femur and the stabilization of the severed musculature. The femur acts as a critical lever arm within the prosthetic socket. A longer lever arm provides greater surface area for load distribution, enhances proprioceptive feedback, and allows for more powerful control of the prosthesis during the stance and swing phases of gait.
The 10-Centimeter Rule for Prosthetic Knees
While preserving femoral length is paramount, the surgeon must account for the physical dimensions of the prosthetic knee mechanism. The conventional, constant-friction knee joint utilized in most standard above-knee prostheses extends approximately 9 to 10 cm distal to the end of the prosthetic socket. Therefore, the bone must be amputated at least 10 cm proximal to the anatomical knee joint line to allow adequate room for the prosthetic components.
If the amputation level is more distal than this critical threshold, the prosthetic knee joint will sit lower than the contralateral anatomical knee. This discrepancy is cosmetically undesirable, highly noticeable when the patient is seated, and alters the swing-phase kinematics of the prosthetic limb.
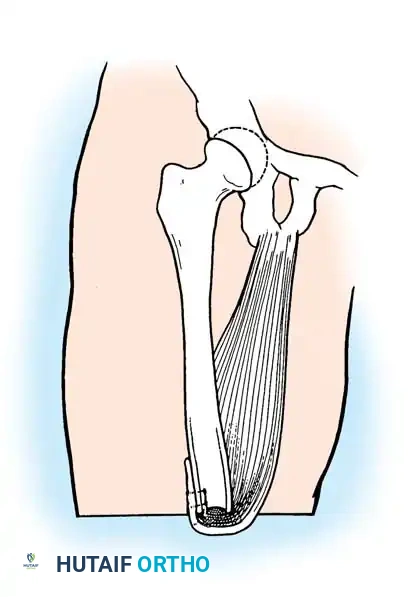
Muscle Stabilization: The Adductor Magnus Imperative
In the intact lower extremity, the adductor magnus is the most powerful adductor of the thigh, providing critical counterbalance to the abductor pull of the gluteus medius and minimus. When the femur is transected, the distal attachment of the adductor magnus is lost.
Gottschalk's seminal biomechanical studies demonstrated that failure to surgically reattach the adductor magnus (myodesis) results in at least a 70% loss of adduction power. Without this medial tether, the unopposed abductors and hip flexors (iliopsoas) cause the residual femur to drift into a position of fixed abduction and flexion. This "anterolateral drift" forces the distal femur against the lateral wall of the prosthetic socket, causing severe pain, skin breakdown, and a highly inefficient, energy-consuming Trendelenburg gait.
Preoperative Planning: Ischemic vs. Nonischemic Limbs
The surgical approach to transfemoral amputation is dictated primarily by the vascular status of the limb.
- Nonischemic Limbs (Trauma, Tumor, Infection): The primary goal is functional optimization. Muscle stabilization via rigid myodesis (suturing muscle directly to bone) is mandatory to construct a strong, sturdy, and dynamic amputation stump.
- Ischemic Limbs (Peripheral Vascular Disease, Diabetes): The primary goal is primary wound healing. Most transfemoral amputations are performed for end-stage ischemic disease. In these compromised limbs, rigid myodesis is generally contraindicated. Drilling holes in the ischemic femur and stripping the periosteum can further compromise the tenuous osseous and soft-tissue blood supply, leading to necrosis and failure of the stump. Instead, myoplastic stabilization (suturing muscle to muscle or fascia to fascia over the bone end) is utilized to decrease anterolateral drift without devascularizing the tissues.
Surgical Technique: Standard Transfemoral Amputation (Nonischemic Limbs)
This technique is indicated for patients with normal vascular anatomy, typically following severe trauma, oncologic resection, or recalcitrant infection.
⚠️ Surgical Warning: Tourniquet Application
In nonischemic limbs, the procedure should be performed under pneumatic tourniquet hemostasis to minimize blood loss and allow for precise identification of neurovascular structures. The tourniquet should be placed as proximally as possible on the thigh.
Step 1: Positioning and Flap Design
- Position the patient supine on the operating table.
- Beginning proximally at the anticipated level of bone section, outline equal anterior and posterior skin flaps.
- The length of each flap must be at least one-half the anteroposterior (AP) diameter of the thigh at the level of bone transection to ensure tension-free closure.
- Note: Atypical flaps (e.g., long anterior, long posterior, or sagittal) are always preferred over sacrificing bone length to achieve equal flaps.
Step 2: Soft Tissue Dissection
- Fashion the anterior flap with an incision starting at the midpoint on the medial aspect of the thigh at the level of anticipated bone section. Pass the incision in a gentle curve distally and laterally, crossing the anterior thigh, and curving proximally to end on the lateral aspect opposite the starting point.
- Fashion the posterior flap in a mirrored, similar manner.
- Deepen the skin incisions through the subcutaneous tissue and deep fascia. Reflect the fasciocutaneous flaps proximally to the level of the intended bone section.
- Divide the quadriceps muscle and its overlying fascia along the line of the anterior incision. Reflect it proximally as a unified myofascial flap.
Step 3: Neurovascular Management
- Identify the femoral artery and vein within the femoral canal (Hunter's canal) on the medial side of the thigh.
- Individually double-ligate and transect the vessels at the level of the bone section.
- Identify the sciatic nerve deep to the hamstring muscles.
- Apply gentle distal traction to the sciatic nerve, ligate it well proximal to the end of the bone (to control the arteria comitans nervi ischiadici), and divide it sharply with a scalpel just distal to the ligature. Allow the nerve to retract deep into the posterior thigh musculature, well away from the weight-bearing zone to prevent symptomatic neuroma formation.
- Isolate and sharply section all superficial cutaneous nerves, allowing them to retract proximally.
Step 4: Bone Resection and Preparation
- Incise the periosteum of the femur circumferentially.
- Divide the bone with an oscillating saw immediately distal to the periosteal incision.
- With a sharp rasp, aggressively smooth the edges of the bone.
- Critical Step: Flatten the anterolateral aspect of the distal femur. Because the femur naturally drifts anterolaterally, a sharp anterolateral cortical edge will create high unit pressures against the overlying soft tissues and the prosthetic socket, leading to pain and ulceration.
Step 5: Myodesis and Closure
- Divide the posterior muscles transversely so their ends retract to the level of the bone section. Remove the amputated limb.
- Irrigate the wound copiously with sterile saline to remove all bone dust, which can cause heterotopic ossification.
- Drill several small osseous tunnels just proximal to the distal end of the femur.
- Attach the adductor and hamstring muscles to the bone through these holes using heavy nonabsorbable or slowly absorbable sutures. The muscles must be attached under slight physiological tension to optimize their length-tension curve.
- Release the tourniquet and achieve meticulous hemostasis using electrocautery and suture ligatures.
- Bring the "quadriceps apron" over the end of the bone. Suture its fascial layer to the posterior fascia of the thigh. Trim any excess muscle or fascia to permit a neat, snug, and non-bulky approximation.
- Insert plastic suction drainage tubes deep beneath the muscle flap and deep fascia. Bring them out through the lateral aspect of the thigh, 10 to 12.5 cm proximal to the end of the stump.
- Approximate the skin edges with interrupted nonabsorbable sutures or surgical staples.
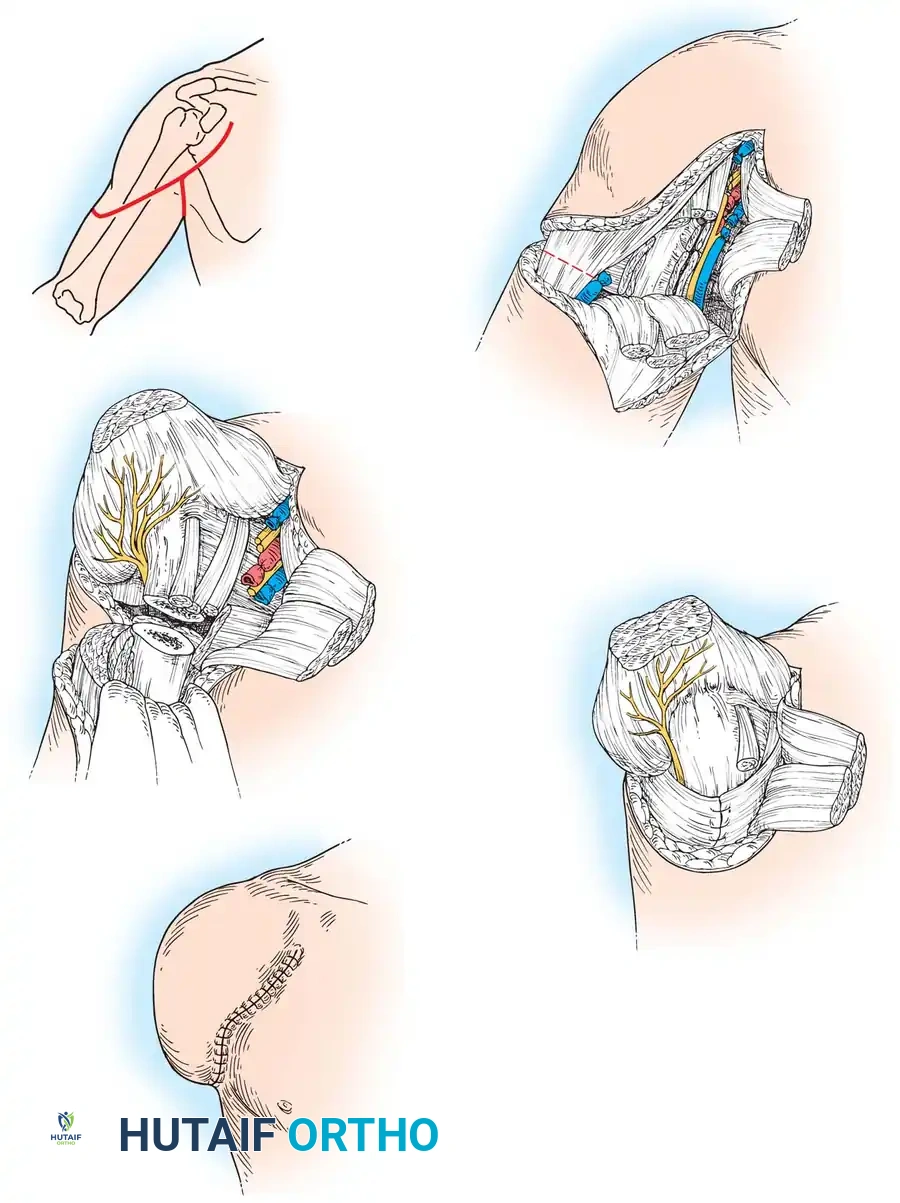
Surgical Technique: Gottschalk Adductor Magnus Myodesis
This specialized technique, popularized by Gottschalk, is designed to maximize the biomechanical advantage of the adductor magnus, preventing the debilitating abduction drift of the residual femur.
Step 1: Positioning and Approach
- Place the patient supine with a bump or roll under the buttock of the affected side to internally rotate the limb slightly and expose the medial thigh.
- Develop skin flaps, utilizing a long medial flap in the sagittal plane whenever possible to keep the suture line away from the distal weight-bearing surface.
Step 2: Muscle Detachment and Vascular Control
- Detach the quadriceps mechanism just proximal to the patella, retaining a robust portion of its tendinous insertion.
- Reflect the vastus medialis off the medial intermuscular septum.
- Identify the adductor magnus insertion at the adductor tubercle of the medial femoral condyle. Detach it sharply and reflect it medially to expose the distal femur.
- Identify, isolate, and securely ligate the femoral vessels within Hunter’s canal.
- Divide the gracilis, sartorius, semimembranosus, and semitendinosus muscles 2.5 to 5 cm below the intended level of bone section.
Step 3: Bone Resection and Myodesis
- Divide the femur exactly 12 cm above the anatomical knee joint line (ensuring adequate clearance for the prosthetic knee).
- Drill osseous holes in the lateral, anterior, and posterior aspects of the distal femur, approximately 1.5 cm from its cut end.
- The Gottschalk Maneuver: Hold the residual femur in maximal adduction. Pull the adductor magnus tendon tightly across the distal end of the bone and suture it directly to the lateral aspect of the femur using the previously drilled holes.
- Place additional anterior and posterior stabilizing sutures to prevent the adductor magnus from sliding backward or forward over the bone end.
Step 4: Final Muscle Stabilization and Closure
- While holding the hip in neutral extension, draw the quadriceps tendon over the newly secured adductor magnus and suture it to the posterior aspect of the femur.
- Suture the remaining posterior hamstring muscles to the posterior aspect of the adductor magnus fascia.
- Close the investing deep fascia and skin in layers over closed suction drains. Apply a soft, compressive dressing.
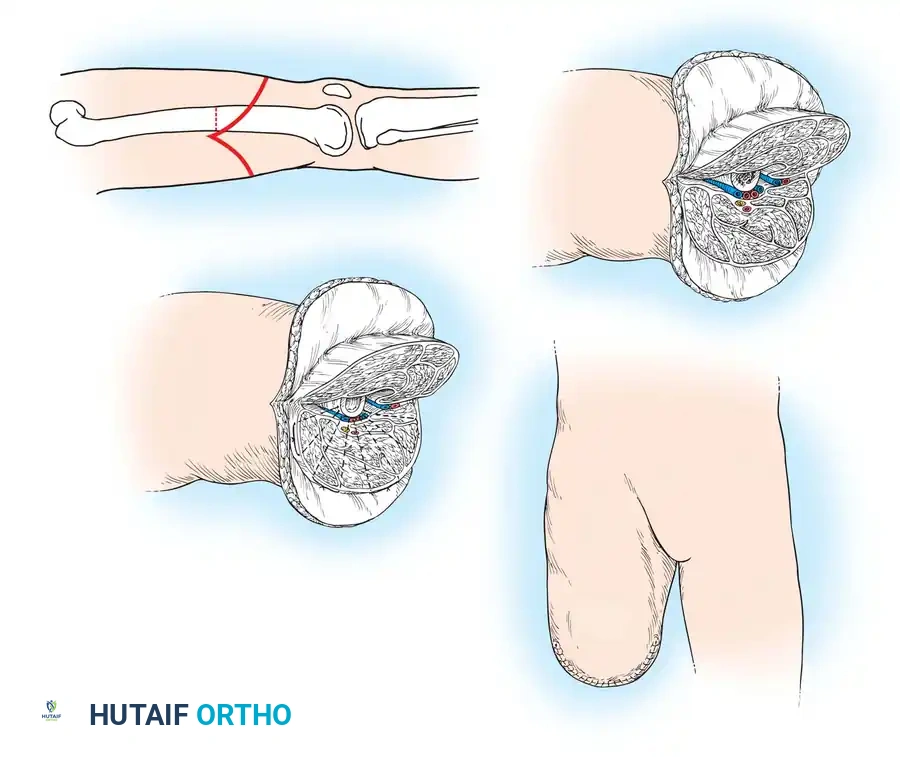
Surgical Technique: Transfemoral Amputation in Ischemic Limbs
Patients with severe peripheral vascular disease or diabetic microangiopathy require a modified approach. Tissue handling must be atraumatic, and the preservation of collateral blood supply is the absolute priority.
⚠️ Surgical Warning: Tourniquet Contraindication
Do NOT use a tourniquet in ischemic limbs. The absence of a tourniquet allows the surgeon to visually assess tissue viability based on active bleeding. Tissues that do not bleed upon transection are nonviable and require amputation at a higher, better-perfused level.
Step 1: Flap Creation
- Position the patient supine.
- Outline equal anterior and posterior skin flaps beginning proximally at the intended level of bone section. The length of each flap should be at least one-half the AP diameter of the thigh.
- Deepen the incisions through the subcutaneous tissue and deep fascia. Reflect the posterior flap to the level of the bone section.
Step 2: Myocutaneous Flap Elevation
- Do not reflect the anterior skin flap off the muscle. Stripping the skin from the underlying fascia destroys delicate perforating vessels, leading to flap necrosis.
- Instead, divide the quadriceps muscle and its overlying fascia directly along the line of the anterior skin incision.
- Reflect the muscle, fascia, and overlying skin proximally as a single, unified myocutaneous flap to the level of anticipated bone section.
Step 3: Resection and Myoplasty
- Identify, individually ligate, and transect the femoral artery and vein in the femoral canal.
- Incise the periosteum circumferentially and divide the bone with a saw just distal to the periosteal incision.
- Smoothly rasp the edges of the bone, paying special attention to flattening the anterolateral aspect of the femur.
- Identify the sciatic nerve, ligate it well proximal to the bone end, and sharply divide it.
- Divide the posterior muscles so their ends retract to the level of the bone section. Remove the leg.
- Irrigate the wound thoroughly to remove bone dust. Clamp and ligate or electrocoagulate all active bleeding points.
- Myoplasty (No Myodesis): Carry the anterior myocutaneous flap over the end of the bone. Suture its deep fascial layer directly to the deep posterior fascia of the thigh. Do not drill the bone or strip the periosteum.
- Insert plastic suction drainage tubes deep to the muscles.
- Approximate the skin edges with interrupted nonabsorbable sutures, utilizing a tension-free technique (e.g., vertical mattress or simple interrupted).
Postoperative Management and Rehabilitation
The postoperative aftertreatment of a transfemoral amputee is complex and highly dependent on the patient's preoperative physiological status. The rehabilitative program for patients with ischemic limbs generally progresses much more slowly and cautiously than for those with traumatic, nonischemic amputations.
The Metabolic Cost of Transfemoral Amputation
A major obstacle to rehabilitation is the loss of the anatomical knee joint. Ambulation with a transfemoral prosthesis exponentially increases the energy expenditure required for locomotion—often requiring 60% to 70% more energy than normal bipedal walking.
This profound metabolic demand has severe consequences for elderly patients, cardiac patients, and those with ischemic contralateral limbs. The patient and their family must be thoroughly counseled regarding the physical risks and demands of the rehabilitation program.
💡 Clinical Pearl: Bilateral Transfemoral Amputations
Oxygen consumption during ambulation with bilateral transfemoral prostheses is four to seven times greater than normal walking. Consequently, many bilateral transfemoral amputees with underlying vascular disease ultimately elect to use a wheelchair for primary mobility, as it is significantly faster, safer, and less metabolically taxing.
Dressing Protocols and Weight Bearing
- Elderly/Dysvascular Patients: A soft, compressive dressing is generally adequate initially. The primary goal is wound healing without subjecting the compromised soft tissues to excessive pressure. Weight-bearing is strictly delayed until the surgical incision is fully healed and sutures or staples are removed (typically 3 to 4 weeks).
- Younger/Trauma Patients: These patients can be progressed much more rapidly. Immediate Postoperative Prosthesis (IPOP) or rigid cast dressings are highly appropriate. Early weight-bearing with a locked prosthetic knee pylon can be initiated within days of surgery to prevent flexion contractures, reduce edema, and provide psychological benefit.
Prosthetic Progression
Once the residual limb has matured and stabilized in volume, ambulation can be progressed. Initial gait training utilizes a locked knee joint to provide maximum stability. As the patient develops core strength, proprioception, and confidence, they are transitioned to an unlocked knee, requiring less upper extremity support (e.g., transitioning from parallel bars to a walker, then to a cane).
For the definitive prosthesis, modern socket designs (such as the Ischial Containment socket) are utilized to lock the femur in adduction and provide a narrow mediolateral dimension. A wide variety of advanced prosthetic knee units—ranging from weight-activated stance-control knees to sophisticated microprocessor-controlled hydraulic knees—are available. These modern units are lighter, accommodate variable gait cadences, and provide exceptional stability during the weight-bearing phase, ultimately maximizing the patient's functional independence.
===```
📚 Medical References
- Transfemoral amputation: surgical procedures. In Bowker JH, Michael JW, eds: Atlas of limb prosthetics: surgical, prosthetic, and rehabilitation principles , 2nd ed, St Louis, 1992, Mosby. Gottschalk F: Transfemoral amputation: biomechanics and surgery, Clin Orthop Relat Res 361:15, 1999.
- Green G, Short K, Easley M: Transtibial amputation, prosthetic use and functional outcome, Orthop Prosthet Foot Ankle 6:315, 2001.
- Gregory RT, Gould RJ, Peclet M, et al: The mangled extremity syndrome (MES): a severity grading system for multisystem injury of the extremity, J Trauma 25:1147, 1985.
- Hadden W, Marks R, Murdoch G, et al: Wedge resection of amputation stumps, a valuable salvage procedure, J Bone Joint Surg 69B:306, 1987.
- Hansen ST: Overview of the severely traumatized lower limb: reconstruction versus amputation, Clin Orthop Relat Res 243:17, 1989.
- Hansen ST: Salvage or amputation after complex foot and ankle trauma, Foot Ankle Trauma 32:181, 2001.
- Harness N, Pinzur M: Health related quality of life in patients with dysvascular transtibial amputation, Clin Orthop Relat Res 383:204, 2001.
- Harris IE, Leff AR, Gitelis S, Simon MA: Function after amputation, arthrodesis, or arthroplasty for tumors about the knee, J Bone Joint Surg 72A:1477, 1990.
- Helfet DL, Howey T, Sanders R, et al: Limb salvage versus amputation: preliminary results of the mangled extremity severity score, Clin Orthop Relat Res 256:80, 1990.
- Herve C, Gaillard M, Andrivet P, et al: Treatment in serious lower limb injuries: amputation versus preservation, Injury 18:21, 1987.
- House JH, Fidler MO: Frostbite of the hand. In Green DP, Hotchkiss RN, Pederson WC, eds: Green’s
You Might Also Like