Mastering the Scapular, Parascapular, and Lateral Arm Free Flaps: A Comprehensive Surgical Guide
Key Takeaway
The scapular, parascapular, and lateral arm free flaps are workhorse options for soft tissue reconstruction in orthopaedic microsurgery. This guide details the vascular anatomy, preoperative planning, and step-by-step surgical dissection required for successful harvest. Key concepts include the circumflex scapular artery within the triangular space and the posterior radial collateral artery for the lateral arm flap, ensuring optimal pedicle length and minimal donor site morbidity.
INTRODUCTION TO EXTREMITY RECONSTRUCTION AND FREE TISSUE TRANSFER
In the realm of advanced orthopaedic microsurgery, the reconstruction of complex soft tissue defects necessitates a versatile armamentarium of free tissue transfers. The selection of an appropriate donor site is dictated by the defect's size, the required tissue thickness, the need for sensory reinnervation, and the imperative to minimize donor site morbidity. Among the most reliable and anatomically consistent fasciocutaneous flaps are the scapular, parascapular, and lateral arm free flaps.
These flaps provide robust, pliable coverage ideal for the distal extremities, particularly the hand, forearm, and foot. This comprehensive guide delineates the intricate vascular anatomy, precise preoperative planning, and step-by-step surgical dissection required to safely harvest these flaps, ensuring optimal outcomes for both the recipient site and the donor area.
PART I: THE SCAPULAR AND PARASCAPULAR FREE FLAPS
The scapular and parascapular flaps are based on the circumflex scapular artery (CSA), a major branch of the subscapular arterial axis. These flaps are highly valued for their reliable vascular pedicle, the ability to harvest large skin paddles that can often be closed primarily, and the lack of major muscle sacrifice, which preserves shoulder girdle biomechanics.
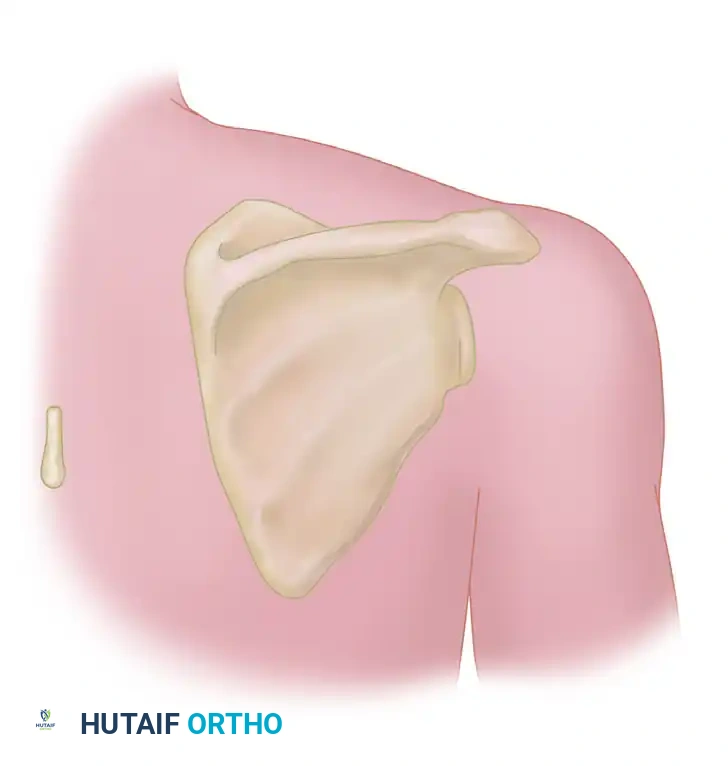
Vascular Anatomy of the Scapular Region
Understanding the three-dimensional anatomy of the posterior shoulder is paramount for safe flap harvest. The subscapular artery arises from the third part of the axillary artery and bifurcates into the thoracodorsal artery and the circumflex scapular artery.
The circumflex scapular artery courses posteriorly, passing through the triangular space. The borders of this critical anatomic landmark are defined as follows:
* Superior Border: Teres minor muscle.
* Inferior Border: Teres major muscle.
* Lateral Border: Long head of the triceps brachii muscle.
Upon exiting the triangular space, the CSA divides into a transverse (horizontal) cutaneous branch, which supplies the scapular flap, and a descending (vertical) cutaneous branch, which supplies the parascapular flap. The pedicle is typically accompanied by two robust venae comitantes that provide venous drainage.
Clinical Pearl: The circumflex scapular artery pedicle can yield a length of 6 to 9 cm and an arterial diameter of 2.5 to 3.0 mm, making it an excellent match for recipient vessels in the distal forearm and lower extremity.
Preoperative Planning: The "Rule of Twos"
Proper design of the scapular flap ensures that the skin paddle captures the transverse branch of the CSA while allowing for primary closure of the donor site. The "Rule of Twos" is a highly effective heuristic for outlining the scapular flap boundaries.
Applying the Rule of Twos:
* Medial Border: May extend up to 2 cm lateral to the spinous processes of the thoracic vertebrae.
* Lateral Border: May extend up to 2 cm superior to the posterior axillary crease.
* Inferior Border: May extend up to 2 cm superior to the inferior angle of the scapula.
* Superior Border: May extend up to 2 cm inferior to the spine of the scapula.
Adhering to these boundaries typically yields a flap measuring up to 8 cm to 10 cm in width and 14 cm to 20 cm in length, which can usually be closed primarily depending on the patient's skin laxity.
Surgical Dissection for the Scapular Flap
The patient is typically positioned in the lateral decubitus or prone position. The entire shoulder girdle and ipsilateral arm are prepped and draped free to allow for manipulation of the upper extremity during dissection.
Step-by-Step Surgical Technique:
- Incision and Subfascial Dissection: Incise the skin and subcutaneous tissue along the designed elliptical markings. Deepen the incision through the deep fascia overlying the infraspinatus and teres major muscles. The dissection must proceed in the subfascial plane to ensure the delicate cutaneous perforators are preserved.
- Identification of the Triangular Space: As the dissection proceeds laterally toward the axilla, retract the deltoid muscle superiorly. Carefully identify the muscular borders: the teres minor superiorly, the long head of the triceps laterally, and the teres major inferiorly. These muscles form the triangular space.
- Exposure of the Pedicle: Retract the long head of the triceps laterally, the teres minor superiorly, and the teres major inferiorly. This maneuver opens the triangular space, exposing the circumflex scapular artery and its venae comitantes.
- Pedicle Dissection: Dissect the pedicle along the inferior border of the teres minor in the interval superficial to the fascia of the teres minor. Ligate any small muscular branches to the teres muscles to maximize pedicle length.
- Flap Mobilization and Harvest: Once the flap has been completely excised and mobilized so that it is attached only to its vascular pedicle, pause to determine that the recipient site is fully prepared. Dissect the pedicle proximally to the desired length. Section the vessels, cauterizing and ligating or applying a hemoclip to the central stump, and apply microvascular clips to the flap pedicle.
- Donor Site Closure: Close the donor site by widely mobilizing the surrounding skin edges. Insert closed-suction drains as needed. Primary closure is achieved in layers, utilizing heavy deep dermal sutures to minimize tension on the skin.
Surgical Warning: Over-resection of the flap width (typically >10 cm) can preclude primary closure, necessitating a split-thickness skin graft over the secondary defect, which yields a poor cosmetic result and can lead to restrictive scarring over the scapula.
The Parascapular Flap Variant
Nassif et al. described the parascapular flap, which receives its vascular supply through the cutaneous parascapular artery, the descending branch of the circumflex scapular artery.
The orientation of this flap is more vertical, and it parallels the anterior margin of the latissimus dorsi muscle. The primary advantage of the parascapular flap over the transverse scapular flap is that the vertical orientation takes advantage of the natural skin laxity of the back, often allowing for primary closure of wider flaps (up to 12 cm in width). Furthermore, the parascapular flap can be designed to include a longer skin paddle, making it ideal for long, narrow extremity defects.
PART II: THE LATERAL ARM FREE FLAP
The lateral arm flap is a versatile fasciocutaneous or purely fascial flap based on the posterior radial collateral artery (PRCA). It is particularly advantageous in upper extremity reconstruction because it can be harvested from the same side as the injured forearm or hand, thereby eliminating multiple surgical sites and allowing for a single-field operation.
If harvested as a fascial flap, it provides exceptionally thin, pliable coverage that is ideal for dorsal hand and finger defects, where bulky tissue would impede tendon gliding and aesthetic contour.
However, the flap is not without its limitations. The chief disadvantages are the relatively short pedicle length (typically 2 to 6 cm) and a variable vessel diameter (ranging from 1 to 3 mm). Furthermore, flap bulkiness can be a significant issue in obese patients. In reviewing the outcome of 123 lateral arm free flaps, Graham et al. concluded that this flap is best limited to male patients in whom primary closure of the donor site is possible, as female patients often possess thicker subcutaneous adipose tissue in this region, leading to excessive flap bulk and less favorable donor site aesthetics.
Vascular Anatomy of the Lateral Arm Flap
The vascular basis of the lateral arm flap is derived from the profunda brachii artery.
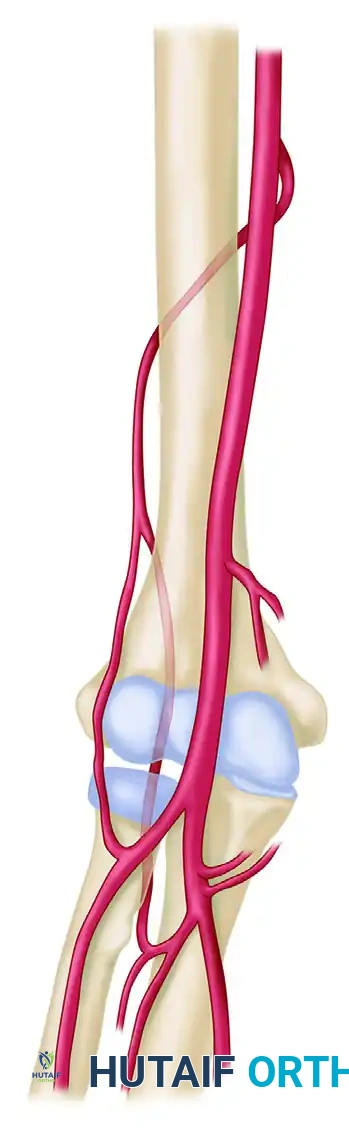
As the profunda brachii artery courses along the spiral groove of the humerus, it passes through the lateral intermuscular septum just distal to the deltoid insertion. At this critical juncture, it branches into two distinct vessels:
1. Anterior Radial Collateral Artery (ARCA): A smaller vessel that accompanies the radial nerve and courses anterior to the brachioradialis muscle.
2. Posterior Radial Collateral Artery (PRCA): The larger branch and the primary blood supply to the lateral arm flap.
The PRCA courses posterior to the brachioradialis along the lateral intermuscular septum. As it descends, it gives off multiple small cutaneous perforators that travel through the septum to supply the overlying skin of the lateral arm. Distally, the PRCA eventually anastomoses with the interosseous recurrent artery around the lateral epicondyle, a feature that allows for the design of distally based (reverse) pedicled flaps.
Neurovenous Anatomy:
The PRCA is accompanied by two large venae comitantes, each approximately 2 mm in diameter, which provide robust venous outflow. Neurologically, the flap is intimately associated with the posterior cutaneous nerve of the arm (which innervates the proximal skin) and the posterior cutaneous nerve of the forearm (which innervates the distal skin). The posterior cutaneous nerve of the forearm can be harvested with the flap to create a sensated free tissue transfer, ideal for weight-bearing surfaces of the foot or tactile surfaces of the hand.
Preoperative Planning and Positioning
The patient is placed in the supine position. The entire upper extremity up to the axilla is prepared and draped free. A sterile tourniquet is applied high on the arm to provide a bloodless surgical field, which is critical for identifying the delicate septocutaneous perforators.
Surgical Pearl: It is significantly easier to carry out the dissection with the arm resting across the patient's chest with the elbow in 90 degrees of flexion. This position naturally exposes the lateral aspect of the arm and places the lateral intermuscular septum under optimal tension.
Surgical Technique 63-16: Dissection of the Lateral Arm Flap
The dissection of the lateral arm flap requires meticulous attention to the fascial planes and the lateral intermuscular septum.
Step 1: Flap Design and Marking
Center the flap over the lateral intermuscular septum. The septum can be mapped by drawing a line from the insertion of the deltoid muscle to the lateral epicondyle of the humerus. The width of the flap should ideally not exceed 6 cm to ensure primary closure of the donor site.
Step 2: Posterior Incision and Dissection
Incise the posterior margin of the flap through the skin, subcutaneous tissue, and the deep fascia overlying the triceps muscle. It is imperative to include the deep fascia with the flap to protect the suprafascial vascular plexus.
Step 3: Approaching the Septum
Carry the dissection anteriorly in the subfascial plane, elevating the fascia off the triceps muscle until the lateral intermuscular septum is encountered. As you approach the septum, carefully identify the cutaneous branches of the posterior radial collateral artery traveling within the septal connective tissue.
Step 4: Anterior Incision and Radial Nerve Protection
Once the posterior perforators are secured, make the anterior skin incision. Dissect through the fascia overlying the brachialis and brachioradialis muscles. Elevate this fascia posteriorly toward the septum.
Crucial Step: Deep in the anterior dissection, identify and protect the radial nerve as it emerges from the spiral groove and travels anterior to the lateral intermuscular septum alongside the anterior radial collateral artery.
Step 5: Pedicle Isolation and Harvest
Release the lateral intermuscular septum from its attachment to the humerus. This is done by carefully incising the septum directly off the periosteum, ensuring the PRCA and its venae comitantes remain safely enveloped within the septal tissue. Ligate the distal anastomosis with the interosseous recurrent artery. Trace the pedicle proximally toward the deltoid insertion to achieve the maximum pedicle length (up to 6 cm). Once the recipient vessels are prepared, divide the pedicle and transfer the flap.
Step 6: Donor Site Closure
Deflate the tourniquet and achieve meticulous hemostasis. Insert a closed-suction drain. Close the deep dermal layer with interrupted sutures and the skin with a running subcuticular stitch or staples. If the defect is too wide for primary closure, a split-thickness skin graft must be applied, though this is cosmetically suboptimal.
POSTOPERATIVE PROTOCOLS AND FLAP MONITORING
Successful free tissue transfer relies heavily on rigorous postoperative care.
- Monitoring: The flap should be monitored clinically (color, capillary refill, temperature, and turgor) and via handheld Doppler ultrasonography every hour for the first 24 to 48 hours, then every 2 to 4 hours for the subsequent 3 days.
- Positioning: The reconstructed extremity must be elevated to promote venous drainage and reduce edema. Care must be taken to ensure there is no pressure or tight circumferential dressing over the pedicle.
- Anticoagulation: While protocols vary by institution, many microsurgeons utilize a regimen of daily aspirin (81 mg) or prophylactic low-molecular-weight heparin to prevent microvascular thrombosis, particularly in cases with smaller caliber vessels (such as the 1-3 mm vessels of the lateral arm flap).
- Donor Site Care: The donor arm or back should be immobilized initially to prevent tension on the closure line. Drains are typically removed when output falls below 15-20 cc per 24 hours.
CONCLUSION
The scapular, parascapular, and lateral arm free flaps remain indispensable tools in the orthopaedic reconstructive ladder. Mastery of their distinct vascular anatomy—specifically the circumflex scapular artery within the triangular space and the posterior radial collateral artery within the lateral intermuscular septum—allows the microsurgeon to execute these harvests with precision. By adhering to strict preoperative planning and meticulous subfascial dissection techniques, surgeons can provide durable, high-quality soft tissue coverage while minimizing donor site morbidity.
You Might Also Like

