Uniportal Endoscopic Decompression of the Interdigital Nerve for Morton's Neuroma: A Surgical Masterclass
Key Takeaway
Join us in the OR for a masterclass on uniportal endoscopic decompression of Morton's neuroma. We'll meticulously cover patient positioning, a 1cm incision, precise TIML release using a 30-degree scope and specialized knife, and critical anatomical considerations. Learn essential pearls, potential pitfalls, and comprehensive postoperative management to optimize patient outcomes and minimize complications.
Comprehensive Introduction and Patho-Epidemiology
Morton’s neuroma remains one of the most frequently encountered and debilitating forefoot pathologies in orthopedic practice. Historically, the surgical gold standard for recalcitrant cases has been open neurectomy. However, the paradigm of forefoot peripheral nerve surgery has shifted dramatically over the past three decades. The uniportal endoscopic decompression of the interdigital nerve represents a sophisticated, minimally invasive evolution in our surgical armamentarium, directly challenging the traditional dogma of nerve resection. This technique, originally conceptualized and popularized by Barrett and Pignetti in the 1990s, leverages the precise division of the transverse intermetatarsal ligament (TIML) to alleviate mechanical entrapment while preserving the native interdigital nerve. By abandoning the destructive nature of a neurectomy, the endoscopic approach fundamentally eliminates the risk of a true stump neuroma—a complication that historically plagued up to twenty percent of open resections and often resulted in a secondary pain syndrome far more severe than the initial presentation.
To fully appreciate the rationale behind endoscopic decompression, one must first understand the patho-epidemiology of the lesion itself. The term "Morton’s neuroma" is, in fact, a histological misnomer. It is not a true neoplastic neuroma, but rather a mechanically induced perineural fibroma. Chronic microtrauma and repetitive compression of the common plantar digital nerve against the unyielding transverse intermetatarsal ligament lead to endoneurial edema, localized vascular proliferation, and ultimately, dense perineural fibrosis. This fibrotic cascade results in the characteristic bulbous enlargement of the nerve just proximal to its bifurcation into the proper digital nerves. Epidemiologically, this condition exhibits a striking predilection for middle-aged females, with a female-to-male ratio frequently reported as high as 8:1. This demographic skew is intrinsically linked to extrinsic biomechanical factors, most notably the use of narrow-toe-box footwear and high-heeled shoes, which forcefully hyperextend the metatarsophalangeal (MTP) joints and tether the nerve tightly against the distal edge of the TIML.
The rationale for pure decompression over resection is rooted in the fundamental principles of peripheral nerve surgery applied elsewhere in the body, such as the carpal or cubital tunnel. When a peripheral nerve is subjected to chronic compression, the primary surgical objective should be the restoration of the anatomical space and the release of the offending retinacular or ligamentous structure, not the amputation of the nerve. The uniportal endoscopic technique achieves this objective with remarkable elegance. By utilizing a specialized slotted cannula and a 30-degree endoscope, the surgeon can directly visualize and transect the TIML through a minimal 1-centimeter incision. This minimizes collateral soft tissue disruption, preserves the plantar fat pad, significantly reduces the incidence of postoperative hematoma and infection, and facilitates an accelerated return to weight-bearing and functional activities.
As we progress through this surgical masterclass, we will systematically deconstruct the uniportal endoscopic approach. Mastery of this technique demands not only a precise understanding of the specialized instrumentation but also an intimate, three-dimensional spatial awareness of the intermetatarsal web space. The margin for error is small; inadvertent damage to the neurovascular bundle or adjacent tendinous structures is a recognized risk if meticulous technique is not strictly adhered to. Therefore, a comprehensive grasp of the regional anatomy, rigorous preoperative patient selection, and a disciplined, step-by-step intraoperative execution are paramount for achieving the consistently excellent clinical outcomes that this procedure can offer.
Detailed Surgical Anatomy and Biomechanics
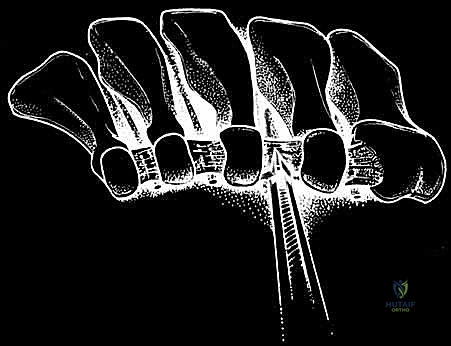
A profound, three-dimensional understanding of the forefoot anatomy is the absolute prerequisite for safe and effective endoscopic decompression. The intermetatarsal space is a highly constrained anatomical compartment, bounded dorsally by the dorsal interosseous fascia, plantarward by the plantar aponeurosis and transverse intermetatarsal ligament, and medially and laterally by the adjacent metatarsal shafts and heads. The primary structure of interest, the common plantar digital nerve, traverses this space from proximal to distal. Notably, the third intermetatarsal web space is the most frequent site of neuroma formation, accounting for approximately sixty to seventy percent of cases, followed closely by the second web space. This specific spatial distribution is not coincidental; it is dictated by the unique neuroanatomy of the plantar foot.
The increased incidence in the third web space is classically attributed to the anatomical confluence of the medial and lateral plantar nerves. In a significant percentage of the population, an anastomotic branch connects the lateral plantar nerve to the third common digital branch of the medial plantar nerve. This anatomical variant results in a nerve trunk that is inherently thicker and significantly less mobile than its counterparts in the adjacent web spaces. Furthermore, the third intermetatarsal space is anatomically narrower, and the relative hypermobility of the fourth metatarsal against the more rigidly fixed third metatarsal creates a dynamic shearing force during the gait cycle. As the foot transitions from midstance to the propulsive push-off phase, the MTP joints dorsiflex. This physiological dorsiflexion engages the windlass mechanism, drawing the plantar fascia tight and pulling the common plantar digital nerve distally and dorsally, directly into the unyielding plantar edge of the transverse intermetatarsal ligament.
The transverse intermetatarsal ligament (TIML) itself is the primary compressive vector in the pathogenesis of Morton's neuroma and the singular target of our endoscopic release. It is a robust, dense fibrous band, essentially a continuous distal extension of the plantar plate system, spanning transversely between the adjacent metatarsal heads and capsules. Anatomically, it measures approximately 10 to 15 millimeters in length and 2 to 3 millimeters in thickness. During endoscopic visualization, it presents as a distinct, taut, white fascial band. It is critical to recognize that the common plantar digital nerve lies strictly plantar to the TIML. Therefore, during the endoscopic approach, the slotted cannula must be positioned dorsal to the nerve and immediately plantar to the TIML, ensuring the nerve is safely shielded by the solid, un-slotted portion of the cannula during ligamentous transection.
Beyond the nerve and the TIML, the surgeon must be acutely aware of the adjacent soft tissue structures to prevent iatrogenic injury. The lumbrical muscle and its distal tendon are of particular surgical significance. The lumbrical tendon courses on the plantar-lateral aspect of the deep transverse intermetatarsal ligament before inserting onto the medial aspect of the extensor expansion of the adjacent toe. During endoscopic release, the lumbrical tendon is the structure most susceptible to inadvertent transection. While isolated transection of a single lumbrical tendon in the lesser toes is generally clinically silent and does not lead to a noticeable biomechanical deficit or toe deformity, meticulous endoscopic technique aims to identify and preserve this structure. Furthermore, the common plantar digital artery and vein accompany the nerve within the web space. Maintaining a precise sub-ligamentous plane with the elevator and cannula is essential to displace these vascular structures away from the cutting blade, thereby preventing postoperative hematoma formation.
Exhaustive Indications and Contraindications
The decision to proceed with operative intervention for Morton’s neuroma must be predicated on a rigorous, evidence-based diagnostic workup and the documented failure of comprehensive conservative management. Surgery is generally indicated only after a minimum of six months of dedicated non-operative therapy. This conservative protocol should encompass footwear modifications (specifically, transitioning to wide toe-box shoes with rigid soles to limit MTP dorsiflexion), the application of custom or prefabricated metatarsal pads placed proximal to the metatarsal heads to splay the interspace, and judicious use of pharmacologic interventions. Corticosteroid injections, typically administered via a dorsal approach under ultrasound guidance, can provide significant diagnostic confirmation and temporary, or occasionally permanent, therapeutic relief. Alcohol sclerosing injections are another conservative modality, though their efficacy remains debated in the literature. Endoscopic decompression is indicated when these measures fail to provide sustained relief and the patient experiences a persistent, unacceptable degradation in their quality of life.
Accurate diagnosis relies heavily on a meticulous physical examination. The hallmark presentation is a sharp, burning, or electrical pain radiating into the plantar aspect of the affected toes, frequently exacerbated by weight-bearing in restrictive footwear. The "Mulder's click"—a palpable and occasionally audible snap elicited by applying lateral compression across the metatarsal heads while simultaneously applying dorsal pressure to the plantar aspect of the affected web space—is highly specific for a thickened, fibrotic nerve subluxating beneath the TIML. A positive metatarsal squeeze test, which reproduces the patient's radicular symptoms, further corroborates the diagnosis. Advanced imaging, particularly high-resolution diagnostic ultrasound, has become an invaluable tool. In experienced hands, sonography can accurately visualize the hypoechoic, ovoid perineural fibroma, measure its precise dimensions, and dynamic assessment can demonstrate the nerve's impingement against the TIML. While MRI can also identify the neuroma, it is significantly more expensive, prone to false positives (identifying asymptomatic enlarged nerves), and lacks the dynamic evaluative capability of ultrasound.
Patient selection is the ultimate determinant of surgical success. While uniportal endoscopic decompression is highly effective for primary, unoperated neuromas, its utility in revision scenarios is nuanced. A true recurrent neuroma (where the nerve was previously preserved but the TIML release was incomplete or scarred) may be amenable to revision endoscopic decompression. However, a true "stump neuroma" resulting from a prior open neurectomy is an absolute contraindication to this specific endoscopic technique, as the anatomical planes are obliterated, the nerve end is disorganized, and the pathology requires a completely different surgical strategy, such as targeted muscle reinnervation (TMR) or proximal implantation into muscle or bone.
| Category | Specific Conditions and Criteria |
|---|---|
| Absolute Indications | - Persistent, debilitating web space pain refractory to >6 months of conservative care. - Positive Mulder's click and localized web space tenderness. - Sonographic or MRI confirmation of an interdigital neuroma. - Temporary, complete symptom resolution following a diagnostic local anesthetic block of the affected web space. |
| Relative Indications | - Concomitant, mild second MTP joint synovitis (if primary pain generator is definitively the neuroma). - Bilateral or adjacent web space neuromas (can be addressed simultaneously via separate portals). |
| Absolute Contraindications | - Presence of a true "stump neuroma" from a prior open neurectomy. - Active local or systemic soft tissue infection. - Severe peripheral arterial disease compromising wound healing. - Advanced, unmanaged peripheral neuropathy (e.g., diabetic neuropathy) obscuring the primary pain generator. |
| Relative Contraindications | - Severe forefoot deformity (e.g., advanced hallux valgus with cross-over toe) requiring complex structural reconstruction. - Prior open surgery in the same web space with extensive scarring. - Inflammatory arthropathies (e.g., Rheumatoid Arthritis) where the primary pathology is severe bursitis or synovitis rather than isolated nerve entrapment. |
Pre-Operative Planning, Templating, and Patient Positioning
Meticulous preoperative planning and optimal patient positioning are critical elements that dictate the fluidity and safety of the endoscopic procedure. Prior to entering the operating theater, the surgeon must definitively confirm the symptomatic web space. This is often achieved through a combination of clinical mapping and preoperative diagnostic injections. If a patient presents with ambiguous symptoms spanning both the second and third intermetatarsal spaces, a highly specific, low-volume (1-2 mL) diagnostic block using 1% lidocaine (without epinephrine) should be performed in the primary suspect web space. Complete resolution of symptoms confirms the primary pain generator. If symptoms persist in the adjacent space, simultaneous double-web-space decompression may be planned. Preoperative templating via ultrasound is also highly recommended to map the exact location of the neuroma relative to the metatarsal heads, allowing the surgeon to visualize the trajectory of the endoscopic cannula.
Patient positioning is designed to maximize surgical access and intraoperative stability. The patient is placed supine on the operating table. A crucial positioning nuance is the placement of a well-padded bump beneath the ipsilateral hemipelvis and thigh. This maneuver internally rotates the lower extremity slightly, counteracting the natural tendency of the leg to externally rotate when supine, thereby presenting the dorsal forefoot in a perfectly neutral, horizontal plane to the surgeon. The foot itself must be positioned such that the toes extend just beyond the distal edge of the operating table, while the heel rests firmly on the surface. This specific configuration allows the operative assistant to freely manipulate the toes, applying plantarflexion or dorsiflexion to the MTP joints as needed to tension the TIML and open the intermetatarsal space during cannula insertion and ligament transection.
Anesthetic management requires specific considerations tailored to the endoscopic nature of the procedure. While general anesthesia or a regional popliteal block are excellent choices, the local infiltration of anesthetic directly into the surgical field must be strictly avoided. The injection of fluid into the tightly constrained intermetatarsal space causes immediate tissue distension and extravasation into the delicate fascial planes. This fluid obscures the optical cavity, distorts the visual contrast between the white fibrous TIML and the surrounding yellow adipose tissue, and severely compromises the surgeon's ability to safely identify the ligament and protect the nerve. Therefore, if a regional block is utilized, it must be performed proximally at the ankle or popliteal fossa.
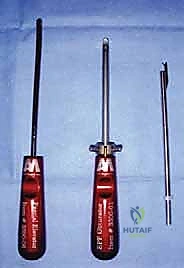
Furthermore, absolute hemostasis is non-negotiable for endoscopic forefoot surgery. Even a minor capillary ooze can rapidly fill the narrow cannula, completely obliterating the endoscopic field of view. Consequently, a well-padded ankle tourniquet is routinely applied and inflated to approximately 250 mm Hg prior to the initial incision. The surgical equipment must be meticulously verified before the tourniquet is inflated. The standard setup requires the specialized AM Surgical uniportal endoscopic set, which includes the slotted cannula, the blunt-tipped obturator, the specialized tissue elevator, the locking device, and the disposable retrograde cutting knife blades. The optical system utilizes a 4.0-millimeter, 30-degree short arthroscope. The 30-degree angle is essential, as it allows the surgeon to look "up" at the plantar surface of the TIML when the scope is positioned within the cannula.
Step-by-Step Surgical Approach and Decompression Technique
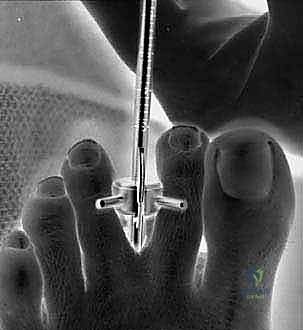
The execution of the uniportal endoscopic decompression is a highly choreographed sequence of steps. With the patient prepped, draped, and the ankle tourniquet inflated, the procedure commences with the creation of the portal. A number 15 scalpel blade is utilized to make a precise, 1-centimeter longitudinal incision centered over the dorsal aspect of the affected web space, positioned immediately proximal to the palpable metatarsal heads. It is imperative that this incision remains superficial, breaching only the epidermis and dermis. Deep, aggressive scalpel work in this region risks iatrogenic injury to the dorsal cutaneous nerve branches or the dorsal venous arch. Once the skin is incised, blunt Stevens tenotomy scissors are introduced to carefully spread the subcutaneous adipose tissue, creating a narrow working channel directed perpendicularly down toward the plantar aspect of the foot.
Following the initial blunt dissection, the specialized slotted cannula, with the blunt-tipped obturator fully engaged, is introduced into the wound. The trajectory of insertion is critical: the instrument is directed plantar-ward and slightly proximal, aiming for the space between the metatarsal necks. The surgeon relies heavily on tactile feedback during this phase. As the obturator advances, the surgeon should feel the instrument drop past the dorsal interosseous fascia and into the intermetatarsal space. The tip of the obturator is then used to palpate the firm, unyielding transverse intermetatarsal ligament. The cannula assembly is carefully advanced so that it slides immediately plantar to the TIML, effectively sandwiching the cannula between the ligament dorsally and the common plantar digital nerve plantar-ward. Crucially, the slot of the cannula must be oriented directly dorsal, at the 12 o'clock position.
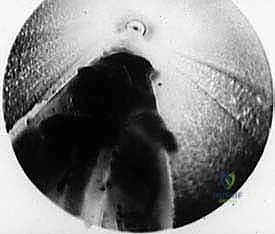
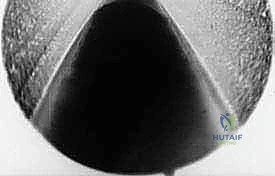
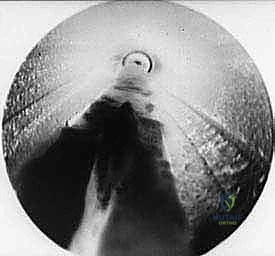
Once the cannula is definitively positioned, the obturator is withdrawn. Frequently, a small amount of intermetatarsal fat or serous fluid will egress into the cannula. This must be meticulously cleared using sterile, absorbent cotton-tipped applicators to ensure an unobstructed optical cavity. The 4.0-millimeter, 30-degree endoscope is then introduced into the cannula. As the scope is advanced, the surgeon should clearly visualize the transverse intermetatarsal ligament stretching tautly across the dorsal slot of the cannula. It appears as a distinct, glistening, white fibrous band running transversely across the visual field. Lateral to the TIML, the surgeon may occasionally identify the pinkish, muscular fibers or the white tendinous slip of the lumbrical muscle.
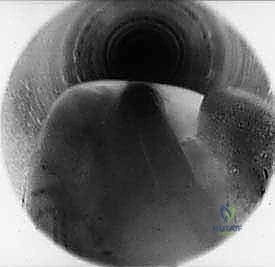
Before proceeding with the transection, the ligament must be meticulously delaminated from the overlying and underlying soft tissues to ensure a safe and complete release. The endoscope is temporarily removed, and the specialized AM Surgical elevator is introduced through the cannula. The elevator is used to aggressively scrape the plantar surface of the TIML, clearing away adherent adipose tissue and ensuring the nerve is physically displaced plantar-ward, safely away from the cutting zone. The surgeon then scrapes the dorsal surface of the ligament to clear the path for the retrograde knife. If the surgeon wishes to visually confirm the pathology of the nerve, the cannula can be carefully rotated 180 degrees so the slot faces the 6 o'clock position. This maneuver often reveals the thickened, fibrotic perineurium characteristic of the neuroma. After verification, the cannula is strictly returned to the 12 o'clock position to shield the nerve.
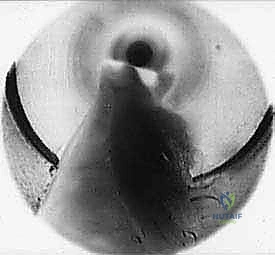
The final, definitive step is the transection of the TIML. The disposable retrograde endoscopic knife is securely mounted onto the locking device. The endoscope and the knife assembly are introduced simultaneously into the cannula. The blade is advanced under direct visualization until it is positioned distal to the distal edge of the TIML.

With the blade oriented parallel to the lens, the surgeon slowly and deliberately retracts the knife assembly proximally. The blade engages the distal edge of the ligament and smoothly cleanly transects the dense fibrous tissue.
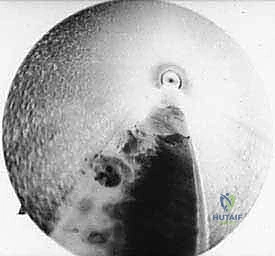
As the ligament is divided, a distinct tactile "give" is felt, and visually, the cut edges of the TIML will instantly retract medially and laterally, revealing a V-shaped gap.
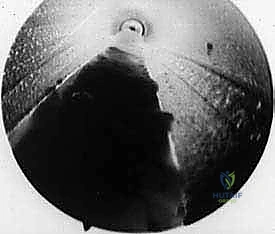
Often, the dorsal interosseous fat will immediately herniate downward through the newly created defect, confirming a complete and thorough release.
The endoscope and cannula are then withdrawn, the tourniquet is deflated, and hemostasis is confirmed. The 1-centimeter skin incision is closed with one or two non-absorbable sutures, and a standard compressive forefoot dressing is applied.
Complications, Incidence Rates, and Salvage Management
While uniportal endoscopic decompression is inherently safer and less morbid than open neurectomy, it is not devoid of potential complications. The most significant advantage of this technique is the near-total elimination of the true stump neuroma, which is the most devastating complication associated with traditional open resection. Because the nerve is preserved in the endoscopic approach, the formation of an amputation neuroma is anatomically impossible unless iatrogenic transection occurs. However, other complications, primarily related to technical execution and incomplete release, must be carefully managed.
The most common complication following endoscopic decompression is persistent or recurrent pain, which occurs in approximately 5% to 10% of cases. This is almost exclusively due to an incomplete transection of the transverse intermetatarsal ligament. If the retrograde knife blade fails to capture the most proximal or distal fibers of the robust ligamentous complex, the mechanical tethering of the nerve persists. In such scenarios, if symptoms remain refractory after a prolonged period of postoperative rehabilitation, a revision endoscopic procedure or an open exploration may be required to complete the release. Iatrogenic nerve injury is exceedingly rare when the cannula is properly positioned at the 12 o'clock orientation, but aggressive or blind use of the elevator can theoretically cause neuropraxia or partial axonotmesis.
Inadvertent transection of the lumbrical tendon is a recognized technical error during this procedure. Because the lumbrical tendon lies immediately adjacent to the plantar-lateral aspect of the TIML, a slightly misdirected cut can easily sever it. Fortunately, isolated lumbrical transection in the lesser toes is overwhelmingly asymptomatic. It rarely leads to a noticeable claw toe deformity or functional deficit, and most patients are entirely unaware of the event. Therefore, while meticulous visualization should aim to preserve the tendon, its accidental division does not typically necessitate surgical repair or alter the postoperative protocol. Hematoma formation and superficial wound infections occur in less than 1% of cases, a stark contrast to the higher rates seen in open dorsal or plantar approaches, and are generally easily managed with oral antibiotics and local wound care.
| Complication | Estimated Incidence | Etiology / Risk Factors | Prevention and Salvage Management |
|---|---|---|---|
| Incomplete TIML Release | 5% - 10% | Failure to engage the most proximal/distal fibers; poor endoscopic visualization. | Prevention: Meticulous delamination; visual confirmation of fat herniation post-cut. Salvage: Revision endoscopic release or open decompression. |
| Iatrogenic Nerve Injury | < 1% | Cannula rotated incorrectly during cutting; aggressive blind instrumentation. | Prevention: Strict adherence to 12 o'clock cannula slot positioning during blade deployment. Salvage: Neurolysis; if completely transected, targeted muscle reinnervation (TMR) or nerve capping. |
| Lumbrical Tendon Transection | 2% - 5% | Blade wandering laterally; failure to identify the tendon visually. | Prevention: Clear visualization of the lateral TIML border. Salvage: Generally requires no intervention; clinically silent in lesser toes. |
| Hematoma / Infection | < 1% | Inadequate hemostasis; premature weight-bearing without compression. | Prevention: Strict tourniquet use; compressive postoperative dressing. Salvage: Local wound care, oral antibiotics; rarely requires evacuation. |
| True Stump Neuroma | ~ 0% | Inherent to nerve preservation. | Prevention: The endoscopic decompression technique itself prevents this. Salvage: N/A (unless iatrogenic complete nerve transection occurs). |
Phased Post-Operative Rehabilitation Protocols
The postoperative rehabilitation following uniportal endoscopic decompression is remarkably accelerated compared to traditional open procedures. The preservation of the plantar fat pad, the minimal disruption of the dorsal soft tissue envelope, and the tiny 1-centimeter incision allow for immediate, protected weight-bearing. The overarching goal of the rehabilitation protocol is to manage early postoperative edema, facilitate primary wound healing, and rapidly restore normal gait mechanics without subjecting the healing intermetatarsal space to excessive shear forces. Patient compliance with footwear restrictions during the initial weeks is critical to preventing hematoma and ensuring optimal outcomes.
Phase 1: Acute Healing (Days 0 to 14)
Immediately following surgery, the patient is placed in a bulky, compressive forefoot dressing and fitted with a rigid-soled postoperative surgical shoe or a controlled ankle motion (CAM) boot. The patient is permitted to weight-bear as tolerated (WBAT) strictly on the heel and lateral border of the foot. Full, propulsive weight-bearing across the forefoot is discouraged during this phase to prevent stretching the newly healing tissues and to minimize bleeding. Strict elevation of the operative extremity above the level of the heart is mandated for the first 48 to 72 hours to control swelling. Ice therapy behind the knee or at the ankle (avoiding direct application to the surgical site) can be utilized. The patient returns to the clinic between postoperative days 10 and 14 for the removal of the compressive dressing and the skin sutures.
Phase 2: Transition and Mobilization (Weeks 2 to 4)
Upon successful suture removal and confirmation of primary wound healing, the patient transitions out of the rigid surgical shoe and into a supportive, wide-toe-box athletic shoe with a stiff sole. The use of high heels, narrow dress shoes, or walking barefoot is strictly prohibited. Patients are encouraged to begin gentle, active, and passive range-of-motion exercises for the metatarsophalangeal and interphalangeal joints to prevent capsular stiffness. Aggressive scar massage over the dorsal incision site is initiated to prevent deep tissue adhesions. Weight-bearing is progressed to a normal heel-to-toe gait pattern, guided by pain tolerance. Low-impact cardiovascular activities, such as stationary cycling or swimming, can be safely introduced during this phase.
Phase 3: Return to Unrestricted Activity (Weeks 4 to 8)
By the fourth postoperative week, the majority of patients experience a significant, if not complete, resolution of their preoperative radicular pain. The focus of this phase shifts toward strengthening the intrinsic musculature of the foot and returning to high-impact activities. Patients can gradually reintroduce jogging, running, and jumping activities, provided they remain symptom-free. While patients may eventually return to wearing dress shoes or heels, they are extensively counseled that chronic use of constrictive footwear was the primary biomechanical catalyst for their neuroma and that long-term modification of footwear habits is the most effective strategy for preventing contralateral or adjacent web space recurrence. Maximum medical improvement is typically achieved by the third postoperative month.
Summary of Landmark Literature and Clinical Guidelines
The evolution of surgical intervention for Morton's neuroma is well-documented in the orthopedic literature, reflecting a definitive shift away from destructive procedures toward nerve-sparing techniques. The foundational text for the endoscopic approach is the landmark 1994 paper by Barrett and Pignetti, published in the Journal of the American Podiatric Medical Association. This prospective study was the first to detail the uniportal endoscopic decompression technique, reporting an 87% success rate with a significantly reduced morbidity profile compared to historical open neurectomy cohorts. Their work established the biomechanical premise that releasing the TIML is sufficient to resolve the entrapment neuropathy, challenging the century-old dogma that the enlarged nerve itself was an irreversible pain generator requiring excision.
Subsequent long-term outcome studies have consistently validated Barrett and Pignetti's initial findings. A comprehensive retrospective review by Schon et al. demonstrated that patients undergoing nerve-sparing decompression reported higher overall satisfaction scores, faster return to work, and significantly lower rates of chronic regional pain syndromes compared to those undergoing neurectomy. Crucially, multiple meta-analyses have confirmed that the incidence of stump neuroma—the most feared complication of Morton's neuroma surgery—is effectively reduced to zero when pure endoscopic decompression is successfully executed.
Current clinical guidelines from major orthopedic and foot and ankle societies strongly advocate for a stepwise approach to Morton's neuroma. Exhaustive conservative management remains the mandated first-line therapy. When surgery is indicated, the guidelines increasingly favor decompression over resection as the primary surgical intervention, reserving neurectomy strictly for salvage cases, true recurrent neuromas with extensive fibrosis
