Mastering Foot and Ankle Surgical Techniques: Preparation, Tourniquets, and Regional Blocks
Key Takeaway
Successful foot and ankle surgery demands a profound understanding of complex biomechanics, meticulous soft-tissue handling, and precise preoperative preparation. This guide details essential surgical principles, including evidence-based skin preparation protocols, safe Esmarch tourniquet application, specialized instrumentation, and step-by-step regional anesthesia techniques. Mastery of these foundational elements minimizes complications and optimizes functional outcomes in both forefoot and hindfoot reconstructive procedures.
Introduction to Foot and Ankle Surgery
In the past, surgery of the foot was often consigned to the junior house officer, with the attending surgeon urging haste under the misconception that "it’s just a simple foot case." This paradigm has shifted dramatically. Today, there is a revived, profound interest in the comprehensive care of the foot and ankle, driven by a renewed respect for this anatomical marvel of support, balance, locomotion, and sensibility.
The catastrophic sequelae produced by the impairment of even a single biomechanical function have refined the orthopaedic surgeon’s appreciation for the foot. It is now universally accepted that the orthopaedic surgeon caring for the foot must be as intimately familiar with its complex anatomy as with that of the hand, shoulder, hip, or knee. Nowhere else—other than perhaps the hand—does the orthopaedist require such a comprehensive grasp of the changing anatomical relationships of vital structures within such a confined, unforgiving space.
A deep, three-dimensional understanding of the structural relationships of the subtalar, midtarsal (Chopart), and metatarsocuneiform-cuboid (Lisfranc) articulations is mandatory. Only when the delicate interplay between the soft-tissue envelope and the osseous architecture is clearly understood can the surgeon fully appreciate the biomechanical principles that govern support and locomotion.
Preoperative Preparation and Operating Room Setup
Eradicating Normal Bacterial Flora
The foot presents a unique challenge regarding surgical site infections (SSIs). The normal bacterial flora residing on the foot, particularly within the web spaces, thrives in environments that are often moist due to confinement in hosiery and footwear. Forefoot procedures are particularly high-risk due to the dense bacterial colonization between the stratum corneum, within the follicles of sebaceous glands, and along hair shafts.
To mitigate this risk, the operative extremity must be scrubbed meticulously for 8 to 10 minutes from the toes to the knee using a patient-tolerated antibacterial soap. Particular attention must be directed to the interdigital web spaces. Following this initial cleansing, the extremity is wrapped in a sterile cloth secured with a gauze wrap, which remains in place until the patient is positioned on the operating table. At that time, a formal antiseptic skin preparation is performed.
Clinical Pearl: Eliminating all normal bacterial flora on the foot via preoperative cleansing is virtually impossible due to the inherent limitations of disinfectants and the rapid recolonization of bacteria and fungi during the procedure. Therefore, optimizing the preparation technique is critical.
Evidence-Based Skin Preparation Protocols
Keblish et al. conducted a landmark study comparing four preoperative skin preparation techniques:
1. Povidone-iodine scrub with soft sponges (with and without isopropyl alcohol prewash).
2. Povidone-iodine scrub with a bristled brush.
3. Alcohol scrub with a bristled brush.
The study concluded that the alcohol scrub with a bristled brush was the most effective method. Furthermore, the addition of an alcohol prewash to a standard povidone-iodine scrub significantly reduced positive bacterial cultures from the web spaces (from 36% down to 8%). The use of a bristled brush with povidone-iodine reduced heavy bacterial growth in nail fold specimens from 72% to 28%.
Rates of Heavy Bacterial Growth (>20 colony-forming units) by Preparation Method:
* Povidone-iodine without bristled brush: Nail Fold (72%), Web Space (12%), Ankle (0%)
* Povidone-iodine without bristled brush + alcohol prewash: Nail Fold (72%), Web Space (4%), Ankle (0%)
* Povidone-iodine WITH bristled brush: Nail Fold (28%), Web Space (0%), Ankle (0%)
* Alcohol only WITH bristled brush: Nail Fold (4%), Web Space (0%), Ankle (4%)
Prophylactic Antibiotics
Prophylactic intravenous antibiotics are administered routinely in foot and ankle reconstructive procedures. A first-generation cephalosporin (e.g., Cefazolin) is the gold standard. For patients with documented penicillin or cephalosporin allergies, an aminoglycoside or clindamycin is typically utilized. Administration must be completed within 60 minutes prior to tourniquet inflation.
Positioning and Illumination
The surgeon and assistant may choose to sit or stand, depending on the procedure. When sitting, an additional sterile drape must be secured to the table and to the surgeon's body to maintain a sterile field in the surgeon’s lap, which rests below the standard table level.
Lighting must be directed onto the small operative field to eliminate shadows and focus sharply on the foot. A high-intensity surgical headlight is highly recommended, especially during deep plantar dissections where overhead lighting is obstructed. The surgical assistant must hold the foot firmly to prevent any motion; this is vitally important to avoid iatrogenic injury to the vulnerable cutaneous nerves of the foot, which, if transected or stretched, can ruin an otherwise excellent biomechanical result.
Tourniquet Principles and Application
The use of a tourniquet facilitates dissection in a bloodless field, significantly decreasing the likelihood of iatrogenic injury to nerves, vessels, and tendons. While adequate surgery can be performed without a tourniquet, it remains a staple of foot and ankle surgery.
Surgical Warning: In selected patients—particularly the elderly or those with severe peripheral vascular disease (PVD) or heavily calcified vessels—a tourniquet is strictly contraindicated. A constricting wrap around the ankle in an ischemic foot can lead to catastrophic tissue necrosis.
Pneumatic vs. Esmarch Tourniquets
If a pneumatic tourniquet is used, the pressure should be set 100 to 125 mm Hg higher than the patient's systolic blood pressure. Inflation should occur only after elevating the leg for 2 minutes or after exsanguinating the extremity from the toes to the tourniquet level using a 10-cm wide elastic rubber wrap.
Tourniquet time should rarely exceed 90 minutes, though 120 minutes is occasionally permissible. If a prolonged procedure is anticipated (>75 minutes), it is advisable to deflate the tourniquet, elevate the leg, allow 10 to 15 minutes of reperfusion, and limit the second inflation to no more than 30 minutes.
Technique: Application of the Esmarch Rubber Tourniquet
The use of an elastic Esmarch wrap as a primary tourniquet has proven highly useful and safe for forefoot and midfoot procedures. It allows surgery to be performed in a bloodless field for up to 2 hours, and patients experience minimal tourniquet pain provided the wrap does not reach the musculotendinous junction at the distal third of the leg.
Grebing and Coughlin evaluated the pressures generated beneath 4-inch and 6-inch Esmarch bandages. They found that three tensioned wraps around the ankle with a tuck produced an average pressure of 222 mm Hg, while four wraps generated an average of 288 mm Hg. This confirms the clinical safety and efficacy of the technique.
Step-by-Step Esmarch Application:
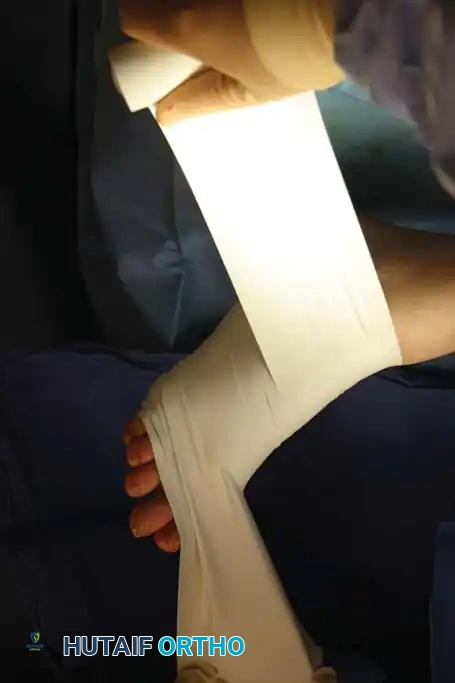
- Have an assistant hold the end of the wrap at a 45-degree angle to the foot, placing tension on the free end, while the surgeon’s thumb holds the wrap firmly against the skin.
Fig. 1: Initial application of the rubber Esmarch wrap tourniquet, maintaining strict tension.
- Begin wrapping proximally. Do not overlap each turn by more than half the width of the tourniquet. Wrap the tourniquet above the ankle, ensuring no skin is left uncovered and preventing the edges from rolling onto themselves.
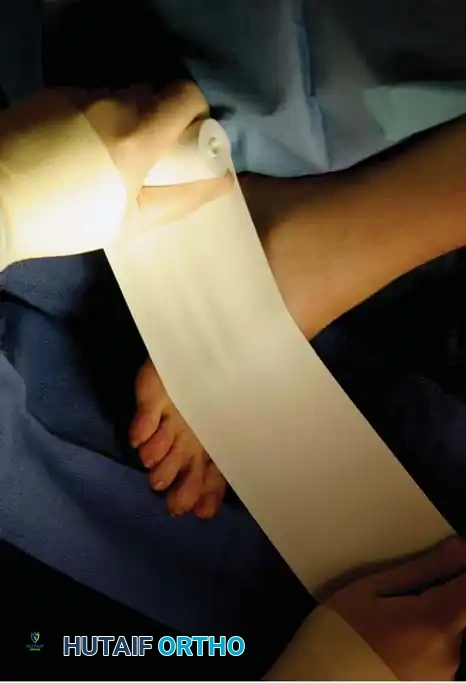
Fig. 2: Progressive wrapping of the Esmarch bandage, overlapping by half-widths to ensure uniform exsanguination.
-
Once above the ankle, proceed proximally, but stop no more than 8 to 10 cm proximal to the malleoli, staying distal to the muscle mass of the calf. Extending further proximally into the muscle belly significantly increases tourniquet discomfort.
-
Complete the exsanguination with no more than three or four tight "cinches" around the ankle, followed by tucking the remaining roll beneath the proximal edge. Unwind the distal portion covering the forefoot just enough to expose the operative field.
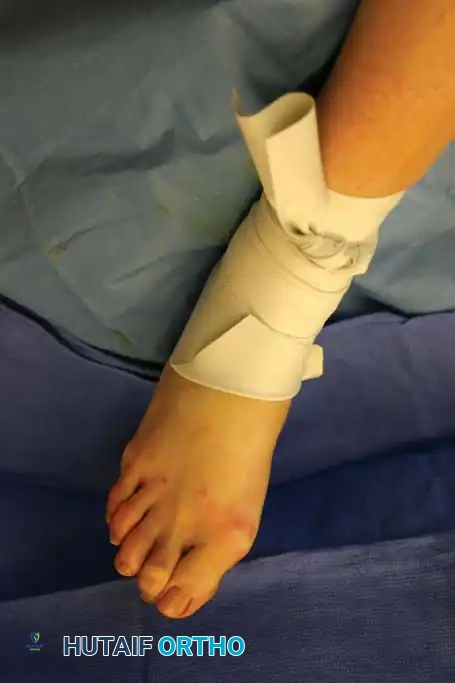
Fig. 3: The Esmarch tourniquet secured at the ankle, with the distal portion removed to expose the forefoot operative field.
Prophylactic Anticoagulation
While routine prophylactic postoperative anticoagulation (e.g., LMWH, DOACs) is standard of care following major hip or knee arthroplasty, its use in foot and ankle surgery is highly debated and not universally widespread.
Large-scale epidemiological studies by Mizel et al. and Solis and Saxby demonstrated that the incidence of symptomatic deep venous thrombosis (DVT) following foot and ankle surgery ranges from a mere 0.22% to 3.5%, with an incidence of fatal pulmonary embolism approaching zero. Consequently, routine prophylactic anticoagulation is not recommended for standard foot and ankle procedures unless the patient possesses specific, high-risk stratifying factors (e.g., prior history of VTE, known thrombophilia, or prolonged immobilization in a high-risk demographic).
Specialized Instrumentation and Soft-Tissue Handling
Meticulous soft-tissue handling is the hallmark of a master foot and ankle surgeon. The soft-tissue envelope of the foot is notoriously thin, with poor collateral circulation in certain zones. Indelicate dissection leads to skin edge necrosis, wound dehiscence, and devastating deep infections.
The "Soft-Tissue" Foot Tray
A dedicated soft-tissue tray is essential. Instruments should include:
* Fine two-tooth retractors and delicate forceps with 1.5 mm between the teeth.
* Brown-Adson forceps: Ideal for grasping small bone fragments and bulky soft tissues without crushing the microvasculature.
* No. 15 Bard-Parker blade: Attached to a multisided handle to facilitate rapid changes in the angle of dissection. Sharp dissection is always preferred over blunt tearing to minimize postoperative edema.
* Retractors: Narrow- and wide-neck mini-Hohmann retractors, and small double-ended right-angle retractors. These allow the assistant’s hands to remain out of the visual field while providing excellent exposure.
* Hemostasis and Suturing: Mosquito hemostats for precise small-vessel occlusion, Webster needle holders with smooth jaws to prevent fraying of fine (4-0 to 5-0) sutures, and a 70-degree angled probe.
The "Bone" Foot Tray
For osseous procedures (arthrodeses, osteotomies, tendon transfers), a heavier tray is required:
* Heavier blades, dissecting scissors, and heavy-duty two-tooth retractors.
* Thin osteotomes, small mallets, and small curets for precise cartilage debridement.
* Inge retractor: Modified with thinned arms and narrowed teeth to fit into tight joint spaces (e.g., the subtalar or Lisfranc joints) without causing iatrogenic bone crush.
* Power Equipment: A Kirschner wire (K-wire) inserter that does not require a key release to change wires, and a power oscillating saw equipped with thin, narrow blades to minimize thermal necrosis and bone loss during osteotomies.
Clinical Pearl: Magnification is indispensable. The routine use of 2.5× to 3.5× surgical loupes ensures the identification and protection of delicate cutaneous nerves (e.g., the medial dorsal cutaneous nerve) that are easily transected with the naked eye.
Regional Anesthesia and Nerve Blocks
As the vast majority of foot surgery transitions to an outpatient setting, the benefits of regional forefoot, ankle, or popliteal block anesthesia have become undeniable. Regional blocks provide excellent intraoperative anesthesia, profound postoperative analgesia, and reduce the need for systemic opioids.
A standard mixture of 1% lidocaine (for rapid onset) and 0.5% bupivacaine (for prolonged duration) provides adequate anesthesia. Anesthesia personnel should be present to provide intravenous sedation and monitor the patient during block administration.
Proximal Regional Anesthesia Techniques
For more extensive midfoot or hindfoot reconstructions, proximal blocks (such as the popliteal sciatic nerve block or saphenous nerve block) are highly effective. These require precise anatomical landmarking and often utilize peripheral nerve stimulation or ultrasound guidance.
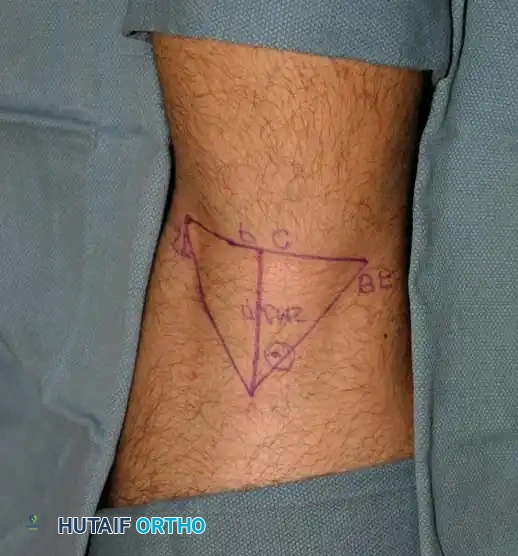
Fig. 4: Anatomical mapping on the posterior calf/popliteal fossa prior to administering a proximal regional nerve block.
When utilizing a nerve stimulator, the needle is advanced until an appropriate motor response (e.g., plantar flexion or dorsiflexion of the foot) is elicited at a low current threshold (typically 0.3 to 0.5 mA), ensuring close proximity to the nerve without intraneural placement.
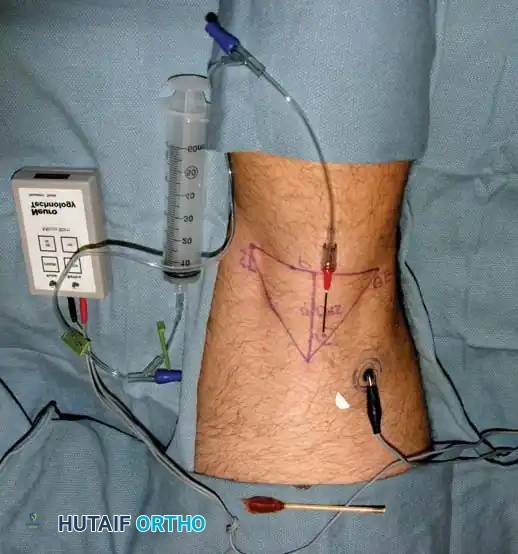
Fig. 5: Setup for a peripheral nerve block utilizing a nerve stimulator to ensure precise localization of the anesthetic agent.
Technique: Step-by-Step Forefoot Block
The forefoot block is highly useful for distal procedures, including distal first metatarsal osteotomies (e.g., Chevron), sesamoidectomies, or hammer toe corrections.
- Deep Peroneal Nerve Block: Palpate the dorsalis pedis artery as it courses into the first intermetatarsal space. The deep peroneal nerve, which supplies sensation to the first web space, accompanies this artery. Using a 25-gauge needle, carefully avoid the artery and inject 2 to 3 mL of the local anesthetic mixture subcutaneously.
- Superficial Peroneal Nerve Block (Lateral): If a second or third hammer toe procedure is planned, withdraw the needle slightly and direct it laterally just beneath the dorsal veins. Block the common digital branches of the superficial peroneal nerve supplying the second and third intermetatarsal spaces with an additional 2 to 3 mL of anesthetic.
- Superficial Peroneal Nerve Block (Medial): Return to the original entrance point and direct the needle medially. Stay immediately beneath the dorsal veins and superficial to the extensor hallucis longus (EHL) tendon. This blocks the medial hallucal branch of the dorsomedial superficial peroneal nerve—the nerve most commonly encountered (and injured) dorsal and medial to the bunion prominence during hallux valgus surgery.
- Completion of Dorsal Block: Conclude the dorsal sensory block at the dorsomedial aspect of the forefoot, approximately 1 cm distal to the first metatarsomedial cuneiform articulation. At this stage, 6 to 8 mL of anesthetic has been administered.
- Plantar Progression: Entering the newly anesthetized area on the dorsomedial aspect of the forefoot, advance the needle plantarward into the subcutaneous space, staying superficial to the abductor hallucis muscle, until the plantar surface of the medial foot is reached. Injecting small amounts of anesthetic as the needle progresses plantarward minimizes patient discomfort and ensures a comprehensive ring block of the forefoot.
By mastering these foundational techniques—from evidence-based skin preparation and safe tourniquet application to meticulous soft-tissue handling and precise regional anesthesia—the orthopaedic surgeon sets the stage for successful, complication-free foot and ankle reconstruction.
You Might Also Like