Achilles Tendon Allograft for Patellar Tendon Reconstruction
Key Takeaway
Chronic patellar tendon ruptures present a formidable surgical challenge due to proximal patellar migration, soft tissue contracture, and poor native tissue quality. The Achilles tendon allograft with a calcaneal bone block provides robust biomechanical fixation and restores the extensor mechanism's length-tension relationship. This comprehensive guide details the surgical technique, including tibial trough preparation, transpatellar tunnel creation, graft tensioning, and postoperative rehabilitation protocols essential for optimal functional recovery.
Introduction to Chronic Patellar Tendon Ruptures
The reconstruction of a chronic or neglected patellar tendon rupture is one of the most formidable challenges in orthopedic surgery. Unlike acute ruptures, which can typically be managed with primary end-to-end repair and augmentation, chronic ruptures (defined as those presenting more than 6 weeks post-injury) are characterized by proximal migration of the patella (patella alta), severe contracture of the quadriceps muscle, and profound degeneration or complete resorption of the native tendon tissue.
In these complex scenarios, primary repair is biomechanically impossible and biologically destined to fail. The restoration of the extensor mechanism requires a robust structural graft capable of withstanding the immense tensile forces generated by the quadriceps while simultaneously bridging the substantial gap between the inferior pole of the patella and the tibial tubercle.
The Achilles tendon allograft, utilizing a calcaneal bone block, has emerged as the gold standard for this reconstruction. It provides a massive collagenous matrix for soft-tissue integration at the patella and allows for rigid, bone-to-bone healing at the tibial tubercle.
Biomechanical Rationale and Graft Selection
The native patellar tendon is a highly specialized structure that transmits forces up to 15 times body weight during activities such as jumping or deep knee flexion. When selecting a graft for chronic reconstruction, the surgeon must prioritize initial fixation strength, stiffness, and long-term biological incorporation.
The Achilles tendon allograft offers several distinct biomechanical advantages:
* Bone-to-Bone Healing: The calcaneal bone block allows for press-fit placement into a tibial trough, secured with lag screws. This yields superior initial pull-out strength compared to soft-tissue fixation and promotes rapid osseous integration.
* Cross-Sectional Area: The Achilles tendon possesses a massive cross-sectional area, providing exceptional tensile strength that closely mimics or exceeds that of the native patellar tendon.
* Versatility in Contouring: The broad, flat nature of the Achilles tendon allows it to be split into multiple tails. A central tail can be passed through a transpatellar tunnel for anatomic reconstruction, while medial and lateral tails can be utilized to reconstruct the retinaculum and balance patellofemoral tracking.
💡 Clinical Pearl: Graft Alternatives
While the Achilles tendon allograft is preferred for its bone block and robust size, alternative options include tibialis anterior allografts, hamstring autografts/allografts, or quadriceps tendon autografts. However, these lack the rigid bone-to-bone fixation at the tibial tubercle provided by the calcaneal block.
Preoperative Planning and Patient Positioning
Imaging Protocol
Thorough preoperative imaging is mandatory.
1. Standard Radiographs: Weight-bearing anteroposterior (AP), lateral, and Merchant views of both knees. The contralateral normal knee serves as a critical template for determining the patient's native patellar height (Insall-Salvati ratio, Caton-Deschamps index).
2. Magnetic Resonance Imaging (MRI): Essential for evaluating the quality of the remaining quadriceps tendon, assessing for concurrent intra-articular pathology, and determining the extent of native patellar tendon retraction and degeneration.
Operating Room Setup
- Anesthesia: General or regional anesthesia with a femoral nerve block for postoperative pain control.
- Positioning: Supine on a standard radiolucent operating table. A lateral post and foot bump are utilized to allow the knee to rest comfortably at 90 degrees of flexion and to permit full extension.
- Tourniquet: A proximal thigh tourniquet is applied but inflated only if visualization becomes compromised, as prolonged ischemia can exacerbate quadriceps contracture.
- Fluoroscopy: A C-arm must be available in the room to confirm patellar height and tunnel trajectory intraoperatively.
Surgical Technique: Achilles Tendon Allograft Reconstruction
1. Incision and Surgical Exposure
Make a generous, extensile longitudinal midline incision beginning 3 to 4 cm proximal to the superior pole of the patella and extending distally to just below the tibial tuberosity.
Utilize sharp subcutaneous dissection to develop full-thickness fasciocutaneous flaps, exposing the extensor mechanism medially and laterally through the plane of the prepatellar bursa.
⚠️ Surgical Warning: Nerve Protection
During the distal and medial dissection, meticulously identify and protect the infrapatellar branch of the saphenous nerve (IPBSN). Iatrogenic neuroma formation in this region is a significant source of postoperative morbidity and anterior knee pain.
Make a sharp longitudinal incision through the remnants of the tendon sheath and the dense scar tissue occupying the midportion of the former patellar tendon. Expose the fibrotic remains of the tendon. If sufficient native tissue is present and deemed viable to add structural strength to the final repair, freshen the ends of the tendon to be used later as a biological augment.
2. Extensor Mechanism Mobilization and Quadricepsplasty
The most challenging aspect of chronic reconstruction is mobilizing the proximally retracted patella.
- Retinacular Release: Perform a thorough lateral retinacular release. Use a combination of blunt and sharp dissection to free the medial and lateral gutters, extending proximally into the suprapatellar pouch to lyse intra-articular adhesions.
- Vastus Intermedius Elevation: If further distal mobilization of the patella is necessary to restore anatomic height, use a long periosteal elevator to bluntly dissect the vastus intermedius muscle proximally off the anterior cortex of the femur.
🛑 Pitfall: Avascular Necrosis of the Patella
Rarely, a medial retinacular release may be required to complete the quadricepsplasty (as described by Thompson). However, this must be avoided if at all possible. The patella's blood supply relies heavily on the superior and inferior medial genicular arteries. Combining a lateral release with a medial release effectively devascularizes the patella, drastically increasing the risk of avascular necrosis (AVN) and subsequent fragmentation.
The lateral incision also provides an excellent window to inspect the intra-articular structures and debride any fibrotic tissue within the patellofemoral articulation.
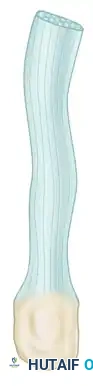
3. Allograft Preparation
Thaw the Achilles tendon allograft in warm saline.
- Bone Block Contouring: Using an oscillating saw and a rongeur, contour the corticocancellous calcaneal bone block to a standardized dimension—typically 2.5 to 3.0 cm in length, 1.5 to 2.0 cm in width, and 1.5 cm in depth.
- Tendon Splitting: Fashion the tendinous portion of the Achilles graft into three distinct branches. The central third should consist of the thickest portion (half to two-thirds of the total tendon volume), yielding a central branch 8 to 9 mm in diameter.
- Distal Freeing: Free this central branch distally toward the bone block far enough to allow the graft to be pulled up to the inferior pole of the patella without tethering or hindering the excursion of the two lateral branches.
- Whipstitching: Place a running, locking whipstitch of No. 2 nonabsorbable high-tensile suture (e.g., FiberWire or Orthocord) into the proximal end of the central branch to facilitate passage.
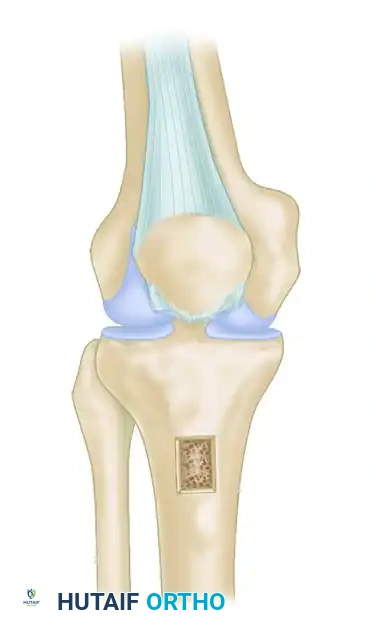
4. Tibial Trough Preparation and Bone Block Fixation
Place the prepared allograft over the anterior tibia to estimate the proper length and positioning. The proximal edge of the bone block should sit approximately 4 cm distal to the joint line, corresponding to the anatomic footprint of the native tibial tubercle.
- Trough Creation: Use an oscillating saw and a small osteotome to create a rectangular trough in the tibial tubercle matching the exact dimensions of your contoured bone block (2.5–3.0 cm long, 1.5–2.0 cm wide, 1.5 cm deep).
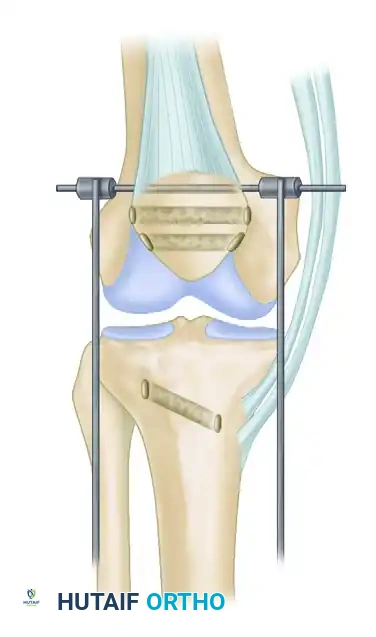
- Fixation: Impact the corticocancellous bone block flush into the trough. Ensure proper rotational alignment of the tendon. Secure the block rigidly in position using two staggered 4.0-mm cancellous screws utilizing a lag technique, or two 6.5-mm partially threaded cancellous screws, depending on the size of the block and bone quality.
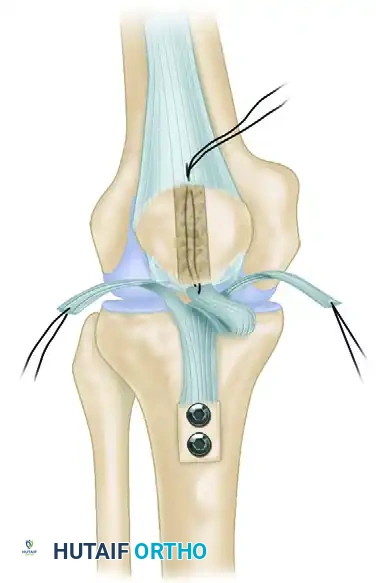
5. Transpatellar Tunnel Creation and Graft Passage
Identify the anatomic attachment site of the patellar tendon at the central area of the inferior pole of the patella.
- Guidewire Placement: Drive a 2.4-mm Kirschner wire from inferior to superior through the central axis of the patella. The wire should exit superiorly approximately 3 mm posterior to the central part of the quadriceps tendon insertion.
- Reaming: Pass an 8-mm or 9-mm cannulated reamer over the K-wire to create the transpatellar tunnel. Use a rasp or a curette to chamfer and smooth the inferior and superior edges of the tunnel to prevent abrasive graft laceration.
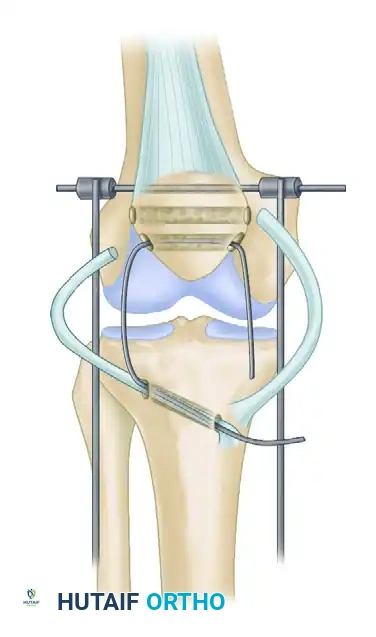
- Graft Passage: Using a suture passing loop or a ligament passer, shuttle the whipstitched central branch of the Achilles tendon from inferior to superior through the patellar tunnel. The graft should exit through a small vertical slit made in the quadriceps tendon just superior to the patellar insertion.
6. Graft Tensioning and Final Fixation
Setting the correct tension and restoring the anatomic patellar height is the most critical and technically demanding step of the procedure.
- Establishing Height: The appropriate graft length is determined by evaluating several parameters:
- Ensure the knee can flex smoothly to 90 degrees without excessive tension.
- Evaluate the Insall-Salvati index using intraoperative fluoroscopy.
- With the knee flexed to 45 degrees, the inferior pole of the patella should lie parallel to the roof of the intercondylar notch (Blumensaat's line).
- With the knee fully extended, there should be approximately 1.5 cm of physiologic slack in the reconstructed patellar tendon.
- Radiographic Confirmation: Obtain a true lateral radiograph with the C-arm to confirm the correct patellar height, comparing it directly to the preoperative templating of the uninvolved extremity.
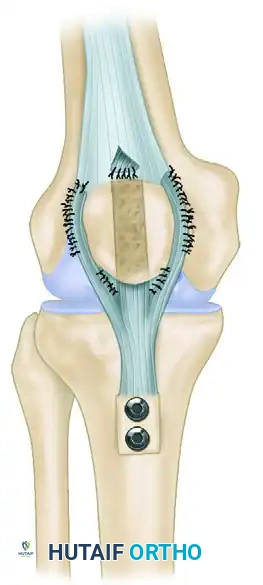
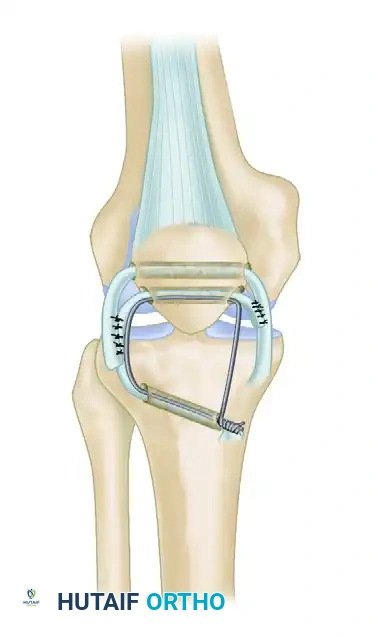
- Securing the Central Slip: Once the optimal height is established, tack the central tendon slip securely in place. Use multiple interrupted No. 2 nonabsorbable sutures to fix the graft to the dense soft tissue at the inferior pole of the patella, and to the edges of the quadriceps tendon at the superior pole where it exits the tunnel.
- Stump Integration: Use multiple interrupted sutures to tack the native patellar tendon stump (if viable) to the anterior surface of the allograft to promote biological incorporation.
- Retinacular Closure: Close the lateral release with the knee flexed to 30 degrees. Carefully evaluate patellofemoral tracking and the Q-angle.
- Securing Lateral Tails: Drape the medial and lateral branches of the Achilles graft over the medial and lateral retinaculum, respectively. Tension them to centralize the patella and tack them down using No. 0 nonabsorbable sutures.
Alternative Fixation: Suture Anchors
If the patella is small, osteopenic, or previously fractured, creating an 8-9 mm transpatellar tunnel may risk an iatrogenic patellar fracture.
* Anchor Technique: Alternatively, place two or three double-loaded metallic or biocomposite suture anchors into the distal pole of the patella. Drape the allograft tendon over the anterior cortex of the patella and the quadriceps tendon fascia, securing it rigidly with the nonabsorbable anchor sutures in a locking Krackow fashion.
Augmentation (If Required)
If the tissue quality is exceptionally poor or the patient is highly non-compliant, the repair can be protected with a neutralization construct.
* Pass a No. 5 nonabsorbable suture, a heavy steel wire, or a cerclage cable in a figure-of-eight or box-stitch fashion through a transverse drill hole in the patella and a corresponding transverse hole in the tibial tubercle. This acts as an internal splint to offload the healing allograft.
Alternative Technique: One-Stage Delayed Reconstruction with Hamstrings
In scenarios where an Achilles allograft is unavailable, or the surgeon prefers autogenous tissue, a one-stage delayed reconstruction utilizing the semitendinosus and gracilis tendons can be performed.
Step A: Patellar Traction
A heavy Steinmann pin is driven through a transverse drill hole in the mid-patella. This pin is used to apply distal traction, overcoming the quadriceps contracture and pulling the patella down to its anatomic position.
Step B: Hamstring Harvest and Passage
The semitendinosus and gracilis tendons are harvested but left attached at their distal tibial insertions. They are divided proximally. A transverse tunnel is drilled through the tibial tubercle, and another through the patella. The free ends of the hamstring tendons are passed through these tunnels to create a figure-of-eight or loop construct. A heavy fixation wire (cerclage) is also passed through the tunnels to act as a rigid internal splint.
Step C: Final Fixation
With the patella held in its normal anatomic position (confirmed fluoroscopically), the heavy fixation wire is twisted and secured. The gracilis and semitendinosus tendons are tensioned, sutured to themselves, and sutured to each other using heavy nonabsorbable sutures, creating a robust biological reconstruction protected by the wire loop.
Postoperative Rehabilitation Protocol
The postoperative rehabilitation following an Achilles tendon allograft reconstruction must be meticulously phased to balance the protection of the healing graft with the prevention of arthrofibrosis.
Phase I: Maximum Protection (Weeks 0–6)
- Immobilization: The patient is placed in a cylinder cast or a rigid knee immobilizer locked in full extension immediately postoperatively.
- Weight-Bearing: Weight-bearing as tolerated (WBAT) with crutches is permitted, provided the knee is locked in absolute extension.
- Range of Motion (ROM): Strict immobilization for the first 2 to 4 weeks depending on graft tension. At 4 weeks, a hinged knee brace is applied, and passive ROM is initiated from 0 to 30 degrees, progressing 15 degrees weekly.
- Muscle Activation: Isometric quadriceps sets, straight leg raises (in the brace), and ankle pumps are encouraged immediately.
Phase II: Moderate Protection and ROM (Weeks 6–12)
- Bracing: The hinged knee brace is unlocked gradually to match the patient's achieved passive ROM.
- ROM Goals: Achieve 90 degrees of flexion by week 8, and 120 degrees by week 12.
- Strengthening: Initiate active-assisted ROM. Begin closed kinetic chain exercises (e.g., mini-squats, leg press) limiting flexion to 60 degrees initially to protect the patellofemoral joint and the graft.
Phase III: Strengthening and Proprioception (Months 3–6)
- Bracing: Discontinue the brace once the patient demonstrates a normal gait pattern and sufficient quadriceps control (no extensor lag).
- Strengthening: Progress closed kinetic chain exercises. Initiate open kinetic chain extension exercises with light resistance. Focus on core and hip/gluteal strengthening.
- Cardiovascular: Stationary cycling and swimming (flutter kick only) are incorporated.
Phase IV: Return to Activity (Months 6–12+)
- Advanced Strengthening: Plyometrics, agility drills, and sport-specific training begin at 6 to 8 months.
- Clearance Criteria: Return to full unrestricted sports or heavy labor is typically delayed until 9 to 12 months postoperatively. Clearance requires >90% quadriceps strength symmetry compared to the contralateral limb, full ROM, and no effusion.
Complications and Pitfalls
- Extensor Lag / Graft Stretching: The most common complication. Over-tensioning the graft intraoperatively is preferred to under-tensioning, as allografts inherently undergo stress relaxation and creep over time.
- Arthrofibrosis: Prolonged immobilization leads to severe stiffness. Early, controlled passive ROM is critical.
- Patellar Fracture: Can occur through the 8-9 mm transpatellar tunnel. Ensure the tunnel is perfectly centralized and avoid this technique in osteopenic bone.
- Infection: As with any massive allograft, the risk of deep infection is elevated. Strict sterile technique and appropriate perioperative antibiotic prophylaxis are mandatory.
You Might Also Like