Staged Soft Tissue Expansion for Complex Achilles Tendon Reconstruction: An Intraoperative Masterclass
Key Takeaway
This masterclass details staged soft tissue expansion for complex Achilles tendon reconstruction. We cover meticulous patient positioning, the posteromedial approach, precise expander implantation, and subsequent removal with definitive tendon repair. Emphasis is placed on comprehensive anatomy, intraoperative technique, identifying neurovascular risks like the sural nerve, and managing postoperative complications for optimal patient outcomes in revision scenarios.
Comprehensive Introduction and Patho-Epidemiology
Complex Achilles tendon reconstruction represents one of the most formidable challenges in orthopedic foot and ankle surgery. Unlike acute primary ruptures, which often permit straightforward end-to-end approximation, neglected ruptures, multiply revised tendons, and cases complicated by deep infection present a dual pathology: massive tendinous defects and a severely compromised soft tissue envelope. The posterior distal third of the leg is notoriously unforgiving. It lacks robust muscle coverage, relying instead on a tenuous fasciocutaneous blood supply. When significant tendon retraction occurs—often exceeding 5 to 10 centimeters in chronic cases—the overlying skin undergoes adaptive contracture. Attempting to bridge these massive gaps and subsequently force primary skin closure over the augmented repair invariably leads to excessive tension, localized ischemia, wound dehiscence, and ultimately, catastrophic failure of the reconstruction.
To circumvent the high morbidity associated with traditional reconstructive paradigms, such as immediate free tissue transfer or complex local rotational flaps, the staged soft tissue expansion technique has emerged as a highly sophisticated, biologically sound alternative. This intraoperative masterclass focuses on the strategic deployment of subcutaneous tissue expanders to harness the principles of mechanical and biological creep. By gradually expanding the local integument over several weeks, we induce a state of localized angiogenesis and cellular proliferation. This process not only increases the surface area of the skin but also enhances its vascularity, creating a robust, pliable, and tension-free envelope perfectly suited to harbor a massive tendon reconstruction, allograft, or tendon transfer.
The patho-epidemiology of these complex cases is deeply rooted in the biological degradation of the musculotendinous unit. Following an unrecognized or neglected rupture, the proximal gastrocnemius-soleus complex undergoes rapid fatty infiltration, atrophy, and proximal retraction. Concurrently, the intercalary gap fills with disorganized, mechanically inferior fibrotic scar tissue. The paratenon, normally a delicate, vascularized gliding layer, becomes a thickened, adherent sheath that restricts motion and strangles local perfusion. Epidemiologically, these scenarios are most frequently encountered in patients with systemic comorbidities—such as diabetes mellitus, chronic corticosteroid use, or peripheral vascular disease—which further impair intrinsic healing capacities.
Addressing this complex triad of tendon loss, muscle atrophy, and skin contracture requires a paradigm shift from acute trauma management to a meticulous, staged reconstructive philosophy. The staged expansion approach respects the hierarchy of tissue healing: establishing a viable biological environment first, followed by definitive biomechanical restoration. This chapter provides an exhaustive, step-by-step technical guide to executing this two-stage procedure, detailing the nuanced intraoperative decision-making required to navigate the perilous anatomy of the posterior ankle, mitigate complications, and achieve enduring functional outcomes in the most challenging of clinical scenarios.
Detailed Surgical Anatomy and Biomechanics
A profound understanding of the posterior ankle anatomy is the bedrock of safe and effective Achilles reconstruction. The Achilles tendon, the confluence of the gastrocnemius and soleus aponeuroses, is the largest and strongest tendon in the human body, capable of withstanding loads up to ten times body weight during explosive plyometric activities. However, its vascular anatomy renders it uniquely vulnerable. The tendon receives its blood supply from three distinct sources: the musculotendinous junction proximally, the osseous insertion distally, and the paratenon via the mesotenon anteriorly. The critical "watershed" zone, located approximately 2 to 6 centimeters proximal to the calcaneal insertion, exhibits the lowest relative vascularity. In revision or neglected cases, this tenuous vascular network is often entirely obliterated by scar tissue, making preservation of whatever paratenon remains an absolute surgical imperative.
The paratenon itself is a multilayered structure consisting of a deep visceral layer (epitenon) and a superficial parietal layer. It acts not only as a vascular conduit but also as a low-friction gliding interface. During the initial stage of soft tissue expansion, the surgical plane must be meticulously developed superficial to the paratenon and deep to the dermis. Violating the paratenon during pocket creation risks devascularizing the underlying tendon remnant and creating dense adhesions that will severely complicate the definitive second-stage reconstruction. The expander must rest within the subcutaneous fat, utilizing the paratenon as a protective biological barrier over the Achilles.
Neurovascular considerations in this region are paramount, primarily concerning the sural nerve and the short saphenous vein. The sural nerve, formed by the convergence of the medial sural cutaneous nerve (from the tibial nerve) and the communicating branch of the lateral sural cutaneous nerve (from the common peroneal nerve), courses distally along the posterolateral aspect of the calf. It typically crosses the lateral border of the Achilles tendon approximately 10 centimeters proximal to the calcaneal insertion, continuing distally behind the lateral malleolus. Because of its predictable posterolateral trajectory, surgical approaches to the Achilles—particularly for expander placement—are heavily biased toward a posteromedial incision. A direct posterior or posterolateral approach carries an unacceptably high risk of iatrogenic sural nerve injury, which can result in debilitating neuromas and complex regional pain syndrome.
Biomechanically, the reconstruction must restore the resting length and tension of the gastrocnemius-soleus complex to optimize the length-tension curve of the muscle fibers. In chronic ruptures, the proximal muscle belly retracts and shortens. When performing a V-Y advancement or integrating a massive allograft during the second stage, the surgeon must precisely calibrate the tension. Over-tensioning leads to equinus contracture and excessive strain on the skin closure, while under-tensioning results in a persistent calcaneus gait and profound push-off weakness. The expanded soft tissue envelope provides the necessary spatial volume to accommodate these bulky reconstructions without introducing compressive ischemia to the newly restored biomechanical construct.
Exhaustive Indications and Contraindications
The decision to embark on a staged soft tissue expansion protocol is not to be taken lightly; it requires careful patient selection and a thorough understanding of the specific local tissue deficits. The primary indication is a complex Achilles tendon defect where the anticipated volume of the reconstructed tendon will exceed the capacity of the native, contracted skin envelope to achieve a tension-free primary closure. This is most classically seen in neglected ruptures presenting months or years post-injury, where the gap often exceeds 5 to 6 centimeters, and the overlying skin has lost its viscoelastic properties.
Revision Achilles tendon surgeries represent another major indication. Patients who have experienced a failure of a primary repair often present with a catastrophic combination of poor tendon quality, extensive fibrotic scarring, and compromised skin from previous surgical incisions. Attempting a single-stage revision with local tissue rearrangement or massive allografting in this hostile environment carries an exceedingly high risk of wound breakdown. Furthermore, when augmenting a repair with a Flexor Hallucis Longus (FHL) transfer or a synthetic/allograft scaffold, the cross-sectional area of the construct is significantly increased. Staged expansion preemptively creates the necessary subcutaneous "room" to house this augmented repair without strangulating the flap.
Contraindications must be rigorously respected to avoid disastrous complications. Active, untreated deep infection is an absolute contraindication to tissue expansion; placing a foreign body (the expander) into an infected field will invariably lead to an infected implant and further tissue necrosis. Severe peripheral vascular disease (PVD) is also an absolute contraindication, as the ischemic skin cannot tolerate the mechanical stress of expansion and will rapidly undergo full-thickness necrosis. Relative contraindications include poorly controlled diabetes mellitus, active heavy smoking, and a history of extensive local radiation therapy, all of which severely impair the microvascular response required for successful biological creep.
Indications and Contraindications Summary
| Category | Specific Clinical Scenarios | Rationale / Clinical Concern |
|---|---|---|
| Absolute Indications | Neglected ruptures (>6-8 weeks) with gap >5cm and severe skin contracture. | Native envelope cannot accommodate the required tendon graft/transfer volume without tension. |
| Absolute Indications | Revision surgery with extensive previous scarring and anticipated massive augmentation. | Previous incisions compromise local flap options; expansion provides safe, vascularized coverage. |
| Absolute Contraindications | Active deep space infection or osteomyelitis. | Expander will act as a nidus for infection, leading to sepsis and catastrophic tissue loss. |
| Absolute Contraindications | Severe Peripheral Vascular Disease (ABI < 0.5). | Ischemic tissue cannot undergo biological creep; expansion will cause immediate skin necrosis. |
| Relative Contraindications | Active smoking, poorly controlled HbA1c (>8.0%). | Impaired microcirculation increases risk of wound dehiscence and expander extrusion. |
| Relative Contraindications | Non-compliant patient or severe psychiatric illness. | The protocol requires strict adherence to weekly follow-ups and activity restrictions. |
Pre-Operative Planning, Templating, and Patient Positioning
Meticulous preoperative planning is the cornerstone of success in staged Achilles reconstruction. The clinical examination must focus on assessing the resting equinus tone, the palpable gap length, and, crucially, the pliability and vascularity of the posterior skin. However, advanced imaging is mandatory to objectively quantify the internal derangement.
Magnetic Resonance Imaging (MRI) is the gold standard for this evaluation. Sagittal and axial T1 and T2-weighted sequences provide critical information regarding the true extent of the tendon gap, accounting for the intercalary scar tissue that often mimics intact tendon on clinical palpation. The MRI allows the surgeon to assess the degree of fatty infiltration in the gastrocnemius muscle belly (Goutallier classification), which dictates the functional prognosis and influences the choice of augmentation (e.g., opting for an FHL transfer if the gastroc-soleus is severely atrophied). Furthermore, the MRI helps map the optimal subcutaneous plane for expander insertion, ensuring a safe trajectory away from neurovascular bundles and previous scar tissue tracks.
Patient education is arguably as critical as the surgical technique itself. The surgeon must engage in a frank, detailed discussion regarding the prolonged, multiphasic nature of this treatment plan. The patient must understand that the first surgery will not fix their tendon; it will only place a balloon under their skin. They must be prepared for the cosmetic deformity of the expanding mass on their calf, the necessity of weekly clinic visits for inflations, and the strict adherence to protective weight-bearing protocols during the expansion phase. Setting realistic expectations regarding the overall timeline—often spanning 4 to 6 months from the first stage to functional recovery—is essential for maintaining patient compliance and psychological well-being.
Intraoperative positioning is standardized for both stages of the procedure. The patient is placed in the prone position following the induction of general anesthesia. Meticulous attention to padding is required to prevent pressure-induced neurapraxias. Chest rolls are positioned longitudinally from the clavicle to the iliac crest to allow for unencumbered diaphragmatic excursion and to prevent increased intra-abdominal pressure, which can engorge the epidural venous plexus and increase intraoperative bleeding. The arms are abducted to less than 90 degrees and heavily padded. A gel donut protects the face, and the knees are slightly flexed with a padded bolster placed beneath the anterior tibia to allow the ankle to rest in a natural, gravity-dependent equinus position. A pneumatic thigh tourniquet is applied; while its prolonged use is discouraged to minimize ischemic insult to the already compromised skin, it is invaluable for achieving initial hemostasis during the delicate dissection of the expander pocket.
Step-by-Step Surgical Approach and Fixation Technique
The surgical execution is divided into two distinct operative events, separated by a 3 to 4-week outpatient expansion phase. Each stage demands absolute precision and a deep respect for the fragile local soft tissues.
Stage 1: Implantation of the Soft Tissue Expander
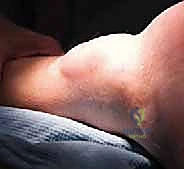
The objective of Stage 1 is to safely insert the tissue expander into the correct anatomical plane without compromising the vascularity of the overlying skin or the underlying tendon remnant. Following standard sterile preparation and draping, a longitudinal posteromedial incision is utilized. This incision is typically 4 to 6 centimeters in length, placed approximately 1 to 2 centimeters medial to the palpable medial border of the Achilles tendon. This specific placement is strategic: it avoids the sural nerve laterally, avoids the watershed hypovascular zone directly posteriorly, and preserves a robust lateral skin bridge for potential future flap mobilization if required.
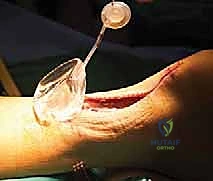
Deepening the incision requires meticulous sharp dissection. The surgeon must identify the paratenon (or the pseudoparatenon scar layer in revision cases). The critical maneuver is developing the subcutaneous pocket superficial to this layer and deep to the subdermal plexus. Using a combination of a #15 blade, fine Metzenbaum scissors, and a small Cobb elevator, a pocket is gently elevated. The dimensions of the pocket must precisely match the selected expander—typically a 70-mL rectangular McGhan soft tissue expander (measuring approximately 6 cm by 4 cm). The pocket should be just large enough to allow the expander to lie completely flat; a pocket that is too small will cause the expander to fold, leading to localized pressure necrosis of the overlying skin.
Once the pocket is prepared and absolute hemostasis is achieved with bipolar electrocautery, the uninflated expander is inserted. The injection port must be positioned remotely from the primary incision to prevent the needle from introducing bacteria into the main wound during subsequent inflations. The catheter is tunneled subcutaneously, and the port is exteriorized or placed in a superficial subcutaneous pocket via a separate small stab incision, usually located proximally or anteromedially. Before closure, 10 mL of sterile normal saline is injected into the port to confirm system integrity, unfold the expander, and assess the initial tension on the skin edges. The wound is then closed meticulously in layers, utilizing a tension-free subcuticular 3-0 Monocryl stitch followed by fine nylon sutures or staples for the skin.
The Expansion Phase
The expansion phase occurs in the outpatient clinic setting. Beginning one week postoperatively, the patient returns weekly for serial inflations. Under strict aseptic technique, the port is accessed, and sterile normal saline is injected. The standard protocol dictates the addition of 10 mL per week.
Surgical Warning: Expander Volume Tolerance
It is an absolute critical clinical pearl that patients with posterior ankle skin rarely tolerate the full theoretical volume of the expander. While a 70-mL expander is used, total inflation volumes exceeding 30 to 40 mL are highly dangerous in this anatomical region. The surgeon must rely on clinical feedback during inflation: if the patient reports significant pain, or if the skin exhibits sustained blanching, capillary refill delay, or a shiny, taut appearance, the inflation must be immediately halted, and 2-5 mL of fluid should be withdrawn. Pushing the expansion beyond the biological limits of the tissue will inevitably result in catastrophic skin necrosis, expander extrusion, and failure of the entire reconstructive plan.
Stage 2: Expander Removal and Definitive Tendon Repair
Once adequate soft tissue redundancy is achieved—typically after 3 to 4 weeks and a total volume of 30-40 mL—the patient returns to the operating room for the definitive reconstruction. The patient is positioned prone, and the previous posteromedial incision is re-accessed and extended proximally and distally as required to visualize the entire tendon defect.
The expanded skin will be noticeably thickened and highly vascularized, a testament to the biological creep induced by the expander. The expander is identified within its fibrous pseudocapsule. This capsule is incised, and the expander, along with its catheter and port, is completely removed. The surgeon now has a capacious, well-vascularized soft tissue envelope within which to perform the complex tendon reconstruction.

The Achilles tendon ends are aggressively debrided back to healthy, bleeding, parallel collagen fibers. The gap is then reassessed. For gaps between 3 and 6 centimeters, a V-Y fractional lengthening of the gastrocnemius aponeurosis is often sufficient. An inverted 'V' incision is made through the aponeurosis proximally, allowing the distal segment to slide inferiorly, converting the 'V' to a 'Y'. This provides significant length while maintaining the continuity of the muscle-tendon unit.
For larger gaps, or when the distal stump is inadequate, a Flexor Hallucis Longus (FHL) transfer is utilized. The FHL is harvested via a single-incision or double-incision technique, depending on the required length. The harvested FHL tendon is then woven through the proximal Achilles stump and secured into the calcaneus using an interference screw or a transosseous bone tunnel technique. The native Achilles remnants are then repaired over the FHL transfer using a heavy, non-absorbable braided suture (e.g., #2 or #5 FiberWire) in a locked, multi-strand Krackow or Bunnell configuration.
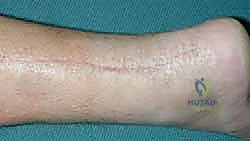
Tensioning the repair is the final critical biomechanical step. The knee is flexed to 90 degrees, and the ankle is positioned in 10 to 15 degrees of plantarflexion. The sutures are tied securely to establish this resting tension. Finally, the paratenon (or the vascularized capsule from the expander pocket) is meticulously closed over the repair using fine absorbable sutures, isolating the tendon from the subcutaneous tissues. The expanded skin is then closed primarily, effortlessly accommodating the bulky reconstruction without tension.
Complications, Incidence Rates, and Salvage Management
Despite meticulous technique, staged soft tissue expansion and complex Achilles reconstruction carry a significant risk profile. Complications can be broadly categorized into those related to the expansion phase and those related to the definitive reconstruction.
Expander-related complications are primarily driven by overly aggressive inflation protocols. Skin necrosis and subsequent expander extrusion are the most feared complications during Stage 1. If the skin begins to break down, the expander must be immediately deflated or removed. Infection of the expander pocket requires emergent hardware removal, aggressive surgical debridement, and culture-directed intravenous antibiotic therapy. Port failure, such as catheter disconnection or leakage, is less catastrophic but requires an unplanned return to the operating room for revision.
Tendon-related complications following Stage 2 include re-rupture, deep infection, and sural nerve injury. Re-rupture is often a consequence of non-compliance with postoperative weight-bearing restrictions or inadequate initial fixation strength. Deep infection in the presence of massive allograft or synthetic suture material is a limb-threatening complication that frequently necessitates complete removal of the reconstructive hardware and prolonged antibiotic therapy.
When the staged expansion fails—either due to massive necrosis, uncontrollable infection, or recurrent rupture—salvage options are highly complex and require a multidisciplinary approach involving plastic surgery.
Complications and Salvage Strategies
| Complication | Estimated Incidence | Clinical Presentation | Management / Salvage Strategy |
|---|---|---|---|
| Expander Extrusion / Skin Necrosis | 5 - 10% | Visible implant, eschar formation, persistent blanching. | Immediate deflation. If full-thickness, remove expander. Salvage with local rotational flap (e.g., sural artery flap) or Free Tissue Transfer (ALT flap). |
| Expander Pocket Infection | 2 - 5% | Erythema, fluctuance, purulent drainage from port site. | Emergent expander removal, aggressive I&D, IV antibiotics. Delay Stage 2 indefinitely until infection is eradicated. |
| Sural Nerve Injury | 3 - 8% | Lateral foot numbness, positive Tinel's sign, neuropathic pain. | Non-operative initially (gabapentin, desensitization). If persistent neuroma forms, surgical excision and burying of the nerve stump into local muscle. |
| Construct Re-Rupture | 2 - 6% | Sudden pain, loss of resting equinus, palpable gap. | Revision surgery. May require massive structural allograft (Achilles with calcaneal bone block) or complete FHL/Peroneus brevis transfer. |
| Catastrophic Failure / Chronic Osteomyelitis | < 2% | Persistent draining sinus, massive tissue loss, calcaneal involvement. | Radical debridement. Salvage options include massive free flap coverage combined with pantalar or tibiocalcaneal arthrodesis to stabilize the limb. |
Phased Post-Operative Rehabilitation Protocols
Rehabilitation following staged complex Achilles reconstruction is a protracted, highly structured process. The protocol is heavily biased toward protecting the fragile soft tissues and the tenuous mechanical repair during the early phases, while gradually restoring tensile strength and functional range of motion in the later phases.
Phase 1: The Expansion Phase (Weeks 0 to 4 Post-Stage 1)
Following the initial expander placement, the patient is placed in a well-padded short leg splint in neutral to slight equinus. The patient is strictly non-weight-bearing (NWB) on the operative extremity. The primary focus during this phase is wound healing and the weekly serial inflations. Active range of motion (ROM) of the toes, knee, and hip is encouraged to prevent deep vein thrombosis and maintain proximal muscle tone.
Phase 2: Maximum Protection Phase (Weeks 0 to 2 Post-Stage 2)
Immediately following the definitive tendon reconstruction, the limb is immobilized in a rigid, anteriorly based short leg splint or a bivalved cast with the ankle in 15 to 20 degrees of plantarflexion (equinus) to eliminate tension on the repair and the skin closure. The patient remains strictly NWB. Elevation is critical to manage edema, which can compromise the microcirculation of the newly expanded skin flaps.
Phase 3: Controlled Mobilization Phase (Weeks 2 to 6 Post-Stage 2)
At the two-week mark, sutures are removed if the wound is fully healed. The patient is transitioned into a Controlled Ankle Motion (CAM) walker boot equipped with a 2-inch to 3-inch heel lift (typically 3 to 4 wedges). Weight-bearing is initiated, starting with touch-down weight-bearing (TDWB) and progressing to partial weight-bearing (PWB) as tolerated, using crutches. Active plantarflexion out of the boot is permitted, but passive dorsiflexion is strictly prohibited. One heel wedge is removed approximately every 10 to 14 days, gradually bringing the ankle toward a neutral position.
Phase 4: Strengthening and Proprioception Phase (Weeks 6 to 12 Post-Stage 2)
By week 6 to 8, the patient should be full weight-bearing in the CAM boot with all wedges removed (neutral ankle). Transition to regular footwear with a small silicone heel cup is initiated. Physical therapy intensifies, focusing on concentric and eccentric strengthening of the gastrocnemius-soleus complex. Isometric exercises progress to isotonic exercises using resistance bands. Proprioceptive training on balance boards is crucial to retrain the neuromuscular pathways disrupted by the chronic injury and extensive surgery.
Phase 5: Return to Function Phase (Months 3 to 6+ Post-Stage 2)
The final phase focuses on restoring explosive power, endurance, and sport-specific agility. Progression to jogging, jumping, and plyometrics is allowed only when the patient demonstrates symmetrical ankle ROM, minimal pain, and the ability to perform a single-leg heel raise without compensatory mechanisms. In complex revision cases, maximum medical improvement may not be reached until 12 to 18 months postoperatively, and patients must be counseled that some degree of permanent calf atrophy and push-off weakness is expected.
Summary of Landmark Literature and Clinical Guidelines
The evolution of soft tissue management in Achilles reconstruction is deeply rooted in the broader plastic surgery literature. The fundamental principles of tissue expansion were pioneered by Radovan in the late 1970s and early 1980s, initially for breast reconstruction and burn scar management. The translation of these techniques to the orthopedic management of the lower extremity was a paradigm shift, recognizing that the mechanical properties of skin—specifically viscoelastic creep and biological angiogenesis—could be harnessed to solve complex reconstructive dilemmas.
Landmark orthopedic literature has consistently highlighted the high complication rates associated with primary closure over massive Achilles defects. Studies by prominent foot and ankle surgeons have demonstrated that when gap lengths exceed 5 centimeters, attempts at local V-Y advancement without prior soft tissue optimization result in wound dehiscence rates approaching 20-30%.
The staged tissue expansion technique, while technically demanding, has been shown in contemporary case series to significantly reduce these catastrophic soft tissue failures. Comparative studies evaluating staged expansion versus immediate free tissue transfer (e.g., anterolateral thigh flaps) for Achilles coverage suggest that while free flaps provide immediate vascularized bulk, they are associated with significantly higher donor site morbidity, longer operative times, and a bulkier, less cosmetically acceptable contour. Staged expansion, conversely, utilizes "like tissue for like tissue," maintaining the native sensate skin of the posterior calf while minimizing donor site morbidity.
Current consensus guidelines from major orthopedic societies (
