Allograft Reconstruction for Chronic Achilles Rupture: An Intraoperative Masterclass
Key Takeaway
This masterclass details allograft reconstruction for chronic Achilles tendon ruptures. Fellows will learn preoperative planning, precise anatomical dissection, meticulous bone block fixation, and optimal tendon tensioning. We'll cover instrument use, neurovascular protection, and crucial intraoperative decisions to ensure robust healing and functional recovery. Postoperative protocols and complication management are also thoroughly discussed for comprehensive patient care.
Alright team, let's gather around. Today, we're tackling a challenging case: a chronic Achilles tendon rupture requiring allograft reconstruction. This isn't your straightforward acute repair; these cases demand meticulous planning, precise execution, and a deep understanding of the pathology. Our goal is to restore robust plantarflexion and stability, giving our patient the best possible functional outcome.
Understanding the Chronic Achilles Rupture
First, let's define what we're up against. A chronic Achilles tendon rupture is typically defined as a tear of greater than 3 months' duration. Why is this distinction crucial? Because the biology changes dramatically. In an acute rupture, we're dealing with fresh tissue. In chronic cases, the body has attempted to heal, but often inefficiently, leading to a significant defect, retraction, and degenerative changes.
Pathology and Indications for Allograft:
The Achilles tendon, particularly the area 2 to 6 cm above its calcaneal insertion, is relatively hypovascular. This predisposes it to tendinopathy, a degenerative process involving microtrauma, hypovascularity, and a failed healing response. This degeneration involves fibrovascular proliferation, lymphocytic infiltration, and myxomatous changes, significantly lowering the tendon's rupture threshold.
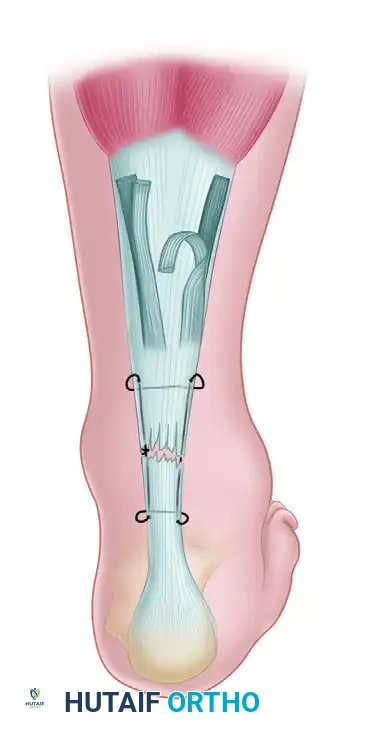
In chronic ruptures, the initial muscle tension causes retraction of the tendon ends. Over weeks, a hematoma organizes into fibrous scar tissue, which, while appearing to reestablish continuity, lacks the organized collagen structure and contractile strength of healthy tendon. These fibroblasts remain disorganized, failing to align longitudinally, leading to an elongated, weak fibrous mass incapable of withstanding the physiological tensile forces of the gastrocnemius-soleus complex.
This allograft technique is specifically indicated for:
* Significant Tendon Defects: When there's a gap of at least 5 cm between healthy tendon ends. Lesser defects might be managed with local tissue or autograft augmentation, but for larger gaps, we simply don't have enough viable host tissue.
* Failed Prior Reconstructions: Patients who have undergone unsuccessful autologous tendon advancement or augmentation.
* Severe Chronic Tendinopathy: Cases where extensive resection of a degenerated tendon segment leaves a defect similar to a chronic rupture.
* Functional Expectations: When direct repair, advancement, or even flexor hallucis longus (FHL) transfer won't provide the necessary functional recovery.
Comprehensive Surgical Anatomy: Navigating the Posterior Leg
Let's quickly review our surgical field. The Achilles tendon is the confluence of the gastrocnemius (medial and lateral heads) and soleus muscles, forming the powerful triceps surae. Its musculotendinous junction typically lies 6 to 8 cm proximal to its insertion into the central third of the posterior calcaneus.
The tendon is encased by the paratenon, a bilaminar structure providing crucial blood supply, nutrition, and lubrication. This blood supply, primarily from vessels running within the paratenon and approaching the tendon's anterior surface via the mesotenon, is notably sparse in the region 4 cm proximal to the insertion and at the calcaneal enthesis – our primary area of concern for rupture and reconstruction.
The enthesis itself is a complex structure of cartilage and fibrocartilage, spanning approximately 6 cm². Anterosuperior to this lies the retrocalcaneal bursa, which we'll need to navigate.
Neurovascular Considerations:
* Sural Nerve: This is our most significant neurovascular risk with a posterior midline approach. The sural nerve typically runs posterolaterally, superficial to the Achilles tendon. It originates from the tibial and common peroneal nerves, descends between the gastrocnemius heads, and then courses distally to supply sensation to the lateral ankle and foot. During our incision and subcutaneous dissection, we must be exquisitely careful to identify and protect this nerve, retracting it gently. Injury can lead to painful neuromas or significant sensory deficits.
* Posterior Tibial Artery and Nerve: These structures lie deep within the posterior compartment, anterior to the Achilles tendon. While less directly at risk with a midline posterior approach, aggressive deep dissection or anterior penetration could endanger them. We must maintain our dissection plane posterior to the deep fascia until we intentionally open the tendon sheath.
* Small Saphenous Vein: Often runs with the sural nerve and should be identified and protected or ligated if necessary.
Rupture of the Achilles tendon leads to profound functional deficits:
1. Loss of Plantarflexion Power: The primary action of the triceps surae.
2. Lack of Control of the Second Rocker: During the stance phase of gait, the inability to control forward progression over the foot.
3. Decreased Ankle Stability: Both subjective and objective.
The resultant limp, inability to run, acquired pes planus, and difficulty climbing stairs are common complaints. Other plantarflexors (FHL, FDL, tibialis posterior, peroneals) can provide weak compensatory plantarflexion, often delaying diagnosis.
Preoperative Planning & Patient Positioning
Before we even bring the patient into the room, meticulous planning is paramount.
Patient Assessment:
* History & Physical: A complete history to identify predisposing factors (tendinopathy, corticosteroid use, fluoroquinolone exposure, smoking, diabetes, gout, hyperthyroidism) and assess premorbid function. On physical exam, we're looking for a palpable gap (often >5cm), calf atrophy, altered resting tension of the foot (excessive dorsiflexion compared to the contralateral side), and an abnormal Thompson-Simmond test (absence of plantarflexion with calf squeeze).
* Thompson-Simmond Test: With the patient prone and knees flexed to 90 degrees, squeeze the gastrocnemius muscle belly. A normal response is passive plantarflexion of the foot. An abnormal result (no plantarflexion) indicates a functional tear.
* Imaging: While not always strictly necessary for diagnosis in chronic cases, MRI or ultrasound can provide invaluable information regarding the extent of diseased tendon that needs resection and the precise gap length, aiding in surgical planning and allograft sizing. Plain radiographs might show calcification within the tendon or a bony avulsion, suggesting a degenerative process.
* Vascular Status: Always assess the peripheral vascular status, especially in older patients or those with diabetes. Poor perfusion increases wound complication risk.
* Skin Quality: The posterior lower leg skin, particularly after previous surgeries, can be tenuous. If there's any concern about skin viability or scarring, a low threshold for plastic surgery consultation is crucial.
Allograft Selection:
* We'll ensure the Achilles tendon allograft with its calcaneal bone block has been properly screened, is within its expiration date, and is appropriately sized for the anticipated defect. Communication with the tissue bank is vital.
Patient Positioning:
1. Tourniquet Application: A well-padded pneumatic tourniquet is applied high on the thigh. This is critical. A more distal tourniquet can tether the gastrocnemius-soleus complex, making accurate graft tensioning difficult.
2. Anesthesia: We prefer a popliteal block for excellent postoperative pain management, combined with general anesthesia. The popliteal block preserves proximal limb girdle muscle function, allowing safer mobilization in the immediate postoperative period.
3. Prone Positioning: This is the standard.
* Carefully position the patient prone on the OR table.
* Ensure adequate padding: gel rolls under the chest (from clavicle to iliac crest) to allow for respiratory excursion and prevent abdominal compression, padding under the ankles, and careful positioning of the arms on arm boards to avoid brachial plexus tension.
* Protect the patient's genitalia.
* Confirm the head is neutrally aligned and airway is secure.
4. Limb Preparation & Draping: The entire lower limb is prepared with antiseptic solution and draped in a standard sterile fashion, extending above the level of the tourniquet.
5. Fluoroscopy Setup: The C-arm will be positioned to allow for quick and easy AP and lateral views of the calcaneus and ankle, which will be essential for confirming bone block placement and screw fixation.
Step-by-Step Intraoperative Execution: The Operating Surgeon's Viewpoint
Alright team, let's get scrubbed in and bring our patient in.
1. Initial Incision and Superficial Dissection
"Alright team, tourniquet up to 350 mmHg, please. Let's ensure a bloodless field for optimal visualization."
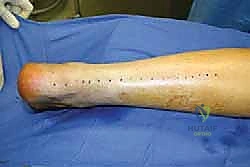
"Scalpel, please. We'll make our incision carefully along the midline of the posterior lower leg, centered over the Achilles tendon and extending distally over the posterior calcaneus. I'm planning for about a 20 cm incision here. If there are pre-existing incisions, we'll try to incorporate them to minimize further soft tissue compromise, always respecting the vascularity of the skin bridges."
"Now, careful with our subcutaneous dissection. We're raising full-thickness skin flaps, but only retracting the deeper tissues to minimize tension on the skin edges. Remember the sural nerve runs posterolaterally. I'm using blunt dissection with Metzenbaum scissors here, gently sweeping the subcutaneous fat laterally to identify and protect it. Assistant, can you keep a keen eye out for any neural structures?"
Surgical Warning: The sural nerve is highly vulnerable during this initial dissection. Always identify it and gently retract it. Injury can lead to chronic neuropathic pain.
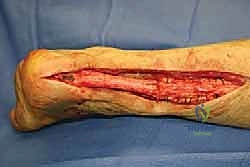
"Good, I see the deep fascia now. It's often thickened and scarred in these chronic cases. We'll incise it longitudinally, directly over the palpable tendon defect. This incision should be long enough to expose the full extent of the diseased tendon and allow for adequate proximal and distal visualization."
2. Tendon Sheath Incision and Tendon End Mobilization
"Now that the deep fascia is open, we can see the paratenon. In chronic ruptures, this is usually fibrotic and adherent. We'll incise the paratenon longitudinally and reflect it gently. We want to preserve as much of this tissue as possible, as it contributes to the tendon's blood supply and will be closed later to aid in healing."
"With the paratenon reflected, we can now clearly define and mobilize the proximal and distal tendon ends. You'll notice the distal stump is often bulbous and scarred, and the proximal end might be retracted significantly due to the unopposed pull of the gastrocnemius-soleus complex."
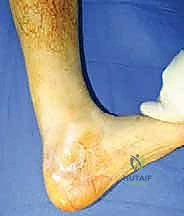
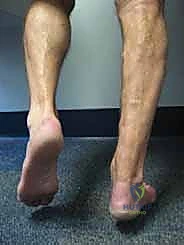
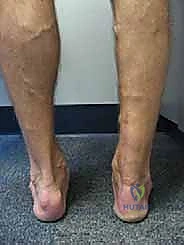
FIG 1 • Preoperative assessment often reveals excessive dorsiflexion due to chronic Achilles tendon rupture, highlighting the functional deficit we aim to correct.
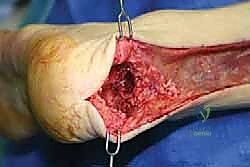
3. Débridement of Diseased Tendon
"This is a critical step, fellows. Adequate débridement of diseased tendon is paramount. We need to leave only healthy, viable host Achilles tendon. See this yellowish, friable, disorganized tissue? That's degenerative and won't contribute to a strong repair. Using a #15 blade and tenotomy scissors, I'm systematically resecting all this unhealthy tissue. Proximally, I'm looking for a firm, glistening, white tendon stump that shows some punctate bleeding when cut – that's our sign of viable tissue."
"For the distal portion, in this allograft reconstruction technique, the entire distal Achilles tendon stump, which is typically extensively scarred and degenerated, is resected completely. We're clearing the posterior calcaneal tuberosity to prepare for the bone block insertion."
Surgical Warning: Inadequate débridement is a common pitfall. Leaving diseased tissue will compromise healing and increase the risk of re-rupture or persistent pain. Be aggressive but judicious, ensuring you have enough healthy tissue proximally for a strong repair.
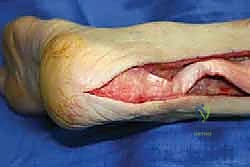
4. Allograft Preparation and Calcaneal Trough Creation
"Nurse, please hand me the allograft. Let's carefully inspect it. We have the distal Achilles tendon with its insertion into a block of allograft calcaneus. Confirm the tissue bank records, expiration date, and ensure it's appropriate for our patient's size and defect."
"Now, we'll contour this allograft bone block. I'll use a small oscillating saw and rongeurs to shape it. We want a trapezoidal or rectangular shape that will fit snugly into our patient's calcaneus, maximizing bone-to-bone contact for optimal integration. Think of it as a custom-fit puzzle piece."
"Next, we prepare the recipient site. Using an oscillating saw, I'll create a matching corticocancellous trough in the posterior aspect of the patient's calcaneus. The posterior calcaneal tuberosity is our landmark. I'll start superficially, ensuring the dimensions match our contoured allograft bone block. We need a trough deep enough to provide stable fixation but not so deep as to compromise the calcaneus or risk penetrating the subtalar joint. I'm using the flexible chisel now to fine-tune the trough walls, ensuring a precise, snug fit. This precision is key for primary stability and eventual bony integration."
TECH FIG 2 • Meticulous preparation of the posterior calcaneus, creating a precise corticocancellous trough to accommodate the allograft bone block.
5. Allograft Bone Block Fixation
"Alright, let's carefully insert the allograft's bony portion into the patient's calcaneal trough. Assistant, can you hold that firmly in place, ensuring it's fully seated and stable? We're looking for maximal bone-to-bone apposition."
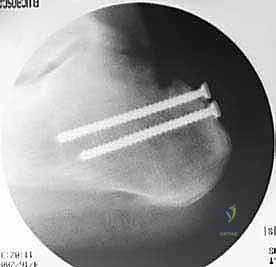
"We'll secure this bony block using two fully threaded cancellous 4.0-mm titanium screws. I prefer these for their robust purchase in cancellous bone and low profile, which minimizes soft tissue irritation. I'll aim for bicortical fixation if possible, taking care to avoid violating the subtalar joint. I'll start with the most distal screw, aiming slightly anteriorly, then the second screw proximally, ensuring good compression across the bone block."
"Fluoroscopy, please. Let's get an AP and lateral view to confirm optimal screw placement and bone block position. We want to see excellent purchase, no joint penetration, and the block sitting flush within the trough. This bony fixation is the foundation of our reconstruction."
TECH FIG 5 • Intraoperative fluoroscopy confirms the precise placement and fixation of the bony segment of the allograft within the calcaneal trough.
TECH FIG 5 • Another fluoroscopic view, demonstrating optimal screw trajectory and bone block stability.
TECH FIG 5 • A third fluoroscopic image, providing comprehensive assessment of the allograft's bony integration.
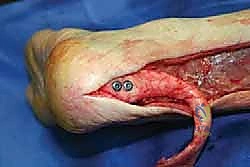
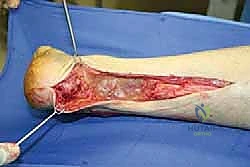
TECH FIG 4 • Direct intraoperative view of the distal bone segment of the allograft securely fixed to the calcaneus.
Additional Intraoperative Imaging & Surgical Steps
REFERENCES
-
Immobilization in a hinged cam walker (Bledsoe Platform Boot, Medical Technology Inc., Grand Prairie, TX) set to neutral dorsiflexion block and block at 20 degrees of plantarflexion. The foot is kept in equinus by inserting heel pads into the boot.
-
Barnes MJ, Hardy AE. Delayed reconstruction of the calcaneal tendon. J Bone Joint Surg Br 1986;68B:121–124.
-
Buck BE, Resnick L, Shah SM, et al. Human immunodeficiency virus cultured from bone: implications for transplantation. Clin Orthop Relat Res 1990;251:249–253.
-
Buck BE, Malinin TI, Brown MD. Bone transplantation and human immunodeficiency virus: an estimate of risk of acquired immunodeficiency syndrome (AIDS). Clin Orthop Relat Res 1989;240:129–136.
-
Carr AJ, Norris SH. The blood supply of the calcaneal tendon. J Bone Joint Surg Br 1989;71B:100–101.
-
Falconiero R, Pallis M. Chronic rupture of a patellar tendon: a technique for reconstruction with Achilles allograft. Arthroscopy 1996;12:623–626.
-
Haraguchi N, Bluman EM, Myerson MS. Reconstruction of chronic Achilles tendon disorders with Achilles tendon allografts. Tech Foot Ankle Surg 2005;4:154–159.
-
Lepow GM, Green JB. Reconstruction of a neglected Achilles tendon rupture with an Achilles tendon allograft: a case report. J Foot Ankle Surg 2006;45:351–355.
-
Levitt R, Malinin T, Posada A, et al. Reconstruction of anterior cruciate ligaments with bone-patella-tendon-bone and Achilles tendon allografts. Clin Orthop Relat Res 1994;303:67–78.
-
Linn RM, Fischer DA, Smith JP, et al. Achilles tendon allograft reconstruction of the anterior cruciate ligament-deficient knee. Am J Sports Med 1993;21:825–831.
-
McNally PD, Marcelli EA. Achilles allograft reconstruction of chronic patellar tendon rupture. Arthroscopy 1998;14:340–344.
-
Simmond FA. The diagnosis of the ruptured Achilles tendon. Practitioner 1957;179:56–58.
-
Simon SR, Mann RA, Hagy JL et al. Role of posterior calf muscles in normal gait. J Bone Jont Surg Am 1978;60A:465–472.
-
Sutherland DH, Cooper L, Daniel D. The role of the ankle plantar flexors in normal walking. J Bone Joint Surg Am 1980;62A:354–363.
-
Thompson TC, Doherty JH. Spontaneous rupture of tendon Achilles: a new diagnostic test. J Trauma 1962;2:126.
-
Yuen JC, Nicholas R. Reconstruction of a total Achilles tendon and soft-tissue defect using an Achilles allograft combined with a rectus muscle free flap. Plast Reconstr Surg 2001;107:1807–1811.
-
Partial weight bearing (25 kg) is commenced at 2 weeks. This is increased by increments of 25 kg per week until full weight bearing is achieved.
-
At 8 to 10 weeks the boot is swapped for a 1to 2-cm heel raise inside a shoe.
-
Gentle passive and active range-of-motion exercises and isometric exercises are commenced at 4 weeks.
-
Gentle passive stretching is started at 4 weeks and effort is gradually increased until at 10 weeks, standing calf-stretching exercises are commenced.
-
Elastic band exercises are started upon removal of the boot. Stationary bike riding is started at 10 to 12 weeks, with gradual progression of exercise up to 18 weeks, when active push-off exercises are initiated.
OUTCOMES
- In our hands, outcomes with this technique have been satisfactory and without wound complications ( FIG 3 ).
-
Typically, at 20 weeks the patient can perform single-leg toe-raises and begin jogging and light sporting activities, if previously able ( FIG 4 ).
-
In our experience, most patients return to their preoperative exercise level and return to their prior occupation.
COMPLICATIONS
- Infection
-
Wound dehiscence
-
Rupture of repair
You Might Also Like