BIOMECHANICAL PRINCIPLES OF THE ANKLE MORTISE
The ankle joint is a highly congruent, weight-bearing hinge joint that relies heavily on the precise anatomical relationship between the talus, the distal tibia, and the distal fibula. The lateral malleolus acts as the critical lateral buttress of the ankle mortise. Biomechanical studies have classically demonstrated that even a 1-millimeter lateral shift of the talus can decrease the tibiotalar contact area by up to 42%, leading to exponentially increased peak contact stresses and rapid onset of post-traumatic arthrosis.
Therefore, the primary objective in the fixation of the lateral malleolus is the absolute restoration of fibular length, alignment, and rotation. Restoring the lateral column effectively pulls the talus back under the tibial plafond via the intact lateral collateral ligamentous complex, re-establishing the anatomical mortise.
SURGICAL SEQUENCING IN MULTIPLE MALLEOLAR FRACTURES
When addressing complex ankle trauma, the sequence of fixation is a critical strategic decision that dictates the ease and success of the overall reconstruction.
If the fractured fibula is part of a bimalleolar or trimalleolar fracture pattern, the standard orthopedic doctrine dictates that we usually reduce and internally fix the lateral malleolar (fibular) fracture before addressing the medial malleolar component. By restoring the length and rotation of the fibula first, the surgeon utilizes the intact syndesmotic ligaments (if present) or the lateral collateral ligaments to indirectly reduce the talus, which in turn acts as a template for the subsequent reduction of the medial malleolus.
💡 Clinical Pearl: The Exception to the "Lateral First" Rule
The primary exception to fixing the lateral side first is the presence of a severely comminuted lateral malleolus as part of a bimalleolar or trimalleolar pattern. Occasionally, if comminution is severe, attempting to restore fibular length first can lead to the lateral malleolus being overreduced or malaligned in the coronal plane. This iatrogenic malreduction directly inhibits the anatomical reduction of the medial malleolar component. In this specific circumstance, it is highly advisable to proceed with medial malleolar fixation initially. A perfectly reduced medial malleolus will anatomically position the talus, which then serves as a reliable template to accurately restore the length and rotation of the comminuted fibula.
PREOPERATIVE PLANNING AND PATIENT POSITIONING
Meticulous preoperative planning requires orthogonal radiographic views (anteroposterior, lateral, and mortise) and, increasingly, computed tomography (CT) to assess articular impaction, comminution, and posterior malleolar involvement.
- Positioning: The patient is placed supine on a radiolucent operating table.
- Hip Bump: A sandbag or gel bump is placed under the ipsilateral hip to internally rotate the leg. This neutralizes the natural external rotation of the lower extremity, bringing the lateral malleolus directly anterior for easier surgical access.
- Tourniquet: A well-padded thigh tourniquet is applied to ensure a bloodless surgical field.
- Fluoroscopy: The C-arm should be positioned on the contralateral side of the table, allowing for unhindered intraoperative imaging in both AP/mortise and lateral planes.
SURGICAL APPROACHES TO THE LATERAL MALLEOLUS
The choice of surgical approach depends on the fracture morphology, the condition of the soft tissue envelope, and the planned method of plate fixation.
The Direct Lateral Approach
The direct lateral longitudinal incision is the workhorse approach for most lateral malleolar fractures.
* Incision: A longitudinal incision is made directly over the lateral aspect of the fibula, extending distally to the tip of the lateral malleolus.
* Nerve Protection: The superficial peroneal nerve is at significant risk during this approach. It typically crosses the fibula from anterior to posterior approximately 10 to 12 cm proximal to the tip of the lateral malleolus. Dissection must remain strictly subfascial or supraperiosteal to avoid injuring the nerve branches.
* Exposure: The periosteum is incised longitudinally and elevated minimally—only enough to expose the fracture edges. Excessive periosteal stripping devitalizes the bone fragments and increases the risk of nonunion.
The Posterolateral Approach
Alternatively, a posterolateral incision can be utilized. This approach is particularly advantageous when a posterior antiglide plating technique is planned or when a posterior malleolar fracture must be addressed concurrently.
* Incision: The incision is placed midway between the posterior border of the fibula and the lateral border of the Achilles tendon.
* Nerve Protection: The sural nerve and the short saphenous vein must be identified and protected, usually retracting them laterally.
* Exposure: The plane is developed between the peroneal tendons (retracted laterally) and the flexor hallucis longus (retracted medially). This provides excellent access to the posterior surface of the fibula.
OPERATIVE TECHNIQUES FOR LATERAL MALLEOLAR FIXATION
Lag Screw Fixation for Oblique Fractures
For simple, oblique fractures (e.g., Weber B patterns) where the bone stock is good and there is no comminution, interfragmentary compression is the biomechanical gold standard.
If the fracture is sufficiently oblique, fix the fracture with two lag screws inserted from anterior to posterior to establish robust interfragmentary compression.
- Screw Placement: Place the screws approximately 1 cm apart. This spacing ensures adequate distribution of compressive forces without creating a stress riser that could propagate a secondary fracture.
- Drilling Technique: A glide hole (e.g., 3.5 mm) is drilled in the near cortex, and a thread hole (e.g., 2.5 mm) is drilled in the far cortex. The hole is countersunk to prevent the screw head from causing stress concentrations or soft tissue irritation.
- Screw Length and Trajectory: The length of the screws is critically important. The screws must fully engage the posterior cortex for secure fixation. However, they must not protrude far enough posteriorly to encroach on the peroneal tendon sheaths. Prominent hardware in this region will lead to severe postoperative peroneal tendinopathy or tendon rupture.
⚠️ Surgical Warning: Peroneal Tendon Impingement
Always palpate the posterior aspect of the fibula with a dental pick or Freer elevator after lag screw insertion, or utilize a tangential fluoroscopic view, to ensure the screw tips are flush with the posterior cortex and do not impinge upon the peroneal tendons.
While two lag screws alone can provide fixation in highly selected, compliant patients with pristine bone, modern AO principles strongly advocate for the addition of a neutralization plate (either lateral or posterolateral) to protect the lag screws from torsional and bending forces during the healing phase.
Intramedullary Fixation for Transverse Fractures
If the fracture is transverse (e.g., certain Weber A or high Weber C patterns), interfragmentary lag screw fixation is geometrically impossible. In these scenarios, plate fixation (compression plating) or an intramedullary device may be used.
When utilizing an intramedullary device (such as a fibular nail or a Rush pin):
1. Exposure: Expose the tip of the lateral malleolus.
2. Ligament Splitting: Access the medullary canal by carefully splitting the fibers of the calcaneofibular ligament (CFL) longitudinally.
3. Insertion: The entry point must be perfectly centralized on the distal tip of the fibula to prevent angular malalignment during device insertion. The device is advanced across the fracture site under fluoroscopic guidance, ensuring anatomical restoration of length and rotation.
CONCURRENT MEDIAL MALLEOLAR FIXATION (AO TECHNIQUE)
Once the lateral malleolus is anatomically reduced and securely fixed (or if the medial side is addressed first due to lateral comminution), attention is turned to the medial malleolus. The goal is to restore the medial articular surface and the competence of the deltoid ligament complex.
Surgical Technique 54-1: Medial Malleolar Fixation
The standard AO technique for internal fixation of the medial malleolus utilizes partially threaded cancellous screws to achieve interfragmentary compression across the fracture site.
- Reduction and Provisional Fixation: The medial malleolar fragment is anatomically reduced using a pointed reduction forceps. The joint surface must be inspected (often via a small anteromedial arthrotomy) to ensure no periosteum is interposed and the articular cartilage is perfectly flush.
- Kirschner Wire Placement: The distal fragment is held reduced with two smooth Kirschner wires (K-wires). These wires are driven from the tip of the medial malleolus, perpendicular to the fracture plane, into the distal tibial metaphysis. The K-wires are intentionally bent to stay out of the way of the subsequent drilling and screw insertion steps.
- Drilling: A hole (3.2 mm) is drilled over a guide wire or directly, depending on the screw system utilized. The drill is advanced while the fragment is securely held by the K-wires.
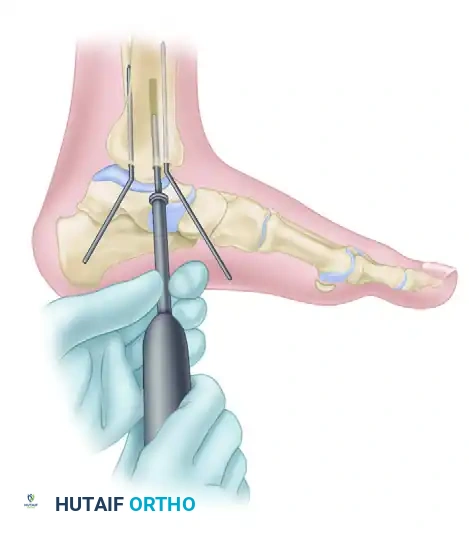
FIGURE 54-6 A: AO technique for internal fixation of the medial malleolus. A 3.2 mm hole is drilled while the distal fragment is held anatomically reduced with two Kirschner wires, which are bent to stay out of the way of the drill. The length of the hole is then measured using a depth gauge.
- Screw Insertion: The length of the hole is measured. A partially threaded malleolar or cancellous screw is then inserted. In osteoporotic bone, insertion of the malleolar screw without tapping is preferred to maximize thread purchase and pull-out strength.
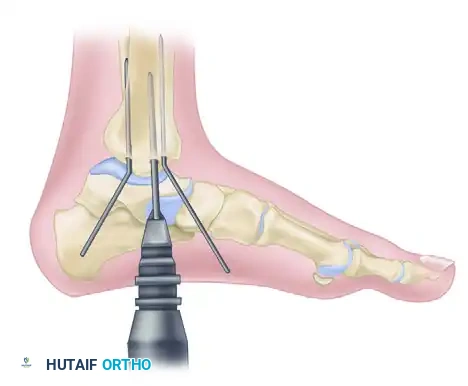
FIGURE 54-6 B: Insertion of the malleolar screw without tapping. The Kirschner wires are removed only after the screw is fully tightened and compression is achieved.
- Rotational Control: A single screw provides compression but poor rotational stability. If the fragment tends to rotate around the axis of the primary screw, an additional smaller screw (e.g., a 2.7 mm or 3.5 mm cortical screw used as a lag screw) or a parallel cancellous screw must be added. Alternatively, if the fragment is small or comminuted, a tension band compression wiring technique can be utilized to convert the distracting forces of the deltoid ligament into compressive forces at the fracture site.
POSTOPERATIVE MANAGEMENT AND REHABILITATION
The postoperative protocol is tailored to the patient's bone quality, the stability of the fixation, and patient compliance.
- Phase I (0-2 Weeks): The ankle is immobilized in a well-padded short leg splint or a bulky Jones dressing in neutral dorsiflexion. The patient is strictly non-weight-bearing. Elevation and cryotherapy are emphasized to manage edema and protect the surgical incisions.
- Phase II (2-6 Weeks): Sutures are removed at 14 days assuming uncomplicated wound healing. The patient is transitioned to a removable controlled ankle motion (CAM) boot. Active range of motion (ROM) exercises (dorsiflexion and plantarflexion) are initiated to prevent capsular contracture and promote cartilage nutrition. Weight-bearing status remains restricted, though touch-down weight-bearing may be permitted based on radiographic stability.
- Phase III (6-12 Weeks): Clinical and radiographic evaluation is performed at 6 weeks. If bridging callus is visible and the fracture is clinically non-tender, progressive weight-bearing is initiated. Physical therapy focuses on proprioception, peroneal strengthening, and Achilles stretching.
- Phase IV (3-6 Months): Transition to regular footwear. High-impact activities and sports-specific training are gradually reintroduced as strength and functional dynamic stability normalize.
COMPLICATIONS AND AVOIDANCE
- Wound Dehiscence and Infection: The soft tissue envelope over the lateral malleolus is notoriously thin. Meticulous handling of the skin edges, avoiding excessive retraction, and ensuring tension-free closure are paramount.
- Hardware Prominence: Due to the lack of subcutaneous fat, lateral plates and screw heads frequently cause irritation, particularly in thin patients or athletes wearing tight footwear (e.g., ski boots, ice skates). Utilizing low-profile anatomical plates and countersinking screw heads mitigates this risk. Routine hardware removal is not recommended unless symptomatic.
- Malunion: Failure to restore the exact length and rotation of the fibula results in a widened ankle mortise, leading to rapid joint degeneration. Intraoperative mortise views must be scrutinized to ensure the "dime sign" (an unbroken Shenton's line of the ankle) is restored and the medial clear space is equal to the superior clear space.
- Nerve Injury: Iatrogenic injury to the superficial peroneal nerve (lateral approach) or sural nerve (posterolateral approach) can result in painful neuromas or sensory deficits. Careful superficial dissection and gentle retraction are mandatory.
