INTRODUCTION TO ADVANCED MUSCLE FLAP TRANSFERS
In the armamentarium of the reconstructive orthopaedic surgeon, the utilization of vascularized muscle transfers remains a cornerstone for managing complex soft tissue defects, chronic osteomyelitis, and profound functional deficits. The selection of an appropriate donor muscle is dictated by the size of the defect, the required pedicle length, the need for functional restoration (innervated transfers), and the imperative to minimize donor site morbidity.
This comprehensive masterclass delineates the surgical anatomy, biomechanical considerations, and precise operative techniques for two highly versatile flaps: the Serratus Anterior Free Flap and the Pectoralis Major Transfer. Both muscles offer unique advantages. The serratus anterior provides a thin, pliable muscle belly with an exceptionally long and reliable vascular pedicle, making it ideal for extremity coverage. Conversely, the pectoralis major, while less commonly used as a free flap due to its shorter pedicle, serves as a formidable workhorse for pedicled regional reconstruction and targeted functional restoration, such as elbow or finger flexion.
PART I: THE SERRATUS ANTERIOR FREE FLAP
The serratus anterior muscle is highly regarded in reconstructive microsurgery. It can be harvested as a muscle-only flap, a musculocutaneous flap, or a composite osteomuscular flap (incorporating vascularized rib). Its primary advantage lies in its consistent vascular anatomy, the ability to harvest multiple independent slips (digitations), and the preservation of shoulder girdle function when the superior digitations are spared.
Indications and Biomechanics
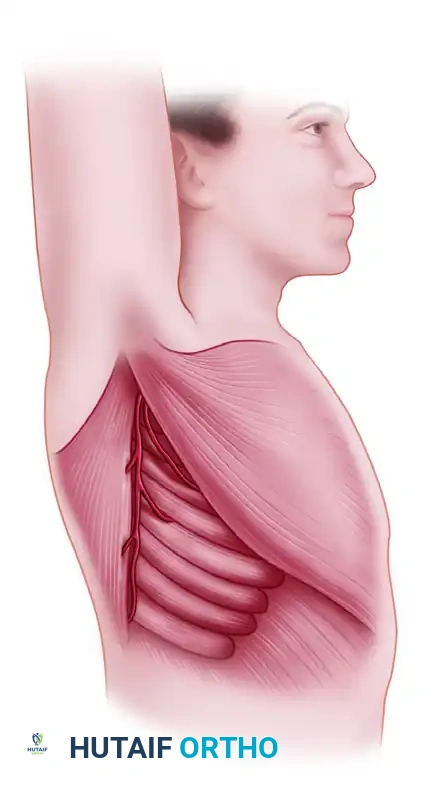
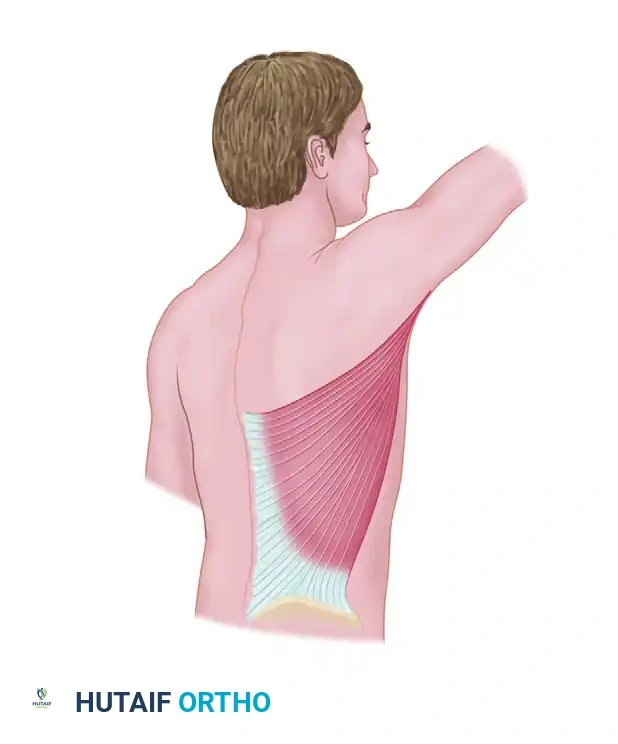
The serratus anterior is a broad, flat muscle that originates from the anterolateral surfaces of the first eight to nine ribs and inserts on the medial border of the scapula. Biomechanically, it is the primary protractor of the scapula and assists in upward rotation, which is critical for overhead arm elevation.
Clinical Indications:
* Coverage of small to medium-sized soft tissue defects in the distal third of the tibia or foot.
* Reconstruction of the hand and digits, where a thin, pliable muscle is required to allow tendon gliding.
* Functional muscle transfer for facial reanimation (using single digitations).
* Composite reconstruction of bone and soft tissue defects (e.g., utilizing the underlying 6th or 7th rib).
Surgical Warning: Complete harvest or denervation of the serratus anterior will result in profound scapular winging and severe impairment of shoulder abduction and flexion. To prevent this, only the lower three to four digitations (arising from ribs 6 through 9) are harvested, leaving the superior digitations intact and innervated.
Vascular and Neural Anatomy
A profound understanding of the axillary and subscapular arterial tree is mandatory for safe harvest.
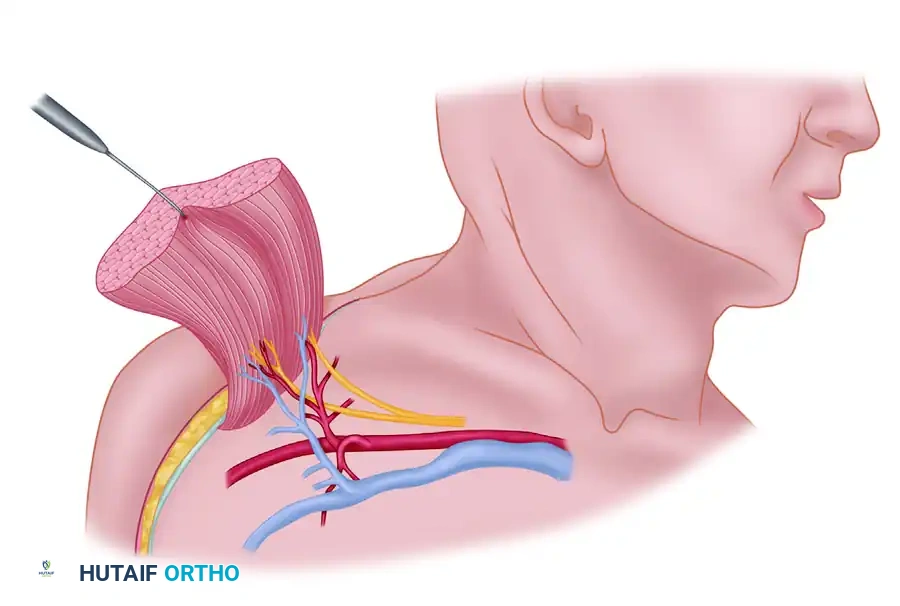
The primary blood supply to the serratus anterior is derived from the serratus branch of the thoracodorsal artery. The subscapular artery arises from the third part of the axillary artery and bifurcates into the circumflex scapular artery and the thoracodorsal artery. As the thoracodorsal artery descends along the lateral border of the latissimus dorsi, it gives off a constant anterior branch—the serratus branch—which arborizes into the lower digitations of the serratus anterior.
Secondary blood supply to the superior portion of the muscle is provided by the lateral thoracic artery. However, for free tissue transfer of the lower digitations, the thoracodorsal system is the dominant and utilized pedicle.
The motor innervation is supplied by the long thoracic nerve (roots C5, C6, C7). This nerve descends vertically along the superficial surface of the muscle, deep to the fascia. It gives off individual branches to each digitation. During harvest of the lower slips, the main trunk of the long thoracic nerve must be meticulously protected to preserve the function of the remaining superior muscle.
Preoperative Planning and Positioning
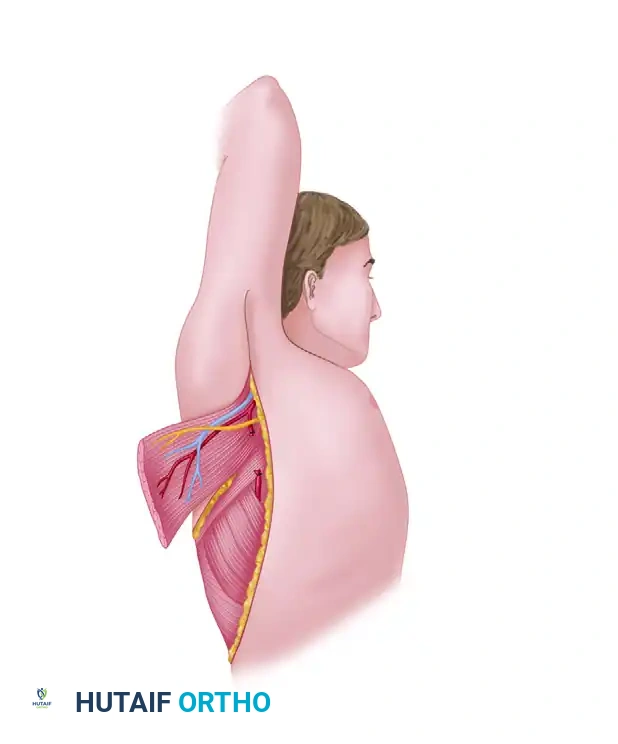
- Patient Positioning: The patient is placed in the lateral decubitus position. The ipsilateral arm is prepped and draped free to allow for wide abduction and manipulation during axillary dissection.
- Marking: The anterior border of the latissimus dorsi is palpated and marked. The inferior angle of the scapula is identified.
- Skin Flap Design (if applicable): If a musculocutaneous flap is planned, an elliptical skin paddle is designed obliquely over the lower lateral chest wall, oriented along the axis of the underlying ribs and the lower digitations of the serratus anterior.

Surgical Technique: Step-by-Step Dissection
The following technique details the harvest of the lower three to four digitations of the serratus anterior as a free flap.
Step 1: Incision and Exposure
Make an incision parallel to and approximately 3 cm posterior to the anterior edge of the latissimus dorsi muscle. If a skin paddle is required, incise the outlined ellipse down to the underlying muscle fascia.
Step 2: Latissimus Dorsi Retraction
Identify the anterior border of the latissimus dorsi. Retract the latissimus dorsi posteriorly. This exposes the loose areolar tissue covering the serratus anterior muscle.
Clinical Pearl: The plane between the latissimus dorsi and the serratus anterior is avascular and easily developed with blunt dissection. Ensure you are deep to the latissimus fascia to avoid injuring the thoracodorsal pedicle, which runs on the undersurface of the latissimus.
Step 3: Pedicle Identification
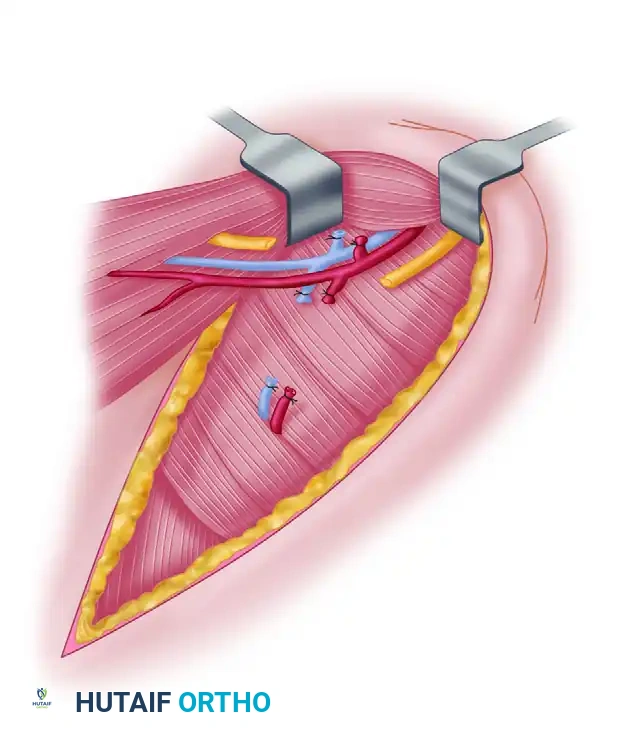
Widely abduct the arm. Using careful blunt dissection, identify the thoracodorsal artery and vein just beneath the latissimus dorsi muscle. Trace the pedicle proximally to identify its anterior branch—the serratus branch—which courses toward the serratus anterior.
Step 4: Pedicle Isolation
If the latissimus dorsi is not being harvested, the thoracodorsal artery and vein are ligated and divided just distal to the takeoff of the serratus branch. This maneuvers the entire proximal thoracodorsal pedicle to supply only the serratus anterior flap.
Step 5: Neural Dissection and Protection
Identify the thoracodorsal nerve by direct exposure or by using a disposable nerve stimulator. Carefully preserve it as the dissection is carried proximally along the thoracodorsal artery and vein.
Next, trace the serratus branch distally to the point at which it enters the lower three to four digitations of the serratus anterior.
Crucially, identify the long thoracic nerve. It runs vertically across the digitations. You must protect the proximal portion of the long thoracic nerve to ensure the superior digitations remain innervated.
Step 6: Muscle Elevation
Elevate the lower three to four digitations off the underlying ribs and intercostal muscles. This is done from anterior to posterior. Section the scapular insertion of this portion of the muscle.

Step 7: Pedicle Division and Closure
Verify that the isolated muscle segment is well perfused by its vascular pedicle. Once the recipient site is fully prepared, divide the subscapular/thoracodorsal pedicle proximally to maximize length.
Take care to achieve meticulous hemostasis in the axilla and chest wall. Close the wound in layers over closed-suction drainage to prevent seroma formation, a common complication in this anatomical region.
PART II: PECTORALIS MAJOR TRANSFER
While the pectoralis major muscle is rarely utilized for free muscle transfer due to its relatively short pedicle and visible donor site morbidity, it remains an indispensable tool in the reconstructive surgeon's repertoire. It is most commonly deployed as a pedicled muscle flap for head, neck, and sternal reconstruction, or as a bipolar pedicled transfer to restore elbow flexion (Clark's transfer). Occasionally, it is utilized as a free innervated functioning muscle transfer to restore finger flexion in severe Volkmann's ischemic contracture or brachial plexus injuries.
Indications and Biomechanics
The pectoralis major is a powerful internal rotator, adductor, and flexor of the humerus. It consists of two distinct anatomical and functional components:
1. Superior (Clavicular) Component: Arises along the medial one-half of the clavicle and extends inferiorly and laterally to the lateral margin of the bicipital groove.
2. Inferior (Sternocostal) Component: Arises along the anterior surface of the sternum, the costal cartilages of ribs two through six, and the external oblique muscle aponeurosis. It passes laterally, inserting on the humerus deep to the clavicular portion.
Clinical Indications:
* Pedicled transfer for sternal wound dehiscence or mediastinitis.
* Pedicled functional transfer to restore elbow flexion (biceps/brachialis loss).
* Free innervated transfer to restore finger flexion.
* Head and neck soft tissue reconstruction.
Clinical Pearl: Removing only the sternal head of the pectoralis major causes minimal functional deficit in activities of daily living, as the clavicular head, latissimus dorsi, and anterior deltoid compensate effectively for the loss of adduction and internal rotation.
Vascular and Neural Anatomy
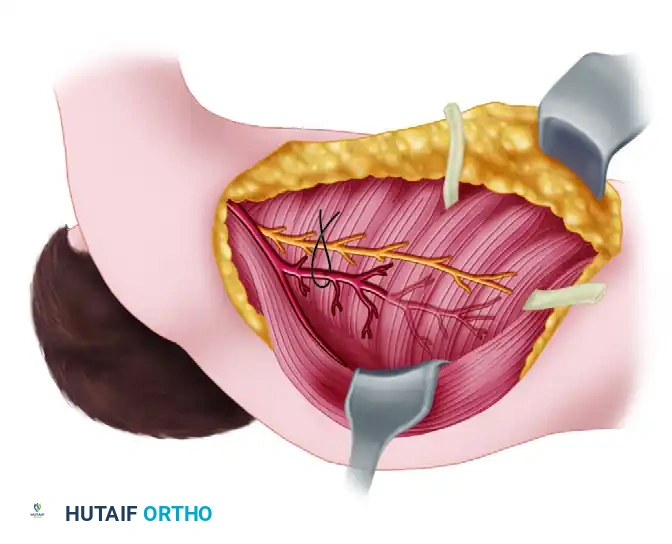
The pectoralis major receives its dominant blood supply through the pectoral branch of the thoracoacromial artery.
The thoracoacromial trunk arises from the second part of the axillary artery, pierces the clavipectoral fascia, and divides into four branches (pectoral, acromial, clavicular, and deltoid). The pectoral artery gives off a superior branch to the clavicular portion of the muscle and an inferior branch to the sternal head.
- Pedicle Characteristics: The inferior branch serves as the vascular pedicle for the transfer of the sternal head. According to Mathes and Nahai, this dominant vascular pedicle is approximately 4 cm long with a robust arterial diameter of 2.5 mm, making it highly suitable for microvascular anastomosis, despite its shorter length compared to the latissimus dorsi.
- Secondary Supply: The sternal portion may also be supplied by less constant arteries, including a secondary branch of the pectoral artery (present in 40% of dissections) and branches from the lateral thoracic artery.
Innervation:
The muscle is innervated by the medial and lateral pectoral nerves. Manktelow has observed five to six distinct nerve branches to the sternocostal portion. These are usually monofascicular branches that pass to the pectoralis major from above and below the pectoralis minor, often piercing the substance of the pectoralis minor. Each nerve branch has a definite, isolated area of muscle supply with minimal overlap, allowing the muscle to be split into independent functional units if required for complex reconstructions.
Surgical Technique: Pectoralis Major Free Transfer (Manktelow; Ikuta)
The following technique describes the harvest of the sternocostal head of the pectoralis major for free tissue transfer.
Step 1: Preparation and Positioning
Place the patient in the supine position. Prepare and drape the chest wall and the entire ipsilateral arm to allow for free movement and manipulation of the shoulder joint.
Note: The donor muscle is usually selected from the same side as the recipient limb (e.g., recipient forearm) to facilitate a two-team approach and minimize operative time.
Step 2: Skin Incision and Flap Design
Outline an ellipse of skin on the chest wall over the muscle mass to be removed. This skin paddle should be oriented parallel to the inferior margin of the muscle and positioned superior to the nipple to optimize cosmesis.
Make an incision extending from the anterior shoulder, curving inferiorly toward the sternum and following the direction of the rectus abdominis insertion.
Step 3: Skin Paddle Elevation
Incise the outlined skin ellipse down through the subcutaneous tissue to the pectoral fascia.
Surgical Warning: The subcutaneous tissue over the pectoralis major is prone to shearing forces during manipulation. Immediately suture the dermis of the skin paddle to the underlying pectoral fascia using interrupted absorbable sutures (e.g., 3-0 Vicryl) to prevent shear injury to the delicate musculocutaneous perforators.
Step 4: Muscle Dissection
Elevate the skin flaps superiorly and inferiorly to expose the entire sternocostal head of the pectoralis major. Define the interval between the clavicular and sternocostal heads. This avascular plane is usually marked by a fat stripe containing a venous tributary.
Divide the sternal and costal origins of the muscle using electrocautery, elevating the muscle from medial to lateral off the chest wall and ribs.
Step 5: Pedicle Isolation
As the muscle is reflected laterally, identify the neurovascular bundle entering the deep surface of the muscle. Carefully dissect the pectoral branch of the thoracoacromial artery and its accompanying veins. Trace the pedicle proximally to its origin at the thoracoacromial trunk to maximize pedicle length.
Identify the medial and lateral pectoral nerves. If a functional transfer is planned, use a nerve stimulator to map the fascicular anatomy and isolate the specific nerve branches supplying the harvested sternocostal segment.
Step 6: Humeral Detachment and Harvest
Once the pedicle is fully isolated and protected, detach the insertion of the sternocostal head from the lateral lip of the bicipital groove of the humerus.
Allow the muscle to perfuse on its isolated pedicle until the recipient site is ready. Ligate the pedicle and transfer the flap.
Step 7: Closure
Achieve meticulous hemostasis of the chest wall. Insert a closed-suction drain in the axilla and over the anterior chest wall. Close the subcutaneous tissues and skin in layers.
POSTOPERATIVE PROTOCOL AND REHABILITATION
The success of free and pedicled muscle transfers relies heavily on rigorous postoperative monitoring and structured rehabilitation.
Inpatient Flap Monitoring
- Vascular Checks: Flap perfusion must be monitored every hour for the first 24 hours, then every 2 hours for the next 24 hours. Monitoring modalities include clinical assessment (color, capillary refill, turgor of the skin paddle), handheld Doppler ultrasonography of the marked perforator, or implantable tissue oximetry (e.g., ViOptix).
- Positioning: The patient must be positioned to avoid any direct pressure or sheer stress on the flap or the vascular pedicle. For upper extremity reconstructions, the limb is typically elevated in a custom splint.
- Drain Management: Closed-suction drains at the donor site (axilla/chest wall) are maintained until output is less than 30 cc over a 24-hour period to prevent seroma or hematoma formation.
Rehabilitation Phases
- Phase I (0-3 Weeks): Absolute immobilization of the recipient site to allow for microvascular healing and initial soft tissue adherence. Donor site range of motion (e.g., gentle shoulder pendulum exercises) is initiated early to prevent adhesive capsulitis, provided it does not place tension on the surgical closure.
- Phase II (3-6 Weeks): Gentle, passive range of motion is initiated at the recipient site. If a functional muscle transfer was performed, the patient is educated on cognitive re-mapping (e.g., attempting to "internally rotate the shoulder" to activate a pectoralis major transferred for finger flexion).
- Phase III (6-12+ Weeks): Active range of motion and progressive strengthening. Electromyography (EMG) biofeedback can be highly beneficial in training innervated free muscle transfers to achieve independent, coordinated function in their new anatomical location.
