INTRODUCTION TO RADIAL POLYDACTYLY AND BIFID THUMBS
Radial polydactyly, commonly presenting as a duplicated or bifid thumb, is one of the most frequent congenital hand anomalies, occurring in approximately 1 in 3,000 live births. The condition arises from a failure of programmed apoptosis within the apical ectodermal ridge during embryonic development. The Wassel classification remains the gold standard for categorizing these deformities based on the level of skeletal duplication.
This comprehensive surgical masterclass focuses exclusively on the correction of Wassel Type I (bifid distal phalanx with a common epiphysis) and Wassel Type II (completely duplicated distal phalanx articulating with a broad proximal phalanx head).
While these distal duplications may appear anatomically straightforward compared to more proximal variants, they present profound reconstructive challenges. The surgeon must meticulously balance the preservation of interphalangeal (IP) joint stability, the centralization of flexor and extensor forces, and the precise reconstruction of the nail matrix to prevent debilitating secondary deformities.
Clinical Pearl: The primary goal of bifid thumb reconstruction is not merely the ablation of the extra digit, but the creation of a single, stable, sensate, and aesthetically acceptable thumb capable of powerful tip-to-tip and key pinch.
PREOPERATIVE EVALUATION AND SURGICAL PLANNING
Clinical Assessment
A thorough clinical examination must evaluate the symmetry of the duplicated digits. Symmetrical duplications (where both digits are hypoplastic and neither is sufficient to form a standalone thumb) are classically treated with the Bilhaut-Cloquet procedure. Asymmetrical duplications (where one digit, typically the ulnar one, is dominant and better developed) are managed via the ablation of the lesser digit with collateral ligament reconstruction, such as the Lamb, Marks, and Bayne technique.
Radiographic Analysis
Standard posteroanterior (PA) and lateral radiographs of the hand are mandatory. The surgeon must specifically assess:
* The presence of a shared or split epiphysis at the distal phalanx.
* The width and contour of the proximal phalanx head.
* Any angular deformity (clinodactyly) at the interphalangeal joint.
* The presence of delta phalanges or longitudinal epiphyseal brackets.
Timing of Surgery
Surgical intervention is optimally performed between 12 and 18 months of age. At this stage, the anatomical structures are sufficiently large to permit meticulous tissue handling, and the child has not yet fully integrated the anomalous digit into their developing fine motor prehension patterns.
SURGICAL TECHNIQUE 79-25: THE BILHAUT-CLOQUET PROCEDURE
The Bilhaut-Cloquet procedure is indicated for Wassel Types I and II symmetrical bifid thumbs. The technique involves a central wedge resection of the adjacent halves of the duplicated digits, followed by the amalgamation of the remaining lateral and medial halves to create a single, appropriately sized thumb.
Patient Positioning and Preparation
- Place the patient supine with the affected upper extremity extended on a radiolucent hand table.
- Administer general anesthesia.
- Apply a well-padded pediatric pneumatic tourniquet to the upper arm. Exsanguinate the limb using an Esmarch bandage and inflate the tourniquet to the appropriate weight-based pressure (typically 150–200 mm Hg).
- Utilize loupe magnification (3.5x to 4.5x) throughout the procedure, as the meticulous alignment of the nail bed and physeal plates is critical.
Incision and Exposure
- Design a central, V-shaped or wedge-shaped incision extending from the dorsal aspect to the palmar aspect over the involved thumb tip.
- The proximal apex of the wedge must extend precisely to the level of the bifurcation (the interphalangeal joint or the shared epiphysis).
- Crucial Step: The dorsal component of the incision must pass directly through the nail plate, the sterile matrix, and the germinal matrix. Use a sharp #15 or Beaver blade to ensure clean, perpendicular cuts through the nail bed to facilitate later repair.
Bone and Tendon Resection
- Incise the central component of the underlying flexor and extensor tendons in line with the skin incision.
- Perform a longitudinal osteotomy through the bone of the duplicated structures. Remove the central wedge of bone, cartilage, and soft tissue.
- Ensure that the volume of the resected central wedge is calculated so that the two remaining halves, when brought together, equal the girth of a normal contralateral thumb.
Surgical Warning: Over-resection will result in a constricted, "hourglass" thumb, while under-resection will leave a cosmetically unacceptable, broad, and bulky digit.
Epiphyseal Approximation and Fixation
- Carefully approximate the articular surface and the epiphysis of the remaining parts of the distal phalanx.
- Physeal Alignment: The physis of the radial half must perfectly align with the physis of the ulnar half to prevent asymmetric growth and secondary angular deformities.
- Secure the two halves with a transverse 0.028-inch or 0.035-inch Kirschner wire (K-wire).
- Note: This approximation may be difficult due to the tightening of the radial and ulnar collateral ligaments. If excessive tension is noted, a limited release or fractional lengthening of the collateral ligaments at their proximal origins may be required.
Soft Tissue and Nail Bed Reconstruction
- The most critical aesthetic step is the repair of the nail bed. Mismatch here will result in a permanent longitudinal ridge or a split nail (the classic "Z-deformity").
- Carefully suture the sterile and germinal matrices using 6-0 or 7-0 absorbable sutures (e.g., chromic gut or Vicryl Rapide) on a spatulated micro-needle. Ensure the knots are buried or placed superficially so they do not interpose between the healing matrix edges.
- Repair the flexor and extensor tendon halves using 5-0 non-absorbable or slowly absorbable sutures.
- Close the skin with interrupted 5-0 or 6-0 absorbable sutures.
SURGICAL TECHNIQUE 79-26: LAMB, MARKS, AND BAYNE TECHNIQUE
For asymmetrical Type I and II duplications, the Bilhaut-Cloquet procedure is contraindicated due to the risk of creating a mismatched, stiff joint. Instead, the Lamb, Marks, and Bayne technique is employed. This involves the ablation of the less functional component (usually the radial digit), narrowing of the broad proximal phalanx head, and meticulous collateral ligament reconstruction.
Step A: Excision of the Less Functional Component
- Identify the dominant digit (typically the ulnar digit, which has better ulnar collateral ligament stability necessary for pinch).
- Design a racquet-shaped incision around the base of the hypoplastic radial digit.
- Divide the soft tissue septum and cartilage separating the two digits.
- Identify and divide the anomalous insertions of the flexor and extensor tendons to the radial digit.
Figure 1: Step A - Division of the septum and cartilage. The flexor and extensor tendons of the duplicated digit are divided, while the radial collateral ligament is carefully preserved for later transfer.
Step B: Collateral Ligament Management
- The radial collateral ligament (RCL) of the IP joint is attached to the radial digit being excised. This ligament is vital for the postoperative stability of the remaining thumb.
- Instead of simply transecting the ligament, elevate it distally from the base of the excised radial distal phalanx.
- Ideally, harvest the RCL with a small periosteal sleeve or a tiny fleck of cartilage/bone to provide a robust tissue edge for later reattachment.
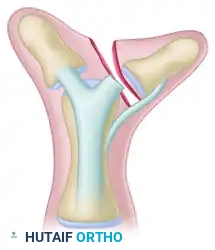
Figure 2: Step B - The collateral ligament is detached distally from the excised digit. Note the inherent angulation (clinodactyly) of the remaining phalanx that must be addressed.
Step C: Osteotomy and Joint Contouring
- Once the radial digit is removed, the head of the proximal phalanx will appear abnormally broad, featuring a bifid articular facet.
- Use a scalpel or a fine oscillating saw to shave down the radial prominence of the proximal phalanx head, decreasing its size to match the articular base of the remaining distal phalanx.
- If the remaining distal phalanx exhibits significant angular deformity (clinodactyly) due to eccentric tendon insertions or a bracket epiphysis, a closing wedge osteotomy of the proximal or distal phalanx must be performed to correct the mechanical axis.
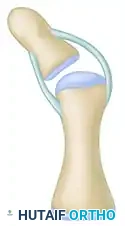
Figure 3: Step C - The hypertrophic, bifid head of the proximal phalanx is decreased in size. A corrective osteotomy is performed to realign the angulated phalanx.
Step D: Fixation and Ligament Reconstruction
- Centralize the extensor and flexor tendons over the remaining distal phalanx. If they are eccentrically inserted, detach and reinsert them centrally to prevent dynamic deviation.
- Reduce the IP joint and drive a longitudinal 0.035-inch K-wire retrograde through the tip of the distal phalanx, across the IP joint, and into the proximal phalanx to maintain alignment.
- Advance the previously harvested radial collateral ligament and attach it to the radial base of the remaining distal phalanx. This can be secured using a transosseous suture technique or a micro-suture anchor.
- Close the skin flaps, utilizing Z-plasties if necessary to prevent longitudinal scar contracture across the joint flexion crease.
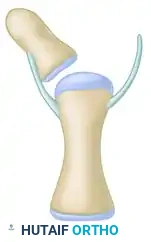
Figure 4: Step D - The corrected alignment is stabilized with a longitudinal Kirschner wire. The preserved collateral ligament is securely attached to the base of the centralized distal phalanx.
POSTOPERATIVE CARE AND REHABILITATION PROTOCOL
The success of bifid thumb reconstruction relies heavily on strict adherence to postoperative immobilization protocols to protect the delicate physeal approximations, osteotomies, and ligamentous reconstructions.
Immobilization Strategy
- Immediately postoperatively, apply a sterile, non-adherent dressing followed by a well-molded fiberglass cast.
- Age-Dependent Casting:
- For infants and younger children (under 3 years of age), a long-arm thumb spica cast is absolutely mandatory. The cylindrical shape of an infant's arm allows short-arm casts to easily slip off, compromising the surgical repair. The elbow should be flexed to 90 degrees to lock the cast in place.
- For older, more compliant children, a short-arm thumb spica cast may be considered, though long-arm casting remains the safest option.
Hardware Removal and Follow-Up
- Weeks 0-4: The patient remains strictly immobilized in the cast. Keep the extremity elevated for the first 48-72 hours to minimize edema.
- Weeks 4-6: The cast is removed in the clinic between 4 to 6 weeks postoperatively. Clinical and radiographic union of the osteotomies is assessed.
- Week 6: The transverse or longitudinal Kirschner wires are removed in the clinic. This is typically done without the need for general anesthesia, though child life specialists can assist with distraction techniques.
- Post-Wire Removal: Progressively increased use of the hand is allowed. Formal occupational therapy is rarely required in infants, as they will naturally incorporate the reconstructed thumb into play and prehension. However, parents are instructed on gentle scar massage and range-of-motion exercises.
COMPLICATIONS AND PITFALLS
Despite meticulous surgical technique, the correction of Types I and II bifid thumbs carries a risk of specific complications that the orthopedic surgeon must anticipate and mitigate.
1. Nail Deformities (The "Z-Deformity")
The most common complication following the Bilhaut-Cloquet procedure is a longitudinal ridge or split in the nail plate. This occurs due to imperfect alignment of the germinal matrix during the central wedge closure.
* Prevention: Use high-powered loupe magnification. Ensure the dorsal incision is perfectly perpendicular. Suture the matrix with precise, closely spaced 6-0 or 7-0 absorbable sutures.
2. Joint Stiffness
The Bilhaut-Cloquet procedure inherently violates the articular surface of the IP joint. Consequently, some degree of IP joint stiffness is almost universal.
* Management: While IP joint motion may be reduced, the functional deficit is usually minimal provided the thumb is fused or stiffens in a functional position (10 to 15 degrees of flexion). The Lamb, Marks, and Bayne technique generally preserves better IP joint motion.
3. Secondary Angular Deformity (Zig-Zag Deformity)
Angular deformities can recur as the child grows. This is often due to eccentric tendon pull, asymmetric physeal growth (if the physis was damaged or misaligned during surgery), or failure to adequately reconstruct the collateral ligaments.
* Prevention: Always centralize the FPL and EPL tendons. Ensure robust reattachment of the collateral ligament with appropriate tension. If a delta phalanx is present, it must be addressed with a physiolysis or corrective osteotomy at the index procedure.
4. Physeal Arrest
Transfixing the physis with K-wires or aggressive surgical dissection near the epiphyseal plates can lead to premature physeal closure, resulting in a shortened thumb.
* Prevention: Use smooth, small-diameter K-wires (0.028 or 0.035 inch). Pass the wire across the physis as few times as possible. Avoid thermal necrosis by using a slow-speed drill or inserting the wire by hand.
Mastery Concept: The surgical correction of radial polydactyly is an exercise in anticipating future growth. The surgeon must not only achieve immediate intraoperative alignment but must also balance the dynamic soft-tissue forces to ensure the thumb grows straight and functional over the next decade of the child's life.
