FUNDAMENTAL PRINCIPLES OF HAND INCISIONS
The integumentary envelope of the hand is a highly specialized organ, uniquely adapted to withstand friction on its palmar surface while maintaining extraordinary pliability on its dorsal aspect. In operative orthopaedics, the placement of a skin incision is not merely a means of access; it is a critical determinant of the functional outcome. Poorly planned incisions can lead to hypertrophic scarring, debilitating flexion contractures, skin necrosis, and iatrogenic nerve injury.
As long as strict biomechanical and anatomical principles are observed, skin incisions can be made almost anywhere on the hand, not strictly confined to major skin creases.
Biomechanics of the Skin and Scar Tissue
The plane of motion of any digit or joint is approximately perpendicular to the long axis of its corresponding skin creases. A fundamental rule of hand surgery is that an incision must never cross a flexion crease at or near a right angle.
Surgical Warning: A mature scar does not possess the elastic properties of normal skin. If a scar crosses a crease perpendicularly, it falls directly into the line of tension created by joint motion. This tension induces scar hypertrophy and inevitably results in a longitudinal flexion contracture, causing significant functional impairment.
Strategic Incision Placement
- Avoid Deep Creases: Incisions directly within deep creases should be avoided. In these zones, subcutaneous fat is exceedingly sparse, and moisture tends to accumulate, leading to maceration of the skin edges and delayed wound healing.
- Adequate Length: An incision must be long enough to expose deep structures without requiring excessive, traumatic retraction of the skin edges. Greater exposure is facilitated by dissecting the skin and subcutaneous fat as a single full-thickness unit from the underlying fascia.
- The Offset Principle: The placement of a skin incision applies only to the integument. Entries into deeper structures (e.g., tendon sheaths, joint capsules) are dictated by deep anatomy and should ideally be offset from the skin incision. For example, in the surgical release of de Quervain stenosing tenosynovitis, the skin incision over the radial styloid may be transverse, but the underlying incision through the first dorsal compartment is longitudinal. This prevents the skin scar from adhering to the healing tendon sheath.
- Curved and S-Shaped Incisions: Straight-line incisions are generally avoided in the hand, with the notable exception of the dorsal approach to the wrist in rheumatoid patients. Gently curved or S-shaped incisions conform better to natural lines of tension, provide superior exposure on their concave sides, and can be easily extended if wider exposure is required.
- Vascular Considerations: Parallel or nearly parallel incisions that are placed too close together must be strictly avoided. The intervening skin bridge is at high risk for ischemia and full-thickness necrosis due to impairment of the subdermal vascular plexus.
DIGITAL INCISIONS: APPROACHES TO THE FINGERS
Surgical approaches to the fingers demand meticulous handling of the neurovascular bundles. The choice of incision depends on the pathology, the required exposure, and the presence of pre-existing contractures.
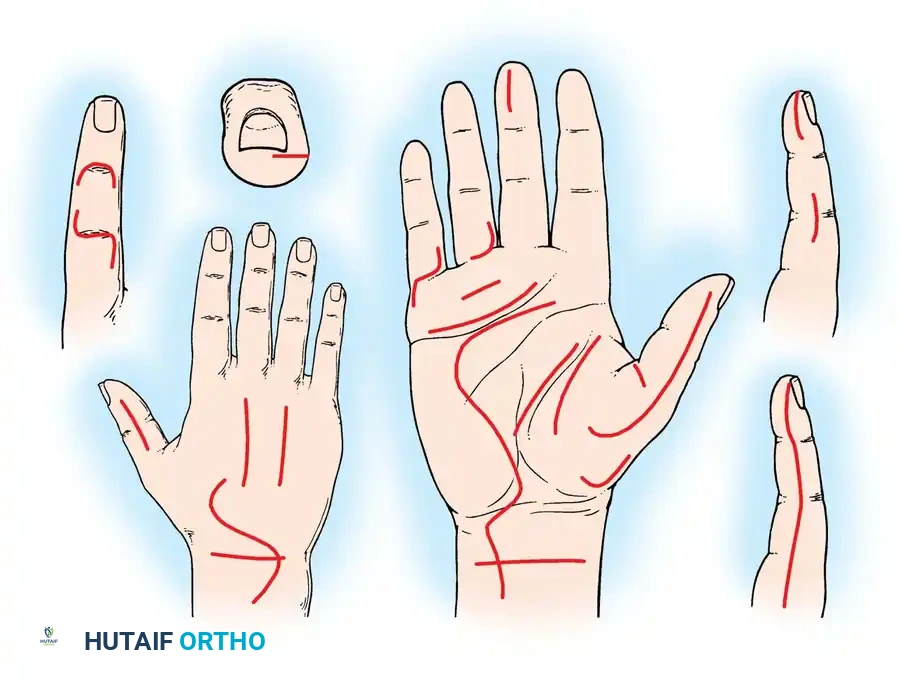
The Midlateral Finger Incision
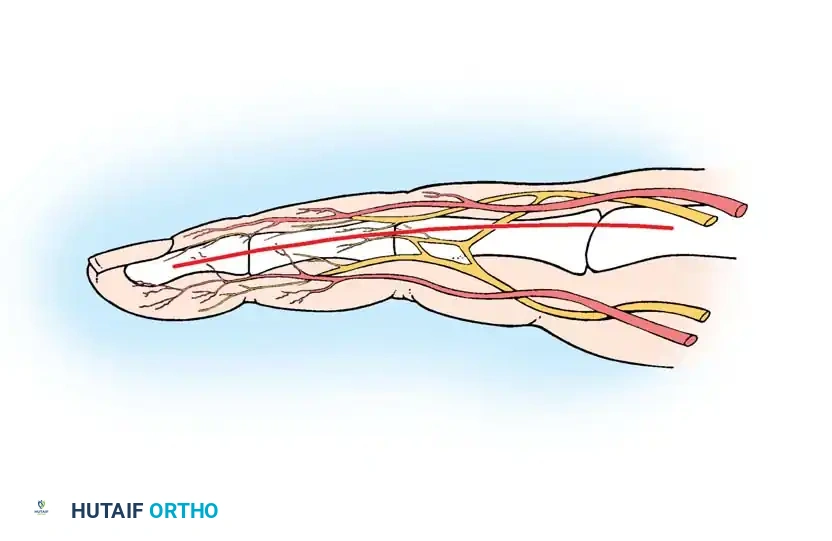
The midlateral incision is a highly versatile, basic approach that provides excellent exposure of the flexor tendon sheath while minimizing the risk of volar scar contracture. It is often misunderstood. The critical decision in this approach is whether to carry the neurovascular bundle volarward with the anterior skin flap or to leave it in situ by dissecting superficial to it.
Technique 1: Volar Translation of the Neurovascular Bundle
This technique is preferred when extensive exposure of the flexor tendon sheath is required, as it safely retracts the neurovascular structures out of the operative field.
- Incision Placement: Begin the incision on the midlateral aspect of the finger at the level of the metacarpophalangeal (MCP) joint proximal flexion crease.
- Distal Extension: Carry the incision distally to the proximal interphalangeal (PIP) joint, staying just dorsal to the flexor skin crease. Continue distally along the middle phalanx, dorsal to the distal interphalangeal (DIP) flexor crease, proceeding toward the lateral edge of the paronychial fold. Because flexor creases extend slightly over halfway around the digit, the true midlateral line is slightly posterolateral.
- Dorsal Flap: Develop the dorsal flap slightly to facilitate eventual closure.
- Nerve Preservation: On the radial sides of the index and middle fingers, and the ulnar side of the little finger, carefully identify and preserve the dorsal branch of the digital nerve.
- Volar Flap Development: Develop the volar flap by dissecting into the subcutaneous fat over the proximal and middle phalanges.
- Deep Dissection: Immediately after incising the fat, carry the dissection volarward deep to the neurovascular bundle. Elevate the bundle with the volar skin flap to expose the underlying flexor tendon sheath.
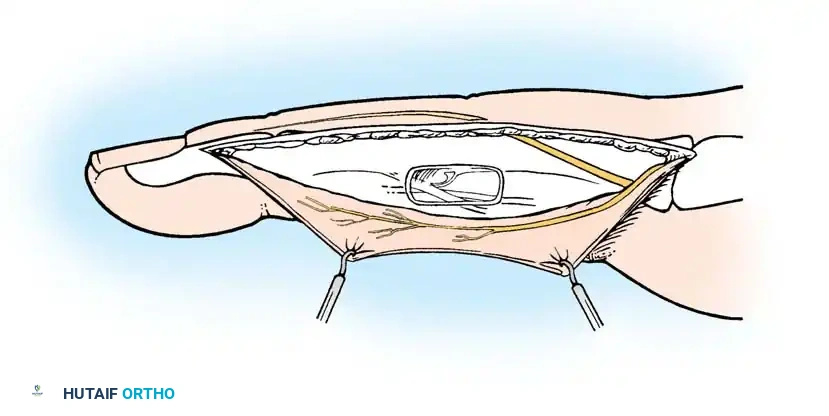
Clinical Pearl: Subcutaneous fat is notoriously scanty over the PIP joint. Exercise extreme caution in this zone to avoid inadvertently entering the joint capsule or damaging the neurovascular bundle.

Technique 2: Neurovascular Bundle Left in Situ
In this variation, the skin flap is developed superficial to the neurovascular bundle.
- Incision: Make the standard midlateral skin incision. Just distal to the distal flexor skin crease, carry the incision obliquely into the volar pulp of the finger.
- Flap Elevation: As the volar skin flap is developed through the subcutaneous fat, carefully isolate the neurovascular bundle. It is most easily identified at the level of the middle phalanx.
- Exposure: Dissect the fat from the volar surface of the bundle to expose it, then carry the dissection toward the bone to expose the flexor sheath.
- Caution: If dissecting superficial to the bundle, ensure the skin flaps are not made too thin, which could compromise their vascularity and lead to marginal necrosis.
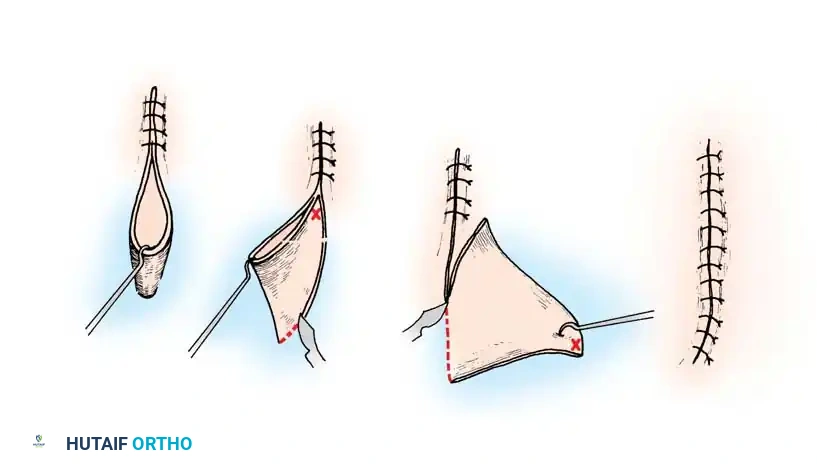
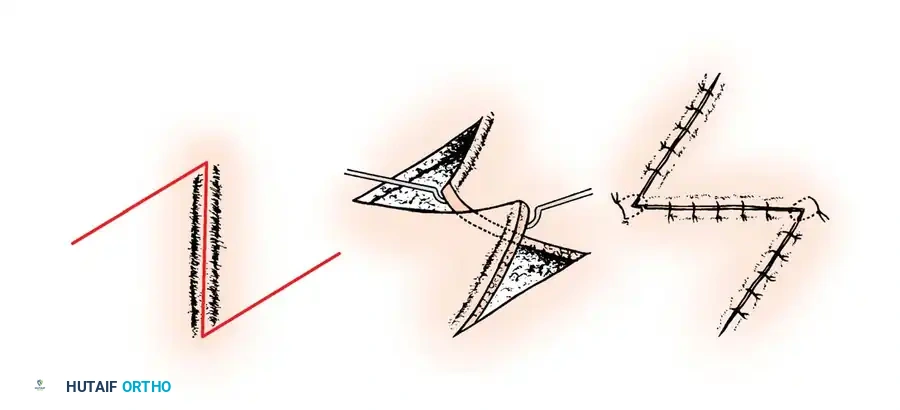
The Volar Zigzag (Bruner) Incision
The Bruner volar zigzag incision is highly popular for primary flexor tendon repair and trigger finger release. It provides direct, wide exposure of the volar surface of the flexor tendon sheath without requiring the mobilization of either neurovascular bundle.
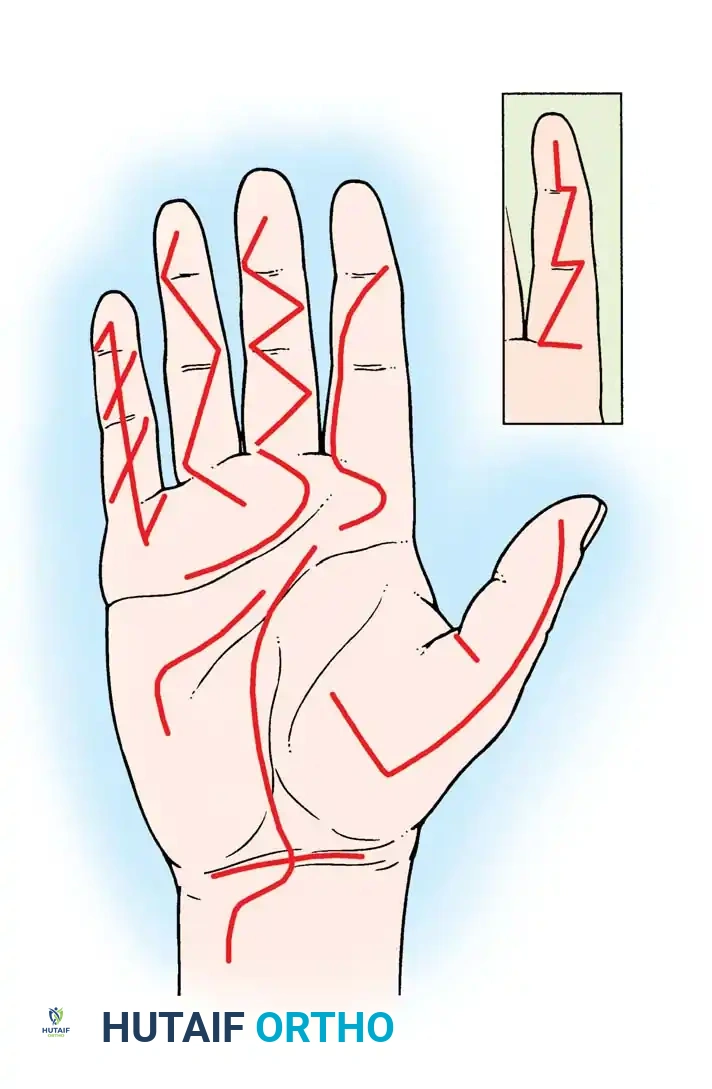
- Biomechanics: The incision utilizes V-shaped flaps with the apices of the flaps ending at the lateral extremities of the flexion creases.
- Pitfalls: When used on a severely contracted skin surface (e.g., Dupuytren's contracture), the zigzag incision tends to straighten out postoperatively, resulting in a linear scar that crosses the flexion creases and exacerbates the contracture. In such cases, multiple Z-plasty incisions are far superior.
The Volar Midline Oblique Incision
This approach is a safe and easily closed alternative to the Bruner incision. The incision crosses the flexion creases obliquely in the midline of the finger, safely navigating between the radial and ulnar neurovascular bundles. It is particularly useful for localized procedures such as isolated pulley releases or mass excisions.
THUMB INCISIONS
The principles of midlateral incisions apply equally to the thumb. The radial side is generally more accessible.
- Extended Exposure: A radial midlateral incision can be extended by curving its proximal end at the mid-metacarpal area, creating a palmar flap. This allows for extensive exposure of the flexor surface for tendon grafting without requiring a separate palmar incision.
- Nerve Protection: When operating on the radial aspect of the thumb, the dorsal branches of the superficial radial nerve must be meticulously identified and protected to prevent painful neuromas.
- Joint Capsule: Fat is extremely sparse on the lateral aspects of the thumb interphalangeal (IP) joint. Care must be taken not to inadvertently open the volar plate when seeking the flexor tendon sheath.
- Trigger Thumb: When making a transverse incision for a trigger thumb release at the level of the MCP joint flexion crease, the surgeon must be acutely aware that the two proper digital nerves of the thumb are located centrally and superficially, immediately adjacent to the flexor tendon sheath.
PALMAR AND WRIST INCISIONS
Incisions in the palm require a deep understanding of the complex neurovascular anatomy, particularly the superficial palmar arch and the cutaneous nerve branches.
Distal Palmar Incisions
Incisions in the distal palm are generally transverse, paralleling the distal palmar crease.
* Fascial Dissection: After incising the skin and underlying fat, the fat should be dissected from the palmar fascia and carried with the skin flaps.
* Deep Exposure: In the distal palm, the structures lying between the metacarpal heads (lumbricals, digital neurovascular bundles) are not protected by the dense palmar fascia. Once the skin flaps are retracted, the fascia can be incised or excised to reveal the underlying tendons and parallel neurovascular bundles.
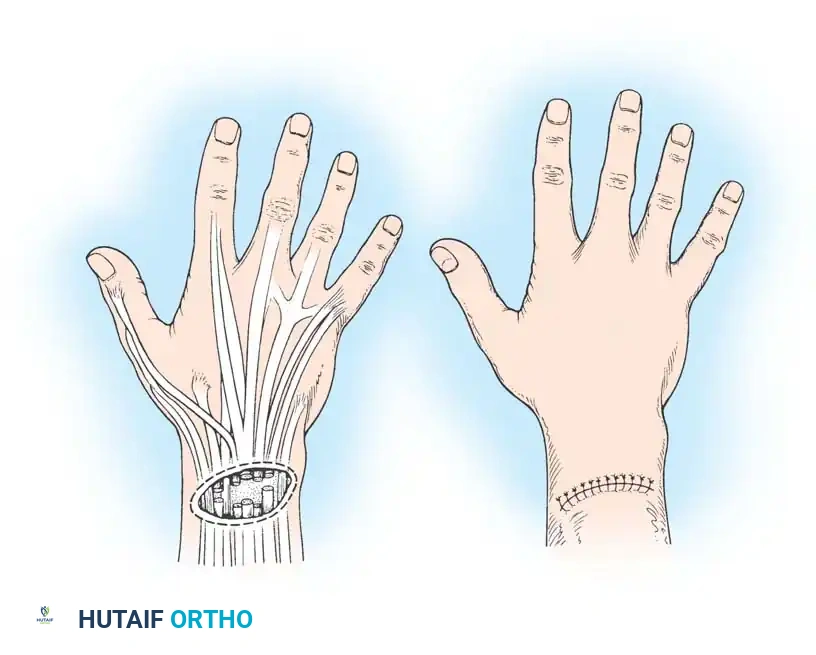
Proximal Palmar and Carpal Tunnel Incisions
Incisions in the proximal palm tend to be more longitudinal, with the distal end curving radially to parallel the closest major skin crease (e.g., the thenar crease).
Surgical Warning: When extending a palmar incision proximally into the wrist, it must never cross the transverse flexor wrist creases at a right angle. A zigzag or oblique crossing is mandatory to prevent severe wrist flexion contractures.
Cutaneous Nerve Anatomy
Anatomical studies by Martin, Seiler, and Lesesne, as well as Matloub et al., have revolutionized our understanding of palmar cutaneous innervation. There is no single longitudinal incision in the proximal palm that completely avoids all palmar cutaneous branches of the median and ulnar nerves.

- Palmar Cutaneous Branch of the Median Nerve (PCBm): Present in 100% of specimens, it branches from the median nerve proximal to the carpal tunnel and travels superficially to innervate the base of the thenar eminence.
- Palmar Cutaneous Branch of the Ulnar Nerve (PCBu): Present in approximately 16% of specimens.
- Nerve of Henle: Present in 40% of specimens, providing sympathetic innervation to the ulnar artery and cutaneous sensation to the distal ulnar forearm.

To minimize iatrogenic injury during carpal tunnel release or proximal palmar surgery, incisions should be placed carefully in the "safe zone" aligned with the longitudinal axis of the radial border of the ring finger, and blunt dissection should be utilized in the subcutaneous tissues. Furthermore, the recurrent motor branch of the median nerve must be explicitly protected; if its anatomical variation is suspected, it should be formally exposed.
DORSAL INCISIONS
The skin on the dorsum of the hand and wrist is highly mobile, allowing for shorter incisions to achieve adequate exposure compared to the volar surface.
- The Lazy-S Incision: A 7.5-cm longitudinal lazy-S incision on the mid-dorsum of the wrist provides massive exposure. Through this single approach, structures can be accessed from the extreme radial side (extensor pollicis brevis and abductor pollicis longus in the first compartment) to the extreme ulnar side (extensor carpi ulnaris in the sixth compartment).
- Rheumatoid Exception: While straight-line incisions are generally condemned, the dorsal longitudinal approach to the wrist in a patient with severe rheumatoid arthritis is a recognized exception. The altered skin mechanics and the need for extensive synovectomy and potential arthrodesis justify this approach, provided meticulous closure is performed.
ADVANCED TISSUE REARRANGEMENT: Z-PLASTY AND FLAPS
When dealing with contracted scars, Dupuytren's disease, or web space contractures, simple linear incisions are insufficient. Tissue rearrangement techniques are required to lengthen the skin envelope and redirect tension lines.
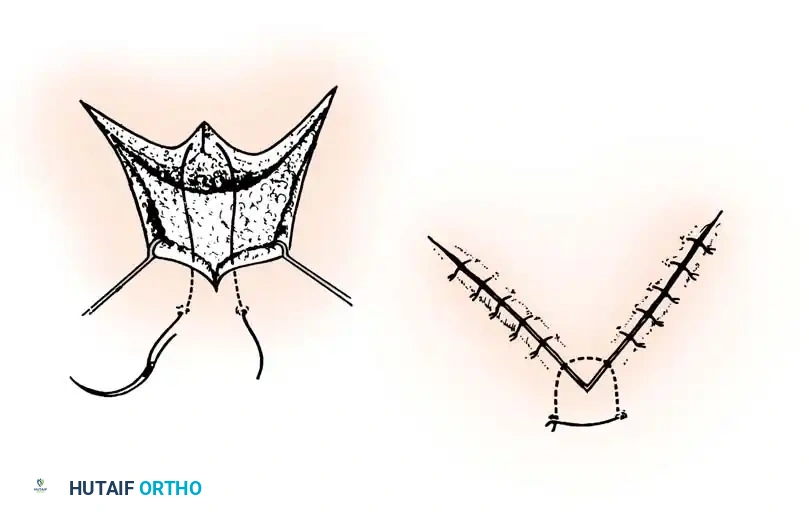
The Z-Plasty
The Z-plasty is a fundamental reconstructive technique used to elongate a contracted scar or to rotate the axis of tension.
* Biomechanics: A standard 60-degree Z-plasty provides a theoretical length increase of 73% along the central limb.
* Execution: The central limb is placed along the line of the contracture. Two peripheral limbs are designed at 60-degree angles to the central limb. The resulting triangular flaps are elevated as full-thickness units (including subcutaneous fat to preserve the subdermal plexus) and transposed.
Multiple Z-plasties can be designed in series for long linear contractures crossing multiple joints, effectively breaking up the scar and restoring full extension to the digit.
Flap Management and Closure
When elevating skin flaps in the hand, strict adherence to atraumatic technique is paramount.
* Use fine skin hooks or stay sutures rather than crushing forceps to retract skin edges.
* Ensure absolute hemostasis before closure to prevent hematoma formation, which acts as a barrier to healing and a nidus for infection.
Wound closure should be performed with non-absorbable monofilament sutures (e.g., 4-0 or 5-0 nylon) using simple interrupted or horizontal mattress techniques to perfectly evert the skin edges. Tension on the closure must be avoided; if the wound cannot be closed primarily without tension, a skin graft or local rotational flap must be considered.
POSTOPERATIVE PROTOCOLS
The success of a meticulously planned and executed hand incision relies heavily on appropriate postoperative management.
- Dressings: A non-adherent contact layer should be applied directly to the incision, followed by fluffed gauze to absorb exudate. A bulky, softly compressive dressing is applied to minimize edema.
- Immobilization: The hand is typically immobilized in a "safe position" (intrinsic-plus position: wrist extended 20-30 degrees, MCP joints flexed 70-90 degrees, IP joints fully extended) using a volar plaster splint. This prevents collateral ligament contracture.
- Elevation: Strict elevation of the operative extremity above the level of the heart is mandatory for the first 48-72 hours to control postoperative edema, which is the primary enemy of wound healing and joint mobility.
- Suture Removal: Sutures in the hand are generally left in place longer than in other parts of the body due to the high mobility and tension of the region. Removal is typically performed at 10 to 14 days, provided the wound edges are fully epithelialized and stable.
- Scar Management: Once sutures are removed and the wound is sealed, aggressive scar massage, silicone gel sheeting, and early controlled mobilization are instituted under the guidance of a certified hand therapist to prevent deep adhesions and optimize functional recovery.
