Arthrodesis of the First Metatarsocuneiform Articulation (Lapidus Procedure): Comprehensive Surgical Guide
Key Takeaway
The Lapidus procedure, or first metatarsocuneiform arthrodesis, is a powerful surgical technique for correcting severe hallux valgus associated with first ray hypermobility. This procedure achieves multiplanar correction by fusing the first tarsometatarsal joint, effectively restoring the medial column's biomechanical integrity. Success relies on meticulous joint preparation, precise plantarflexion and adduction of the first metatarsal, and rigid internal fixation to ensure optimal functional outcomes and prevent recurrence.
INTRODUCTION AND BIOMECHANICAL RATIONALE
The arthrodesis of the first metatarsocuneiform (tarsometatarsal or TMT) articulation, universally known as the Lapidus Procedure, is a cornerstone technique in the reconstructive armamentarium for complex forefoot deformities. Originally described by Paul Lapidus in 1934 and subsequently refined by modern masters such as Myerson, Sangeorzan, Hansen, and Mauldin, this procedure addresses the apex of the deformity in severe hallux valgus: the hypermobile first ray.
The primary biomechanical objective of the Lapidus procedure is to restore the weight-bearing capacity of the medial column. In patients with first ray hypermobility, the first metatarsal dorsiflexes and inverts during the terminal stance phase of gait, leading to a loss of the windlass mechanism and subsequent transfer of load to the lesser metatarsals (transfer metatarsalgia). By achieving a rigid arthrodesis at the first TMT joint, the surgeon effectively stabilizes the medial column, allowing for powerful correction of the intermetatarsal angle (IMA) while simultaneously plantarflexing the first ray to restore normal forefoot contact pressures.
Clinical Pearl: The Lapidus procedure is not merely a uniplanar correction. It is a triplanar realignment. The first metatarsal must be adducted (to close the IMA), plantarflexed (to restore medial column weight-bearing), and derotated (to correct the frontal plane pronation of the first ray).
INDICATIONS AND CONTRAINDICATIONS
Primary Indications
- Severe Hallux Valgus: Intermetatarsal angle (IMA) > 15 degrees and Hallux Valgus Angle (HVA) > 40 degrees.
- First Ray Hypermobility: Demonstrated clinically by excessive dorsal-plantar translation of the first metatarsal relative to the lesser metatarsals (>9 mm of excursion).
- Recurrent Hallux Valgus: Failed previous distal or diaphyseal osteotomies where the primary deforming force (TMT instability) was not addressed.
- Generalized Ligamentous Laxity: Patients with conditions such as Ehlers-Danlos or Marfan syndrome, or severe pes planovalgus, where osteotomies are prone to failure.
- Concomitant TMT Arthritis: Degenerative joint disease at the first metatarsocuneiform articulation.
Contraindications
- Open physes (absolute).
- Active soft tissue or bone infection (absolute).
- Severe peripheral arterial disease (absolute).
- First metatarsophalangeal (MTP) joint arthrosis (relative—unless a concomitant MTP arthrodesis is planned).
- Non-compliant patients unable to adhere to strict postoperative non-weight-bearing protocols.
PREOPERATIVE PLANNING
Standard weight-bearing anteroposterior (AP), lateral, and sesamoid axial radiographs are mandatory.
* AP View: Assess the IMA, HVA, and the congruency of the first MTP joint. Evaluate the shape of the medial cuneiform; a highly oblique joint surface may require more aggressive bony resection.
* Lateral View: Assess the sagittal elevation of the first metatarsal (metatarsus primus elevatus) and the presence of dorsal osteophytes at the TMT joint.
* Sesamoid Axial: Evaluate the frontal plane rotation of the first metatarsal and the subluxation of the sesamoid apparatus.
SURGICAL TECHNIQUE: THE LAPIDUS PROCEDURE
The modern Lapidus procedure is meticulously performed through a three-incision approach to ensure comprehensive soft tissue balancing and precise bony preparation.
Step 1: The Medial Eminence and MTP Joint Approach
Make the first incision medially over the medial eminence of the first metatarsal head. Dissect sharply through the subcutaneous tissues, taking care to protect the terminal branches of the superficial peroneal nerve and the medial dorsal cutaneous nerve.
Incise the MTP joint capsule in an inverted-L shape distally. The apex of the flap should be dorsal and proximal. This specific capsulotomy preserves the plantar blood supply to the metatarsal head and provides a robust flap for later capsulorrhaphy.
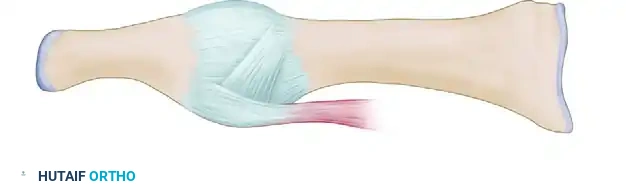
FIGURE 81-63A: Capsular flap is inverted-L with apex dorsal and proximal.
Peel the capsular flap to expose the medial eminence. Using an oscillating saw, resect the medial eminence (bunionectomy) in line with the medial sagittal sulcus of the first metatarsal. Preserve the plantar-medial aspect of the metatarsal head to avoid destabilizing the tibial sesamoid.
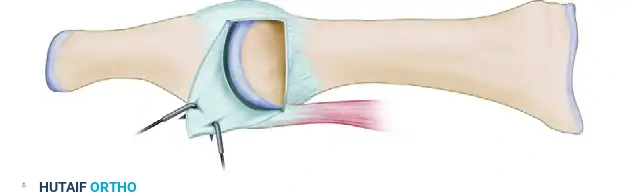
FIGURE 81-63B: Medial eminence exposed after peeling flap. Flap can be resutured or attached to the neck of the metatarsal through a drill hole.
Step 2: First Web Space Dissection (Lateral Release)
Make a second incision dorsally in the first web space. Deepen the dissection between the first and second metatarsal heads.
1. Identify and retract the extensor hallucis brevis (EHB) tendon.
2. Release the adductor hallucis tendon from its insertions at the base of the proximal phalanx and the lateral margin of the fibular sesamoid.
3. Incise the capsulosesamoid ligament in an axial plane.
4. Release the deep transverse metatarsal ligament.
5. Mobilize the sesamoids beneath the metatarsal head to ensure they can be reduced anatomically.
Surgical Warning: Do not resuture the adductor hallucis in the first intermetatarsal space, as this can tether the first ray and restrict the necessary adduction required at the TMT joint.
Step 3: First TMT Joint Exposure
Make a third incision dorsally over the first metatarsocuneiform articulation. This incision should be long enough to adequately expose the dorsal venous arch and the most medial branch of the superficial peroneal nerve, which must be carefully retracted.
To find the joint, make a longitudinal incision with a small blade over the base of the first metatarsal extending proximally onto the medial cuneiform. Perform gentle subperiosteal dissection medially and laterally.
Surgical Pitfall: Avoid aggressive lateral dissection deep in the first intermetatarsal space to prevent injury to the penetrating branch of the dorsalis pedis artery (deep plantar artery), which dives between the first and second metatarsal bases.
Step 4: Joint Preparation and Deformity Correction
The goal of joint preparation is to remove the articular cartilage while creating a bony geometry that allows for correction of the metatarsus primus varus and elevatus.
Remove a small wedge of bone from the articulation laterally and plantarward. This specific wedge resection ensures that as the joint is compressed, the first metatarsal will naturally plantarflex and adduct.
FIGURE 81-63C: Correction of metatarsus primus varus achieved by translation and slight rotation of the metatarsal.
FIGURE 81-63D: Correction of metatarsus primus varus achieved by translation and slight rotation of the metatarsal (Cross-sectional view).
Technical Pearls for Joint Preparation:
* Remove as little bone as possible to prevent excessive shortening of the first ray.
* Myerson recommends removing only the articular cartilage laterally and plantarward, leaving the articular surface of the medial aspect of the joint intact to act as a hinge.
* The dorsal part of the arthrodesis site should never be wider than the plantar part. This is notoriously difficult to achieve because of the deep plantar recession at the base of the first metatarsocuneiform articulation (the joint can be up to 3 cm deep).
* Use a small, flexible, thin chisel blade or a long-handled, small rongeur to reach deep within the joint.
* Strict Rule: Osteotomes, even thin ones, are generally not recommended for the primary resection because they tend to remove too much bone dorsally, inadvertently causing dorsiflexion of the metatarsal (a disastrous complication leading to severe transfer metatarsalgia).
Step 5: Provisional Fixation and Alignment Verification
Manually reduce the deformity. The first metatarsal should plantarflex and adduct. Hold the metatarsal in the corrected position with a 0.062-inch Kirschner wire driven from the dorsal-distal first metatarsal into the plantar-proximal medial cuneiform.
Verify the correct positioning of the metatarsal with intraoperative fluoroscopy. Check the AP view for closure of the IMA and the lateral view to ensure the first metatarsal is plantarflexed relative to the talonavicular axis.
Step 6: Definitive Internal Fixation
Rigid internal fixation is paramount. The gold standard technique utilizes two 3.5-mm cortical screws inserted using a lag screw technique.
- First Screw (The "Home Run" Screw): Inserted from dorsal to plantar, starting from the medial cuneiform proximally and aiming into the base of the first metatarsal distally. Overdrill the proximal cortex (medial cuneiform) to achieve interfragmentary compression.
- Second Screw: Inserted from the dorsal-distal aspect of the first metatarsal base, aiming proximally into the plantar aspect of the medial cuneiform.
Tighten the screws sequentially to ensure uniform compression across the arthrodesis site.
FIGURE 81-63E: Screw position demonstrating the crossed lag screw technique for rigid TMT fixation.
Step 7: Bone Grafting
To maximize fusion rates, use a small burr to create two or three small troughs on the dorsal and medial sides of the arthrodesis site. Fill these troughs with autogenous cancellous bone graft. The small quantity of bone graft required can be easily obtained from one of the adjacent tarsal bones, the calcaneus, or the distal tibia.
Step 8: MTP Joint Congruency and Capsular Repair
Move the first MTP joint through a full range of motion to locate the exact position in which the joint is most congruent.
Critical Step: This step is vital. If the intermetatarsal angle is undercorrected, or if the hallux valgus angle is excessive, forcing the hallux into a straight position will cause impingement or joint incongruency, resulting in severe loss of motion and early arthrosis of the first MTP joint.
When the position of first MTP joint congruency is located, repair the medial capsule in that exact position. If the corner of the L-shaped capsulotomy cannot be resutured because of a lack of soft tissue, use a Kirschner wire to drill a small hole in the metatarsal neck for the attachment of the capsule.
The Akin Osteotomy:
If, after capsular repair, the hallux still impinges on the second toe or remains in an unattractive valgus position (due to hallux valgus interphalangeus), perform an Akin basal phalangeal closing-wedge osteotomy. Do not force the hallux straight via soft tissue tethering, as this produces joint incongruency.
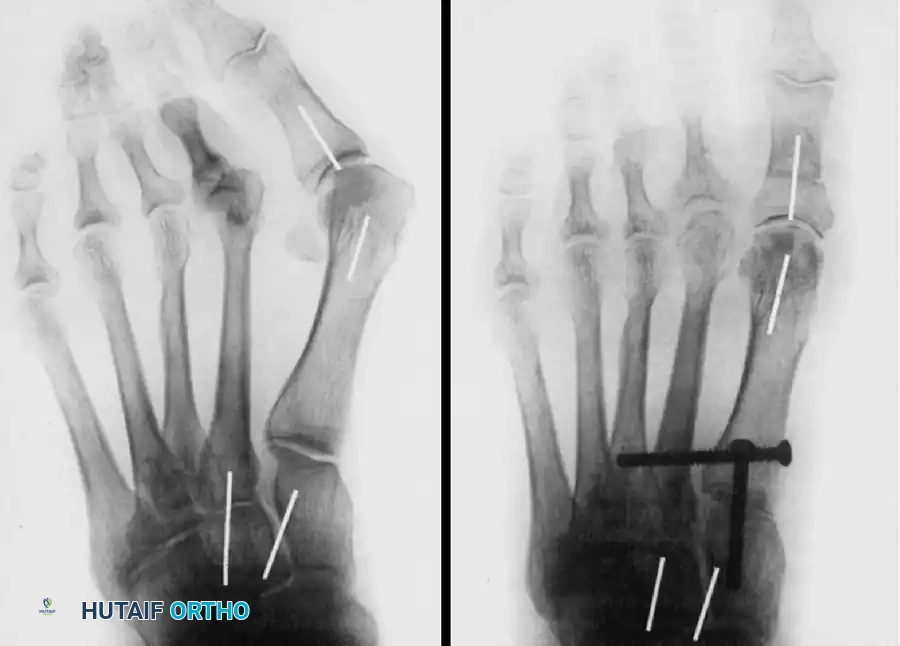
FIGURE 81-63F: Final correction obtained, demonstrating restoration of the intermetatarsal angle and a congruent first MTP joint.
ADJUNCTIVE PROCEDURES: FIRST MTP ARTHRODESIS
In cases where severe hallux valgus is accompanied by advanced degenerative joint disease of the first MTP joint (hallux rigidus), or in severe rheumatoid deformities, a Lapidus procedure alone is insufficient. In these scenarios, a First Metatarsophalangeal Arthrodesis is indicated.
A highly effective method for MTP joint preparation is the Truncated Cone Arthrodesis technique, which provides excellent bony apposition and intrinsic stability.
Truncated Cone Technique for MTP Arthrodesis
-
Phalangeal Preparation: The base of the proximal phalanx is prepared using an end-cutting reamer to create a concave, cup-like surface.
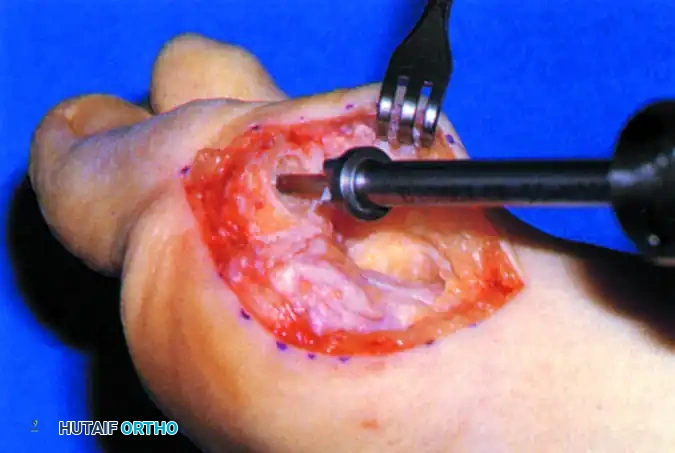
FIGURE 81-62A: Preparation of phalangeal base with end-cutting reamer. -
Metatarsal Preparation: A metatarsal angle guide is placed over the first metatarsal head to establish the correct sagittal and transverse plane alignment (typically 10-15 degrees of valgus and 15-20 degrees of dorsiflexion relative to the metatarsal shaft).
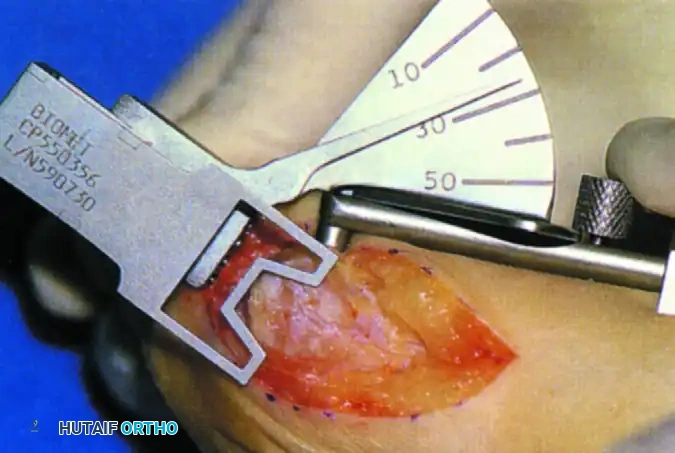
FIGURE 81-62B: Metatarsal angle guide for reaming. -
Conical Reaming: A side-cutting reamer is then used to shape the metatarsal head into a truncated cone that perfectly matches the prepared phalangeal base.
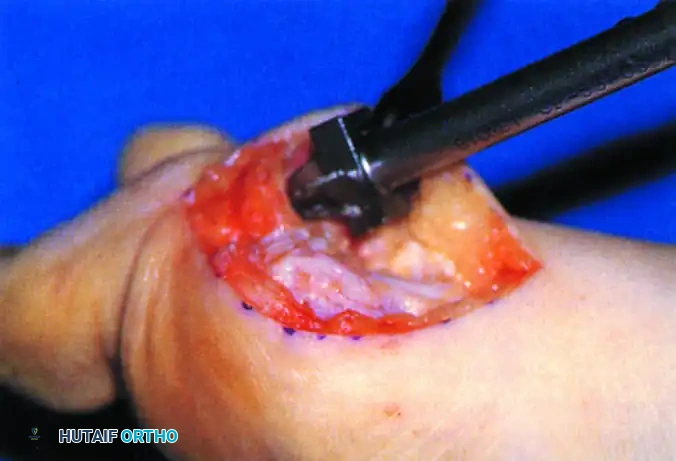
FIGURE 81-62C: Cutting truncated cone with side-cutting reamer.
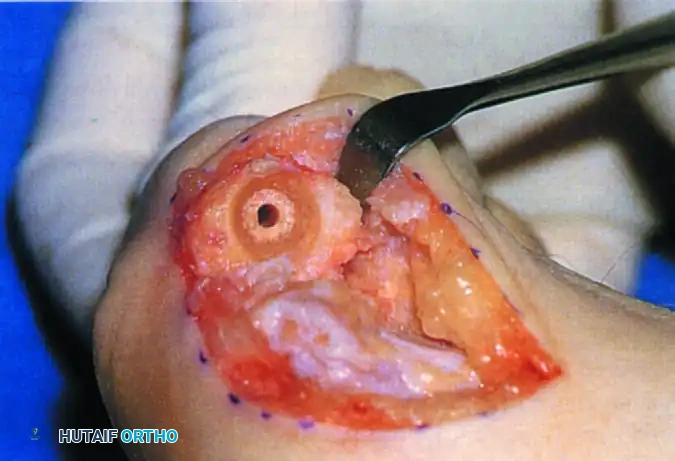
FIGURE 81-62D: Base of proximal phalanx after reaming, showing the congruent matching surface.
Once the joint surfaces are prepared, the MTP joint is reduced and fixed. While crossed lag screws are traditional, modern fixation often utilizes a dorsal locking plate with a compression screw for maximum rigidity, allowing for earlier weight-bearing.
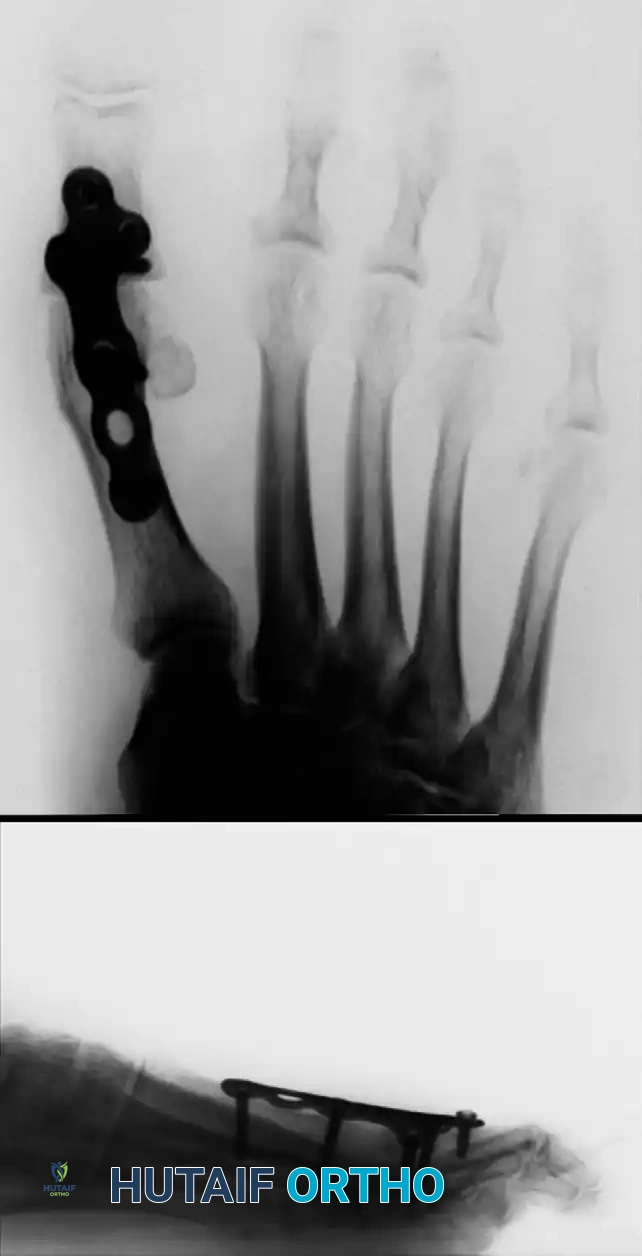
FIGURE 81-64: Anteroposterior (A) and lateral (B) radiographs of first metatarsophalangeal arthrodesis fixed with a dorsal plate and screws.
POSTOPERATIVE CARE AND REHABILITATION
The postoperative protocol for a Lapidus procedure requires strict adherence to protect the TMT arthrodesis site from shear forces during the early phases of bone healing.
- Weeks 0-2: The patient is placed in a well-padded, non-weight-bearing short leg splint or cast. Strict elevation is mandated to control edema and protect the incisions.
- Weeks 2-6: Sutures are removed at 2 weeks if incisions are fully healed. The patient is transitioned to a non-weight-bearing fiberglass cast.
- Weeks 6-10: Radiographs are obtained at 6 weeks. If there is radiographic evidence of bridging trabeculae and clinical absence of pain at the TMT joint, the patient may transition to a removable walking cast boot. Weight-bearing is advanced to tolerance.
- Months 3-6: Transition to supportive, stiff-soled athletic shoes.
Patient Counseling Pearl: Myerson et al. emphasized that postoperative swelling can be highly bothersome and persistent for 4 to 6 months. Patients must be explicitly counseled preoperatively that they cannot expect to wear normal, fashionable shoes until this prolonged period of edema resolves.
COMPLICATIONS AND PITFALLS
- Nonunion: The first TMT joint has a relatively high nonunion rate (reported between 3% and 12%) due to its complex topography and the high shear forces of the medial column. Meticulous joint preparation (avoiding thermal necrosis
You Might Also Like
