Introduction to Supine Position Hip Arthroscopy
Hip arthroscopy has evolved exponentially over the past two decades, transitioning from a purely diagnostic modality to a highly sophisticated therapeutic intervention. Pioneered and popularized by Dr. J.W. Thomas Byrd, the supine position for hip arthroscopy remains the gold standard for many orthopedic surgeons worldwide. Compared to the lateral decubitus position, the supine approach offers a more intuitive anatomical orientation, simplifies fluoroscopic imaging, and facilitates seamless transition between the central and peripheral compartments of the hip joint.
This comprehensive guide details the rigorous, evidence-based surgical technique for supine hip arthroscopy, encompassing precise patient positioning, neurovascular anatomy, portal establishment, capsulotomy, and compartment navigation.
Indications and Patient Selection
Supine hip arthroscopy is indicated for a wide spectrum of intra-articular and extra-articular pathologies. Proper patient selection is the cornerstone of successful outcomes.
- Femoroacetabular Impingement (FAI): Cam, pincer, or mixed morphology requiring osteochondroplasty and rim trimming.
- Acetabular Labral Tears: Requiring debridement, repair, or reconstruction.
- Chondral Lesions: Addressed via chondroplasty, microfracture, or cartilage restoration techniques.
- Loose Bodies: Extraction of osteochondral fragments or synovial chondromatosis.
- Ligamentum Teres Injuries: Debridement or reconstruction of partial or complete tears.
- Synovial Disease: Synovitis, pigmented villonodular synovitis (PVNS), or inflammatory arthropathies.
- Extra-articular Pathology: Iliopsoas snapping, greater trochanteric pain syndrome (abductor tears), and deep gluteal space syndrome.
Operating Room Setup and Patient Positioning
The success of hip arthroscopy is heavily dependent on meticulous patient positioning. Inadequate setup can lead to catastrophic neurovascular complications, primarily pudendal nerve neuropraxia or sciatic nerve traction injuries.
The Distraction Table
Place the patient supine on a dedicated hip distraction table or a standard fracture table equipped with a distraction device. The table must allow for unencumbered fluoroscopic access (C-arm) in both anterior-posterior (AP) and lateral planes.
The Perineal Post
The perineal post is the fulcrum against which traction is applied.
🚨 SURGICAL WARNING: Pudendal Nerve Protection
Place a heavily padded perineal post, lateralizing it strictly against the medial thigh of the operative leg. The post must never rest directly against the perineum or genitalia. Eccentric placement directs the counter-traction forces into the medial thigh musculature, drastically reducing the risk of pudendal nerve neuropraxia.
Limb Positioning and Traction Vector
Position the operative hip in neutral flexion/extension, slight abduction (10 to 15 degrees), and neutral rotation.
💡 CLINICAL PEARL: The Flexion Paradox
While slight flexion of the hip may relax the robust anterior capsule (iliofemoral ligament) and theoretically facilitate joint distraction, it alters the anatomical course of the sciatic nerve. Flexion places increased traction on the sciatic nerve and draws it closer to the posterior joint capsule, making it highly vulnerable to iatrogenic injury during portal placement and instrumentation. Therefore, neutral extension is strongly preferred.
Apply traction to the operative extremity slowly and progressively. Confirm adequate distraction of the joint (typically 10 to 12 mm of joint space opening) fluoroscopically. A vacuum sign (nitrogen bubble) is often visible on the monitor, confirming breaking of the intra-articular seal.
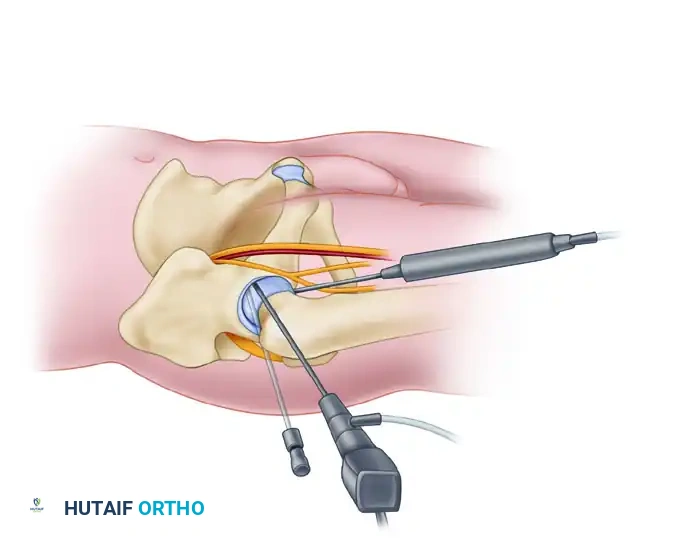
Portal Anatomy and Establishment
Safe access to the hip joint requires a profound understanding of the surrounding neurovascular structures. Three standard portals are utilized for the central compartment: the Anterolateral (AL), Anterior (A), and Posterolateral (PL) portals.
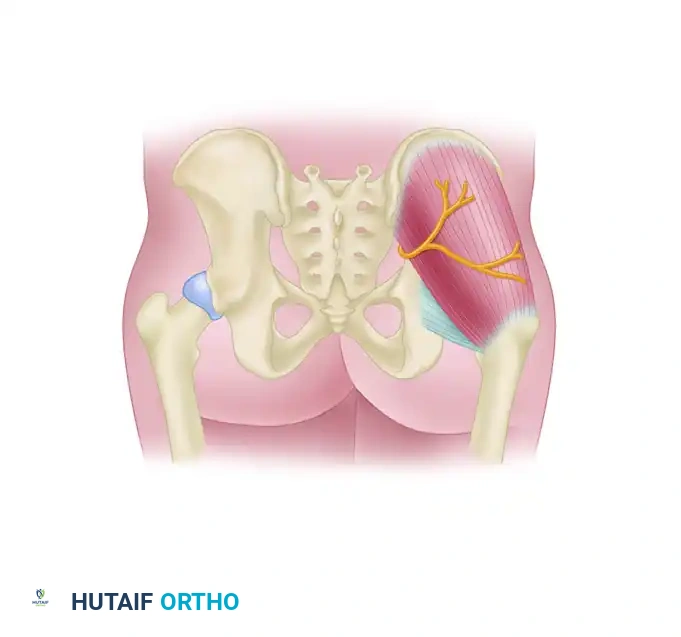
1. The Anterolateral (AL) Portal: The Safe Zone
The anterolateral portal is established first, as it lies in the most anatomically forgiving region—the "safe zone" of the hip.
Anatomy: The portal passes through the gluteus medius muscle. The superior gluteal nerve lies approximately 4 to 5 cm proximal to the tip of the greater trochanter; therefore, the portal must remain distal to this neurovascular bundle.
Gluteus medius muscle and the Anterolateral portal pathway.
Detailed view of the Anterolateral portal trajectory avoiding the superior gluteal nerve.
Technique:
1. Palpate the anterior, superior, and posterior margins of the greater trochanter.
2. Introduce a 6-inch, 17-gauge spinal needle just superior and anterior to the tip of the greater trochanter.
3. Advance the needle under direct AP fluoroscopic guidance, aiming for the lateral aspect of the femoral head, slipping under the acetabular labrum.
4. Labral Protection: Take extreme care that the labrum is not penetrated. If excessive resistance is met during needle placement, do not force it. Redirect the needle under fluoroscopic control, aiming slightly more parallel to the femoral head and away from the edge of the acetabulum.
5. Once intra-articular placement is confirmed (loss of resistance or fluid return), distend the joint with 20 to 30 mL of sterile normal saline.
6. Pass a flexible nitinol guidewire through the needle, withdraw the needle, and pass the cannula-operator assembly over the guidewire into the joint. Do not injure the articular surface of the head or penetrate the labrum when introducing the cannula.
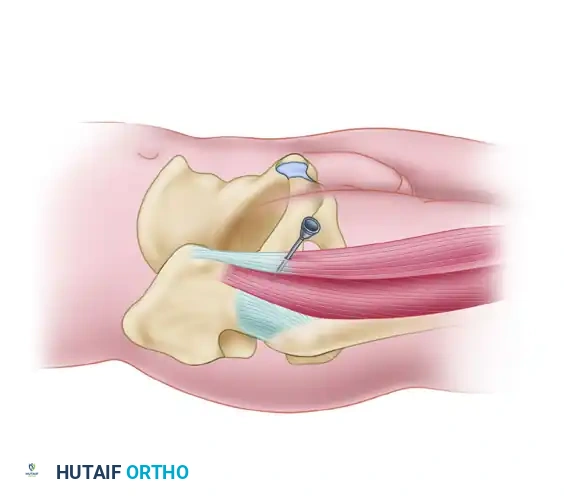
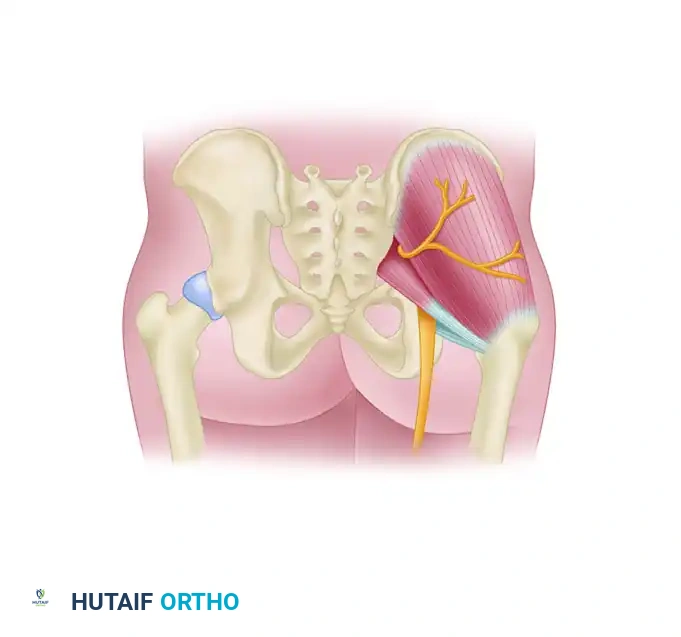
2. The Anterior (A) Portal
The anterior portal is established under direct arthroscopic visualization from the AL portal, combined with fluoroscopic verification.
Anatomy: The anterior portal penetrates the sartorius and rectus femoris muscles before entering the anterior capsule. The primary structure at risk is the Lateral Femoral Cutaneous Nerve (LFCN), which exhibits significant anatomic variability. The terminal branches of the ascending lateral circumflex femoral artery are also in the vicinity.
Rectus femoris and Sartorius muscles illustrating the Anterior portal pathway.
Cross-sectional anatomy of the Anterior portal trajectory.
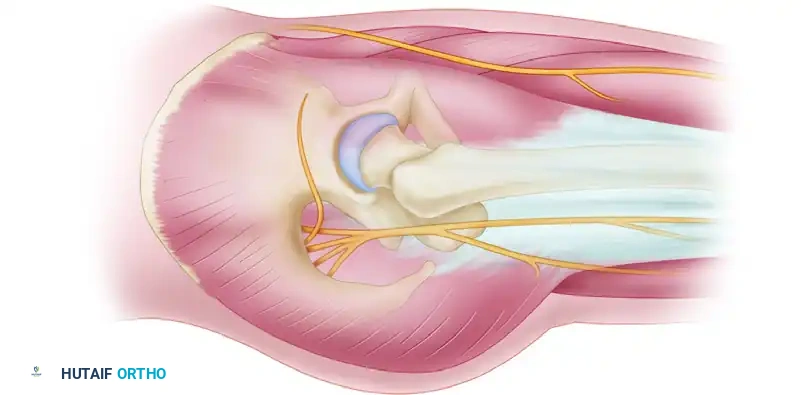
Diagram of arthroscopic incisions and their relationship to the Lateral Femoral Cutaneous Nerve.
Technique:
1. Place the anterior portal at the intersection of a longitudinal line drawn distally from the Anterior Superior Iliac Spine (ASIS) and a transverse line drawn from the superior margin of the greater trochanter.
2. To avoid transecting branches of the lateral femoral cutaneous nerve, make the incision only through the skin using a #11 blade. Use a hemostat to bluntly dissect down to the capsule.
3. Pass a spinal needle into the joint, observing the needle and its trajectory with a 70-degree arthroscope placed in the AL portal.
4. Verify correct placement with fluoroscopy, ensuring the needle enters the joint anterior to the femoral head and distal to the labrum.
5. Exchange for a working cannula using the Seldinger technique.
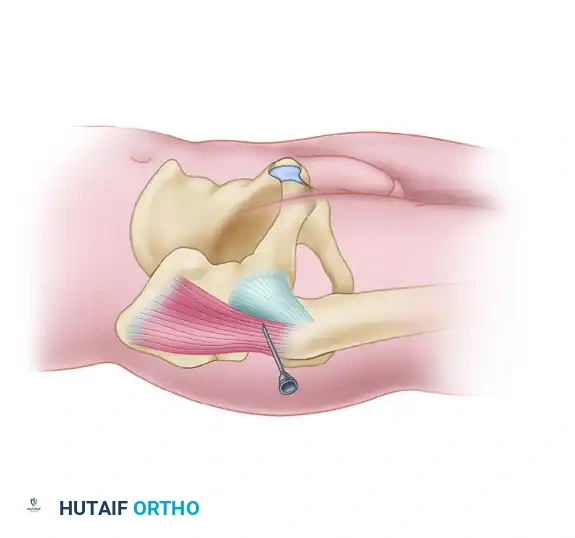
3. The Posterolateral (PL) Portal
The posterolateral portal provides excellent visualization of the posterior labrum and posterior inferior capsule.
Anatomy: This portal passes through the gluteus medius and minimus, just posterior to the piriformis tendon. The major structure at risk is the sciatic nerve.
Piriformis tendon and the Posterolateral portal pathway.
Detailed view of the Posterolateral portal trajectory.
Relationship of the Posterolateral portal to the Sciatic Nerve.
Technique:
1. Rotate the 70-degree scope in the AL portal posteriorly to visualize the posterior capsule.
2. Make the posterolateral portal under arthroscopic and fluoroscopic control just superior to the margin of the greater trochanter at its posterior border.
3. The portal should be directed slightly cephalad and anteriorly, converging toward the anterolateral portal.
4. Sciatic Nerve Protection: It is imperative to have the hip in neutral rotation while making this portal to ensure that the sciatic nerve is not at risk. Internal rotation draws the nerve closer to the portal trajectory.
5. After establishing the three portals, place the fluid outflow in the posterolateral portal to maintain a clear visual field.
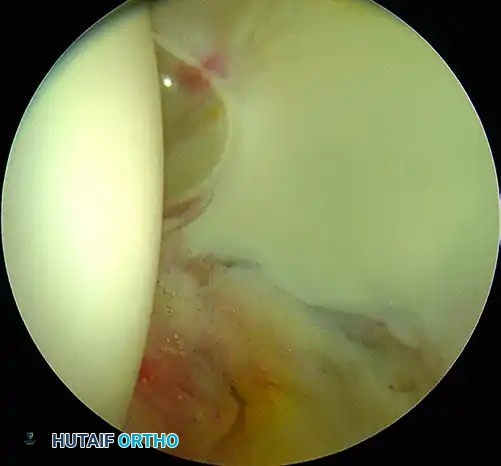
Diagnostic Arthroscopy of the Central Compartment
Once portals are established, a systematic diagnostic tour of the central compartment is mandatory. The central compartment includes all structures medial to the acetabular labrum (acetabular fossa, ligamentum teres, lunate cartilage, and the weight-bearing articular surface of the femoral head).
To view the acetabulum, labrum, and femoral head comprehensively from each of the three portals, the surgeon must alternate between the 70-degree scope and the 30-degree scope between the anterolateral and anterior portals.
- The 70-Degree Arthroscope: Best utilized for viewing the labrum, the periphery of the acetabulum, and the peripheral margins of the femoral head. Its steep angle allows the surgeon to "look around the corner" of the convex femoral head.
- The 30-Degree Arthroscope: Ideal for viewing the central portion of the acetabulum, the apex of the femoral head, and the superior portion of the acetabular fossa.
Arthroscopic view of the acetabular fossa and ligamentum teres using a 30-degree scope.
During the diagnostic sweep, rotate the lens, and dynamically internally and externally rotate the hip to bring different regions of the femoral head and anterior/posterior labrum into view.
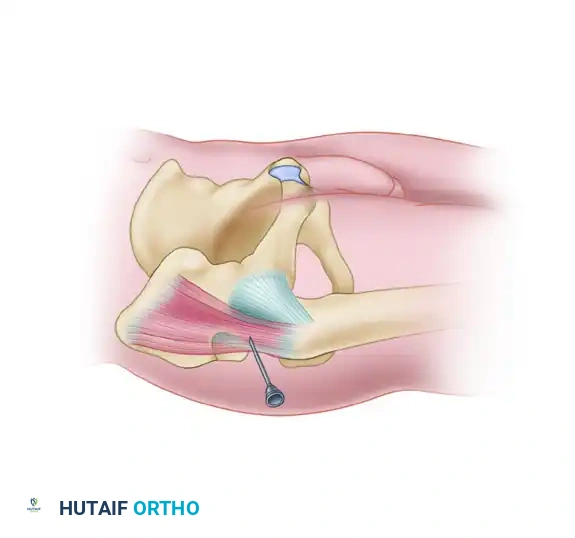
Capsulotomy and Instrumentation
The native hip capsule is thick and unyielding, particularly the anterior iliofemoral ligament. To allow for adequate instrument maneuverability and to access cam lesions on the femoral neck, a capsulotomy is usually required.
Interportal Capsulotomy
Pass an arthroscopic knife (e.g., a banana blade or specialized capsulotomy blade) through the anterior cannula. Slightly incise the surrounding capsule transversely, connecting the anterolateral and anterior portals. This interportal cut parallels the acetabular rim and significantly increases the working space.
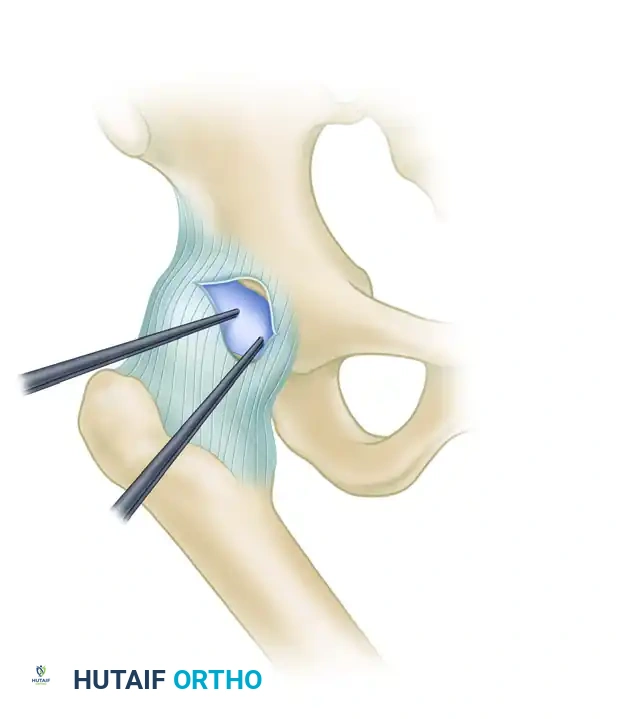
Diagram A: Planned interportal capsulotomy connecting the Anterolateral and Anterior portals.
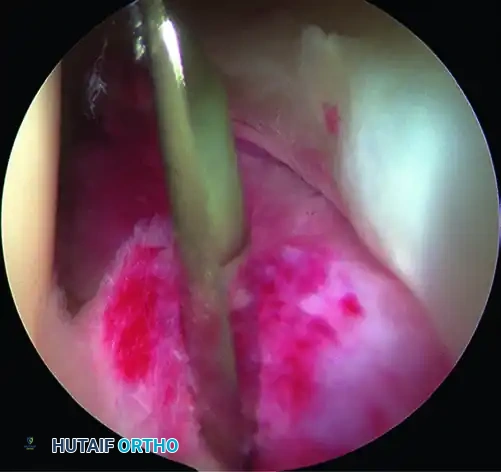
Diagram B: Arthroscopic view of the capsulotomy from the anterior portal.
Advanced Instrumentation
The hip joint is deep, and standard knee or shoulder arthroscopy instruments are often insufficient.
* Use interchangeable, flexible cannulas to prevent fluid extravasation and protect the soft tissues during instrument passes.
* Utilize curved shaver blades and burrs to reach the greatest portion of the femoral head and acetabulum.
* Employ extra-length instrumentation (graspers, biters, and suture passers) for the removal of labral tears, loose body fragments, or for labral repair.
* Remove larger loose bodies piecemeal, carefully observing the retraction through the cannulas to prevent losing fragments in the soft tissues.
Transitioning to the Peripheral Compartment
The peripheral compartment consists of the area lateral to the labrum, encompassing the femoral neck and the synovial folds. This is the primary location for cam-type femoroacetabular impingement lesions.
After completing arthroscopy and all necessary interventions (e.g., labral repair, pincer resection) in the central compartment, the joint must be relaxed to access the periphery.
- Release Traction: The operative leg is completely released from traction. This is a critical step to minimize the total traction time and prevent nerve neuropraxia.
- Flex the Hip: The hip is flexed to approximately 45 degrees. This maneuver relaxes the anterior capsule, opening up the peripheral compartment.
- Establish Peripheral Vision: The arthroscope is redirected along the femoral neck. The capsulotomy previously created allows the instruments to slide easily down the neck to perform a femoral osteochondroplasty (cam resection) under dynamic visualization.
Postoperative Protocol and Rehabilitation
Postoperative rehabilitation is tailored to the specific procedures performed (e.g., simple debridement vs. labral repair vs. microfracture).
- Weight Bearing: Generally, patients are placed on 20 pounds flat-foot weight-bearing for 2 to 4 weeks if a labral repair or osteochondroplasty was performed. Microfracture requires strict non-weight-bearing or touch-down weight-bearing for 6 to 8 weeks.
- Range of Motion: Early, protected range of motion is encouraged to prevent capsular adhesions. A continuous passive motion (CPM) machine or stationary bike (no resistance) is often utilized starting on postoperative day one. Flexion is typically limited to 90 degrees, and external rotation is restricted to protect the anterior capsular closure (if performed).
- Heterotopic Ossification (HO) Prophylaxis: Depending on surgeon preference and patient risk factors, NSAIDs (e.g., Naproxen or Indomethacin) are prescribed for 2 to 3 weeks postoperatively to prevent HO.
- DVT Prophylaxis: Mechanical prophylaxis (SCDs) and early mobilization are standard. Pharmacologic prophylaxis is considered based on individual patient risk stratification.
Complications and Pitfalls
While supine hip arthroscopy is generally safe, the learning curve is steep, and complications can occur.
- Iatrogenic Chondral/Labral Injury: The most common complication during portal establishment. Strict adherence to fluoroscopic guidance and avoiding forceful needle insertion is mandatory.
- Nerve Neuropraxia: Pudendal nerve palsy (from inadequate perineal post padding) and sciatic/femoral nerve palsies (from excessive or prolonged traction) are devastating. Traction time should ideally be kept under 90 minutes, and traction force should be minimized.
- Fluid Extravasation: High pump pressures can lead to massive fluid extravasation into the thigh, abdomen, or retroperitoneum. Monitor inflow/outflow carefully and maintain pump pressures between 40 and 60 mmHg.
- Vascular Injury: Rare, but can occur if portals are placed too medially (femoral bundle) or if the ascending branch of the lateral circumflex femoral artery is lacerated during anterior portal placement.
By adhering to strict anatomical landmarks, utilizing proper equipment, and respecting the biomechanics of joint distraction, the orthopedic surgeon can safely and effectively navigate the hip joint in the supine position to deliver excellent patient outcomes.
